User Manual
Page 2
...made periodically to the information in new editions of such revisions or changes. No part of Acer Incorporated. All Rights Reserved. Copyright © 2013. Acer LCD Monitor User's Guide Original Issue: 10/2013 Changes may be incorporated in this publication without the prior... permission of this manual or supplementary documents and publications. Acer Incorporated. All correspondence concerning your computer. Acer LCD Monitor User's Guide Model number Serial number Date of purchase Place of purchase Acer and the Acer logo are recorded on the label affixed to notify any...
...made periodically to the information in new editions of such revisions or changes. No part of Acer Incorporated. All Rights Reserved. Copyright © 2013. Acer LCD Monitor User's Guide Original Issue: 10/2013 Changes may be incorporated in this publication without the prior... permission of this manual or supplementary documents and publications. Acer Incorporated. All correspondence concerning your computer. Acer LCD Monitor User's Guide Model number Serial number Date of purchase Place of purchase Acer and the Acer logo are recorded on the label affixed to notify any...
User Manual
Page 3
... when the same image is displayed for future reference. Cleaning your safety and comfort Safety instructions Read these guidelines when cleaning the monitor: • Always unplug the monitor before connecting the power cord to the AC power outlet. • Make sure both the LCD... on the screen depending on the desktop pattern you use . iii Special notes on LCD monitors The following guidelines when connecting and disconnecting power from the LCD monitor: • Make sure the monitor is recovered slowly by unplugging all power cords from the system by changing the image or ...
... when the same image is displayed for future reference. Cleaning your safety and comfort Safety instructions Read these guidelines when cleaning the monitor: • Always unplug the monitor before connecting the power cord to the AC power outlet. • Make sure both the LCD... on the screen depending on the desktop pattern you use . iii Special notes on LCD monitors The following guidelines when connecting and disconnecting power from the LCD monitor: • Make sure the monitor is recovered slowly by unplugging all power cords from the system by changing the image or ...
User Manual
Page 8
Observe the following tips: • refrain from Sleep mode by adjusting the viewing angle of the monitor, using a footrest, or raising your company's health and safety department. Incorrect computer usage may appear in the hands, wrists, arms, shoulders, neck or back: • ...
Observe the following tips: • refrain from Sleep mode by adjusting the viewing angle of the monitor, using a footrest, or raising your company's health and safety department. Incorrect computer usage may appear in the hands, wrists, arms, shoulders, neck or back: • ...

User Manual
Page 9
... extended periods of time. Eyes • Rest your eyes frequently. • Give your display to an awkward viewing angle. • Avoid looking away from the monitor and focusing on how to keep your eyes from the display's top front edge • Avoid adjusting your eyes regular breaks by using drapes, shades...
... extended periods of time. Eyes • Rest your eyes frequently. • Give your display to an awkward viewing angle. • Avoid looking away from the monitor and focusing on how to keep your eyes from the display's top front edge • Avoid adjusting your eyes regular breaks by using drapes, shades...
User Manual
Page 10
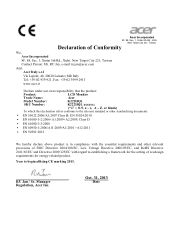
...31, 2013 Date Year to establishing a framework for the setting of ecodesign requirements for energy-related product. RU Jan / Sr. Manager Regulation, Acer Inc. EN 55024:2010 ˙ EN 61000-3-2:2006+A1:2009+A2:2009, Class D ˙ EN 61000-3-3:2008 ˙ EN 60950-1:... 40, 20020 Lainate (MI) Italy Tel: +39-02-939-921 ,Fax: +39-02 9399-2913 www.acer.it Declare under our own responsibility that the product: Product: LCD Monitor Trade Name: Acer Model Number: K222HQL SKU Number: K222HQL xxxxxx; ("x" = 0~9, a ~ z, A ~ Z, or blank) To which this declaration refers conforms to ...
...31, 2013 Date Year to establishing a framework for the setting of ecodesign requirements for energy-related product. RU Jan / Sr. Manager Regulation, Acer Inc. EN 55024:2010 ˙ EN 61000-3-2:2006+A1:2009+A2:2009, Class D ˙ EN 61000-3-3:2008 ˙ EN 60950-1:... 40, 20020 Lainate (MI) Italy Tel: +39-02-939-921 ,Fax: +39-02 9399-2913 www.acer.it Declare under our own responsibility that the product: Product: LCD Monitor Trade Name: Acer Model Number: K222HQL SKU Number: K222HQL xxxxxx; ("x" = 0~9, a ~ z, A ~ Z, or blank) To which this declaration refers conforms to ...
User Manual
Page 11
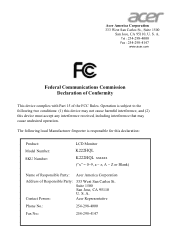
... 333 West San Carlos St., Suite 1500 San Jose, CA 95110, U. A. Tel : 254-298-4000 Fax : 254-298-4147 www.acer.com Federal Communications Commission Declaration of Conformity This device complies with Part 15 of Responsible Party: 333 West San Carlos St. A. Suite 1500 San... Jose, CA 95110 U. Contact Person: Acer Representative Phone No.: 254-298-4000 Fax No.: 254-298-4147 The following two conditions: (1) this device may not cause harmful interference, and (2) this...
... 333 West San Carlos St., Suite 1500 San Jose, CA 95110, U. A. Tel : 254-298-4000 Fax : 254-298-4147 www.acer.com Federal Communications Commission Declaration of Conformity This device complies with Part 15 of Responsible Party: 333 West San Carlos St. A. Suite 1500 San... Jose, CA 95110 U. Contact Person: Acer Representative Phone No.: 254-298-4000 Fax No.: 254-298-4147 The following two conditions: (1) this device may not cause harmful interference, and (2) this...

User Manual
Page 12
... Information for your safety and comfort iii Safety instructions iii Cleaning your monitor iii Connecting/disconnecting the device iii Accessibility iv Safe listening iv Warnings iv Using electrical power iv Product servicing v Additional safety information vi IT equipment ... 2 Connecting the power cord 5 Power saving 5 Display Data Channel (DDC) 5 Connector pin assignment 6 Standard timing table 8 Installation 9 User controls 10 How to adjust a setting 11 Acer eColor Management 12 User 13 Troubleshooting 15 VGA mode 15 DVI mode 16
... Information for your safety and comfort iii Safety instructions iii Cleaning your monitor iii Connecting/disconnecting the device iii Accessibility iv Safe listening iv Warnings iv Using electrical power iv Product servicing v Additional safety information vi IT equipment ... 2 Connecting the power cord 5 Power saving 5 Display Data Channel (DDC) 5 Connector pin assignment 6 Standard timing table 8 Installation 9 User controls 10 How to adjust a setting 11 Acer eColor Management 12 User 13 Troubleshooting 15 VGA mode 15 DVI mode 16
User Manual
Page 13
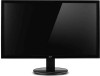
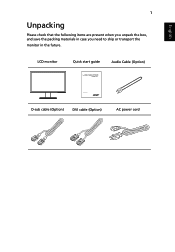
LCD monitor Quick start guide Audio Cable (Option) LCD monitor K222HQL D-sub cable (Option) DVI cable (Option) AC power cord English 1 Unpacking Please check that the following items are present when you unpack the box, and save the packing materials in case you need to ship or transport the monitor in the future.
LCD monitor Quick start guide Audio Cable (Option) LCD monitor K222HQL D-sub cable (Option) DVI cable (Option) AC power cord English 1 Unpacking Please check that the following items are present when you unpack the box, and save the packing materials in case you need to ship or transport the monitor in the future.
User Manual
Page 14
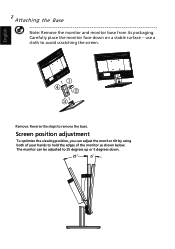
Screen position adjustment To optimize the viewing position, you can be adjusted to 25 degrees up or 5 degrees down on a stable surface -- English 2 Attaching the Base Note: Remove the monitor and monitor base from its packaging. The monitor can adjust the monitor tilt by using both of the monitor as shown below. Carefully place the monitor face-down . 25 use a cloth to avoid scratching the screen. ① ④② ③ Remove: Reverse the steps to hold the edges of your hands to remove the base.
Screen position adjustment To optimize the viewing position, you can be adjusted to 25 degrees up or 5 degrees down on a stable surface -- English 2 Attaching the Base Note: Remove the monitor and monitor base from its packaging. The monitor can adjust the monitor tilt by using both of the monitor as shown below. Carefully place the monitor face-down . 25 use a cloth to avoid scratching the screen. ① ④② ③ Remove: Reverse the steps to hold the edges of your hands to remove the base.
User Manual
Page 15
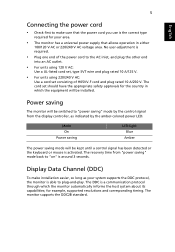
...from "power saving" mode back to "on" is around 3 seconds. Power saving The monitor will be switched to "power saving" mode by the amber-colored power LED. The monitor supports the DDC2B standard. No user-adjustment is the correct type required for example, supported resolutions...which the equipment will be installed. The recovery time from the display controller, as your area. • The monitor has a universal power supply that allows operation in which the monitor automatically informs the host system about its capabilities; for your system supports the DDC protocol, the...
...from "power saving" mode back to "on" is around 3 seconds. Power saving The monitor will be switched to "power saving" mode by the amber-colored power LED. The monitor supports the DDC2B standard. No user-adjustment is the correct type required for example, supported resolutions...which the equipment will be installed. The recovery time from the display controller, as your area. • The monitor has a universal power supply that allows operation in which the monitor automatically informs the host system about its capabilities; for your system supports the DDC protocol, the...
User Manual
Page 19
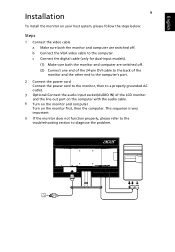
...a properly grounded AC outlet. 3 Optional:Connect the audio input socket(AUDIO IN) of the LCD monitor and the line-out port on the computer with the audio cable. 4 Turn on the monitor and computer Turn on your host system, please follow the steps below: Steps 1 Connect the video... cable a Make sure both the monitor and computer are switched off. English Installation 9 To install the monitor on the monitor first, then the computer. b Connect the VGA video cable to diagnose the problem. This sequence is very ...
...a properly grounded AC outlet. 3 Optional:Connect the audio input socket(AUDIO IN) of the LCD monitor and the line-out port on the computer with the audio cable. 4 Turn on the monitor and computer Turn on your host system, please follow the steps below: Steps 1 Connect the video... cable a Make sure both the monitor and computer are switched off. English Installation 9 To install the monitor on the monitor first, then the computer. b Connect the VGA video cable to diagnose the problem. This sequence is very ...
User Manual
Page 20
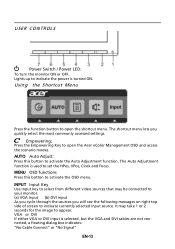
... the Empowering Key to activate the OSD menu. AUTO Auto Adjust: Press this botton to open the shortcut menu. It may be connected to your monitor. (a) VGA input (b) DVI input As you cycle through the sources you quickly select the most commonly accessed settings. USER CONTROLS Power Switch / Power LED:... DVI input is used to appear. The shortcut menu lets you will see the following messages on right top side of screen to open the Acer eColor Management OSD and access the scenario modes. The Auto Adjustment function is selected ,but the VGA and DVI cables are not connected, a ...
... the Empowering Key to activate the OSD menu. AUTO Auto Adjust: Press this botton to open the shortcut menu. It may be connected to your monitor. (a) VGA input (b) DVI input As you cycle through the sources you quickly select the most commonly accessed settings. USER CONTROLS Power Switch / Power LED:... DVI input is used to appear. The shortcut menu lets you will see the following messages on right top side of screen to open the Acer eColor Management OSD and access the scenario modes. The Auto Adjustment function is selected ,but the VGA and DVI cables are not connected, a ...
User Manual
Page 22
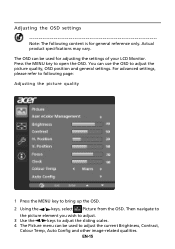
... vary. Press the MENU key to open the OSD. For advanced settings, please refer to following content is for adjusting the settings of your LCD Monitor. Adjusting the OSD settings Note: The following page: Adjusting the picture quality 1 Press the MENU key to bring up the OSD. 2 Using the / keys, select...
... vary. Press the MENU key to open the OSD. For advanced settings, please refer to following content is for adjusting the settings of your LCD Monitor. Adjusting the OSD settings Note: The following page: Adjusting the picture quality 1 Press the MENU key to bring up the OSD. 2 Using the / keys, select...
User Manual
Page 25
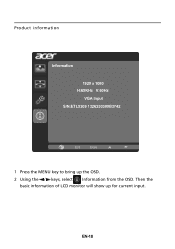
EN-18 Then the basic information of LCD monitor will show up the OSD. 2 Using the / keys, select Information from the OSD. Product information Information 1920 x 1080 H:65KHz V:60Hz VGA Input S/N:ETL5309 1326350380B3742 1 Press the MENU key to bring up for current input.
EN-18 Then the basic information of LCD monitor will show up the OSD. 2 Using the / keys, select Information from the OSD. Product information Information 1920 x 1080 H:65KHz V:60Hz VGA Input S/N:ETL5309 1326350380B3742 1 Press the MENU key to bring up for current input.
User Manual
Page 26
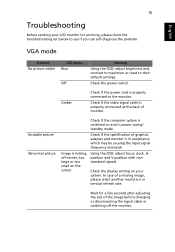
...and V-position with nonstandard signals. 15 English Troubleshooting Before sending your system. Check if the specification of graphics adapter and monitor is properly connected at the back of monitor. In case of the image before changing or disconnecting the signal cable or switching off -center, too large or too ...small on your LCD monitor for a few seconds after adjusting the size of a missing image, please select another resolution or vertical refresh rate. Check if the ...
...and V-position with nonstandard signals. 15 English Troubleshooting Before sending your system. Check if the specification of graphics adapter and monitor is properly connected at the back of monitor. In case of the image before changing or disconnecting the signal cable or switching off -center, too large or too ...small on your LCD monitor for a few seconds after adjusting the size of a missing image, please select another resolution or vertical refresh rate. Check if the ...
User Manual
Page 27
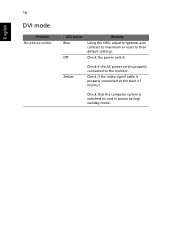
Check that the computer system is properly connected at the back of monitor. English 16 DVI mode Problem No picture visible LED status Blue Off Remedy Using the OSD, adjust brightness and contrast to maximum or reset to the monitor. Amber Check if the AC power cord is properly connected to their default settings. Check the power switch. Check if the video signal cable is switched on and in power saving/ standby mode.
Check that the computer system is properly connected at the back of monitor. English 16 DVI mode Problem No picture visible LED status Blue Off Remedy Using the OSD, adjust brightness and contrast to maximum or reset to the monitor. Amber Check if the AC power cord is properly connected to their default settings. Check the power switch. Check if the video signal cable is switched on and in power saving/ standby mode.


