User Manual
Page 6
...slots clogged with any electronic components unless the projector is unplugged. • The product will detect the life of displaying inverted images for ceiling mount installation. The only user serviceable part is securely installed. vi contact your dealer. • Do not keep using this case contact your.... Allow the projector to cool for approximately 45 minutes prior to removing the lamp assembly for mounting the projector and ensure it to break or drop it. Only use acer ceiling mount kit for replacement. • Do not operate lamps beyond the rated lamp life. In this...
...slots clogged with any electronic components unless the projector is unplugged. • The product will detect the life of displaying inverted images for ceiling mount installation. The only user serviceable part is securely installed. vi contact your dealer. • Do not keep using this case contact your.... Allow the projector to cool for approximately 45 minutes prior to removing the lamp assembly for mounting the projector and ensure it to break or drop it. Only use acer ceiling mount kit for replacement. • Do not operate lamps beyond the rated lamp life. In this...

User Manual
Page 10
Troubleshooting 27 LED & Alarm Definition Listing 31 Replacing the Lamp 32 Ceiling Mount Installation 33 Specifications 36 Compatibility modes 38 Regulations and safety notices 42
Troubleshooting 27 LED & Alarm Definition Listing 31 Replacing the Lamp 32 Ceiling Mount Installation 33 Specifications 36 Compatibility modes 38 Regulations and safety notices 42

User Manual
Page 30
... signal aspect ratio and zoom in by tilting projection. (±15 degrees) The Manual Keystone funcion is placed on the desk. • Ceiling: Turns the image upside down for ceiling-mounted projection. Projection Location • Rear: Reverses the image so you can project from behind a translucent screen. • Auto: Automatically adjusts projection location...
... signal aspect ratio and zoom in by tilting projection. (±15 degrees) The Manual Keystone funcion is placed on the desk. • Ceiling: Turns the image upside down for ceiling-mounted projection. Projection Location • Rear: Reverses the image so you can project from behind a translucent screen. • Auto: Automatically adjusts projection location...

User Manual
Page 43
...obtain the appropriate screws for your type of ceiling. 2 Secure the ceiling rod using a ceiling mount, please refer to ceiling Long Rod Screw Type A 50 mm length / 8 mm diameter - Extension Rod Long Cylinder Cap Allen Key - English 33 Ceiling Mount Installation If you wish to install the ...projector using the appropriate type of four-cylinder screws. Short Rod Ceiling Mount Base - Attach to the steps below: 1 Drill four holes into a solid, ...
...obtain the appropriate screws for your type of ceiling. 2 Secure the ceiling rod using a ceiling mount, please refer to ceiling Long Rod Screw Type A 50 mm length / 8 mm diameter - Extension Rod Long Cylinder Cap Allen Key - English 33 Ceiling Mount Installation If you wish to install the ...projector using the appropriate type of four-cylinder screws. Short Rod Ceiling Mount Base - Attach to the steps below: 1 Drill four holes into a solid, ...
User Manual
Page 44
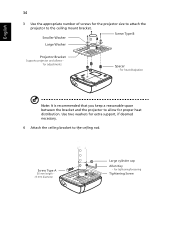
..., if deemed necessary. 4 Attach the ceiling bracket to the ceiling mount bracket. Use two washers for adjustments Spacer - For heat dissipation Note: It is recommended that you keep a reasonable space between the bracket and the projector to allow for the projector size to attach the projector to the ceiling rod. For tightening/loosening Tightening...
..., if deemed necessary. 4 Attach the ceiling bracket to the ceiling mount bracket. Use two washers for adjustments Spacer - For heat dissipation Note: It is recommended that you keep a reasonable space between the bracket and the projector to allow for the projector size to attach the projector to the ceiling rod. For tightening/loosening Tightening...


