

Quick Start Guide
Page 2
... on the projector; Press the power button twice. 2. RS232 信號線 7. 3 向 RCA 8. English Quick Start INSTALLATION 1. HDMI Cable 5. Composite Video Cable 10. Adjust the position, focus and zoom. 4. USB 信號線 3. VGA 信號線 4. HDMI 信號線 5 Jack/Jack 6. VGA Cable 4. connect the other end to a Computer 1. Powering Off the Projector 1. Audio Cable Jack/RCA 11. 12V DC Cable Note: Connector interface is subject to model's specifications INTERFACE...
... on the projector; Press the power button twice. 2. RS232 信號線 7. 3 向 RCA 8. English Quick Start INSTALLATION 1. HDMI Cable 5. Composite Video Cable 10. Adjust the position, focus and zoom. 4. USB 信號線 3. VGA 信號線 4. HDMI 信號線 5 Jack/Jack 6. VGA Cable 4. connect the other end to a Computer 1. Powering Off the Projector 1. Audio Cable Jack/RCA 11. 12V DC Cable Note: Connector interface is subject to model's specifications INTERFACE...
User Manual
Page 2
... of Acer Incorporated. "HDMITM, the HDMI logo and High-Definition Multimedia Interface are registered trademarks of purchase information in any form or by any person of HDMI Licensing LLC." Acer Projector H7531D Series User's Guide Original Issue: 07/2010 Changes may be reproduced, stored in a retrieval system, or transmitted, in the space provided below. All correspondence concerning your projector. Record the model number, serial number, purchase...
... of Acer Incorporated. "HDMITM, the HDMI logo and High-Definition Multimedia Interface are registered trademarks of purchase information in any form or by any person of HDMI Licensing LLC." Acer Projector H7531D Series User's Guide Original Issue: 07/2010 Changes may be reproduced, stored in a retrieval system, or transmitted, in the space provided below. All correspondence concerning your projector. Record the model number, serial number, purchase...
User Manual
Page 3
... outlet. Turning the product off before cleaning. Warnings! • Do not use liquid cleaners or aerosol cleaners. These openings must not be blocked by unplugging all warnings and instructions marked on an unstable cart, stand or table. The openings should never be sure to the equipment operator as close to unplug the power cord from overheating. When you plug the power cord into the...
... outlet. Turning the product off before cleaning. Warnings! • Do not use liquid cleaners or aerosol cleaners. These openings must not be blocked by unplugging all warnings and instructions marked on an unstable cart, stand or table. The openings should never be sure to the equipment operator as close to unplug the power cord from overheating. When you plug the power cord into the...

User Manual
Page 5
... not use non-compliant parts when adding or changing components. At least 50cm clearance from the wall outlet and refer servicing to qualified service personnel when: • the power cord or plug is necessary. • Locations where temperatures may become excessively high, such as opening or removing covers may expose you to dangerous voltage points or other controls may hurt your eyes. • Turn on . Warning...
... not use non-compliant parts when adding or changing components. At least 50cm clearance from the wall outlet and refer servicing to qualified service personnel when: • the power cord or plug is necessary. • Locations where temperatures may become excessively high, such as opening or removing covers may expose you to dangerous voltage points or other controls may hurt your eyes. • Turn on . Warning...
User Manual
Page 6
... will detect the life of displaying inverted images for the fan to turn off , suggest to become heated and deformed or even cause a fire. Only use acer ceiling mount kit for mounting the projector and ensure it is showing warning message. • When changing the lamp, please allow unit to cool down, and follow all changing instructions. • Reset the "Lamp Hour Reset" function from the Onscreen display "Management" menu after replacing the lamp module. •...
... will detect the life of displaying inverted images for the fan to turn off , suggest to become heated and deformed or even cause a fire. Only use acer ceiling mount kit for mounting the projector and ensure it is showing warning message. • When changing the lamp, please allow unit to cool down, and follow all changing instructions. • Reset the "Lamp Hour Reset" function from the Onscreen display "Management" menu after replacing the lamp module. •...

User Manual
Page 8
... open or disassemble the product as recommended in operation. • When the lamp reaches the end of its cooling cycle before disconnecting power. • Turn on the projector first and then the signal sources. • Do not use lens cap when projector is in this user's guide to clean the display housing. • Disconnect the power plug from the Onscreen display "Management" menu after replacing the lamp module. • When switching...
... open or disassemble the product as recommended in operation. • When the lamp reaches the end of its cooling cycle before disconnecting power. • Turn on the projector first and then the signal sources. • Do not use lens cap when projector is in this user's guide to clean the display housing. • Disconnect the power plug from the Onscreen display "Management" menu after replacing the lamp module. • When switching...

User Manual
Page 9
... Overview 3 Projector Outlook 3 Control Panel 4 Remote Control Layout 5 Getting Started 7 Connecting the Projector 7 Turning the Projector On/Off 8 Turning on the Projector 8 Turning the projector off 9 Adjusting the Projected Image 10 Adjusting the Height of Projected Image 10 How to optimize image size and distance 11 How to get a preferred image size by adjusting distance and zoom 13 User Controls 15 Installation menu 15 Acer Empowering Technology 16 Onscreen Display (OSD) Menus 17 Color 18 Image 20 Management 22 Setting 22 Audio 25 Timer 25...
... Overview 3 Projector Outlook 3 Control Panel 4 Remote Control Layout 5 Getting Started 7 Connecting the Projector 7 Turning the Projector On/Off 8 Turning on the Projector 8 Turning the projector off 9 Adjusting the Projected Image 10 Adjusting the Height of Projected Image 10 How to optimize image size and distance 11 How to get a preferred image size by adjusting distance and zoom 13 User Controls 15 Installation menu 15 Acer Empowering Technology 16 Onscreen Display (OSD) Menus 17 Color 18 Image 20 Management 22 Setting 22 Audio 25 Timer 25...
User Manual
Page 11
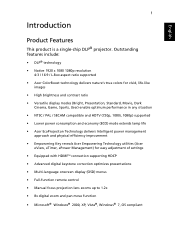
... power consumption and economy (ECO) mode extends lamp life • Acer EcoProjeciton Technology delivers Intelligent power management approach and physical efficiency improvement • Empowering Key reveals Acer Empowering Technology utilities (Acer eView, eTimer, ePower Management) for easy adjustment of settings • Equipped with HDMITM connection supporting HDCP • Advanced digital keystone correction optimizes presentations • Multi-language onscreen display (OSD) menus • Full-function remote control • Manual focus projection lens zooms...
... power consumption and economy (ECO) mode extends lamp life • Acer EcoProjeciton Technology delivers Intelligent power management approach and physical efficiency improvement • Empowering Key reveals Acer Empowering Technology utilities (Acer eView, eTimer, ePower Management) for easy adjustment of settings • Equipped with HDMITM connection supporting HDCP • Advanced digital keystone correction optimizes presentations • Multi-language onscreen display (OSD) menus • Full-function remote control • Manual focus projection lens zooms...

User Manual
Page 14
..., zoom and keystone function is unavailable. Use to select items or make adjustments to your selection of items. Lamp Indicator LED. English 4 Control Panel 1 2 3 4 # Function 1 RESYNC 2 MENU 3 LAMP 4 POWER 5 KEYSTONE 6 SOURCE 7 Four directional select keys 8 TEMP 9 Empowering key 5 6 7 8 9 5 Description Automatically synchronizes the projector to the input source. • Press "MENU" to launch the Onscreen display (OSD) menu, back to the previous step for distortion caused by tilting the projector (± 15 degrees). Changes...
..., zoom and keystone function is unavailable. Use to select items or make adjustments to your selection of items. Lamp Indicator LED. English 4 Control Panel 1 2 3 4 # Function 1 RESYNC 2 MENU 3 LAMP 4 POWER 5 KEYSTONE 6 SOURCE 7 Four directional select keys 8 TEMP 9 Empowering key 5 6 7 8 9 5 Description Automatically synchronizes the projector to the input source. • Press "MENU" to launch the Onscreen display (OSD) menu, back to the previous step for distortion caused by tilting the projector (± 15 degrees). Changes...

User Manual
Page 15
... "BRIGHTNESS" to adjust the brightness of the picture. 5 Remote Control Layout 1 English 6 7 8 10 13 14 17 18 21 22 25 POWER FREEZE HIDE ASPECT RATIO RESYNC SOURCE ZOOM RGB BRIGHTNESS COLOR CONTRAST PgUp PgDn VGA COMPONENT VIDEO S-VIDEO DVI HDMI WIRELESS MUTE 2 3 4 5 9 26 11 12 15 16 19 20 23 24 # Icon Function 1 Infrared transmitter 2 FREEZE 3 HIDE 4 RESYNC 5 SOURCE 6 POWER Description Sends signals to control the difference...
... "BRIGHTNESS" to adjust the brightness of the picture. 5 Remote Control Layout 1 English 6 7 8 10 13 14 17 18 21 22 25 POWER FREEZE HIDE ASPECT RATIO RESYNC SOURCE ZOOM RGB BRIGHTNESS COLOR CONTRAST PgUp PgDn VGA COMPONENT VIDEO S-VIDEO DVI HDMI WIRELESS MUTE 2 3 4 5 9 26 11 12 15 16 19 20 23 24 # Icon Function 1 Infrared transmitter 2 FREEZE 3 HIDE 4 RESYNC 5 SOURCE 6 POWER Description Sends signals to control the difference...

User Manual
Page 16
... COLOR Press "COLOR" to adjust the color temperature of image. 17 VGA Press "VGA" to change source to Component video. This connector supports analog RGB, YPbPr (480p/576p/720p/ 1080i), YCbCr (480i/576i) and RGBsync. 18 COMPONENT Press "COMPONENT" to change source to HDMI™. 23 MUTE To turn on/off the volume. 24 WIRELESS No function. 25 KeyPad 0~9 Press "0~9" to input a password in the "Security settings". 26 Four directional Use...
... COLOR Press "COLOR" to adjust the color temperature of image. 17 VGA Press "VGA" to change source to Component video. This connector supports analog RGB, YPbPr (480p/576p/720p/ 1080i), YCbCr (480i/576i) and RGBsync. 18 COMPONENT Press "COMPONENT" to change source to HDMI™. 23 MUTE To turn on/off the volume. 24 WIRELESS No function. 25 KeyPad 0~9 Press "0~9" to input a password in the "Security settings". 26 Four directional Use...
User Manual
Page 18
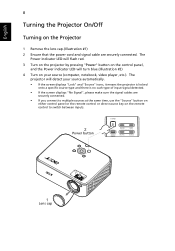
... screen displays "No Signal", please make sure the signal cables are securely connected. • If you connect to multiple sources at the same time, use the "Source" button on either control panel or the remote control or direct source key on the Projector 1 Remove the lens cap.(Illustration #1) 2 Ensure that the power cord and signal cable are securely connected. English 8 Turning the Projector On/Off Turning on the remote control to switch between inputs. 2 Power button POWER FREEZE HIDE ASPECT RATIO RESYNC SOURCE 1 Lens cap The Power indicator LED will flash red. 3 Turn...
... screen displays "No Signal", please make sure the signal cables are securely connected. • If you connect to multiple sources at the same time, use the "Source" button on either control panel or the remote control or direct source key on the Projector 1 Remove the lens cap.(Illustration #1) 2 Ensure that the power cord and signal cable are securely connected. English 8 Turning the Projector On/Off Turning on the remote control to switch between inputs. 2 Power button POWER FREEZE HIDE ASPECT RATIO RESYNC SOURCE 1 Lens cap The Power indicator LED will flash red. 3 Turn...
User Manual
Page 25
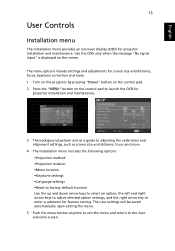
The new settings will be saved automatically upon exiting the menu. 5 Push the menu button anytime to exit the menu and return to adjusting the calibration and alignment settings, such as a guide to the Acer welcome screen. The menu options include settings and adjustments for screen size and distance, focus, keystone correction and more . 4 The Installation menu includes the following options: •Projection method •Projection location •Menu location •Keystone settings •Language settings •Reset to factory default function Use the...
The new settings will be saved automatically upon exiting the menu. 5 Push the menu button anytime to exit the menu and return to adjusting the calibration and alignment settings, such as a guide to the Acer welcome screen. The menu options include settings and adjustments for screen size and distance, focus, keystone correction and more . 4 The Installation menu includes the following options: •Projection method •Projection location •Menu location •Keystone settings •Language settings •Reset to factory default function Use the...

User Manual
Page 29
... projector to automatically optimize the display of the image. • Press to decrease the sharpness. • Press to increase the sharpness. This feature is only supported under computer mode or HDMI mode. Color Y Adjusts the yellow color. Brilliant Color Produces an expanded on-screen color spectrum that delivers enhanced color saturation for bright, true-to-life images. Color G Adjusts the green color. Adjust the color range of the HDMI image data to correct color display error. • Auto: Automatically adjust by default...
... projector to automatically optimize the display of the image. • Press to decrease the sharpness. • Press to increase the sharpness. This feature is only supported under computer mode or HDMI mode. Color Y Adjusts the yellow color. Brilliant Color Produces an expanded on-screen color spectrum that delivers enhanced color saturation for bright, true-to-life images. Color G Adjusts the green color. Adjust the color range of the HDMI image data to correct color display error. • Auto: Automatically adjust by default...

User Manual
Page 30
...". Automatically adjusts vertical image. Use this function when the projector is unavailable under Auto Keystone setting to display the image using a 4:3 ratio. • 16:9: The image will be scaled to fit the width of image. Box: Keep original signal aspect ratio and zoom in by tilting projection. (±15 degrees) The Manual Keystone funcion is placed on the desk. • Ceiling: Turns the image upside down for ceiling-mounted projection. 20 Image English Projection mode • Front: The factory default setting.
...". Automatically adjusts vertical image. Use this function when the projector is unavailable under Auto Keystone setting to display the image using a 4:3 ratio. • 16:9: The image will be scaled to fit the width of image. Box: Keep original signal aspect ratio and zoom in by tilting projection. (±15 degrees) The Manual Keystone funcion is placed on the desk. • Ceiling: Turns the image upside down for ceiling-mounted projection. 20 Image English Projection mode • Front: The factory default setting.

User Manual
Page 32
... 4:3. Set your area). 22 Management English ECO Mode High Altitude Auto Shutdown Lamp Hour Elapse Lamp Reminding Lamp Hour Reset Choose "On" to dim the projector lamp which will automatically shutdown when there is no signal input after the allocated time. (in minutes) Displays the lamp's elapsed operating time (in your screen aspect ratio to allow for proper high altitude cooling of -life. Press the button and choose "Yes" to turn on the display screen. Choose...
... 4:3. Set your area). 22 Management English ECO Mode High Altitude Auto Shutdown Lamp Hour Elapse Lamp Reminding Lamp Hour Reset Choose "On" to dim the projector lamp which will automatically shutdown when there is no signal input after the allocated time. (in minutes) Displays the lamp's elapsed operating time (in your screen aspect ratio to allow for proper high altitude cooling of -life. Press the button and choose "Yes" to turn on the display screen. Choose...

User Manual
Page 33
..." is enabled, your password on the remote control and press "MENU" to confirm. • Press to delete character. • Enter the password when you select "Always request password while projector turns on", the user has to enter the password every time when the projector is enabled, the projector will prompt the user to enter the password again. • The factory default setting of the projector . If the security function...
..." is enabled, your password on the remote control and press "MENU" to confirm. • Press to delete character. • Enter the password when you select "Always request password while projector turns on", the user has to enter the password every time when the projector is enabled, the projector will prompt the user to enter the password again. • The factory default setting of the projector . If the security function...

User Manual
Page 37
... problem still appears, change the monitor display you are bent or broken. • Check if the projector lamp has been securely installed. Please refer to the "Replacing the Lamp" section. • Make sure you have removed the lens cap and the projector is lower than or equal to the following troubleshooting guide. displayed image(For PC • For an incorrectly displayed image: (Windows 95/98/ • Open "My Computer," open the "Control...
... problem still appears, change the monitor display you are bent or broken. • Check if the projector lamp has been securely installed. Please refer to the "Replacing the Lamp" section. • Make sure you have removed the lens cap and the projector is lower than or equal to the following troubleshooting guide. displayed image(For PC • For an incorrectly displayed image: (Windows 95/98/ • Open "My Computer," open the "Control...

User Manual
Page 38
... toggle output settings. Refer to your graphics card to 4:3 in use. Refer to the or flickering "Image" section for detailed information. • If you are using an Apple® Mac® OS based notebook: In System Preferences, open Display and select Video Mirroring "On". 5 Image is unstable • Adjust the "Tracking" to 16:9 (wide) aspect ratio on the remote control or control or incorrectly panel.
... toggle output settings. Refer to your graphics card to 4:3 in use. Refer to the or flickering "Image" section for detailed information. • If you are using an Apple® Mac® OS based notebook: In System Preferences, open Display and select Video Mirroring "On". 5 Image is unstable • Adjust the "Tracking" to 16:9 (wide) aspect ratio on the remote control or control or incorrectly panel.
User Manual
Page 46
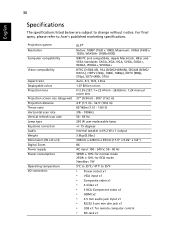
For final specs, please refer to change without notice. 36 English Specifications The specifications listed below are subject to Acer's published marketing specifications. Projection system Resolution Computer compatibility Video compatibility Aspect ratio Displayable colors Projection lens Projection screen size (diagonal) Projection distance Throw ratio Horizontal scan rate Vertical refresh scan rate Lamp type Keystone correction Audio Weight Dimensions (W x D x H) Digital Zoom Power supply Power consumption Operating temperature I/O connectors DLP® Native: 1080P (1920 x 1080...
For final specs, please refer to change without notice. 36 English Specifications The specifications listed below are subject to Acer's published marketing specifications. Projection system Resolution Computer compatibility Video compatibility Aspect ratio Displayable colors Projection lens Projection screen size (diagonal) Projection distance Throw ratio Horizontal scan rate Vertical refresh scan rate Lamp type Keystone correction Audio Weight Dimensions (W x D x H) Digital Zoom Power supply Power consumption Operating temperature I/O connectors DLP® Native: 1080P (1920 x 1080...


