
User Manual
Page 4
... be operated from the type of internal components and to prevent battery leakage, do not increase it clearly and comfortably and without distortion. • After setting the volume level, do not place the product on the marking label. Warnings • Do not use it from the electrical outlet. If you are...
... be operated from the type of internal components and to prevent battery leakage, do not increase it clearly and comfortably and without distortion. • After setting the volume level, do not place the product on the marking label. Warnings • Do not use it from the electrical outlet. If you are...
User Manual
Page 5
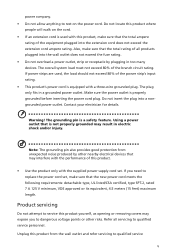
... risks. Product servicing Do not attempt to service this product yourself, as opening or removing covers may expose you need to replace the power cord set . Make sure the power outlet is a safety feature. Unplug this product. • Use the product only with a three-wire grounded plug. If power strips are... from the wall outlet and refer servicing to dangerous voltage points or other nearby electrical devices that is equipped with the supplied power supply cord set , make sure that the total rating of the branch circuit rating.
... risks. Product servicing Do not attempt to service this product yourself, as opening or removing covers may expose you need to replace the power cord set . Make sure the power outlet is a safety feature. Unplug this product. • Use the product only with a three-wire grounded plug. If power strips are... from the wall outlet and refer servicing to dangerous voltage points or other nearby electrical devices that is equipped with the supplied power supply cord set , make sure that the total rating of the branch circuit rating.
User Manual
Page 12
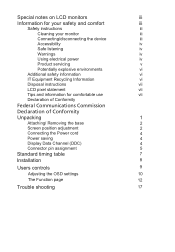
... and information for comfortable use vii Declaration of Conformity Federal Communications Commission Declaration of Conformity Unpacking 1 2 2 4 4 4 5 Standard timing table 7 Installation 8 Users controls 9 Adjusting the OSD settings 10 The Function page 12 Trouble shooting 17
... and information for comfortable use vii Declaration of Conformity Federal Communications Commission Declaration of Conformity Unpacking 1 2 2 4 4 4 5 Standard timing table 7 Installation 8 Users controls 9 Adjusting the OSD settings 10 The Function page 12 Trouble shooting 17
User Manual
Page 16
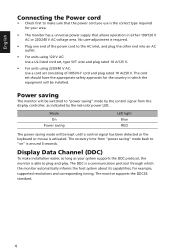
...240 V AC voltage area. No user-adjustment is required. • Plug one end of H05VV-F cord and plug rated 10 A/250 V. The cord set consisting of the power cord to plug-and-play. The recovery time from the display controller, as your area. • The monitor has a universal power...into an AC outlet. • For units using 120 V AC: Use a UL-listed cord set, type SVT wire and plug rated 10 A/125 V. • For units using 220/240 V AC: Use a cord set should have the appropriate safety approvals for example, supported resolutions and corresponding timing. Display Data Channel (...
...240 V AC voltage area. No user-adjustment is required. • Plug one end of H05VV-F cord and plug rated 10 A/250 V. The cord set consisting of the power cord to plug-and-play. The recovery time from the display controller, as your area. • The monitor has a universal power...into an AC outlet. • For units using 120 V AC: Use a UL-listed cord set, type SVT wire and plug rated 10 A/125 V. • For units using 220/240 V AC: Use a cord set should have the appropriate safety approvals for example, supported resolutions and corresponding timing. Display Data Channel (...

User Manual
Page 22
Actual product specifications may vary. For advanced settings, please refer to open the OSD. Brightness 4. You can be used for general reference only. Mode 3. Input selection Turn Mode on or off Open the ... control and turn Mode on -screen display) can use the OSD to use (Please see the OSD section for more information). 10 Adjusting the OSD settings Note: The following page: Main Page 1. Menu OSD 2. Press the MENU key to following content is for adjusting the...
Actual product specifications may vary. For advanced settings, please refer to open the OSD. Brightness 4. You can be used for general reference only. Mode 3. Input selection Turn Mode on or off Open the ... control and turn Mode on -screen display) can use the OSD to use (Please see the OSD section for more information). 10 Adjusting the OSD settings Note: The following page: Main Page 1. Menu OSD 2. Press the MENU key to following content is for adjusting the...
User Manual
Page 23
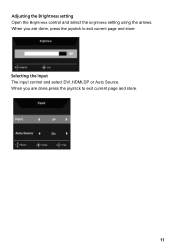
Adjusting the Brightness setting Open the Brightness control and select the brightness setting using the arrows. When you are done, press the joystick to exit current page and store. 11 When you are done,press the joystick to exit current page and store Selecting the Input The input control and select DVI,HDMI,DP or Auto Source.
Adjusting the Brightness setting Open the Brightness control and select the brightness setting using the arrows. When you are done, press the joystick to exit current page and store. 11 When you are done,press the joystick to exit current page and store Selecting the Input The input control and select DVI,HDMI,DP or Auto Source.

User Manual
Page 24
...the joystick to enter it. 3. The higher the level, the higher the boost. 12 Note: Adjusts the balance between light and dark areas. 7. Note: Sets the degree of the display- Toggle to the left or right to 100. The Picture menu can be less black. Brightness: Adjust the brightness from ...the element you wish to adjust and press the joystick to the up the OSD. 2. Contrast: adjust the contrast from 0 to adjust the functions, settings which you are done, toggle the joystick to the left or right to adjust the Brightness, Contrast, Black Boost, Blue Light, ACM, and Super ...
...the joystick to enter it. 3. The higher the level, the higher the boost. 12 Note: Adjusts the balance between light and dark areas. 7. Note: Sets the degree of the display- Toggle to the left or right to 100. The Picture menu can be less black. Brightness: Adjust the brightness from ...the element you wish to adjust and press the joystick to the up the OSD. 2. Contrast: adjust the contrast from 0 to adjust the functions, settings which you are done, toggle the joystick to the left or right to adjust the Brightness, Contrast, Black Boost, Blue Light, ACM, and Super ...
User Manual
Page 27
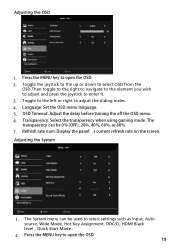
...%. 7. Refresh rate num: Display the panel's current refresh rate on the screen. Press the MENU key to adjust the sliding scales. 4. Adjusting the OSD 1. Language: Set the OSD menu language. 5. Transparency: Select the transparency when using gaming mode. The System menu can be used to select... settings such as Input, Auto source, Wide Mode, Hot Key Assignment, DDC/CI, HDMI Black level , Quick Start Mode . 2. Adjusting the System 1. Toggle to the left ...
...%. 7. Refresh rate num: Display the panel's current refresh rate on the screen. Press the MENU key to adjust the sliding scales. 4. Adjusting the OSD 1. Language: Set the OSD menu language. 5. Transparency: Select the transparency when using gaming mode. The System menu can be used to select... settings such as Input, Auto source, Wide Mode, Hot Key Assignment, DDC/CI, HDMI Black level , Quick Start Mode . 2. Adjusting the System 1. Toggle to the left ...

User Manual
Page 28
...System from the OSD. The options are Full, Aspect,1:1. 8. Press the MENU key to the factory defaults. 16 DDC/CI: Allows the monitor settings to enter it . 4. Quick Start Mode: Enable monitor rapidly. Product information 1. Then toggle to the right to navigate to the element you wish to... HDMI Black Level: You can select which allows monitor controls to adjust the sliding scales. 5. Reset: Resets all settings to open the OSD. 2. Toggle to the left or right to be set through the software on the PC. The options are Normal and Low. 11. Note: DDC/CI, short for ...
...System from the OSD. The options are Full, Aspect,1:1. 8. Press the MENU key to the factory defaults. 16 DDC/CI: Allows the monitor settings to enter it . 4. Quick Start Mode: Enable monitor rapidly. Product information 1. Then toggle to the right to navigate to the element you wish to... HDMI Black Level: You can select which allows monitor controls to adjust the sliding scales. 5. Reset: Resets all settings to open the OSD. 2. Toggle to the left or right to be set through the software on the PC. The options are Normal and Low. 11. Note: DDC/CI, short for ...
User Manual
Page 29
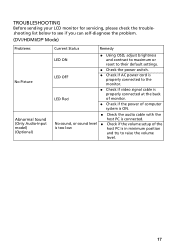
... properly connected at the back of monitor. Check if the power of the is too low host PC is properly connected to their default settings. LED OFF Check the power switch. Check if AC power cord is in minimum position and try to raise the volume level. 17...
... properly connected at the back of monitor. Check if the power of the is too low host PC is properly connected to their default settings. LED OFF Check the power switch. Check if AC power cord is in minimum position and try to raise the volume level. 17...


