User Manual(US)
Page 2
© 2010 All Rights Reserved Acer E110 Smartphone User Guide First issue: 02/2010 Acer E110 Smartphone Model number Serial number Date of purchase Place of purchase 2
© 2010 All Rights Reserved Acer E110 Smartphone User Guide First issue: 02/2010 Acer E110 Smartphone Model number Serial number Date of purchase Place of purchase 2
User Manual(US)
Page 7
Table of Contents End User Licence Agreement Getting to know your smartphone Features and functions 9 Product registration 9 Chapter 1: Setting Up Unpacking your smartphone 11 Getting to know your smartphone 12 Installing or removing the battery 14 Installing a SIM or microSD Card 16 Turning on for the first time 17 Using the touchscreen 18 The...
Table of Contents End User Licence Agreement Getting to know your smartphone Features and functions 9 Product registration 9 Chapter 1: Setting Up Unpacking your smartphone 11 Getting to know your smartphone 12 Installing or removing the battery 14 Installing a SIM or microSD Card 16 Turning on for the first time 17 Using the touchscreen 18 The...
User Manual(US)
Page 8
Chapter 5: Advanced Settings Putting your smartphone in airplane mode 39 Acer Settings 40 Sound and display 42 Setting the date and time 43 Setting alarms 43 Changing location and text options 43 Managing your contacts 44 ...Managing your calendar 46 Connecting to a PC 47 Social Networking 49 Multimedia playback 52 GPS tracker 55 FM radio 56 Managing applications 57 Resetting your smartphone...
Chapter 5: Advanced Settings Putting your smartphone in airplane mode 39 Acer Settings 40 Sound and display 42 Setting the date and time 43 Setting alarms 43 Changing location and text options 43 Managing your contacts 44 ...Managing your calendar 46 Connecting to a PC 47 Social Networking 49 Multimedia playback 52 GPS tracker 55 FM radio 56 Managing applications 57 Resetting your smartphone...
User Manual(US)
Page 9
... the first time, it is recommended that you ! Getting to know your smartphone Features and functions Your new smartphone offers leading, easy-to the Internet at high speed, via HSDPA (3.6 Mbps). • Keep in customer surveys • The latest news from Acer Hurry and register, as : • Faster service from our trained representatives...
... the first time, it is recommended that you ! Getting to know your smartphone Features and functions Your new smartphone offers leading, easy-to the Internet at high speed, via HSDPA (3.6 Mbps). • Keep in customer surveys • The latest news from Acer Hurry and register, as : • Faster service from our trained representatives...
User Manual(US)
Page 10
How to register To register your product registration, you will be sent a confirmation email with important data that you should keep in a safe place. 10 After we receive your Acer product, visit our website at registration.acer.com. Choose your smartphone by tapping the Registration icon. You can also register directly from your country and follow the simple instructions.
How to register To register your product registration, you will be sent a confirmation email with important data that you should keep in a safe place. 10 After we receive your Acer product, visit our website at registration.acer.com. Choose your smartphone by tapping the Registration icon. You can also register directly from your country and follow the simple instructions.
User Manual(US)
Page 11
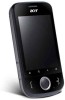
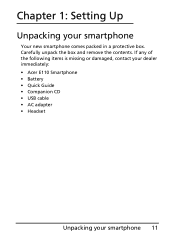
If any of the following items is missing or damaged, contact your dealer immediately: • Acer E110 Smartphone • Battery • Quick Guide • Companion CD • USB cable • AC adapter • Headset Unpacking your smartphone Your new smartphone comes packed in a protective box. Carefully unpack the box and remove the contents. Chapter 1: Setting Up Unpacking your smartphone 11
If any of the following items is missing or damaged, contact your dealer immediately: • Acer E110 Smartphone • Battery • Quick Guide • Companion CD • USB cable • AC adapter • Headset Unpacking your smartphone Your new smartphone comes packed in a protective box. Carefully unpack the box and remove the contents. Chapter 1: Setting Up Unpacking your smartphone 11

User Manual(US)
Page 12
Getting to move the cursor. Activates selected item. 12 Open the Google search function. Activate phone/dial/view recently dialed numbers or answer a call. 4-way navigation control to know your smartphone Views No. Return to display data, phone content and enter information. Item 1 microSD Card slot 2 Touchscreen 3 Home button 4 Search button 5 Call button 6 Navigation pad 7 Selection button Description Expansion slot for microSD Card. 2.8-inch, 240 x 320 pixel resistive touchscreen to the home screen.
Getting to move the cursor. Activates selected item. 12 Open the Google search function. Activate phone/dial/view recently dialed numbers or answer a call. 4-way navigation control to know your smartphone Views No. Return to display data, phone content and enter information. Item 1 microSD Card slot 2 Touchscreen 3 Home button 4 Search button 5 Call button 6 Navigation pad 7 Selection button Description Expansion slot for microSD Card. 2.8-inch, 240 x 320 pixel resistive touchscreen to the home screen.

User Manual(US)
Page 13
... Mail, message, missed call and battery status. 13 Phone speaker Emits audio from your smartphone; Low battery (less than three seconds to turn the screen on/off . Press to turn the smartphone off or enter sleep mode; jack 17 Camera A 3-megapixel camera for holding to your...Increase or decrease the phone volume. 15 Micro USB connector Connects to a USB cable/charger. 16 3.5 mm headphone Connects to know your smartphone 13 suitable for more than 15%); Getting to stereo headphones. missed call, unread mail or message. no unread mail or messages. press ...
... Mail, message, missed call and battery status. 13 Phone speaker Emits audio from your smartphone; Low battery (less than three seconds to turn the screen on/off . Press to turn the smartphone off or enter sleep mode; jack 17 Camera A 3-megapixel camera for holding to your...Increase or decrease the phone volume. 15 Micro USB connector Connects to a USB cable/charger. 16 3.5 mm headphone Connects to know your smartphone 13 suitable for more than 15%); Getting to stereo headphones. missed call, unread mail or message. no unread mail or messages. press ...

User Manual(US)
Page 14
... the phone. Place the battery into the slots in place. 14 Insert the tabs on the side of the compartment. Installing the battery Insert your smartphone and needs to provide power. D S ro ic m D S ro ic m D S ro ic m Installing or removing the battery Your...
... the phone. Place the battery into the slots in place. 14 Insert the tabs on the side of the compartment. Installing the battery Insert your smartphone and needs to provide power. D S ro ic m D S ro ic m D S ro ic m Installing or removing the battery Your...

User Manual(US)
Page 15
... grasping the sides of use , you can charge it each day to recharge the battery to full capacity. After that you need to charge your smartphone, then connect the USB connector to heat up when charging or during long periods of the battery. Replace the battery cover as shown in "Installing... the battery" on your smartphone for the phone to the AC adapter. Installing or removing the battery 15 Plug the AC adapter into any AC current outlet and charge the...
... grasping the sides of use , you can charge it each day to recharge the battery to full capacity. After that you need to charge your smartphone, then connect the USB connector to heat up when charging or during long periods of the battery. Replace the battery cover as shown in "Installing... the battery" on your smartphone for the phone to the AC adapter. Installing or removing the battery 15 Plug the AC adapter into any AC current outlet and charge the...

User Manual(US)
Page 16
The SIM card holder is located in "Removing the battery" on the left side of your smartphone's telephony capabilities, you may wish to increase your smartphone's storage by pressing and holding the power button. 2. Insert the SIM or microSD Card as described in the battery bay. NOTE: Ensure that the microSD ...
The SIM card holder is located in "Removing the battery" on the left side of your smartphone's telephony capabilities, you may wish to increase your smartphone's storage by pressing and holding the power button. 2. Insert the SIM or microSD Card as described in the battery bay. NOTE: Ensure that the microSD ...
User Manual(US)
Page 17
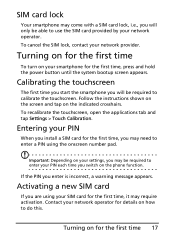
...Turning on how to do this. To cancel the SIM lock, contact your network provider. Calibrating the touchscreen The first time you start the smartphone you will only be required to calibrate the touchscreen. Contact your network operator for details on for the first time, press and hold the power... button until the system bootup screen appears. Follow the instructions shown on the screen and tap on your smartphone for the first time 17 Entering your PIN When you install a SIM card for the first time To turn on the indicated crosshairs. Turning...
...Turning on how to do this. To cancel the SIM lock, contact your network provider. Calibrating the touchscreen The first time you start the smartphone you will only be required to calibrate the touchscreen. Contact your network operator for details on for the first time, press and hold the power... button until the system bootup screen appears. Follow the instructions shown on the screen and tap on your smartphone for the first time 17 Entering your PIN When you install a SIM card for the first time To turn on the indicated crosshairs. Turning...
User Manual(US)
Page 18
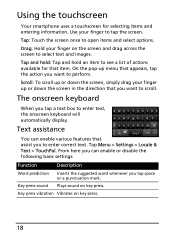
... settings: Function Description Word prediction Inserts the suggested word whenever you to scroll. Key press sound Plays sound on key press. Using the touchscreen Your smartphone uses a touchscreen for that item. Scroll: To scroll up or down the screen in the direction that you want to select text and images. Tap...
... settings: Function Description Word prediction Inserts the suggested word whenever you to scroll. Key press sound Plays sound on key press. Using the touchscreen Your smartphone uses a touchscreen for that item. Scroll: To scroll up or down the screen in the direction that you want to select text and images. Tap...

User Manual(US)
Page 19
... the screen, giving you quick, icon-based access to open the application. At the bottom of the home screen. The first time you start your smartphone, you have installed. The home screen 19 Tap the tab to many of the frequently-used features of your...
... the screen, giving you quick, icon-based access to open the application. At the bottom of the home screen. The first time you start your smartphone, you have installed. The home screen 19 Tap the tab to many of the frequently-used features of your...

User Manual(US)
Page 25
... displays the number/contact you are talking to the country you check all call . Tap Speaker again to hold your smartphone abroad, roaming charges will apply. We suggest you are using your smartphone. Onscreen call options Answering a call Press the Call button to answer a call rates with your network provider. To activate...
... displays the number/contact you are talking to the country you check all call . Tap Speaker again to hold your smartphone abroad, roaming charges will apply. We suggest you are using your smartphone. Onscreen call options Answering a call Press the Call button to answer a call rates with your network provider. To activate...
User Manual(US)
Page 29
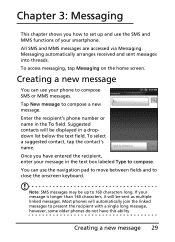
... have entered the recipient, enter your phone to compose SMS or MMS messages. Once you how to set up to 160 characters long. If your smartphone. Creating a new message You can use the SMS and MMS functions of your message is longer than 160 characters, it will be sent as multiple...
... have entered the recipient, enter your phone to compose SMS or MMS messages. Once you how to set up to 160 characters long. If your smartphone. Creating a new message You can use the SMS and MMS functions of your message is longer than 160 characters, it will be sent as multiple...

User Manual(US)
Page 31
.... Icon Description Convert the SMS to an MMS, allowing you based on information retrieved from the message list. Show other available options. Tip: Ask your smartphone will set up the MMS profile. MMS messages 31 Convert the SMS to an MMS, allowing you to see available options. Insert a smiley/emoticon into...
.... Icon Description Convert the SMS to an MMS, allowing you based on information retrieved from the message list. Show other available options. Tip: Ask your smartphone will set up the MMS profile. MMS messages 31 Convert the SMS to an MMS, allowing you to see available options. Insert a smiley/emoticon into...
User Manual(US)
Page 33
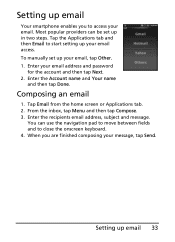
... the account and then tap Next. 2. Most popular providers can use the navigation pad to move between fields and to start setting up email Your smartphone enables you are finished composing your message, tap Send.
... the account and then tap Next. 2. Most popular providers can use the navigation pad to move between fields and to start setting up email Your smartphone enables you are finished composing your message, tap Send.

User Manual(US)
Page 35
... you can use the camera. Camera icons and indicators In the camera window, there are three icons on the rear. Chapter 4: Using the Camera Your smartphone features a 3-megapixel EDOF digital camera mounted on the screen to control certain features. • Tap the yellow bar to adjust brightness. • Use the zoom... of the screen to have a microSD Card inserted into the microSD slot before you through all the steps in taking photos and videos with your smartphone. Note: You need to adjust the zoom. Camera icons and indicators 35
... you can use the camera. Camera icons and indicators In the camera window, there are three icons on the rear. Chapter 4: Using the Camera Your smartphone features a 3-megapixel EDOF digital camera mounted on the screen to control certain features. • Tap the yellow bar to adjust brightness. • Use the zoom... of the screen to have a microSD Card inserted into the microSD slot before you through all the steps in taking photos and videos with your smartphone. Note: You need to adjust the zoom. Camera icons and indicators 35

User Manual(US)
Page 37
... button down to stop recording. Tap the Camera icon or press the Selection button to 1. Frame your subject and steady your smartphone. 3. Taking a photo 1. Frame your subject and steady your smartphone. 3. Counter Reset the counter back to take the photo. Ensure you have adjusted the parameters described above . 2. Prefix Set default file...
... button down to stop recording. Tap the Camera icon or press the Selection button to 1. Frame your subject and steady your smartphone. 3. Taking a photo 1. Frame your subject and steady your smartphone. 3. Counter Reset the counter back to take the photo. Ensure you have adjusted the parameters described above . 2. Prefix Set default file...

