
User Manual
Page 2
... unit should include the serial number, model number and purchase information. Such changes will be incorporated in the space provided below. All correspondence concerning your computer. The serial number and model number are used herein for a particular purpose. Record the model number, serial number, purchase date and place of purchase information in new editions of this manual or supplementary documents and publications. Acer LCD Monitor User's Guide Original Issue: 03...
... unit should include the serial number, model number and purchase information. Such changes will be incorporated in the space provided below. All correspondence concerning your computer. The serial number and model number are used herein for a particular purpose. Record the model number, serial number, purchase date and place of purchase information in new editions of this manual or supplementary documents and publications. Acer LCD Monitor User's Guide Original Issue: 03...

User Manual
Page 3
... changing the image or turning off the power switch and then turn it on again to make sure the flicker disappears. • You may flicker during initial use . • The LCD screen has 99.99% or more effective pixels. Keep this case, the screen is displayed for your monitor Please carefully follow these instructions carefully. Connecting/disconnecting the device Observe the following are turned off before connecting the power cord to the AC power...
... changing the image or turning off the power switch and then turn it on again to make sure the flicker disappears. • You may flicker during initial use . • The LCD screen has 99.99% or more effective pixels. Keep this case, the screen is displayed for your monitor Please carefully follow these instructions carefully. Connecting/disconnecting the device Observe the following are turned off before connecting the power cord to the AC power...

User Manual
Page 4
... volume. • Avoid turning up the volume to rest on the power cord. If you . If the product falls, it under sporting, exercising, or any kind onto or into is used with this product through cabinet slots as possible. Never spill liquid of any kind into this product, make sure that could be blocked or covered. When you need...
... volume. • Avoid turning up the volume to rest on the power cord. If you . If the product falls, it under sporting, exercising, or any kind onto or into is used with this product through cabinet slots as possible. Never spill liquid of any kind into this product, make sure that could be blocked or covered. When you need...
User Manual
Page 5
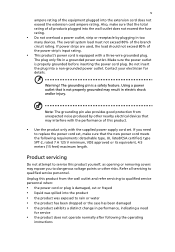
... change in too many devices. The overall system load must not exceed 80% of this product yourself, as opening or removing covers may expose you need for details. If power strips are used, the load should not exceed 80% of the power strip's input rating. • This product's power cord is properly grounded before inserting the power cord plug. If you to service this product. • Use...
... change in too many devices. The overall system load must not exceed 80% of this product yourself, as opening or removing covers may expose you need for details. If power strips are used, the load should not exceed 80% of the power strip's input rating. • This product's power cord is properly grounded before inserting the power cord plug. If you to service this product. • Use...

User Manual
Page 6
.... We at service stations. Switch off the device near gas pumps at Acer are very conscious of the environmental effects of our business and strive to identify and provide the best working procedures to environmental protection and views recycling, in minimizing the burden placed on the features and benefits of our other controls may contain small parts. Additional...
.... We at service stations. Switch off the device near gas pumps at Acer are very conscious of the environmental effects of our business and strive to identify and provide the best working procedures to environmental protection and views recycling, in minimizing the burden placed on the features and benefits of our other controls may contain small parts. Additional...
User Manual
Page 7
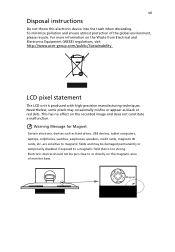
... (WEEE) regulations, visit http://www.acer‐group.com/public/Sustainability LCD pixel statement The LCD unit is too strong. For more information on the recorded image and does not constitute a malfunction. To minimize pollution and ensure utmost protection of monitor base. Warning Message for Magnet Certain electronic devices such as black or red dots. Electronic devices should not...
... (WEEE) regulations, visit http://www.acer‐group.com/public/Sustainability LCD pixel statement The LCD unit is too strong. For more information on the recorded image and does not constitute a malfunction. To minimize pollution and ensure utmost protection of monitor base. Warning Message for Magnet Certain electronic devices such as black or red dots. Electronic devices should not...
User Manual
Page 8
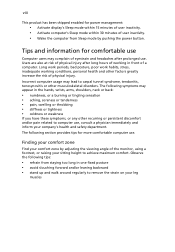
... recurring or persistent discomfort and/or pain related to computer use, consult a physician immediately and inform your company's health and safety department. The following tips: • refrain from Sleep mode by adjusting the viewing angle of physical injury after prolonged use . Users are also at risk of the monitor, using a footrest, or raising your sitting height to achieve maximum comfort.
... recurring or persistent discomfort and/or pain related to computer use, consult a physician immediately and inform your company's health and safety department. The following tips: • refrain from Sleep mode by adjusting the viewing angle of physical injury after prolonged use . Users are also at risk of the monitor, using a footrest, or raising your sitting height to achieve maximum comfort.

User Manual
Page 9
Display • Keep your display clean. • Keep your head at a higher level than the top edge of the display so your eyes point downward when looking at the middle of the display. • Adjust the display brightness and/or contrast to an awkward viewing angle. • Avoid looking away from the monitor and focusing on how to keep your eyes. Developing good work habits to...
Display • Keep your display clean. • Keep your head at a higher level than the top edge of the display so your eyes point downward when looking at the middle of the display. • Adjust the display brightness and/or contrast to an awkward viewing angle. • Avoid looking away from the monitor and focusing on how to keep your eyes. Developing good work habits to...

User Manual
Page 10
...Via Lepetit, 40, 20020 Lainate (MI) Italy Tel: +39-02-939-921 ,Fax: +39-02 9399-2913 www.acer.it Declare under our own responsibility that the product: Product: Trade Name: Model Number: SKU Number: LCD Monitor Acer B246HYL B246HYL xxxxxx; ("x" = 0~9, a ~ z, A ~ Z, or blank) To which this declaration refers conforms to the relevant ...hereby declare above product is in compliance with regard to begin affixing CE marking 2013. Year to establishing a framework for the setting of EMC Directive 2004/108/EC, Low Voltage Directive 2006/95/EC, and RoHS Directive 2011/65/EU and Directive 2009/125...
...Via Lepetit, 40, 20020 Lainate (MI) Italy Tel: +39-02-939-921 ,Fax: +39-02 9399-2913 www.acer.it Declare under our own responsibility that the product: Product: Trade Name: Model Number: SKU Number: LCD Monitor Acer B246HYL B246HYL xxxxxx; ("x" = 0~9, a ~ z, A ~ Z, or blank) To which this declaration refers conforms to the relevant ...hereby declare above product is in compliance with regard to begin affixing CE marking 2013. Year to establishing a framework for the setting of EMC Directive 2004/108/EC, Low Voltage Directive 2006/95/EC, and RoHS Directive 2011/65/EU and Directive 2009/125...
User Manual
Page 12
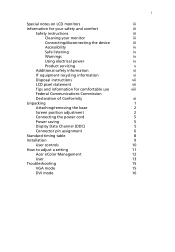
... Accessibility Safe listening Warnings Using electrical power Product servicing Additional safety information IT equipment recycling information Disposal instructions LCD pixel statement Tips and information for comfortable use Federal Communications Commission Declaration of Conformity Unpacking Attaching/removing the base Screen position adjustment Connecting the power cord Power saving Display Data Channel (DDC) Connector pin assignment Standard timing table Installation User controls How to adjust a setting Acer eColor Management User Troubleshooting VGA mode DVI mode 1 iii iii iii iii...
... Accessibility Safe listening Warnings Using electrical power Product servicing Additional safety information IT equipment recycling information Disposal instructions LCD pixel statement Tips and information for comfortable use Federal Communications Commission Declaration of Conformity Unpacking Attaching/removing the base Screen position adjustment Connecting the power cord Power saving Display Data Channel (DDC) Connector pin assignment Standard timing table Installation User controls How to adjust a setting Acer eColor Management User Troubleshooting VGA mode DVI mode 1 iii iii iii iii...

User Manual
Page 13
LCD monitor Quick start guide DP cable (Option) D-sub cable (Option) DVI cable (Option) AC power cord Audio Cable (Option) USB cable (Option) English 1 Unpacking Please check that the following items are present when you unpack the box, and save the packing materials in case you need to ship or transport the monitor in the future.
LCD monitor Quick start guide DP cable (Option) D-sub cable (Option) DVI cable (Option) AC power cord Audio Cable (Option) USB cable (Option) English 1 Unpacking Please check that the following items are present when you unpack the box, and save the packing materials in case you need to ship or transport the monitor in the future.

User Manual
Page 15
Only at the highest point can adjust the height of the monitor. 1 2 150mm • Tilt Please see the illustration below for the angle of the tilt range. English 3 SCREEN POSITION ADJUSTMENT In oder to optimize the best viewing position, you can adjust the height/tilt/ swivel/pivot of the monitor. • Height Adjustment After pressing the top of the monitor then you can 35 degrees of recline be offered for an example of elevation. 5o 35o
Only at the highest point can adjust the height of the monitor. 1 2 150mm • Tilt Please see the illustration below for the angle of the tilt range. English 3 SCREEN POSITION ADJUSTMENT In oder to optimize the best viewing position, you can adjust the height/tilt/ swivel/pivot of the monitor. • Height Adjustment After pressing the top of the monitor then you can 35 degrees of recline be offered for an example of elevation. 5o 35o
User Manual
Page 17
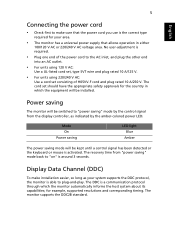
Mode On Power saving LED light Blue Amber The power saving mode will be installed. 5 English Connecting the power cord • Check first to "on" is around 3 seconds. Display Data Channel (DDC) To make sure that allows operation in either 100/120 V AC or 220/240 V AC voltage area. The DDC is required. • Plug one end of H05VV-F cord and plug rated 10 A/250 V. Power saving The monitor will be kept until a control signal has been...
Mode On Power saving LED light Blue Amber The power saving mode will be installed. 5 English Connecting the power cord • Check first to "on" is around 3 seconds. Display Data Channel (DDC) To make sure that allows operation in either 100/120 V AC or 220/240 V AC voltage area. The DDC is required. • Plug one end of H05VV-F cord and plug rated 10 A/250 V. Power saving The monitor will be kept until a control signal has been...

User Manual
Page 21
b Connect the VGA video cable to diagnose the problem. c Connect the digital cable (only for dual-input models). (1) Make sure both the monitor and computer are switched off. (2) Connect one end of the 20-pin DP cable to the back of the monitor and the other end to the computer's port. 2 Connect the power cord Connect the power cord to the monitor, then to a properly grounded AC outlet. 3 Connect the USB Cable(Optional) Connect the USB 3.0 cable to the computer's port. This...
b Connect the VGA video cable to diagnose the problem. c Connect the digital cable (only for dual-input models). (1) Make sure both the monitor and computer are switched off. (2) Connect one end of the 20-pin DP cable to the back of the monitor and the other end to the computer's port. 2 Connect the power cord Connect the power cord to the monitor, then to a properly grounded AC outlet. 3 Connect the USB Cable(Optional) Connect the USB 3.0 cable to the computer's port. This...
User Manual
Page 22
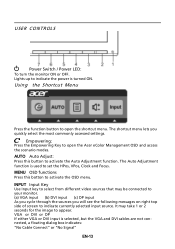
... the sources you quickly select the most commonly accessed settings. Empowering: Press the Empowering Key to appear. Lights up to open the Acer eColor Management OSD and access the scenario modes. Using the Shortcut Menu Press the function button to indicate the power is selected ,but the VGA and DVI cables are not connected, a floating dialog box indicates: "No Cable Connect" or "No Signal" EN-13 USER CONTROLS Power Switch / Power LED: To turn the monitor ON...
... the sources you quickly select the most commonly accessed settings. Empowering: Press the Empowering Key to appear. Lights up to open the Acer eColor Management OSD and access the scenario modes. Using the Shortcut Menu Press the function button to indicate the power is selected ,but the VGA and DVI cables are not connected, a floating dialog box indicates: "No Cable Connect" or "No Signal" EN-13 USER CONTROLS Power Switch / Power LED: To turn the monitor ON...
User Manual
Page 23
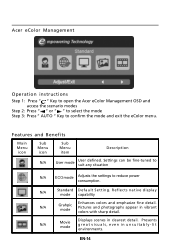
... menu. N/A Standard D efau lt Settin g . EN-14 Features and Benefits Main Menu icon Sub Menu icon Sub Menu item Description N/A User mode User defined. Pictures and photographs appear in vibrant colors with sharp detail. Acer eColor Management Operation instructions Step 1: Press " " Key to open the Acer eColor Management OSD and access the scenario modes Step 2: Press " " or " " to select the mode Step 3: Press " AUTO " Key to reduce power...
... menu. N/A Standard D efau lt Settin g . EN-14 Features and Benefits Main Menu icon Sub Menu icon Sub Menu item Description N/A User mode User defined. Pictures and photographs appear in vibrant colors with sharp detail. Acer eColor Management Operation instructions Step 1: Press " " Key to open the Acer eColor Management OSD and access the scenario modes Step 2: Press " " or " " to select the mode Step 3: Press " AUTO " Key to reduce power...
User Manual
Page 24
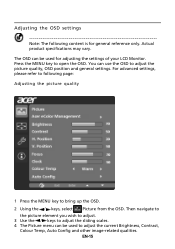
Press the MENU key to adjust the current Brightness, Contrast, Colour Temp, Auto Config and other image-related qualities. Then navigate to the picture element you wish to adjust. 3 Use the / keys to adjust the sliding scales. 4 The Picture menu can be used to open the OSD. EN-15 The OSD can use the OSD to bring up the OSD. 2 Using the / keys, select Picture from the OSD. For advanced settings, please refer to...
Press the MENU key to adjust the current Brightness, Contrast, Colour Temp, Auto Config and other image-related qualities. Then navigate to the picture element you wish to adjust. 3 Use the / keys to adjust the sliding scales. 4 The Picture menu can be used to open the OSD. EN-15 The OSD can use the OSD to bring up the OSD. 2 Using the / keys, select Picture from the OSD. For advanced settings, please refer to...

User Manual
Page 26
EN-17 Then navigate to the feature you wish to adjust. 3 The Setting menu can be used to adjust the screen Menu Language and other important settings. 4 Select Power-off USB charge function. Adjusting the setting 1 Press the MENU key to enable/disable Power-off USB charge ON/OFF to bring up the OSD. 2 Using the / keys, select Setting from the OSD.
EN-17 Then navigate to the feature you wish to adjust. 3 The Setting menu can be used to adjust the screen Menu Language and other important settings. 4 Select Power-off USB charge function. Adjusting the setting 1 Press the MENU key to enable/disable Power-off USB charge ON/OFF to bring up the OSD. 2 Using the / keys, select Setting from the OSD.
User Manual
Page 28
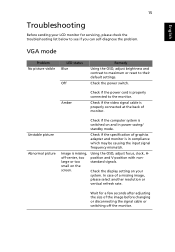
... input signal frequency mismatch. Wait for servicing, please check the troubleshooting list below to see if you can self-diagnose the problem. VGA mode Problem No picture visible LED status Blue Off Remedy Using the OSD, adjust brightness and contrast to maximum or reset to the monitor. Check if the video signal cable is missing, off the monitor. Image is properly connected at the back of a missing image, please select another resolution or vertical refresh rate. Check the power switch. In case of monitor. Check if the specification...
... input signal frequency mismatch. Wait for servicing, please check the troubleshooting list below to see if you can self-diagnose the problem. VGA mode Problem No picture visible LED status Blue Off Remedy Using the OSD, adjust brightness and contrast to maximum or reset to the monitor. Check if the video signal cable is missing, off the monitor. Image is properly connected at the back of a missing image, please select another resolution or vertical refresh rate. Check the power switch. In case of monitor. Check if the specification...
User Manual
Page 29
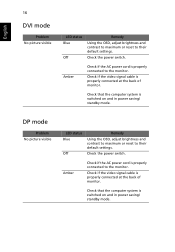
... monitor. Check if the video signal cable is properly connected at the back of monitor. Check that the computer system is switched on and in power saving/ standby mode. Amber Check if the AC power cord is properly connected to the monitor. Amber Check if the AC power cord is properly connected to the monitor. English 16 DVI mode Problem No picture visible LED status Blue Off Remedy Using the OSD, adjust brightness and contrast to maximum or reset to their default settings. DP mode Problem No picture visible LED status Blue...
... monitor. Check if the video signal cable is properly connected at the back of monitor. Check that the computer system is switched on and in power saving/ standby mode. Amber Check if the AC power cord is properly connected to the monitor. Amber Check if the AC power cord is properly connected to the monitor. English 16 DVI mode Problem No picture visible LED status Blue Off Remedy Using the OSD, adjust brightness and contrast to maximum or reset to their default settings. DP mode Problem No picture visible LED status Blue...


