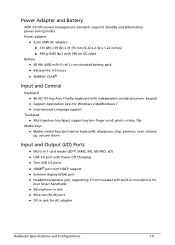
Aspire V3-471 Keyboard - Acer
Aspire V3-471 Keyboard

View Results Below
Free Acer Aspire V3-471 manuals!
Problems with Acer Aspire V3-471?
Ask a Question
Free Acer Aspire V3-471 manuals!
Problems with Acer Aspire V3-471?
Ask a Question
Related Manual Pages


Related Videos

Acer Aspire V3 Video Review
Duration: 5:06
Total Views: 62,953
Duration: 5:06
Total Views: 62,953
Digital Review Acer Aspire V3-571G
Duration: 4:01
Total Views: 539
Duration: 4:01
Total Views: 539
Similar Questions

I Felt Tea On My Laptop Keyboard. My Laptop Is In Under Warranty Period. It Is P
(Posted by AmolSB 10 years ago)

Keyboard Doesn't Work, Some Bottoms Are Not Active (backspace, Enter, Some Lette
keyboard doesn't work, some bottoms are not active (backspace, enter, tab, some letters)
keyboard doesn't work, some bottoms are not active (backspace, enter, tab, some letters)
(Posted by gvsvas 11 years ago)

Speaker Above Keyboard
the speaker above the keyboard like a long grey line i cant hear any sound from it is this normal or...
the speaker above the keyboard like a long grey line i cant hear any sound from it is this normal or...
(Posted by juslai05 11 years ago)
Keyboard Sensitivity
The keyboard on my Acer 5742-7159 is ultrasensitive. Is there anything I can do to reduce that sensi...
The keyboard on my Acer 5742-7159 is ultrasensitive. Is there anything I can do to reduce that sensi...
(Posted by denniskennedy 12 years ago)

Related Terms
The following terms were also used when searching for Aspire V3-471 Keyboard - Acer:- acer aspire v3
- acer aspire v3 471
- acer aspire v3 471 battery
- acer aspire v3 471 bluetooth driver windows 10
- acer aspire v3 471 core i3
- acer aspire v3 471 core i5
- acer aspire v3 471 driver
- acer aspire v3 471 driver for win 8.1 64 bit
- acer aspire v3 471 drivers
- acer aspire v3 471 i3
- acer aspire v3 471 i5
- acer aspire v3 471 laptop reviews
- acer aspire v3 471 price
- acer aspire v3 471 review
- acer aspire v3 471 series
- acer aspire v3 471 specification
- acer aspire v3 471 wifi driver download
- acer aspire v3 4710
- acer aspire v3 4710 driver
- acer aspire v3 4710g
- acer aspire v3 471g
- acer aspire v3 471g 53214g75ma
- acer aspire v3 471g battery
- acer aspire v3 471g bios
- acer aspire v3 471g bluetooth driver
- acer aspire v3 471g boot menu
- acer aspire v3 471g core i3
- acer aspire v3 471g core i5
- acer aspire v3 471g driver
- acer aspire v3 471g driver download
- acer aspire v3 471g drivers
- acer aspire v3 471g drivers for windows 7
- acer aspire v3 471g drivers for windows 8
- acer aspire v3 471g fan
- acer aspire v3 471g i3
- acer aspire v3 471g i5
- acer aspire v3 471g i5-2450m
- acer aspire v3 471g indonesia
- acer aspire v3 471g price
- acer aspire v3 471g price in india
- acer aspire v3 471g recovery
- acer aspire v3 471g specification
- acer aspire v3 471g touchpad
- acer aspire v3 471g touchpad problem
- acer aspire v3 471g webcam driver
- acer aspire v3 471g-53214g75makk
- acer aspire v3 551 8469
- acer aspire v3 551 8887
- acer aspire v3 551g 8454
- acer aspire v3 571
- acer aspire v3 571 6643
- acer aspire v3 571g
- acer aspire v3 571g 6602
- acer aspire v3 731 4695
- acer aspire v3 771g
- acer aspire v3 771g 6601
- acer aspire v3 771g 9875
- acer aspire v3 review
- acer aspire v3 series
- acer aspire v3- 471g
- acer aspire v3- 471g driver download
- acer aspire v3- 471g drivers
- acer aspire v3- 471g i3
- acer aspire v3-471
- acer aspire v3-471 3rd gen
- acer aspire v3-471 bluetooth driver
- acer aspire v3-471 core i3
- acer aspire v3-471 core i5
- acer aspire v3-471 core i5 3210m
- acer aspire v3-471 driver
- acer aspire v3-471 driver download
- acer aspire v3-471 drivers
- acer aspire v3-471 i3
- acer aspire v3-471 keyboard
- acer aspire v3-471 laptop
- acer aspire v3-471 price
- acer aspire v3-471 review
- acer aspire v3-471 reviews
- acer aspire v3-471 series
- acer aspire v3-471 spec
- acer aspire v3-471 specifications
- acer aspire v3-471 specs
- acer aspire v3-471 xp driver free download
- acer aspire v3-4710g
- acer aspire v3-471g
- acer aspire v3-471g battery
- acer aspire v3-471g bluetooth
- acer aspire v3-471g bluetooth driver download
- acer aspire v3-471g core i5
- acer aspire v3-471g driver
- acer aspire v3-471g driver download
- acer aspire v3-471g drivers
- acer aspire v3-471g i3
- acer aspire v3-471g i5
- acer aspire v3-471g keyboard
- acer aspire v3-471g price
- acer aspire v3-471g price in india
- acer aspire v3-471g specification
- acer aspire v3-471g touchpad problem
- acer aspire v3-471g-53214g75ma
- acer aspire v3-471g-53214g75makk
- acer aspire v3-471g-53218g75makk
- acer aspire v3-551-8469
- acer aspire v3-571
- acer aspire v333
- aspire v3
- aspire v3 -471g
- aspire v3 471
- aspire v3 471 battery
- aspire v3 471 bluetooth driver windows 10
- aspire v3 471 core i3
- aspire v3 471 core i5
- aspire v3 471 driver
- aspire v3 471 driver for win 8.1 64 bit
- aspire v3 471 drivers
- aspire v3 471 i3
- aspire v3 471 i3 3110m
- aspire v3 471 i5
- aspire v3 471 laptop reviews
- aspire v3 471 price
- aspire v3 471 review
- aspire v3 471 series
- aspire v3 471 specification
- aspire v3 471 specs
- aspire v3 471 wifi driver download
- aspire v3 4710
- aspire v3 4710 driver
- aspire v3 4710g
- aspire v3 471g
- aspire v3 471g 53214g75ma
- aspire v3 471g battery
- aspire v3 471g bios
- aspire v3 471g bluetooth driver
- aspire v3 471g boot menu
- aspire v3 471g core i3
- aspire v3 471g core i5
- aspire v3 471g driver
- aspire v3 471g driver download
- aspire v3 471g drivers
- aspire v3 471g drivers for windows 7
- aspire v3 471g drivers for windows 8
- aspire v3 471g fan
- aspire v3 471g i3
- aspire v3 471g i5
- aspire v3 471g i5-2450m
- aspire v3 471g indonesia
- aspire v3 471g price
- aspire v3 471g price in india
- aspire v3 471g recovery
- aspire v3 471g specification
- aspire v3 471g touchpad
- aspire v3 471g touchpad problem
- aspire v3 471g webcam driver
- aspire v3 471g-53214g75makk
- aspire v3 472p
- aspire v3 551
- aspire v3 551 8469 review
- aspire v3 551 8887
- aspire v3 551g
- aspire v3 571 6849
- aspire v3 571g
- aspire v3 571g 6407
- aspire v3 571g 6602
- aspire v3 571g 6622
- aspire v3 571g-9686
- aspire v3 731
- aspire v3 731 4477
- aspire v3 731 4695
- aspire v3 731 4854
- aspire v3 731-4473
- aspire v3 731-4477
- aspire v3 731-4854
- aspire v3 771
- aspire v3 771-6470
- aspire v3 771-6833
- aspire v3 771g
- aspire v3 771g 6601
- aspire v3 771g 9875
- aspire v3 771g-6601
- aspire v3 771g-6851
- aspire v3 771g-9809
- aspire v3 772g
- aspire v3 acer
- aspire v3 acer 17.3
- aspire v3 battery
- aspire v3 bios
- aspire v3 crack
- aspire v3 drivers
- aspire v3 i5
- aspire v3 i5 review
- aspire v3 laptop
- aspire v3 license
- aspire v3 manual
- aspire v3 notebook
- aspire v3 notebook review
- aspire v3 price
- aspire v3 price malaysia
- aspire v3 review
- aspire v3 sale
- aspire v3 series
- aspire v3 spec
- aspire v3 specification
- aspire v3 specs
- aspire v3 tutorials
- aspire v3 v3-571g-6602
- aspire v3 v3-571g-9435
- aspire v3 v3-771g-6601
- aspire v3 v3-771g-9875
- aspire v3- 471g
- aspire v3- 471g driver download
- aspire v3-471
- aspire v3-471 3rd gen
- aspire v3-471 bluetooth
- aspire v3-471 bluetooth driver
- aspire v3-471 core i3
- aspire v3-471 core i5
- aspire v3-471 core i5 3210m
- aspire v3-471 driver
- aspire v3-471 driver download
- aspire v3-471 driver win7 64bit
- aspire v3-471 driver windows 10
- aspire v3-471 driver xp
- aspire v3-471 drivers
- aspire v3-471 i3
- aspire v3-471 keyboard
- aspire v3-471 laptop
- aspire v3-471 price
- aspire v3-471 review
- aspire v3-471 reviews
- aspire v3-471 series
- aspire v3-471 spec
- aspire v3-471 specifications
- aspire v3-471 specs
- aspire v3-471 webcam
- aspire v3-471 wireless driver
- aspire v3-471 xp driver
- aspire v3-471 xp driver free download
- aspire v3-4710g
- aspire v3-471g
- aspire v3-471g battery
- aspire v3-471g bluetooth
- aspire v3-471g bluetooth driver
- aspire v3-471g bluetooth driver download
- aspire v3-471g core i5
- aspire v3-471g driver
- aspire v3-471g driver download
- aspire v3-471g driver windows 8
- aspire v3-471g drivers
- aspire v3-471g i3
- aspire v3-471g i5
- aspire v3-471g keyboard
- aspire v3-471g price
- aspire v3-471g price in india
- aspire v3-471g specification
- aspire v3-471g touchpad problem
- aspire v3-471g wireless driver
- aspire v3-471g-53214g75ma
- aspire v3-471g-53214g75makk
- aspire v3-471g-53218g75ma
- aspire v3-471g-53218g75makk
- aspire v3-472p
- aspire v3-531
- aspire v3-551
- aspire v3-551-8887
- aspire v3-551g
- aspire v3-551g drivers
- aspire v3-551g-8454
- aspire v3-571
- aspire v3-571-6849
- aspire v3-571g
- aspire v3-571g drivers
- aspire v3-571g ram
- aspire v3-571g review
- aspire v3-571g-6407
- aspire v3-571g-6602
- aspire v3-571g-6622
- aspire v3-571g-9435
- aspire v3-571g-9686
- aspire v3-572
- aspire v3-572p
- aspire v3-731
- aspire v3-731 acer drivers
- aspire v3-731 drivers
- aspire v3-731 manual
- aspire v3-731-4695
- aspire v3-771
- aspire v3-771/v3-731
- aspire v3-771g
- aspire v3-771g-6601
- aspire v3-771g-6601 v3
- aspire v3-771g-6851
- aspire v3-771g-9809
- aspire v3-771g-9875
- aspire v3-772
- aspire v3-772g
- aspire v3-772g-9402
- aspire v3.0
- aspire v3.09
- laptop acer aspire v3 471