

AL1923 LCD Service Guide
Page 5
... the responsibility of the user to comply with the emission limits. 3. WARNING: To prevent fire or chock hazard, do not expose the monitor to qualified personnel only. - 5 - NOTICE: 1. Reorient or relocate the receiving antenna. 2. Refer servicing to rain or moisture. Dangerously...; Partner our company has determined that interference will not occur in a residential installation. These limits are present inside the monitor. Do not open the cabinet. The changes or modifications not expressly approved by unauthorized modification to this equipment has been ...
... the responsibility of the user to comply with the emission limits. 3. WARNING: To prevent fire or chock hazard, do not expose the monitor to qualified personnel only. - 5 - NOTICE: 1. Reorient or relocate the receiving antenna. 2. Refer servicing to rain or moisture. Dangerously...; Partner our company has determined that interference will not occur in a residential installation. These limits are present inside the monitor. Do not open the cabinet. The changes or modifications not expressly approved by unauthorized modification to this equipment has been ...

AL1923 LCD Service Guide
Page 6
...other hazards. If you to power surges. l Slots and openings in a wet basement. Do not place the monitor on an unstable trolley, stand, or table. This plug will protect the monitor from the type of power supplied to ground the appliance safely. l Do not overload power strips and extension ...-pronged grounded plug, a plug with the attached power adapter (output 12V DC) which have an electrician install the correct outlet, or use the monitor only with the monitor. l Unplug the unit during a lightning storm or when it will not be easily accessible. Never spill liquids on the...
...other hazards. If you to power surges. l Slots and openings in a wet basement. Do not place the monitor on an unstable trolley, stand, or table. This plug will protect the monitor from the type of power supplied to ground the appliance safely. l Do not overload power strips and extension ...-pronged grounded plug, a plug with the attached power adapter (output 12V DC) which have an electrician install the correct outlet, or use the monitor only with the monitor. l Unplug the unit during a lightning storm or when it will not be easily accessible. Never spill liquids on the...
AL1923 LCD Service Guide
Page 7
... following symptoms are normal with LCD monitor and do not indicate a problem. In this case, the screen is displayed for hours. - 7 - NOTES l Due to the nature of the previous screen may remain ...
... following symptoms are normal with LCD monitor and do not indicate a problem. In this case, the screen is displayed for hours. - 7 - NOTES l Due to the nature of the previous screen may remain ...
AL1923 LCD Service Guide
Page 8
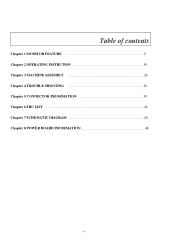
Table of contents Chapter 1 MONITOR FEATURE 9 Chapter 2 OPERATING INSTRUTION 19 Chapter 3 MACHINE ASSEMBLY 24 Chapter 4 TROUBLE SHOOTING 36 Chapter 5 CONNECTOR INFORMATION 39 Chapter 6 FRU LIST 41 Chapter 7 SCHEMATIC DIAGRAM 42 Chapter 8 POWER BOARD INFORMATION 48 - 8 -
Table of contents Chapter 1 MONITOR FEATURE 9 Chapter 2 OPERATING INSTRUTION 19 Chapter 3 MACHINE ASSEMBLY 24 Chapter 4 TROUBLE SHOOTING 36 Chapter 5 CONNECTOR INFORMATION 39 Chapter 6 FRU LIST 41 Chapter 7 SCHEMATIC DIAGRAM 42 Chapter 8 POWER BOARD INFORMATION 48 - 8 -

AL1923 LCD Service Guide
Page 9
Monitor Feature Chapter 1 LCD Panel Driving system Size Pixel pitch Viewable angle TFT Color LCD 19" 0.294 mm AU panel 8ms :70/60/70/70 degree(...
Monitor Feature Chapter 1 LCD Panel Driving system Size Pixel pitch Viewable angle TFT Color LCD 19" 0.294 mm AU panel 8ms :70/60/70/70 degree(...

AL1923 LCD Service Guide
Page 17
... enter a selection in OSD. If OSD is active, press to select or adjust OSD options. If OSD ?3 UP/ PLUS is ?5 AUTO inactive, press and the monitor will automatically optimize the position, focus and clock of your display. - 19 - If OSD is inactive, press once, then press the buttons marked or to...
... enter a selection in OSD. If OSD is active, press to select or adjust OSD options. If OSD ?3 UP/ PLUS is ?5 AUTO inactive, press and the monitor will automatically optimize the position, focus and clock of your display. - 19 - If OSD is inactive, press once, then press the buttons marked or to...

AL1923 LCD Service Guide
Page 20
... dual color (blue/amber) led to the VESA DDC STANDARD. HOW TO OPTIMIZE THE DOS-MODE Plug and play Plug & play DDC2B feature This monitor is equipped with VESA DDC2B capabilities according to indict system status and defined as bellows : LED Color Green System Status System in normal operation mode... Amber System in power-saving mode Dark System in power-off mode LOGO : When the monitor is power on, the LOGO will be showed in two levels, DDC2B. The DDC2B is defined in the center, and disappear slowly. The communication ...
... dual color (blue/amber) led to the VESA DDC STANDARD. HOW TO OPTIMIZE THE DOS-MODE Plug and play Plug & play DDC2B feature This monitor is equipped with VESA DDC2B capabilities according to indict system status and defined as bellows : LED Color Green System Status System in normal operation mode... Amber System in power-saving mode Dark System in power-off mode LOGO : When the monitor is power on, the LOGO will be showed in two levels, DDC2B. The DDC2B is defined in the center, and disappear slowly. The communication ...

AL1923 LCD Service Guide
Page 21
... note that power supply card needs to use a cord set by reducing power consumption when there is no video input signal this monitor, following a time-out period, will automatically switch to a "Screen Saver" feature except the display is no video-input signal present. This... monitor meets the Green monitor standards as set consisting of personal computer: Please use VDE 0602, 0625, 0821 approval power cord in European counties. - 23 - The appearance is...
... note that power supply card needs to use a cord set by reducing power consumption when there is no video input signal this monitor, following a time-out period, will automatically switch to a "Screen Saver" feature except the display is no video-input signal present. This... monitor meets the Green monitor standards as set consisting of personal computer: Please use VDE 0602, 0625, 0821 approval power cord in European counties. - 23 - The appearance is...
AL1923 LCD Service Guide
Page 22
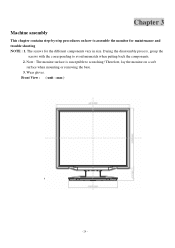
Note : The monitor surface is susceptible to avoid mismatch when putting back the components. 2. Therefore, lay the monitor on how to assemble the monitor for the different components vary in size. Front View : ( unit : mm ) - 24 - Chapter 3 Machine assembly This chapter contains step-by-step procedures on a soft surface when mounting or removing the base. 3. Wear gloves. During the disassembly process, group the screws with the corresponding to scratching! The screws for maintenance and trouble shooting NOTE : 1.
Note : The monitor surface is susceptible to avoid mismatch when putting back the components. 2. Therefore, lay the monitor on how to assemble the monitor for the different components vary in size. Front View : ( unit : mm ) - 24 - Chapter 3 Machine assembly This chapter contains step-by-step procedures on a soft surface when mounting or removing the base. 3. Wear gloves. During the disassembly process, group the screws with the corresponding to scratching! The screws for maintenance and trouble shooting NOTE : 1.

AL1923 LCD Service Guide
Page 34
AT FIRST CHECK IF 2*PCS SCREW IN THE COVER IS LOST 2. INSERT DVI CABLE INTO DVI CONNECTOR AND INSERT POWER CORD INTO POWER CONNECTOR 2. GET BASE FIXTRUE AND ASSEMBLE IT TO STAND NECK. 1. 1. LOCK 4*PCS SCREW (M4*10-B) TO FASTEN STAND NECK 1. STAND UP THE MONITOR AND STICK TRAVALCARD AT LEFT DOWNSIDE OF MONITOR Chapter 4 - 35 - INSERT VGA CABLE INTO VGA CONNECTOR AND INSERT POWER CORD INTO POWER CONNECTOR 2.
AT FIRST CHECK IF 2*PCS SCREW IN THE COVER IS LOST 2. INSERT DVI CABLE INTO DVI CONNECTOR AND INSERT POWER CORD INTO POWER CONNECTOR 2. GET BASE FIXTRUE AND ASSEMBLE IT TO STAND NECK. 1. 1. LOCK 4*PCS SCREW (M4*10-B) TO FASTEN STAND NECK 1. STAND UP THE MONITOR AND STICK TRAVALCARD AT LEFT DOWNSIDE OF MONITOR Chapter 4 - 35 - INSERT VGA CABLE INTO VGA CONNECTOR AND INSERT POWER CORD INTO POWER CONNECTOR 2.

AL1923 User's Guide
Page 1
Table of Contents Precautions ...2 Special notes on LCD monitors 2 Package contents 3 Installation instructions 3 Assembling the monitor 3 Adjusting the viewing angle 4 Connecting the devices 6 Switching the power 7 Adjusting display settings 7 External controls 7 OSD options...8 OSD menu ...8 Troubleshooting 11 General specifications 12 1
Table of Contents Precautions ...2 Special notes on LCD monitors 2 Package contents 3 Installation instructions 3 Assembling the monitor 3 Adjusting the viewing angle 4 Connecting the devices 6 Switching the power 7 Adjusting display settings 7 External controls 7 OSD options...8 OSD menu ...8 Troubleshooting 11 General specifications 12 1

AL1923 User's Guide
Page 2
...Do not allow sharp objects such as the monitor requires ventilation. When cleaning this problem. 2 Do not spray liquid directly on the desktop pattern you use . If this happens, the screen will clean stubborn stains. Recycling information Acer cares very much about protecting the environment, and...recycle industrial technology products. Opening or removing covers can be healthier if appropriate measures are normal for LCD monitors and do not attempt to avoid any danger of the monitor. When this does not resolve the problem, do not indicate a problem with a mild detergent solution ...
...Do not allow sharp objects such as the monitor requires ventilation. When cleaning this problem. 2 Do not spray liquid directly on the desktop pattern you use . If this happens, the screen will clean stubborn stains. Recycling information Acer cares very much about protecting the environment, and...recycle industrial technology products. Opening or removing covers can be healthier if appropriate measures are normal for LCD monitors and do not attempt to avoid any danger of the monitor. When this does not resolve the problem, do not indicate a problem with a mild detergent solution ...

AL1923 User's Guide
Page 3
... AC power cord to fit in the carton. After removing the monitor from the base, pull the monitor slightly up and away from the base and place it further. Detaching the monitor If you need to detach the monitor for repackaging, the monitor and base must be separated in order to make sure the power... is off. 2. Separate the monitor and base. Pull the 4 hooks on the bottom side of the base. 2. ...
... AC power cord to fit in the carton. After removing the monitor from the base, pull the monitor slightly up and away from the base and place it further. Detaching the monitor If you need to detach the monitor for repackaging, the monitor and base must be separated in order to make sure the power... is off. 2. Separate the monitor and base. Pull the 4 hooks on the bottom side of the base. 2. ...

AL1923 User's Guide
Page 4
Adjusting the viewing angle (Only AL1923 h/AL1923 r) Your monitor features a multi-adjustable stand that upon pulling out the pin, erect the machine on the right and left edge of the monitor ranges from ejecting. 4 Pull out the pin from ejecting. To make an adjustment, grasp the monitor with both hands on the table to prevent the...
Adjusting the viewing angle (Only AL1923 h/AL1923 r) Your monitor features a multi-adjustable stand that upon pulling out the pin, erect the machine on the right and left edge of the monitor ranges from ejecting. 4 Pull out the pin from ejecting. To make an adjustment, grasp the monitor with both hands on the table to prevent the...

AL1923 User's Guide
Page 6
... signal cable to the DVI-D output socket of the audio cable. 5 Power switch On / off WARNING! Also check that the computer and the monitor are bent or otherwise damaged. VGA 6 DVI-D Connecting the devices Caution: Make sure that none of the pins are both disconnected from the power ...supply. 1 Power cord Attach the monitor to the power cord, and then insert the power cord into . Then tighten the thumbscrews on the computer. Then tighten the thumbscrews on the connector...
... signal cable to the DVI-D output socket of the audio cable. 5 Power switch On / off WARNING! Also check that the computer and the monitor are bent or otherwise damaged. VGA 6 DVI-D Connecting the devices Caution: Make sure that none of the pins are both disconnected from the power ...supply. 1 Power cord Attach the monitor to the power cord, and then insert the power cord into . Then tighten the thumbscrews on the computer. Then tighten the thumbscrews on the connector...

AL1923 User's Guide
Page 7
... options. Allow about 10 seconds for use. Adjusting display settings External controls 1 Auto If the OSD is inactive, press Auto and the monitor will automatically optimize the position, focus, and clock of monitor, then turn on PC and power button on monitor's control panel. If the OSD is active, press Auto to appear.
... options. Allow about 10 seconds for use. Adjusting display settings External controls 1 Auto If the OSD is inactive, press Auto and the monitor will automatically optimize the position, focus, and clock of monitor, then turn on PC and power button on monitor's control panel. If the OSD is active, press Auto to appear.

AL1923 User's Guide
Page 11
... none of "active off electrical devices that the Power Cord is connected. See color adjustment (p. 8) to service or open the monitor or computer yourself. Inspect the monitor's video cable and ensure that the power cord is connected. Caution: Do not attempt to adjust RGB color. Move the mouse or... of the pins are bent. Move or switch off " mode. Press select/auto key and the monitor will automatically optimize the position of the monitor and the computer. See horizontal and vertical position adjustment (p. 7). Check to see if the power switch is in the ON position. ...
... none of "active off electrical devices that the Power Cord is connected. See color adjustment (p. 8) to service or open the monitor or computer yourself. Inspect the monitor's video cable and ensure that the power cord is connected. Caution: Do not attempt to adjust RGB color. Move the mouse or... of the pins are bent. Move or switch off " mode. Press select/auto key and the monitor will automatically optimize the position of the monitor and the computer. See horizontal and vertical position adjustment (p. 7). Check to see if the power switch is in the ON position. ...


