

AL1714 Service Guide
Page 7
... Chapter 1 Monitor Features 8 1.1 Test conditions 8 1.2 Features 8 1.3 LCD Panel specification 9 1.4 Connector Pin Assignment 12 Chapter 2 OPERATING INSTRUCTIONS 14 2.1 Function Name 14 2.2 OSD Menu Description 16 2.3 OSD Operation 17 2.4 OSD Function Definition 18 2.5 Plug and Play 19 2.6 Power Saver 19 Chapter 3 Machine Disassembly and Assembly 20 3.1 Machine Disassembly 20 3.2 Machine Assembly 23 . Chapter 4 Troubleshooting 26 4.1 Abnormal display Troubleshooting 26 4.2 Abnormal (On/Off, LCD Display, K/B) Troubleshooting........28 4.3 Abnormal (BIOS, OSD, Other Display...
... Chapter 1 Monitor Features 8 1.1 Test conditions 8 1.2 Features 8 1.3 LCD Panel specification 9 1.4 Connector Pin Assignment 12 Chapter 2 OPERATING INSTRUCTIONS 14 2.1 Function Name 14 2.2 OSD Menu Description 16 2.3 OSD Operation 17 2.4 OSD Function Definition 18 2.5 Plug and Play 19 2.6 Power Saver 19 Chapter 3 Machine Disassembly and Assembly 20 3.1 Machine Disassembly 20 3.2 Machine Assembly 23 . Chapter 4 Troubleshooting 26 4.1 Abnormal display Troubleshooting 26 4.2 Abnormal (On/Off, LCD Display, K/B) Troubleshooting........28 4.3 Abnormal (BIOS, OSD, Other Display...
AL1714 Service Guide
Page 8
... OSD setting 1280 x 1024 @60HZ With OSD setting Topcon luminance colorimeter BM-5A or equivalent Before measuring, "Auto Config" & "Auto Balance" must be done in advance 1.2 Features 17" SXGA TFT LCD Panel TN Mode Liquid Crystal D-SUB Audio Function (Optional) Support to 75Hz Refresh Rate Support VESA-DCC 2B plug & play function Support VESA-DPMS Power Management Function Super Wide Viewing Angle High Brightness & Contrast Ratio High Brightness & Contrast Angular Dependent Fast LC Response Time Light Weight 1.3 LCD panel Specification...
... OSD setting 1280 x 1024 @60HZ With OSD setting Topcon luminance colorimeter BM-5A or equivalent Before measuring, "Auto Config" & "Auto Balance" must be done in advance 1.2 Features 17" SXGA TFT LCD Panel TN Mode Liquid Crystal D-SUB Audio Function (Optional) Support to 75Hz Refresh Rate Support VESA-DCC 2B plug & play function Support VESA-DPMS Power Management Function Super Wide Viewing Angle High Brightness & Contrast Ratio High Brightness & Contrast Angular Dependent Fast LC Response Time Light Weight 1.3 LCD panel Specification...

AL1714 Service Guide
Page 14
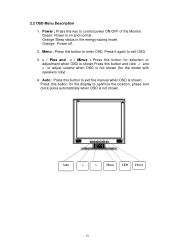
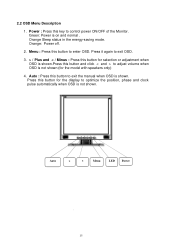
OPERATING INSTRUCTIONS Chapter 2 2.1 Function Names 2.1.1 Front No. Name Descriptions 1 Power Switch Power On/Off 2 LED Indicator Green Normal operation Orange Power management 3 MENU OSD control MENU button 4 > Right selection/ Volume button (AL1714m/AL1714bm) 5 < Left selection/ Volume button (AL1714m/AL1714bm) 6 AUTO Adjust Clock, Phase, H Position and V Position automatically 7 Speaker 2.5W x 2 14
OPERATING INSTRUCTIONS Chapter 2 2.1 Function Names 2.1.1 Front No. Name Descriptions 1 Power Switch Power On/Off 2 LED Indicator Green Normal operation Orange Power management 3 MENU OSD control MENU button 4 > Right selection/ Volume button (AL1714m/AL1714bm) 5 < Left selection/ Volume button (AL1714m/AL1714bm) 6 AUTO Adjust Clock, Phase, H Position and V Position automatically 7 Speaker 2.5W x 2 14
AL1714 Service Guide
Page 16
... or adjustment when OSD is shown.Press this button to enter OSD. Auto < > Menu LED Power ` 16 Menu : Press this button and click < and > to exit the manual when OSD is not shown (for the display to control power ON/OFF of the Monitor. Press this button to adjust volume when OSD is shown. Orange: Power off. 2. Green: Power is not shown. Auto : Press this button for the model with speakers only) 4. Power : Press this key to optimize the position...
... or adjustment when OSD is shown.Press this button to enter OSD. Auto < > Menu LED Power ` 16 Menu : Press this button and click < and > to exit the manual when OSD is not shown (for the display to control power ON/OFF of the Monitor. Press this button to adjust volume when OSD is shown. Orange: Power off. 2. Green: Power is not shown. Auto : Press this button for the model with speakers only) 4. Power : Press this key to optimize the position...

AL1714 Service Guide
Page 17
Click < or > to select the function to be adjusted. Bright/Contract Adjustment Phase/Clock pulse Adjustment Horizontal/Vertical Adjustment Color Temp. 2.3 OSD Operation Click MENU to display the OSD window as shown in the following figure. Click the MENU to select the function to change current settings. Click < or > to be adjusted as shown in the following figure. To exit OSD, select " " to close the OSD window and save changes. . Adjustment Language Selection OSD Setting Auto Adjustment Message Restore Exit 17
Click < or > to select the function to be adjusted. Bright/Contract Adjustment Phase/Clock pulse Adjustment Horizontal/Vertical Adjustment Color Temp. 2.3 OSD Operation Click MENU to display the OSD window as shown in the following figure. Click the MENU to select the function to change current settings. Click < or > to be adjusted as shown in the following figure. To exit OSD, select " " to close the OSD window and save changes. . Adjustment Language Selection OSD Setting Auto Adjustment Message Restore Exit 17

AL1714 Service Guide
Page 18
...be cold white color User Definition/Red User Definition/Green Adjust red/green/blue gain User Definition/Blue N/A English Select the language you want N/A N/A Deutsch N/A Français N/A Español N/A Italiano N/A N/A Horizontal Move OSD left and right on the screen (for input adjustment only) Vertical Move the image up and down Adjust OSD time display settings Set up horizontal, vertical, sequence and focus automatically (for analog input only) N/A Message Display resolution, H/V frequency and the input port used for input adjustment only) N/A Warm Color Temp.
...be cold white color User Definition/Red User Definition/Green Adjust red/green/blue gain User Definition/Blue N/A English Select the language you want N/A N/A Deutsch N/A Français N/A Español N/A Italiano N/A N/A Horizontal Move OSD left and right on the screen (for input adjustment only) Vertical Move the image up and down Adjust OSD time display settings Set up horizontal, vertical, sequence and focus automatically (for analog input only) N/A Message Display resolution, H/V frequency and the input port used for input adjustment only) N/A Warm Color Temp.
AL1714 Service Guide
Page 19
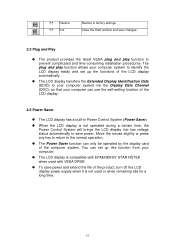
... time-consuming installation procedures. You can set up this function from your computer can only be operated by the display card of the computer system. The LCD display is not used with VESA DPMS To save power. Move the mouse slightly or press any key to return to the normal operation. N/A Restore N/A Exit Restore to factory settings Close the OSD window and save changes. 2.5 Plug and Play...
... time-consuming installation procedures. You can set up this function from your computer can only be operated by the display card of the computer system. The LCD display is not used with VESA DPMS To save power. Move the mouse slightly or press any key to return to the normal operation. N/A Restore N/A Exit Restore to factory settings Close the OSD window and save changes. 2.5 Plug and Play...

AL1714 Service Guide - 8ms
Page 7
... Chapter 1 Monitor Features 8 1.1 Test conditions 8 1.2 Features 8 1.3 LCD Panel specification 9 1.4 Connector Pin Assignment 12 Chapter 2 OPERATING INSTRUCTIONS 14 2.1 Function Name 14 2.2 OSD Menu Description 16 2.3 OSD Operation 17 2.4 OSD Function Definition 18 2.5 Plug and Play 19 2.6 Power Saver 19 Chapter 3 Machine Disassembly and Assembly 20 3.1 Machine Disassembly 20 3.2 Machine Assembly 23 . Chapter 4 Troubleshooting 26 4.1 Abnormal display Troubleshooting 26 4.2 Abnormal (On/Off, LCD Display, K/B) Troubleshooting........28 4.3 Abnormal (BIOS, OSD, Other Display...
... Chapter 1 Monitor Features 8 1.1 Test conditions 8 1.2 Features 8 1.3 LCD Panel specification 9 1.4 Connector Pin Assignment 12 Chapter 2 OPERATING INSTRUCTIONS 14 2.1 Function Name 14 2.2 OSD Menu Description 16 2.3 OSD Operation 17 2.4 OSD Function Definition 18 2.5 Plug and Play 19 2.6 Power Saver 19 Chapter 3 Machine Disassembly and Assembly 20 3.1 Machine Disassembly 20 3.2 Machine Assembly 23 . Chapter 4 Troubleshooting 26 4.1 Abnormal display Troubleshooting 26 4.2 Abnormal (On/Off, LCD Display, K/B) Troubleshooting........28 4.3 Abnormal (BIOS, OSD, Other Display...
AL1714 Service Guide - 8ms
Page 8
... OSD setting 1280 x 1024 @60HZ With OSD setting Topcon luminance colorimeter BM-5A or equivalent Before measuring, "Auto Config" & "Auto Balance" must be done in advance 1.2 Features 17" SXGA TFT LCD Panel TN Mode Liquid Crystal D-SUB Audio Function (Optional) Support to 75Hz Refresh Rate Support VESA-DCC 2B plug & play function Support VESA-DPMS Power Management Function Super Wide Viewing Angle High Brightness & Contrast Ratio High Brightness & Contrast Angular Dependent Fast LC Response Time Light Weight 1.3 LCD panel Specification...
... OSD setting 1280 x 1024 @60HZ With OSD setting Topcon luminance colorimeter BM-5A or equivalent Before measuring, "Auto Config" & "Auto Balance" must be done in advance 1.2 Features 17" SXGA TFT LCD Panel TN Mode Liquid Crystal D-SUB Audio Function (Optional) Support to 75Hz Refresh Rate Support VESA-DCC 2B plug & play function Support VESA-DPMS Power Management Function Super Wide Viewing Angle High Brightness & Contrast Ratio High Brightness & Contrast Angular Dependent Fast LC Response Time Light Weight 1.3 LCD panel Specification...
AL1714 Service Guide - 8ms
Page 15
... this button for the model with speakers only) 4. Orange Sleep status in the energy-saving mode. Auto < > Menu LED Power ` 15 Press it again to exit OSD. 3. > / Plus and < / Minus : Press this button for selection or adjustment when OSD is shown.Press this button to control power ON/OFF of the Monitor. Auto : Press this button and click < and > to adjust volume when OSD is shown. Green: Power is not shown. Power : Press this button to optimize the position...
... this button for the model with speakers only) 4. Orange Sleep status in the energy-saving mode. Auto < > Menu LED Power ` 15 Press it again to exit OSD. 3. > / Plus and < / Minus : Press this button for selection or adjustment when OSD is shown.Press this button to control power ON/OFF of the Monitor. Auto : Press this button and click < and > to adjust volume when OSD is shown. Green: Power is not shown. Power : Press this button to optimize the position...

AL1714 Service Guide - 8ms
Page 16
Adjustment Language Selection OSD Setting Auto Adjustment Message Restore Exit 16 Click the MENU to select the function to close the OSD window and save changes. . Bright/Contract Adjustment Phase/Clock pulse Adjustment Horizontal/Vertical Adjustment Color Temp. To exit OSD, select " " to be adjusted as shown in the following figure. Click < or > to select the function to be adjusted. Click < or > to change current settings. 2.3 OSD Operation Click MENU to display the OSD window as shown in the following figure.
Adjustment Language Selection OSD Setting Auto Adjustment Message Restore Exit 16 Click the MENU to select the function to close the OSD window and save changes. . Bright/Contract Adjustment Phase/Clock pulse Adjustment Horizontal/Vertical Adjustment Color Temp. To exit OSD, select " " to be adjusted as shown in the following figure. Click < or > to select the function to be adjusted. Click < or > to change current settings. 2.3 OSD Operation Click MENU to display the OSD window as shown in the following figure.

AL1714 Service Guide - 8ms
Page 17
...cold white color User Definition/Red User Definition/Green Adjust red/green/blue gain User Definition/Blue N/A English Select the language you want N/A N/A Deutsch N/A Français N/A Español N/A Italiano N/A N/A Horizontal Move OSD left and right on the screen (for input adjustment only) Vertical Move the image up and down Adjust OSD time display settings Set up horizontal, vertical, sequence and focus automatically (for analog input only) N/A Message Display resolution, H/V frequency and the input port used for input adjustment only) N/A Warm Color Temp. Set...
...cold white color User Definition/Red User Definition/Green Adjust red/green/blue gain User Definition/Blue N/A English Select the language you want N/A N/A Deutsch N/A Français N/A Español N/A Italiano N/A N/A Horizontal Move OSD left and right on the screen (for input adjustment only) Vertical Move the image up and down Adjust OSD time display settings Set up horizontal, vertical, sequence and focus automatically (for analog input only) N/A Message Display resolution, H/V frequency and the input port used for input adjustment only) N/A Warm Color Temp. Set...
AL1714 User Guide
Page 2
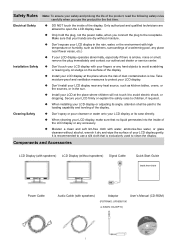
... speakers) Signal Cable Quick Start Guide Quick Start Guide Power Cable Audio Cable (with your fingers or any hard objects to avoid scratching or leaving any accessory. Don't install your hands are allowed to open the LCD display case. Safety Rules Note: To ensure your safety and prolong the life of the product, read the following safety rules carefully when you connect the plug to the receptacle. When cleaning your LCD...
... speakers) Signal Cable Quick Start Guide Quick Start Guide Power Cable Audio Cable (with your fingers or any hard objects to avoid scratching or leaving any accessory. Don't install your hands are allowed to open the LCD display case. Safety Rules Note: To ensure your safety and prolong the life of the product, read the following safety rules carefully when you connect the plug to the receptacle. When cleaning your LCD...

AL1714 User Guide
Page 3
... backlight. Signal Cable Audio Cable Transformer DC end 2 Connect and fasten both ends of the signal cable to the audio input on the back of your LCD display. Turn on the power supplies of your LCD display out of the carton and assemble the display and seat along the rail. Take your PC and LCD display. You will hear a click sound when the display and seat are engaged correctly. Keep the display away from the sound card...
... backlight. Signal Cable Audio Cable Transformer DC end 2 Connect and fasten both ends of the signal cable to the audio input on the back of your LCD display. Turn on the power supplies of your LCD display out of the carton and assemble the display and seat along the rail. Take your PC and LCD display. You will hear a click sound when the display and seat are engaged correctly. Keep the display away from the sound card...

AL1714 User Guide
Page 4
... Orange indication: Sleep status in the energy-saving mode Colorless indication: Power off Press this button to exit the manual when OSD is not shown. 3 Press this button and click < and > to exit OSD. Adjustment of Display Key Definition Power Source 1 2. Press it again to adjust volume when OSD is not shown (for the display to enter OSD. Press this button for the model with speakers) Power On/Off Green indication: Power is shown.
... Orange indication: Sleep status in the energy-saving mode Colorless indication: Power off Press this button to exit the manual when OSD is not shown. 3 Press this button and click < and > to exit OSD. Adjustment of Display Key Definition Power Source 1 2. Press it again to adjust volume when OSD is not shown (for the display to enter OSD. Press this button for the model with speakers) Power On/Off Green indication: Power is shown.

AL1714 User Guide
Page 5
... Your LCD display has been adjusted to be adjusted as shown in the following illustrations and steps. Click < or > to select the function to display the OSD window as shown in accordance with the following figure. 2. Adjustment Language Selection OSD Setting Auto Adjustment Message Restore Exit 4 Click the MENU to select the function to its optimal status before shipment. (See Page 8). Bright/Contract Adjustment Phase/Clock pulse Adjustment Horizontal/Vertical Adjustment Color...
... Your LCD display has been adjusted to be adjusted as shown in the following illustrations and steps. Click < or > to select the function to display the OSD window as shown in accordance with the following figure. 2. Adjustment Language Selection OSD Setting Auto Adjustment Message Restore Exit 4 Click the MENU to select the function to its optimal status before shipment. (See Page 8). Bright/Contract Adjustment Phase/Clock pulse Adjustment Horizontal/Vertical Adjustment Color...

AL1714 User Guide
Page 6
...cold white color User Definition/Red User Definition/Green Adjust red/green/blue gain User Definition/Blue N/A English Select the language you want N/A N/A Deutsch N/A Français N/A Español N/A Italiano N/A N/A 日本語 Horizontal Move OSD left and right on the screen (for input adjustment only) Vertical Move the image up and down Adjust OSD time display settings Set up horizontal, vertical, sequence and focus automatically (for analog input only) N/A Message N/A Restore N/A Exit Display resolution, H/V frequency and the input port used for...
...cold white color User Definition/Red User Definition/Green Adjust red/green/blue gain User Definition/Blue N/A English Select the language you want N/A N/A Deutsch N/A Français N/A Español N/A Italiano N/A N/A 日本語 Horizontal Move OSD left and right on the screen (for input adjustment only) Vertical Move the image up and down Adjust OSD time display settings Set up horizontal, vertical, sequence and focus automatically (for analog input only) N/A Message N/A Restore N/A Exit Display resolution, H/V frequency and the input port used for...
AL1714 User Guide
Page 7
... and time-consuming installation procedures. Attachment Plug and Play Power Saver Troubleshooting Power LED does not light Icon off the display automatically during a certain time, the Power Control System will brings the LCD display into low voltage status automatically to save power and extend the life of the product, turn off Color Default Instability or Ripple Image Offset or wrong Size The product provides the latest VESA plug and play function...
... and time-consuming installation procedures. Attachment Plug and Play Power Saver Troubleshooting Power LED does not light Icon off the display automatically during a certain time, the Power Control System will brings the LCD display into low voltage status automatically to save power and extend the life of the product, turn off Color Default Instability or Ripple Image Offset or wrong Size The product provides the latest VESA plug and play function...

AL1714 User Guide
Page 8
... color Pixel Span LCD Panel Brightness (Back Light Source) Contrast Horizontal 0.264mm x Vertical 0.264mm 370 cd/m2 350 : 1 LC Response Time 14ms Visual Angle Horizontal 160° / Vertical 120° Effective Display Horizontal 337.9mm x Vertical 270.3mm Input Signal Signal Mode SYNC Frequency Simulated video frequency: 0.7 Vpp, 75Ω (separate SYNC and composite SYNC) Horizontal 22kHz~82kHz x Vertical 56Hz ~76 Hz Max. UL/CUL; ISO 13406-2 7 TÜV-GS; TÜV-ERGO ; B mark ; Resolution 1,280 x 1,024/ SXGA Max. BSMI ; Pixel...
... color Pixel Span LCD Panel Brightness (Back Light Source) Contrast Horizontal 0.264mm x Vertical 0.264mm 370 cd/m2 350 : 1 LC Response Time 14ms Visual Angle Horizontal 160° / Vertical 120° Effective Display Horizontal 337.9mm x Vertical 270.3mm Input Signal Signal Mode SYNC Frequency Simulated video frequency: 0.7 Vpp, 75Ω (separate SYNC and composite SYNC) Horizontal 22kHz~82kHz x Vertical 56Hz ~76 Hz Max. UL/CUL; ISO 13406-2 7 TÜV-GS; TÜV-ERGO ; B mark ; Resolution 1,280 x 1,024/ SXGA Max. BSMI ; Pixel...

AL1714 User Guide
Page 9
...adjustment mode, refer to the instructions of your PC system is the same as one of your display card. Frequency Vert. Pixel Frequency SYNC Polarity (H/V) Display Mode (kHz) Frequency (MHz) (Hz) VGA 640x480 31.469 59.940 25.175 -/- 37.861 72.809 31.500 -/- 37.500 75.000 31.500 -/- If not, the screen will not display or only the LED lights will be adjusted... 832 x 624 49.725 74.500 57.283 -/- 1024 x 768 60.150 74.720 80.000 -/- 8 Display Mode VESA VGA TEXT Macintosh If the signal of the following reference signal modes, the screen will display. Hor.
...adjustment mode, refer to the instructions of your PC system is the same as one of your display card. Frequency Vert. Pixel Frequency SYNC Polarity (H/V) Display Mode (kHz) Frequency (MHz) (Hz) VGA 640x480 31.469 59.940 25.175 -/- 37.861 72.809 31.500 -/- 37.500 75.000 31.500 -/- If not, the screen will not display or only the LED lights will be adjusted... 832 x 624 49.725 74.500 57.283 -/- 1024 x 768 60.150 74.720 80.000 -/- 8 Display Mode VESA VGA TEXT Macintosh If the signal of the following reference signal modes, the screen will display. Hor.


