Acer AL1711 Support and Manuals
Get Help and Manuals for this Acer Computers item
Popular Acer AL1711 Manual Pages
al1711ug.pdf - Page 1

... ON LCD MONITORS 3
BEFORE YOU OPERATE THE MONITOR 3 FEATURES 3 PACKING LIST 3 INSTALLATION INSTRUCTIONS 4 CONTROLS AND CONNECTORS 5 ADJUSTING THE VIEWING ANGLE 6
OPERATING INSTRUCTIONS 7 GENERAL INSTRUCTIONS 7 HOW TO ADJUST A SETTING 9 ADJUSTING THE PICTURE 9-10 PLUG AND PLAY 11
TECHNICAL SUPPORT(FAQ 12-13 ERROR MESSAGE & POSSIBLE SOLUTION ------- 14
APPENDIX 15 SPECIFICATIONS 15...
al1711ug.pdf - Page 2

... an ENERGY STAR® Partner our company International has determined that this manual thoroughly. These limits are present inside the monitor. Reorient or relocate the receiving antenna. 2. Increase the separation between the equipment and receiver. 3. Do not open the cabinet.
Refer servicing to rain or moisture. WARNING:
To prevent fire or shock hazard...
al1711ug.pdf - Page 4

...Windows • Recommened Resolutions: 1280 X 1024 @60Hz • EPA ENERGY STAR® • Ergonomic Design (TCO'99 Approved) • Space Saving, Compact Case Design
CHECKING THE CONTENTS OF THE PACKAGE
The product package should include the following symptoms are normal with LCD monitor and do not indicate a problem. SPECIAL NOTES ON LCD MONITORS
The following items:
1. Owner's Manual...
al1711ug.pdf - Page 6
... into a nearby outlet. Plug the other end to the back of the monitor and
connect the other
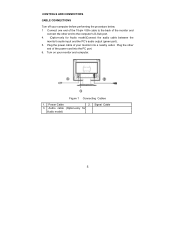
end of your monitor into the PC port. 6. CONTROLS AND CONNECTORS
CABLE CONNECTIONS
Turn off your ...computer's D-Sub port. 4. (Option-only for
Audio model)
Signal Cable
5 Turn on your monitor and computer.
3
Figure 1 Connecting Cables
1. Power Cable
2.
3. Audio cable (Option-only for ...
al1711ug.pdf - Page 8

... changing these settings, the picture can be adjusted to your personal preferences.
• The power cord should be connected. • Connect the video cable from the monitor to the video card. • Press the power button to turn on or off. MENU/ENTER 5. The power indicator
will light up. OPERATING INSTRUCTIONS
GENERAL INSTRUCTIONS
Press...
al1711ug.pdf - Page 9

... a safety precaution, always unplug the monitor before cleaning it with a mild detergent solution. Orange - Stubborn stains may be removed with a cloth lightly dampened with a soft cloth. NOTES
• Do not install the monitor in a location near heat sources such as radiators
or air ducts, or in a place subject to set the HPos, VPos, Clock...
al1711ug.pdf - Page 12
... consumption when there is no video-input signal present. The appearance is similar to an OFF mode. The DDC2B is completely off. This monitor meets the Green monitor standards as set consisting of DDC used, communicate additional information about its identity and, depending on type connector body, rated 10A, 250V, having standard CEE...
al1711ug.pdf - Page 13

...*Inspect the monitor's video cable and make
sure none of the pins are bent. *Make sure computer is ON (orange) but there's no video or no picture. TECHNICAL SUPPORT (FAQ)
Problem & Question Power... LED should be snugly
seated in its slot *Make sure monitor's video cable is
properly connected to the computer. *Inspect monitor's video cable and make sure that may cause
electrical interference....
al1711ug.pdf - Page 15

Check the signal -cable connection pins for damage. ERROR MESSAGE & POSSIBLE SOLUTION
CABLE NOT CONNECTED : 1. Check that the signal-cable is properly connected , If the connector is
loose, tighten the connector's screws. 2. INPUT NOT SUPPORT : Your computer has been set to unsuitable display mode ,set the computer to display mode given in the following table(See page 17).
14
AL1711 Service Guide - Page 1

for more Acer AL1711 Service Guide
Service guide files and updates are available on the CSD web;
AL1711 Service Guide - Page 2

... hereof and specifically disclaims any warranties of Intel Corporation. Disclaimer
The information in this guide is a registered trademark of Acer Corporation. Should the programs prove defective following their respective holders. Other brand and product names are trademarks of merchantability or fitness for any particular purpose. No part of all necessary servicing, repair, and any...
AL1711 Service Guide - Page 4

... the most up-to order FRU parts for repair and service of customer machines. In such cases, please contact your Acer office may have decided to the BASIC CONFIGURATION decided for whatever reason, a part number change is made, it supports, please read the following general information. 1. Preface
Before using this printed Service Guide. These LOCALIZED FEATURES will not...
AL1711 Service Guide - Page 8

... View 18 Rear Bezel View 19
Chapter 2 Operating Instructions
20
External Controls 20 Front Panel Control 20 OSD Menu 22 Hot-Key Menu 25 OSD Message 26 LOGO 27
Chapter 3 Machine Disassembly and Replacement
28
Chapter 4 Troubleshooting
31
Chapter 5 Connector Information
34
Chapter 6 FRU (Field Replaceable Unit) List
35
Exploded Diagram 35
Chapter 7 Schematic...
AL1711 Service Guide - Page 15

... power up. Read EEPROM content to 11 10. etc.
4. Setup MST scaler for display according input timing 11. Initialize MCU settings, including I/O, Timer, ISR and Serial Port settings.
2. etc.
3. Mode detection 9. Debug handler, only debug only If yes,
then go to 7, else go
to recover monitor settings, including brightness, contrast, color temperature and OSD position ....
AL1711 Service Guide - Page 46

... Notebook, Desktop, Server models inculding:
Service guides User's manuals Training materials Bios updates Spare parts lists TABs (Technical Announcement Bulletin) For these purposes, we offer, accompanied by a list of technical material. Acer's Website offers you convenient and valuable support resources whenever you have included an Acrobat File to facilitate the problem-free downloading of...
Acer AL1711 Reviews
We have not received any reviews for Acer yet.