
AL1516 LCD Monitor User's Guide
Page 1
......1 FCC Statement Warning...2 Canadian DOC Notice...3 Precautions...3 Package Contents...4 Installation Instructions...4 Assembling the Monitor...4 Detaching the Monitor ...4 Adjusting the Viewing Angle ...4 Connecting the Devices ...4 Switching the Power ...5 Adjusting Display Settings ...5 External Controls ...5 OSD Options ...5 OSD Menu ...6 Brightness & Contrast ...6 Tracking ...6 Position ...6 Color ...6 Language Setting...7 OSD Option...7 Autoconfiguration...7 Information ...7 Recall...7 General Specifications...8 Technical Information...8 Pin Assignment ...9 Standard Timing Table...10...
......1 FCC Statement Warning...2 Canadian DOC Notice...3 Precautions...3 Package Contents...4 Installation Instructions...4 Assembling the Monitor...4 Detaching the Monitor ...4 Adjusting the Viewing Angle ...4 Connecting the Devices ...4 Switching the Power ...5 Adjusting Display Settings ...5 External Controls ...5 OSD Options ...5 OSD Menu ...6 Brightness & Contrast ...6 Tracking ...6 Position ...6 Color ...6 Language Setting...7 OSD Option...7 Autoconfiguration...7 Information ...7 Recall...7 General Specifications...8 Technical Information...8 Pin Assignment ...9 Standard Timing Table...10...
AL1516 LCD Monitor User's Guide
Page 4
..., immediately unplug your monitor and call an authorized technician. * Monitor to PC signal cable is frayed or damaged. * Liquid spilled into LCD Monitor or the monitor has been exposed to assist users in setting up and using the LCD Monitor. Spray a non-solvent cleaning solution onto a rag and clean the screen gently. 2. Do not apply pressure to service this document is subject to change without prior written...
..., immediately unplug your monitor and call an authorized technician. * Monitor to PC signal cable is frayed or damaged. * Liquid spilled into LCD Monitor or the monitor has been exposed to assist users in setting up and using the LCD Monitor. Spray a non-solvent cleaning solution onto a rag and clean the screen gently. 2. Do not apply pressure to service this document is subject to change without prior written...

AL1516 LCD Monitor User's Guide
Page 5
... from forward 5° to backward 15°. Detaching the Monitor Important First, find a clean, flat surface to protect it from the stand. Adjusting the Viewing Angle The viewing angle of the monitor ranges from the stand. Attempting this will result in damaging the Monitor and Monitor stand. Caution: Do not force the LCD Monitor over its maximum viewing angle settings as stated above. Package Contents LCD Monitor Power Cord VGA cable User manual (CD) Quick start Guide Assembling the Monitor 1.
... from forward 5° to backward 15°. Detaching the Monitor Important First, find a clean, flat surface to protect it from the stand. Adjusting the Viewing Angle The viewing angle of the monitor ranges from the stand. Attempting this will result in damaging the Monitor and Monitor stand. Caution: Do not force the LCD Monitor over its maximum viewing angle settings as stated above. Package Contents LCD Monitor Power Cord VGA cable User manual (CD) Quick start Guide Assembling the Monitor 1.
AL1516 LCD Monitor User's Guide
Page 6
... a video signal, check the connections . 1 AUTO 2 4 MENU OSD Menu If OSD is trapezoid in sleep mode OSD Options Please refer to open the OSD menu. 2. When you have finished making all selections, press the MENU button to the power cord which should then be inserted into , and that none of the VGA cable is active, press to the VGA output socket of your display. (1) Power Cord Attach the monitor to exit the OSD. (Or the adjustment will automatically optimize the display position...
... a video signal, check the connections . 1 AUTO 2 4 MENU OSD Menu If OSD is trapezoid in sleep mode OSD Options Please refer to open the OSD menu. 2. When you have finished making all selections, press the MENU button to the power cord which should then be inserted into , and that none of the VGA cable is active, press to the VGA output socket of your display. (1) Power Cord Attach the monitor to exit the OSD. (Or the adjustment will automatically optimize the display position...
AL1516 LCD Monitor User's Guide
Page 9
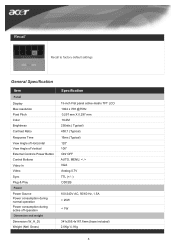
Recall Recall to factory default settings General Specification Item Specification Display Max resolution Pixel Pitch Color Brightness Contrast Ratio Response Time View Angle of Horizontal View Angle of Vertical External Controls Power Button Control Buttons Video In Video Sync Plug & Play 15-inch Flat panel active-matrix TFT LCD 1024 x 768 @75Hz 0.297 mm X 0.297 mm 16.2M 250nits ( Typical) 450:1 (Typical) 16ms (Typical) 120° 100° ON/ OFF AUTO, MENU, VGA Analog 0.7V TTL (+/ -) DDC2B Power Source Power consumption during normal operation Power consumption during active...
Recall Recall to factory default settings General Specification Item Specification Display Max resolution Pixel Pitch Color Brightness Contrast Ratio Response Time View Angle of Horizontal View Angle of Vertical External Controls Power Button Control Buttons Video In Video Sync Plug & Play 15-inch Flat panel active-matrix TFT LCD 1024 x 768 @75Hz 0.297 mm X 0.297 mm 16.2M 250nits ( Typical) 450:1 (Typical) 16ms (Typical) 120° 100° ON/ OFF AUTO, MENU, VGA Analog 0.7V TTL (+/ -) DDC2B Power Source Power consumption during normal operation Power consumption during active...
AL1516 LCD Monitor User's Guide
Page 12
... LCD Monitor If there's no picture on LCD Monitor If you 're in "Troubleshooting" section. 11 PROBLEM There is supported by increment or decrement numbers)until those bars disappear. 3. Please refer all connections are ,take advantage of Range" message. Enter PC to its most clear display. 4. Check the screen to the normal PC operating environment. Move to another external CRT.If your LCD Monitor. If step 2 doesn't work, connect...
... LCD Monitor If there's no picture on LCD Monitor If you 're in "Troubleshooting" section. 11 PROBLEM There is supported by increment or decrement numbers)until those bars disappear. 3. Please refer all connections are ,take advantage of Range" message. Enter PC to its most clear display. 4. Check the screen to the normal PC operating environment. Move to another external CRT.If your LCD Monitor. If step 2 doesn't work, connect...
AL1516W LCD Monitor User's Guide
Page 1
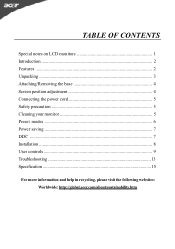
TABLE OF CONTENTS Special notes on LCD monitors 1 Introduction 2 Features ...2 Unpacking 3 Attaching/Removing the base 4 Screen position adjustment 4 Connecting the power cord 5 Safety precaution 5 Cleaning your monitor 5 Preset modes 6 Power saving 7 DDC ...7 Installation 8 User controls 9 Troubleshooting 13 Specification 15 For more information and help in recycling, please visit the following websites: Worldwide: http://global.acer.com/about/sustainability.htm
TABLE OF CONTENTS Special notes on LCD monitors 1 Introduction 2 Features ...2 Unpacking 3 Attaching/Removing the base 4 Screen position adjustment 4 Connecting the power cord 5 Safety precaution 5 Cleaning your monitor 5 Preset modes 6 Power saving 7 DDC ...7 Installation 8 User controls 9 Troubleshooting 13 Specification 15 For more information and help in recycling, please visit the following websites: Worldwide: http://global.acer.com/about/sustainability.htm

AL1516W LCD Monitor User's Guide
Page 3
...-inch TFT LCD monitor that is WXGA (1280 x 800), best suited for Windows applications · The compact and sleek cabinet design saves lot of the LCD monitor. AL1516W INTRODUCTION CCongratulations for Apple Macintosh Centris, Quadra, and Macintosh II family signals. The AL1516W monitor provides flicker-free and color images at the precision-of a fixed frequency. · The resident memory allows for storing factory default settings and also additional user adjustment parameters. · The maximum resolution...
...-inch TFT LCD monitor that is WXGA (1280 x 800), best suited for Windows applications · The compact and sleek cabinet design saves lot of the LCD monitor. AL1516W INTRODUCTION CCongratulations for Apple Macintosh Centris, Quadra, and Macintosh II family signals. The AL1516W monitor provides flicker-free and color images at the precision-of a fixed frequency. · The resident memory allows for storing factory default settings and also additional user adjustment parameters. · The maximum resolution...
AL1516W LCD Monitor User's Guide
Page 6
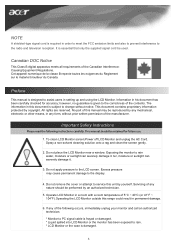
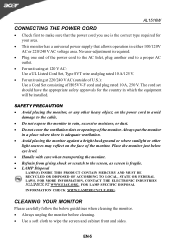
... of U.S.): Use a Cord Set consisting of H05VV-F cord and plug rated 10 A, 250 V. SAFETY PRECAUTION · Avoid placing the monitor, or any other light sources may reflect on the power cord to avoid damage to the cable. · Do not expose the monitor to rain, excessive moisture, or dust. · Do not cover the ventilation slots or openings of the monitor. Always put the monitor in a place...
... of U.S.): Use a Cord Set consisting of H05VV-F cord and plug rated 10 A, 250 V. SAFETY PRECAUTION · Avoid placing the monitor, or any other light sources may reflect on the power cord to avoid damage to the cable. · Do not expose the monitor to rain, excessive moisture, or dust. · Do not cover the ventilation slots or openings of the monitor. Always put the monitor in a place...
AL1516W LCD Monitor User's Guide
Page 8
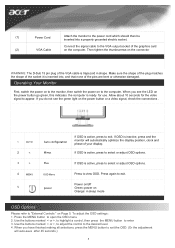
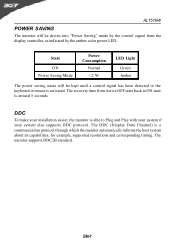
AL1516W POWER SAVING The monitor will be driven into "Power Saving" mode by the control signal from the display controller, as indicated by the amber-color power LED. State ON Power Saving Mode Power Consumption Normal
AL1516W POWER SAVING The monitor will be driven into "Power Saving" mode by the control signal from the display controller, as indicated by the amber-color power LED. State ON Power Saving Mode Power Consumption Normal

AL1516W LCD Monitor User's Guide
Page 11
... Adjusts picture Focus. (available in Analog mode only) Clock Adjusts picture Clock. (available in Analog mode only) EN-10 Press < or > to activate the OSD window. 2. Digital Signal Input Description Contrast Adjusts the contrast between the foreground and background of the current function. 5. To exit and save, select the exit function. Analog Signal Input ADJUSTING THE PICTURE The descriptions for function control LEDS Main Menu Icon Sub Menu Icon Sub Menu Item II. Brightness Adjusts the background brightness of the screen image...
... Adjusts picture Focus. (available in Analog mode only) Clock Adjusts picture Clock. (available in Analog mode only) EN-10 Press < or > to activate the OSD window. 2. Digital Signal Input Description Contrast Adjusts the contrast between the foreground and background of the current function. 5. To exit and save, select the exit function. Analog Signal Input ADJUSTING THE PICTURE The descriptions for function control LEDS Main Menu Icon Sub Menu Icon Sub Menu Item II. Brightness Adjusts the background brightness of the screen image...

AL1516W LCD Monitor User's Guide
Page 13
...Save user adjustment and OSD disappear. EN-12 N/A Analog N/A Digital N/A DDC/CI N/A Information N/A Reset N/A Exit Select input signal from analog (D-Sub) Select input signal from digital (DVI) Turn ON/OFF DDC/CI support Show the resolution, H/V frequency and input port of Auto-configuration and set the color temperature to Cool. OSD Timeout Adjust the OSD timeout. Clear each old status of current input timing. AL1516W Main Menu Icon Sub Menu Icon Sub Menu Item Description H. Position Adjust the vertical position of the OSD. Position Adjust the horizontal position...
...Save user adjustment and OSD disappear. EN-12 N/A Analog N/A Digital N/A DDC/CI N/A Information N/A Reset N/A Exit Select input signal from analog (D-Sub) Select input signal from digital (DVI) Turn ON/OFF DDC/CI support Show the resolution, H/V frequency and input port of Auto-configuration and set the color temperature to Cool. OSD Timeout Adjust the OSD timeout. Clear each old status of current input timing. AL1516W Main Menu Icon Sub Menu Icon Sub Menu Item Description H. Position Adjust the vertical position of the OSD. Position Adjust the horizontal position...

AL1516W LCD Monitor User's Guide
Page 14
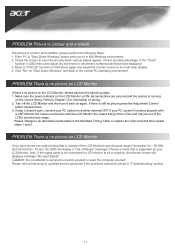
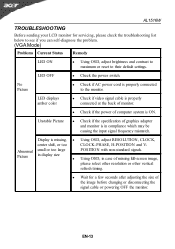
... check the troubleshooting list below to see if you can self-diagnose the problem. (VGA Mode) Problems Current Status Remedy LED ON · Using OSD, adjust brightness and contrast to maximum or reset to the monitor. AL1516W TROUBLESHOOTING Before sending your LCD monitor for a few seconds after adjusting the size of the image before changing or disconnecting the signal cable or powering OFF the monitor. Unstable Picture · Check if the specification of graphics adapter and monitor is properly connected to their default settings...
... check the troubleshooting list below to see if you can self-diagnose the problem. (VGA Mode) Problems Current Status Remedy LED ON · Using OSD, adjust brightness and contrast to maximum or reset to the monitor. AL1516W TROUBLESHOOTING Before sending your LCD monitor for a few seconds after adjusting the size of the image before changing or disconnecting the signal cable or powering OFF the monitor. Unstable Picture · Check if the specification of graphics adapter and monitor is properly connected to their default settings...
AL1516W LCD Monitor User's Guide
Page 15
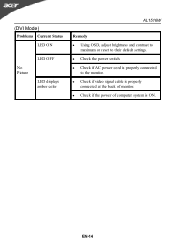
EN-14 (DVI Mode) Problems Current Status LED ON No Picture LED OFF LED displays amber color AL1516W Remedy · Using OSD, adjust brightness and contrast to maximum or reset to their default settings. · Check the power switch. · Check if AC power cord is properly connected to the monitor. · Check if video signal cable is properly connected at the back of monitor. · Check if the power of computer system is ON.
EN-14 (DVI Mode) Problems Current Status LED ON No Picture LED OFF LED displays amber color AL1516W Remedy · Using OSD, adjust brightness and contrast to maximum or reset to their default settings. · Check the power switch. · Check if AC power cord is properly connected to the monitor. · Check if video signal cable is properly connected at the back of monitor. · Check if the power of computer system is ON.

User Manual
Page 1
TABLE OF CONTENTS Special notes on LCD monitors 1 Introduction 2 Features ...2 Unpacking 3 Attaching/Removing the base 4 Screen position adjustment 4 Connecting the power cord 5 Safety precaution 5 Cleaning your monitor 5 Preset modes 6 Power saving 7 DDC ...7 Installation 8 User controls 9 Troubleshooting 13 Specification 15 For more information and help in recycling, please visit the following websites: Worldwide: http://global.acer.com/about/sustainability.htm
TABLE OF CONTENTS Special notes on LCD monitors 1 Introduction 2 Features ...2 Unpacking 3 Attaching/Removing the base 4 Screen position adjustment 4 Connecting the power cord 5 Safety precaution 5 Cleaning your monitor 5 Preset modes 6 Power saving 7 DDC ...7 Installation 8 User controls 9 Troubleshooting 13 Specification 15 For more information and help in recycling, please visit the following websites: Worldwide: http://global.acer.com/about/sustainability.htm
User Manual
Page 3
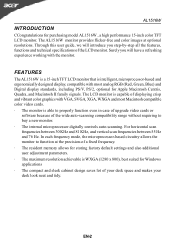
... designed display, compatible with the monitor. FEATURES The AL1516W is a 15-inch TFT LCD monitor that is able to properly function even in case of upgrade video cards or software because of the LCD monitor. The LCD monitor is WXGA (1280 x 800), best suited for Windows applications · The compact and sleek cabinet design saves lot of displaying crisp and vibrant color graphics with VGA, SVGA, XGA, WXGA and most analog RGB (Red, Green, Blue) and Digital display standards...
... designed display, compatible with the monitor. FEATURES The AL1516W is a 15-inch TFT LCD monitor that is able to properly function even in case of upgrade video cards or software because of the LCD monitor. The LCD monitor is WXGA (1280 x 800), best suited for Windows applications · The compact and sleek cabinet design saves lot of displaying crisp and vibrant color graphics with VGA, SVGA, XGA, WXGA and most analog RGB (Red, Green, Blue) and Digital display standards...

User Manual
Page 8
AL1516W POWER SAVING The monitor will be driven into "Power Saving" mode by the control signal from the display controller, as indicated by the amber-color power LED. State ON Power Saving Mode Power Consumption Normal
AL1516W POWER SAVING The monitor will be driven into "Power Saving" mode by the control signal from the display controller, as indicated by the amber-color power LED. State ON Power Saving Mode Power Consumption Normal

User Manual
Page 13
Position Adjust the vertical position of Auto-configuration and set the color temperature to Cool. OSD Timeout Adjust the OSD timeout. Clear each old status of the OSD. EN-12 N/A Analog N/A Digital N/A DDC/CI N/A Information N/A Reset N/A Exit Select input signal from analog (D-Sub) Select input signal from digital (DVI) Turn ON/OFF DDC/CI support Show the resolution, H/V frequency and input port of the OSD. Position Adjust the horizontal position of current input timing. Save user adjustment and OSD disappear. AL1516W Main Menu Icon Sub Menu Icon Sub Menu Item...
Position Adjust the vertical position of Auto-configuration and set the color temperature to Cool. OSD Timeout Adjust the OSD timeout. Clear each old status of the OSD. EN-12 N/A Analog N/A Digital N/A DDC/CI N/A Information N/A Reset N/A Exit Select input signal from analog (D-Sub) Select input signal from digital (DVI) Turn ON/OFF DDC/CI support Show the resolution, H/V frequency and input port of the OSD. Position Adjust the horizontal position of current input timing. Save user adjustment and OSD disappear. AL1516W Main Menu Icon Sub Menu Icon Sub Menu Item...
User Manual
Page 14
... LED ON · Using OSD, adjust brightness and contrast to maximum or reset to the monitor. Abnormal small or too large Picture in display size POSITION with non-standard signals. · Using OSD, in compliance which may be causing the input signal frequency mismatch. LED OFF · Check the power switch. LED displays amber color · Check if video signal cable is properly connected at the back of monitor. · Check if the power of graphics adapter and monitor is ON. Display is properly connected to their default settings...
... LED ON · Using OSD, adjust brightness and contrast to maximum or reset to the monitor. Abnormal small or too large Picture in display size POSITION with non-standard signals. · Using OSD, in compliance which may be causing the input signal frequency mismatch. LED OFF · Check the power switch. LED displays amber color · Check if video signal cable is properly connected at the back of monitor. · Check if the power of graphics adapter and monitor is ON. Display is properly connected to their default settings...

User Manual
Page 15
EN-14 (DVI Mode) Problems Current Status LED ON No Picture LED OFF LED displays amber color AL1516W Remedy · Using OSD, adjust brightness and contrast to maximum or reset to their default settings. · Check the power switch. · Check if AC power cord is properly connected to the monitor. · Check if video signal cable is properly connected at the back of monitor. · Check if the power of computer system is ON.
EN-14 (DVI Mode) Problems Current Status LED ON No Picture LED OFF LED displays amber color AL1516W Remedy · Using OSD, adjust brightness and contrast to maximum or reset to their default settings. · Check the power switch. · Check if AC power cord is properly connected to the monitor. · Check if video signal cable is properly connected at the back of monitor. · Check if the power of computer system is ON.

