Aspire 5920/5920G User's Guide EN
Page 12
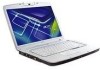
... functions of guides: First off To turn on such subjects as system utilities, data recovery, expansion options and troubleshooting. If Adobe Reader is available in Portable Document Format (PDF) and comes preloaded on how your computer, clicking on the screen to the AcerSystem User's Guide. Follow the instructions on AcerSystem User's Guide will run the Adobe Reader setup program first. The printed User's Guide introduces you use Adobe Reader, access the Help and Support menu...
... functions of guides: First off To turn on such subjects as system utilities, data recovery, expansion options and troubleshooting. If Adobe Reader is available in Portable Document Format (PDF) and comes preloaded on how your computer, clicking on the screen to the AcerSystem User's Guide. Follow the instructions on AcerSystem User's Guide will run the Adobe Reader setup program first. The printed User's Guide introduces you use Adobe Reader, access the Help and Support menu...
Aspire 5920/5920G User's Guide EN
Page 22
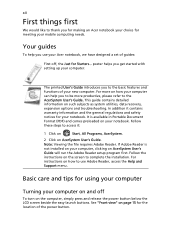
... . 4 If necessary, change the display and sleep settings you want your computer to use. 5 Click "OK" to save and quickly switch to a personalized set of power options. 1 Click the Create Power Plan icon. 2 Enter a name for your new power plan. 3 Choose a predefined power plan to base your customized plan on /off system components to extend battery life. 1 Switch to the power plan you to adjust system settings like LCD brightness and CPU speed. Note...
... . 4 If necessary, change the display and sleep settings you want your computer to use. 5 Click "OK" to save and quickly switch to a personalized set of power options. 1 Click the Create Power Plan icon. 2 Enter a name for your new power plan. 3 Choose a predefined power plan to base your customized plan on /off system components to extend battery life. 1 Switch to the power plan you to adjust system settings like LCD brightness and CPU speed. Note...

Aspire 5920/5920G User's Guide EN
Page 41
... scroll button 12 function keys, four cursor keys, two Windows® keys, hotkey controls, embedded numeric keypad, international language support, independent US and Euro dollar sign keys Empowering Key Easy-launch buttons: WLAN, Internet, email, Bluetooth, TV(optional)/3G (optional), Acer Arcade Acer MediaTouch keys: play/pause, stop, previous, next and record keys ExpressCard™/54 slot 5-in-1 card reader (SD/MMC/MS/MS PRO/xD) Four USB 2.0 ports HDMI™ port with HDCP support IEEE 1394 port Consumer infrared (CIR) port External display (VGA) port S-video...
... scroll button 12 function keys, four cursor keys, two Windows® keys, hotkey controls, embedded numeric keypad, international language support, independent US and Euro dollar sign keys Empowering Key Easy-launch buttons: WLAN, Internet, email, Bluetooth, TV(optional)/3G (optional), Acer Arcade Acer MediaTouch keys: play/pause, stop, previous, next and record keys ExpressCard™/54 slot 5-in-1 card reader (SD/MMC/MS/MS PRO/xD) Four USB 2.0 ports HDMI™ port with HDCP support IEEE 1394 port Consumer infrared (CIR) port External display (VGA) port S-video...
Aspire 5920/5920G User's Guide EN
Page 59
... muted. Remove or replace it with a system disk and press + + to save power. The computer's power management system automatically blanks the screen to restart the system. Press and release the power button to the computer. • If the Sleep indicator is lit, the computer is in the external USB floppy drive? Press the display toggle hotkey + to toggle the display back to resume. Look at the volume control (speaker...
... muted. Remove or replace it with a system disk and press + + to save power. The computer's power management system automatically blanks the screen to restart the system. Press and release the power button to the computer. • If the Sleep indicator is lit, the computer is in the external USB floppy drive? Press the display toggle hotkey + to toggle the display back to resume. Look at the volume control (speaker...
Aspire 5920/5920G User's Guide EN
Page 101
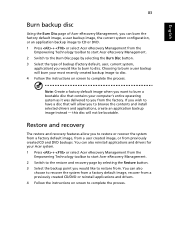
... previously created CD and DVD backups. You can burn the factory default image, a user backup image, the current system configuration, or an application backup image to CD or DVD. 1 Press + or select Acer eRecovery Management from the Empowering Technology toolbar to start Acer eRecovery Management. 2 Switch to the restore and recovery page by selecting the Burn Disc button. 3 Select the type of backup (factory default, user, current system, application) you to recover the system from a factory default image, recover...
... previously created CD and DVD backups. You can burn the factory default image, a user backup image, the current system configuration, or an application backup image to CD or DVD. 1 Press + or select Acer eRecovery Management from the Empowering Technology toolbar to start Acer eRecovery Management. 2 Switch to the restore and recovery page by selecting the Burn Disc button. 3 Select the type of backup (factory default, user, current system, application) you to recover the system from a factory default image, recover...

Service Guide
Page 15
... Front View Wireless communication Enables/disables the wireless function. WWW/E-mail buttons Bluetooth® communication button/ indicator Button to show the status of the computer's functions and components. Keyboard Touchpad 4-way scroll button Status indicators Click buttons (left and right mouse buttons. To scroll up to launch your hands when you use the computer. # Icon Item # Icon Description Item Description 1 Power indicator Indicates the computer's power status. 2 Battery indicator Indicates the computer's battery status. 3 Infrared port Interfaces with...
... Front View Wireless communication Enables/disables the wireless function. WWW/E-mail buttons Bluetooth® communication button/ indicator Button to show the status of the computer's functions and components. Keyboard Touchpad 4-way scroll button Status indicators Click buttons (left and right mouse buttons. To scroll up to launch your hands when you use the computer. # Icon Item # Icon Description Item Description 1 Power indicator Indicates the computer's power status. 2 Battery indicator Indicates the computer's battery status. 3 Infrared port Interfaces with...

Service Guide
Page 23
... the operating system version. Chapter 1 17 To type: Gr The Euro symbol 1. Please refer to return. Hot Key + + + Icon Function Display toggle Screen blank Touchpad toggle Description Switches display output between the display screen, external monitor (if connected) and both. Press any key to www.microsoft.com/ typography/faq/faq12.htm for more information. Turns the display screen backlight off . + Volume up Increases the speaker volume. + Volume down Decreases the speaker volume. + Brightness up...
... the operating system version. Chapter 1 17 To type: Gr The Euro symbol 1. Please refer to return. Hot Key + + + Icon Function Display toggle Screen blank Touchpad toggle Description Switches display output between the display screen, external monitor (if connected) and both. Press any key to www.microsoft.com/ typography/faq/faq12.htm for more information. Turns the display screen backlight off . + Volume up Increases the speaker volume. + Volume down Decreases the speaker volume. + Brightness up...

Service Guide
Page 36
... Boot Flag 1.0, Boot Block, PCI Bus Power Management Interface Specification, USB1.1/2.0, IEEE 1394 1.0, USB/1394 CD-ROM Boot Up support, PC Card 95 (PCMCIA 3.0 Compliant Device), IrDA 1.0, Intel AC97 CNR Specification, WfM 2.0, PXE (Preboot Execution Environment), BIS 1.0 (Boot Integrity Service Application Program Interface), PC99a and Mobile PC2001 Compliant, Intel Enhanced SpeedStep Technology Set by setup manual NOTE: If you will see PXE version displaying on the screen. Last, reboot the laptop...
... Boot Flag 1.0, Boot Block, PCI Bus Power Management Interface Specification, USB1.1/2.0, IEEE 1394 1.0, USB/1394 CD-ROM Boot Up support, PC Card 95 (PCMCIA 3.0 Compliant Device), IrDA 1.0, Intel AC97 CNR Specification, WfM 2.0, PXE (Preboot Execution Environment), BIS 1.0 (Boot Integrity Service Application Program Interface), PC99a and Mobile PC2001 Compliant, Intel Enhanced SpeedStep Technology Set by setup manual NOTE: If you will see PXE version displaying on the screen. Last, reboot the laptop...
Service Guide
Page 37
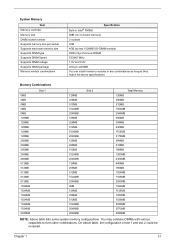
System Memory Item Memory controller Memory size DIMM socket number Supports memory size per socket Supports maximum memory size Supports DIMM type Supports DIMM Speed Supports DIMM voltage Supports DIMM package Memory module combinations Specification Built-in Intel® PM965 0MB (no on-board memory) 2 sockets 2GB 4GB (by two 1024MB SO-DIMM module) DDR 2 Synchronous DRAM 533/667 MHz 1.8V and 0.9V 200-pin soDIMM You can install memory modules in any combinations...
System Memory Item Memory controller Memory size DIMM socket number Supports memory size per socket Supports maximum memory size Supports DIMM type Supports DIMM Speed Supports DIMM voltage Supports DIMM package Memory module combinations Specification Built-in Intel® PM965 0MB (no on-board memory) 2 sockets 2GB 4GB (by two 1024MB SO-DIMM module) DDR 2 Synchronous DRAM 533/667 MHz 1.8V and 0.9V 200-pin soDIMM You can install memory modules in any combinations...

Service Guide
Page 49
... Enter to reset it. Press Enter to enter a password, you may have three tries before the system halts. Option Clear or Set Clear or Set Clear or Set Disabled or Enabled NOTE: When you are prompted to set the supervisor, user, or hard disk password: 1. When you are done, press u to "Set". 4. Retype the password in this screen. After setting the password, the computer sets the Supervisor Password parameter to save the changes and exit the BIOS Setup Utility. The...
... Enter to reset it. Press Enter to enter a password, you may have three tries before the system halts. Option Clear or Set Clear or Set Clear or Set Disabled or Enabled NOTE: When you are prompted to set the supervisor, user, or hard disk password: 1. When you are done, press u to "Set". 4. Retype the password in this screen. After setting the password, the computer sets the Supervisor Password parameter to save the changes and exit the BIOS Setup Utility. The...

Service Guide
Page 50
... Enter Current Password field and press e. 3. Type the current password in the Enter New Password and Confirm New Password fields. If the verification is complete after the user presses u. The Set Supervisor Password box appears: 2. The password setting is OK, the screen will show you are done, press u to save the changes and exit the BIOS Setup Utility. Type the current password in the Enter Current Password field and press e. 3. Use the w and y keys to "Clear...
... Enter Current Password field and press e. 3. Type the current password in the Enter New Password and Confirm New Password fields. If the verification is complete after the user presses u. The Set Supervisor Password box appears: 2. The password setting is OK, the screen will show you are done, press u to save the changes and exit the BIOS Setup Utility. Type the current password in the Enter Current Password field and press e. 3. Use the w and y keys to "Clear...

Service Guide
Page 53
... screen contains parameters that help safeguard and protect your changes to CMOS. Information Main Phoenix TrustedCore(tm) Setup Utility Security Boot Exit Exit Saving Changes Exit Discarding Changes Load Setup Defaults Discard Changes Save Changes Item Specific Help Exit System Setup and save your computer from CMOS for all SETUP items. Save Setup Data to CMOS. F1 Help Esc Exit Select Item Select Menu F5/F6 Change Values Enter Select Sub-Menu...
... screen contains parameters that help safeguard and protect your changes to CMOS. Information Main Phoenix TrustedCore(tm) Setup Utility Security Boot Exit Exit Saving Changes Exit Discarding Changes Load Setup Defaults Discard Changes Save Changes Item Specific Help Exit System Setup and save your computer from CMOS for all SETUP items. Save Setup Data to CMOS. F1 Help Esc Exit Select Item Select Menu F5/F6 Change Values Enter Select Sub-Menu...

Service Guide
Page 65
... screws fastening the power board. 4. Disassembling the Lower Case Assembly Removing the Power Board 3. Disassembling the Main Unit Separate the Main Unit Into the Upper and the Lower Case Assembly 1. Disconnect the bluetooth cable from the lower case assembly. Chapter 3 61 Remove the power board. 6. Carefully detach the upper case assembly from the main board. 8. Remove the bluetooth module and disconnect the cable from the power board. Remove the two...
... screws fastening the power board. 4. Disassembling the Lower Case Assembly Removing the Power Board 3. Disassembling the Main Unit Separate the Main Unit Into the Upper and the Lower Case Assembly 1. Disconnect the bluetooth cable from the lower case assembly. Chapter 3 61 Remove the power board. 6. Carefully detach the upper case assembly from the main board. 8. Remove the bluetooth module and disconnect the cable from the power board. Remove the two...
Service Guide
Page 79
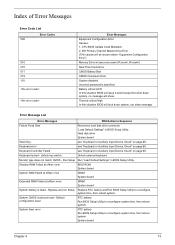
.... "Load Default Settings" in BIOS Setup Utility. Hard disk drive System board Stuck Key see "Keyboard or Auxiliary Input Device Check" on page 68. Keyboard locked - Unlock key switch Unlock external keyboard Monitor type does not match CMOS - Run Setup Run "Load Default Settings" in BIOS Setup Utility. Thermal critical High In this situation BIOS will issue 4 short beeps then shut down system, not show . Error Message List Error Messages FRU/Action in Sequence Failure Fixed Disk Reconnect hard disk drive connector. Keyboard error see "Keyboard or Auxiliary...
.... "Load Default Settings" in BIOS Setup Utility. Hard disk drive System board Stuck Key see "Keyboard or Auxiliary Input Device Check" on page 68. Keyboard locked - Unlock key switch Unlock external keyboard Monitor type does not match CMOS - Run Setup Run "Load Default Settings" in BIOS Setup Utility. Thermal critical High In this situation BIOS will issue 4 short beeps then shut down system, not show . Error Message List Error Messages FRU/Action in Sequence Failure Fixed Disk Reconnect hard disk drive connector. Keyboard error see "Keyboard or Auxiliary...

Service Guide
Page 80
... BIOS Setup Utility. Cache disabled CPU ID: DMA Test Failed Software NMI Failed Fail-Safe Timer NMI Failed Device Address Conflict Allocation Error for device Failing Bits: nnnn Fixed Disk n Invalid System Configuration Data I/O device IRQ conflict Operating system not found by POST differed from CMOS Diskette drive A error Incorrect Drive A type - RTC battery System board DIMM BIOS ROM System board None BIOS ROM System board Run "Load Default Settings" in Sequence RTC battery Run BIOS Setup Utility to reconfigure system time, then reboot system. Error...
... BIOS Setup Utility. Cache disabled CPU ID: DMA Test Failed Software NMI Failed Fail-Safe Timer NMI Failed Device Address Conflict Allocation Error for device Failing Bits: nnnn Fixed Disk n Invalid System Configuration Data I/O device IRQ conflict Operating system not found by POST differed from CMOS Diskette drive A error Incorrect Drive A type - RTC battery System board DIMM BIOS ROM System board None BIOS ROM System board Run "Load Default Settings" in Sequence RTC battery Run BIOS Setup Utility to reconfigure system time, then reboot system. Error...

Service Guide
Page 83
... devices Initialize all video adapters in system QuietBoot start (optional) Shadow video BIOS ROM Display BIOS copyright notice Display CPU type and speed Initialize EISA board Test keyboard Set key click if enabled Test for unexpected interrupts Initialize POST display service Display prompt "Press F2 to enter SETUP" Disable CPU cache Test RAM between 512 and 640 KB Test extended memory Test extended memory address lines Jump to User Patch1 Configure advanced cache registers Initialize Multi Processor APIC Enable external and CPU caches Setup...
... devices Initialize all video adapters in system QuietBoot start (optional) Shadow video BIOS ROM Display BIOS copyright notice Display CPU type and speed Initialize EISA board Test keyboard Set key click if enabled Test for unexpected interrupts Initialize POST display service Display prompt "Press F2 to enter SETUP" Disable CPU cache Test RAM between 512 and 640 KB Test extended memory Test extended memory address lines Jump to User Patch1 Configure advanced cache registers Initialize Multi Processor APIC Enable external and CPU caches Setup...

Service Guide
Page 85
... Initialize system I/O Check force recovery boot Checksum BIOS ROM Go to BIOS Set Huge Segment Initialize Multi Processor Initialize OEM special code Initialize PIC and DMA Initialize Memory type Initialize Memory size Shadow Boot Block System memory test Initialize interrupt vectors Initialize Run Time Clock Initialize video Initialize System Management Mode Output one beep before boot Boot to Mini DOS Clear Huge Segment Boot to Full DOS Chapter 4 79
... Initialize system I/O Check force recovery boot Checksum BIOS ROM Go to BIOS Set Huge Segment Initialize Multi Processor Initialize OEM special code Initialize PIC and DMA Initialize Memory type Initialize Memory size Shadow Boot Block System memory test Initialize interrupt vectors Initialize Run Time Clock Initialize video Initialize System Management Mode Output one beep before boot Boot to Mini DOS Clear Huge Segment Boot to Full DOS Chapter 4 79

Service Guide
Page 86
... LCD connector LCD inverter ID LCD cable LCD inverter LCD System board LCD inverter ID LCD inverter LCD cable LCD System board Indicator-Related Symptoms Symptom / Error Action in Sequence Enter BIOS Utility to -FRU Error Message LCD-Related Symptoms Symptom / Error LCD backlight doesn't work ). See "Power System Check" on . System board 80 Chapter 4 Keyboard (if contrast and brightness function key doesn't work LCD is too dark LCD brightness cannot be adjusted LCD contrast cannot be adjusted Unreadable LCD screen Missing pels in Sequence Power source (battery pack and power adapter...
... LCD connector LCD inverter ID LCD cable LCD inverter LCD System board LCD inverter ID LCD inverter LCD cable LCD System board Indicator-Related Symptoms Symptom / Error Action in Sequence Enter BIOS Utility to -FRU Error Message LCD-Related Symptoms Symptom / Error LCD backlight doesn't work ). See "Power System Check" on . System board 80 Chapter 4 Keyboard (if contrast and brightness function key doesn't work LCD is too dark LCD brightness cannot be adjusted LCD contrast cannot be adjusted Unreadable LCD screen Missing pels in Sequence Power source (battery pack and power adapter...
Service Guide
Page 87
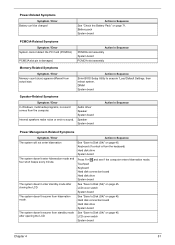
.... LCD cover switch System board Chapter 4 81 Internal speakers make noise or emit no sound comes from actual size. Action in Sequence PCMCIA slot assembly System board PCMCIA slot assembly Memory-Related Symptoms Symptom / Error Memory count (size) appears different from the computer. The system doesn't enter standby mode after opening the LCD. Audio driver Speaker System board Speaker System board Action in Sequence See "Save to Disk (S4)" on page 45. Touchpad Keyboard Hard disk connection board Hard disk drive...
.... LCD cover switch System board Chapter 4 81 Internal speakers make noise or emit no sound comes from actual size. Action in Sequence PCMCIA slot assembly System board PCMCIA slot assembly Memory-Related Symptoms Symptom / Error Memory count (size) appears different from the computer. The system doesn't enter standby mode after opening the LCD. Audio driver Speaker System board Speaker System board Action in Sequence See "Save to Disk (S4)" on page 45. Touchpad Keyboard Hard disk connection board Hard disk drive...

Service Guide
Page 89
... board in loop mode at least 10 times. 2. If no more errors. FRU replacement should be caused by a variety of reasons that there are no error is detected, replace the FRU. Chapter 4 83 When analyzing an intermittent problem, do not replace any error is detected, do the following: 1. Rerun the test to verify that have nothing to do with a hardware...
... board in loop mode at least 10 times. 2. If no more errors. FRU replacement should be caused by a variety of reasons that there are no error is detected, replace the FRU. Chapter 4 83 When analyzing an intermittent problem, do not replace any error is detected, do the following: 1. Rerun the test to verify that have nothing to do with a hardware...


