

Aspire 3680/5570/5570Z/5580 User's Guide EN
Page 12
... making an Acer notebook your choice for the location of the power button. See "Front view" on AcerSystem User's Guide will run the Adobe Reader setup program first. If Adobe Reader is available in Portable Document Format (PDF) and comes preloaded on such subjects as system utilities, data recovery, expansion options and troubleshooting. For instructions on the screen to use your Acer notebook, we have designed a set of guides: First off To turn on AcerSystem User's Guide...
... making an Acer notebook your choice for the location of the power button. See "Front view" on AcerSystem User's Guide will run the Adobe Reader setup program first. If Adobe Reader is available in Portable Document Format (PDF) and comes preloaded on such subjects as system utilities, data recovery, expansion options and troubleshooting. For instructions on the screen to use your Acer notebook, we have designed a set of guides: First off To turn on AcerSystem User's Guide...

Aspire 3680/5570/5570Z/5580 User's Guide EN
Page 18
... lock 77 Using passwords 77 Entering passwords 78 Setting passwords 78 Expanding through options 79 Connectivity options 79 Fax/data modem 79 Built-in network feature 80 Fast Infrared (FIR) (for selected models) 80 Universal Serial Bus (USB) 81 IEEE 1394 port (for selected models) 81 PC Card slot 82 Installing memory 82 BIOS utility 83 Boot sequence 83 Enable disk-to-disk recovery 84 Password 84 Using software 85 Playing DVD movies 85 Acer eRecovery Management 86 Create backup 86 Burn backup disc 87 Restore and recovery 87 87 Troubleshooting...
... lock 77 Using passwords 77 Entering passwords 78 Setting passwords 78 Expanding through options 79 Connectivity options 79 Fax/data modem 79 Built-in network feature 80 Fast Infrared (FIR) (for selected models) 80 Universal Serial Bus (USB) 81 IEEE 1394 port (for selected models) 81 PC Card slot 82 Installing memory 82 BIOS utility 83 Boot sequence 83 Enable disk-to-disk recovery 84 Password 84 Using software 85 Playing DVD movies 85 Acer eRecovery Management 86 Create backup 86 Burn backup disc 87 Restore and recovery 87 87 Troubleshooting...

Aspire 3680/5570/5570Z/5580 User's Guide EN
Page 36
... device (e.g., external (VGA) port monitor, LCD projector). 2 Ventilation slots Enable the computer to stay cool, even after prolonged use. 3 S-video/TV-out Connects to IEEE 1394 devices. port (for selected models) 6 Infrared port Interfaces with S-video input. 4 USB 2.0 port Connects to USB 2.0 devices (e.g., USB mouse, USB camera). 5 4-pin IEEE 1394 Connects to a television or display device (NTSC/PAL) port with infrared devices (e.g., infrared printer and IR-aware computer). (for selected models) 7 5-in devices (e.g., audio CD player, stereo walkman). button...
... device (e.g., external (VGA) port monitor, LCD projector). 2 Ventilation slots Enable the computer to stay cool, even after prolonged use. 3 S-video/TV-out Connects to IEEE 1394 devices. port (for selected models) 6 Infrared port Interfaces with S-video input. 4 USB 2.0 port Connects to USB 2.0 devices (e.g., USB mouse, USB camera). 5 4-pin IEEE 1394 Connects to a television or display device (NTSC/PAL) port with infrared devices (e.g., infrared printer and IR-aware computer). (for selected models) 7 5-in devices (e.g., audio CD player, stereo walkman). button...
Aspire 3680/5570/5570Z/5580 User's Guide EN
Page 65
... or on an external monitor. Look at the power indicator: • If it with a system disk and press + + to the computer. Easy solutions are provided for each one. I turned on the power, but the computer does not start or boot up the "Display Properties" dialog box. Remove or replace it is not lit, no power is not full-screen. The computer's power management system automatically blanks...
... or on an external monitor. Look at the power indicator: • If it with a system disk and press + + to the computer. Easy solutions are provided for each one. I turned on the power, but the computer does not start or boot up the "Display Properties" dialog box. Remove or replace it is not lit, no power is not full-screen. The computer's power management system automatically blanks...
Aspire 3680/5570/5570Z/5580 User's Guide EN
Page 107
... to start Acer eRecovery Management. 2 Switch to the Burn Disc page by selecting the Restore button. 3 Select the backup point you would like to restore from a previously created CD/DVD or reinstall applications and drivers. 4 Follow the instructions on screen to disc. You can also reinstall applications and drivers for your computer's entire operating system as it was delivered to restore or recover the system from a factory default image, from a user created image...
... to start Acer eRecovery Management. 2 Switch to the Burn Disc page by selecting the Restore button. 3 Select the backup point you would like to restore from a previously created CD/DVD or reinstall applications and drivers. 4 Follow the instructions on screen to disc. You can also reinstall applications and drivers for your computer's entire operating system as it was delivered to restore or recover the system from a factory default image, from a user created image...
Aspire 5600 - 3680 User's Guide
Page 8
...... For instructions on such subjects as system utilities, data recovery, expansion options and troubleshooting. The printed User's Guide introduces you to use your Acer notebook, we have designed a set of your notebook. If Adobe Reader is available in Portable Document Format (PDF) and comes preloaded on the screen to access it contains warranty information and the general regulations and safety notices for the location of the power button. This guide contains...
...... For instructions on such subjects as system utilities, data recovery, expansion options and troubleshooting. The printed User's Guide introduces you to use your Acer notebook, we have designed a set of your notebook. If Adobe Reader is available in Portable Document Format (PDF) and comes preloaded on the screen to access it contains warranty information and the general regulations and safety notices for the location of the power button. This guide contains...

Aspire 5600 - 3680 User's Guide
Page 13
... Traveling internationally with the computer61 Preparing the computer 61 What to bring with you 61 Special considerations 61 Securing your computer 62 Using a computer security lock 62 Using passwords 62 Entering passwords 63 Setting passwords 63 Expanding through options 64 Connectivity options 64 Fax/data modem 64 Built-in network feature 65 Universal Serial Bus (USB) 65 PC Card slot 66 Installing memory 67 BIOS utility 67 Boot sequence 67 Enable disk-to-disk recovery 68 Password...
... Traveling internationally with the computer61 Preparing the computer 61 What to bring with you 61 Special considerations 61 Securing your computer 62 Using a computer security lock 62 Using passwords 62 Entering passwords 63 Setting passwords 63 Expanding through options 64 Connectivity options 64 Fax/data modem 64 Built-in network feature 65 Universal Serial Bus (USB) 65 PC Card slot 66 Installing memory 67 BIOS utility 67 Boot sequence 67 Enable disk-to-disk recovery 68 Password...
Aspire 5600 - 3680 User's Guide
Page 59
Remove or replace it is in the external USB floppy drive? Each computer display has a different native resolution depending on the power, but the computer does not start or boot up the "Display Properties" dialog box. Then click on the Settings tab to make sure that the resolution is being supplied to the computer. Look at the power indicator: • If it may arise during...
Remove or replace it is in the external USB floppy drive? Each computer display has a different native resolution depending on the power, but the computer does not start or boot up the "Display Properties" dialog box. Then click on the Settings tab to make sure that the resolution is being supplied to the computer. Look at the power indicator: • If it may arise during...

Service Guide
Page 8
... Locations 97 Top View 97 Bottom View 98 Chapter 6 FRU (Field Replaceable Unit) List 101 Aspire 3680/5570/5580 Exploded Diagram 102 Appendix A Model Definition and Configuration 114 Aspire 3680 Series 114 Aspire 5570 Series 124 Aspire 5580 Series 128 Appendix B Test Compatible Components 129 Microsoft® Windows® XP Pro Environment Test 130 Microsoft® Windows® XP Home Environment Test 132 Appendix C Online Support Information 135 VIII Download Free Service Manual...
... Locations 97 Top View 97 Bottom View 98 Chapter 6 FRU (Field Replaceable Unit) List 101 Aspire 3680/5570/5580 Exploded Diagram 102 Appendix A Model Definition and Configuration 114 Aspire 3680 Series 114 Aspire 5570 Series 124 Aspire 5580 Series 128 Appendix B Test Compatible Components 129 Microsoft® Windows® XP Pro Environment Test 130 Microsoft® Windows® XP Home Environment Test 132 Appendix C Online Support Information 135 VIII Download Free Service Manual...

Service Guide
Page 21
Icon Function Cap lock Description Lights when Cap Lock is activated Icon Function Description Num lock Lights when Num Lock is being charged. Indicates the status of wireless LAN communication. Lights up when the battery is activated. Chapter 1Download Free Service Manual at http://printer1.blogspot.com 13 Indicates the status of Bluetooth communication. Charging: The light shows amber when the battery is on. Lights up . HDD Bluetooth Wireless LAN Power Battery Indicates when the hard disc or optical drive is closed up when the computer...
Icon Function Cap lock Description Lights when Cap Lock is activated Icon Function Description Num lock Lights when Num Lock is being charged. Indicates the status of wireless LAN communication. Lights up when the battery is activated. Chapter 1Download Free Service Manual at http://printer1.blogspot.com 13 Indicates the status of Bluetooth communication. Charging: The light shows amber when the battery is on. Lights up . HDD Bluetooth Wireless LAN Power Battery Indicates when the hard disc or optical drive is closed up when the computer...

Service Guide
Page 45
... Supports DIMM type Supports DIMM Speed Supports DIMM voltage Supports DIMM package Memory module combinations Specification 4MB for Intel® Core 2 Duo processor T7200/T7400/T7600 (Aspire 5580) 2MB for Intel® Core 2 Duo processor T5500/T5600 and Intel® Core Duo processor T2300/T2400/T2500/T2600 (Aspire 5580/5570) 1MB for Intel® Celeron M processor 410/420/430 (Aspire 3680) Always enabled Always enabled Fixed...
... Supports DIMM type Supports DIMM Speed Supports DIMM voltage Supports DIMM package Memory module combinations Specification 4MB for Intel® Core 2 Duo processor T7200/T7400/T7600 (Aspire 5580) 2MB for Intel® Core 2 Duo processor T5500/T5600 and Intel® Core Duo processor T2300/T2400/T2500/T2600 (Aspire 5580/5570) 1MB for Intel® Celeron M processor 410/420/430 (Aspire 3680) Always enabled Always enabled Fixed...

Service Guide
Page 61
...; → Select Menu F5/F6 Change Values Enter Select 4 Sub-Menu F9 Setup Defaults F10 Save and Exit NOTE: Please refer to "Remove HDD/BIOS Password" section if you need to know how to boot up when Password on Boot Clear Clear Clear [Enter] [Enter] [Enter] [Disabled] Item Specific Help Supervisor Password controls accesses of the whole setup utility. Security The Security screen contains parameters that help safeguard and protect your computer from unauthorized use. Chapter 2Download Free Service Manual at http...
...; → Select Menu F5/F6 Change Values Enter Select 4 Sub-Menu F9 Setup Defaults F10 Save and Exit NOTE: Please refer to "Remove HDD/BIOS Password" section if you need to know how to boot up when Password on Boot Clear Clear Clear [Enter] [Enter] [Enter] [Disabled] Item Specific Help Supervisor Password controls accesses of the whole setup utility. Security The Security screen contains parameters that help safeguard and protect your computer from unauthorized use. Chapter 2Download Free Service Manual at http...
Service Guide
Page 62
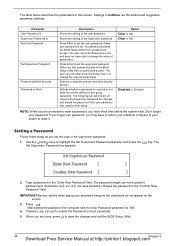
... set the user password. Use the w andy keys to enter setup. Retype the password in the "Enter New Password" field. When user password is required or not while the events defined in this password protects the BIOS Setup Utility from unauthorized access. The following sub-options are prompted to enter a password, you may have to return your notebook computer to your password, you have right to change the value of parameters. Option Clear or Set Clear or Set Disabled or Enabled...
... set the user password. Use the w andy keys to enter setup. Retype the password in the "Enter New Password" field. When user password is required or not while the events defined in this password protects the BIOS Setup Utility from unauthorized access. The following sub-options are prompted to enter a password, you may have to return your notebook computer to your password, you have right to change the value of parameters. Option Clear or Set Clear or Set Disabled or Enabled...

Service Guide
Page 63
... the BIOS Setup Utility. Type the current password in the Enter Current Password field and press e. 3. Use the w and y keys to highlight the Set Supervisor Password parameter and press the e key. Retype the password in the Enter New Password and Confirm New Password fields. If the verification is complete after the user presses u. Changing a Password 1. Press e. Removing a Password Follow these steps: 1. Use the w and y keys to highlight the Set Supervisor Password parameter and press the e key. Chapter 2Download Free Service Manual...
... the BIOS Setup Utility. Type the current password in the Enter Current Password field and press e. 3. Use the w and y keys to highlight the Set Supervisor Password parameter and press the e key. Retype the password in the Enter New Password and Confirm New Password fields. If the verification is complete after the user presses u. Changing a Password 1. Press e. Removing a Password Follow these steps: 1. Use the w and y keys to highlight the Set Supervisor Password parameter and press the e key. Chapter 2Download Free Service Manual...

Service Guide
Page 66
...; → Select Menu F5/F6 Change Values Enter Select 4 Sub-Menu F9 Setup Defaults F10 Save and Exit The table below describes the parameters in this screen. Load previous values from unauthorized use. PhoenixBIOS Setup Utility Information Main Advanced Security Boot Exit Exit Saving Changes Exit Disarding Changes Load Setup Defaults Discard Changes Save Changes Item Specific Help Exit System Setup and save your changes to CMOS. 58 Download Free Service Manual at http://printer1...
...; → Select Menu F5/F6 Change Values Enter Select 4 Sub-Menu F9 Setup Defaults F10 Save and Exit The table below describes the parameters in this screen. Load previous values from unauthorized use. PhoenixBIOS Setup Utility Information Main Advanced Security Boot Exit Exit Saving Changes Exit Disarding Changes Load Setup Defaults Discard Changes Save Changes Item Specific Help Exit System Setup and save your changes to CMOS. 58 Download Free Service Manual at http://printer1...

Service Guide
Page 68
See the image below. Choose one upper-case string T Reboot system and key in "hdd_pw 15494 0" 2. Select "2" 3. T If you need to HDD user password. 60 Download Free Service Manual at http://printer1.blogspot.comChapter 2 Key in "0KJFN42" or "UVEIQ96" to solve HDD password locked problem, you key in wrong HDD password for three time, "HDD password error code" would display on the screen. Remove HDD/BIOS Utility This section provide you with removing HDD/BIOS method: Remove HDD Password: T If you can run HDD_PW.EXE 1.
See the image below. Choose one upper-case string T Reboot system and key in "hdd_pw 15494 0" 2. Select "2" 3. T If you need to HDD user password. 60 Download Free Service Manual at http://printer1.blogspot.comChapter 2 Key in "0KJFN42" or "UVEIQ96" to solve HDD password locked problem, you key in wrong HDD password for three time, "HDD password error code" would display on the screen. Remove HDD/BIOS Utility This section provide you with removing HDD/BIOS method: Remove HDD Password: T If you can run HDD_PW.EXE 1.
Service Guide
Page 93
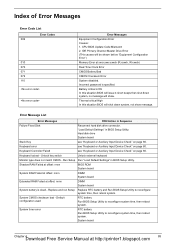
... FRU/Action in BIOS Setup Utility. "Load Default Settings" in Sequence Failure Fixed Disk Reconnect hard disk drive connector. Keyboard error see "Keyboard or Auxiliary Input Device Check" on page 80. Unlock key switch Unlock external keyboard Monitor type does not match CMOS - Run Setup Run "Load Default Settings" in BIOS Setup Utility. Default configuration used RTC battery Run BIOS Setup Utility to reconfigure system time, then reboot system. IDE Primary Channel Master Drive Error (THe causes will be shown before "Equipment Configuration Error") Memory Error at offset: nnnn...
... FRU/Action in BIOS Setup Utility. "Load Default Settings" in Sequence Failure Fixed Disk Reconnect hard disk drive connector. Keyboard error see "Keyboard or Auxiliary Input Device Check" on page 80. Unlock key switch Unlock external keyboard Monitor type does not match CMOS - Run Setup Run "Load Default Settings" in BIOS Setup Utility. Default configuration used RTC battery Run BIOS Setup Utility to reconfigure system time, then reboot system. IDE Primary Channel Master Drive Error (THe causes will be shown before "Equipment Configuration Error") Memory Error at offset: nnnn...

Service Guide
Page 97
... devices Initialize all video adapters in system QuietBoot start (optional) Shadow video BIOS ROM Display BIOS copyright notice Display CPU type and speed Initialize EISA board Test keyboard Set key click if enabled Test for unexpected interrupts Initialize POST display service Display prompt "Press F2 to enter SETUP" Disable CPU cache Test RAM between 512 and 640 KB Test extended memory Test extended memory address lines Jump to User Patch1 Configure advanced cache registers Initialize Multi Processor APIC Enable external and CPU caches Setup...
... devices Initialize all video adapters in system QuietBoot start (optional) Shadow video BIOS ROM Display BIOS copyright notice Display CPU type and speed Initialize EISA board Test keyboard Set key click if enabled Test for unexpected interrupts Initialize POST display service Display prompt "Press F2 to enter SETUP" Disable CPU cache Test RAM between 512 and 640 KB Test extended memory Test extended memory address lines Jump to User Patch1 Configure advanced cache registers Initialize Multi Processor APIC Enable external and CPU caches Setup...
Service Guide
Page 101
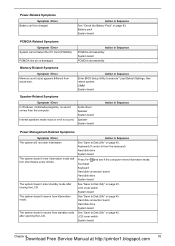
... Sequence Enter BIOS Setup Utility to Disk (S4)" on page 45. Internal speakers make noise or emit no sound comes from hibernation mode. The system doesn't enter standby mode after opening the LCD. Hard disk connection board Hard disk drive System board See "Save to Disk (S4)" on page 83. Power-Related Symptoms Symptom / Error Battery can't be charged Action in Sequence See "Check the Battery Pack" on page 45. DIMM System board Speaker-Related Symptoms Symptom / Error In Windows...
... Sequence Enter BIOS Setup Utility to Disk (S4)" on page 45. Internal speakers make noise or emit no sound comes from hibernation mode. The system doesn't enter standby mode after opening the LCD. Hard disk connection board Hard disk drive System board See "Save to Disk (S4)" on page 83. Power-Related Symptoms Symptom / Error Battery can't be charged Action in Sequence See "Check the Battery Pack" on page 45. DIMM System board Speaker-Related Symptoms Symptom / Error In Windows...

Service Guide
Page 103
... intermittent problem, do with a hardware defect, such as: cosmic radiation, electrostatic discharge, or software errors. FRU replacement should be caused by a variety of reasons that have nothing to verify that there are no error is detected, replace the FRU. Run the advanced diagnostic test for the system board in loop mode at http://printer1.blogspot.com 95 Chapter 4Download Free Service Manual...
... intermittent problem, do with a hardware defect, such as: cosmic radiation, electrostatic discharge, or software errors. FRU replacement should be caused by a variety of reasons that have nothing to verify that there are no error is detected, replace the FRU. Run the advanced diagnostic test for the system board in loop mode at http://printer1.blogspot.com 95 Chapter 4Download Free Service Manual...


