
Intel Rapid Storage Guide
Page 12
... press Enter. 5. When finished press Enter. 12 Create a RAID Volume Use the following steps to select the RAID level and press Enter. 4. Select the appropriate number of hard drives and press Space to enter the BIOS Setup program after the Power-On-Self-Test (POST) memory test begins...screen appears during operating system setup. Enable RAID in the system BIOS. 1. How to install an operating system onto a RAID volume (F6 install method) In order to install an operating system onto a RAID volume, the RAID option must be enabled in the system BIOS, a RAID volume must be created, and...
... press Enter. 5. When finished press Enter. 12 Create a RAID Volume Use the following steps to select the RAID level and press Enter. 4. Select the appropriate number of hard drives and press Space to enter the BIOS Setup program after the Power-On-Self-Test (POST) memory test begins...screen appears during operating system setup. Enable RAID in the system BIOS. 1. How to install an operating system onto a RAID volume (F6 install method) In order to install an operating system onto a RAID volume, the RAID option must be enabled in the system BIOS, a RAID volume must be created, and...

Intel Rapid Storage Guide
Page 13
...Enter to confirm volume creation. 10. At this point, you to create the volume. 9. This message appears at the beginning of available SCSI adapters. Setup will happen immediately after pressing F6. Select 4: Exit and press Enter. 11. When you need to install a third party SCSI or... RAID driver. Select your controller and continue. Leave 13 At the prompt press Y to confirm your controller from the list of Windows XP* setup (during operating system setup: 1. You will then be visible. 6. Press F6 when you see a ...
...Enter to confirm volume creation. 10. At this point, you to create the volume. 9. This message appears at the beginning of available SCSI adapters. Setup will happen immediately after pressing F6. Select 4: Exit and press Enter. 11. When you need to install a third party SCSI or... RAID driver. Select your controller and continue. Leave 13 At the prompt press Y to confirm your controller from the list of Windows XP* setup (during operating system setup: 1. You will then be visible. 6. Press F6 when you see a ...
Intel Rapid Storage Guide
Page 14
...installed. 14 If you wish to the Windows installation folders. During Windows setup, create a partition and file system on any physical disk. Windows setup will need to install Intel Rapid Storage Technology by Note running the Setup.exe process after these files again, remove the floppy disk so that ...Windows setup can reboot as you will need to copy the files again from the floppy to use the Intel Rapid Storage Technology user interface in the floppy drive until the system reboots. the floppy disk in Windows, you would on the RAID volume as needed. 7....
...installed. 14 If you wish to the Windows installation folders. During Windows setup, create a partition and file system on any physical disk. Windows setup will need to install Intel Rapid Storage Technology by Note running the Setup.exe process after these files again, remove the floppy disk so that ...Windows setup can reboot as you will need to copy the files again from the floppy to use the Intel Rapid Storage Technology user interface in the floppy drive until the system reboots. the floppy disk in Windows, you would on the RAID volume as needed. 7....

Intel Rapid Storage Guide
Page 16
Press F6 when you see a prompt that says, Press F6 if you see a message in RAID mode or AHCI mode, the F6 installation method must be prompted with the necessary files. Setup will happen immediately after pressing F6. Press S to install an operating system onto a single Serial ATA... loading drivers. You do not have a floppy drive on Microsoft Windows Vista* and Microsoft Windows 7* because Intel provided a RAID driver as part of Windows XP* setup (during text-mode phase). This message appears at the beginning of the final package. How to load the driver during OS...
Press F6 when you see a prompt that says, Press F6 if you see a message in RAID mode or AHCI mode, the F6 installation method must be prompted with the necessary files. Setup will happen immediately after pressing F6. Press S to install an operating system onto a single Serial ATA... loading drivers. You do not have a floppy drive on Microsoft Windows Vista* and Microsoft Windows 7* because Intel provided a RAID driver as part of Windows XP* setup (during text-mode phase). This message appears at the beginning of the final package. How to load the driver during OS...

Intel Rapid Storage Guide
Page 18
... can be used to install the RAID or AHCI driver, as described in the Advanced Installation Instructions section of installation is used for Intel® Matrix Storage Manager version 8.8) with the following steps in the Microsoft document Deployment Guide Automating Windows NT* Setup. To extract these files, run ....INF, IAAHCI.CAT, IASTOR.INF, IASTOR.CAT, IASTOR.SYS, and TXTSETUP.OEM files from the setup files. Does the system contain a 32-bit or 64-bit processor? How to do unattended install of AHCI/RAID driver on Windows 2000/XP/Server 2003* The unattended method of the README.TXT.
... can be used to install the RAID or AHCI driver, as described in the Advanced Installation Instructions section of installation is used for Intel® Matrix Storage Manager version 8.8) with the following steps in the Microsoft document Deployment Guide Automating Windows NT* Setup. To extract these files, run ....INF, IAAHCI.CAT, IASTOR.INF, IASTOR.CAT, IASTOR.SYS, and TXTSETUP.OEM files from the setup files. Does the system contain a 32-bit or 64-bit processor? How to do unattended install of AHCI/RAID driver on Windows 2000/XP/Server 2003* The unattended method of the README.TXT.

User Manual
Page 3
... (PCI and PCI Express Slots 22 2.7 CrossFireXTM and Quad CrossFireXTM Operation Guide. 23 2.8 Dual Monitor and Surround Display Features 27 2.9 ASRock Smart Remote Installation Guide 30 2.10 Jumpers Setup 31 2.11 Onboard Headers and Connectors 32 2.12 Serial ATA (SATA) / Serial ATA2 (SATA2) Hard Disks Installation 38 2.13 Serial... Plug Feature and Operation Guide 40 2.17 Driver Installation Guide 42 2.18 Installing Windows® 7 / 7 64-bit / VistaTM / VistaTM 64-bit With RAID Functions 42 2.19 Installing Windows® 7 / 7 64-bit / VistaTM / VistaTM 64-bit / XP / XP 64-bit Without...
... (PCI and PCI Express Slots 22 2.7 CrossFireXTM and Quad CrossFireXTM Operation Guide. 23 2.8 Dual Monitor and Surround Display Features 27 2.9 ASRock Smart Remote Installation Guide 30 2.10 Jumpers Setup 31 2.11 Onboard Headers and Connectors 32 2.12 Serial ATA (SATA) / Serial ATA2 (SATA2) Hard Disks Installation 38 2.13 Serial... Plug Feature and Operation Guide 40 2.17 Driver Installation Guide 42 2.18 Installing Windows® 7 / 7 64-bit / VistaTM / VistaTM 64-bit With RAID Functions 42 2.19 Installing Windows® 7 / 7 64-bit / VistaTM / VistaTM 64-bit / XP / XP 64-bit Without...

User Manual
Page 42
... Hard Disks Installation and RAID Configuration", which is located in the folder at the following path: .. \ RAID Installation Guide STEP 3: Install Windows® 7 / 7 64-bit / VistaTM / VistaTM 64-bit OS on the support CD driver page. Enter UEFI SETUP UTILITY Advanced screen Storage ...Configuration. Before you start to configure the RAID function, you want to set RAID configuration. 2.17 Driver Installation Guide To install the drivers to your system, please insert ...
... Hard Disks Installation and RAID Configuration", which is located in the folder at the following path: .. \ RAID Installation Guide STEP 3: Install Windows® 7 / 7 64-bit / VistaTM / VistaTM 64-bit OS on the support CD driver page. Enter UEFI SETUP UTILITY Advanced screen Storage ...Configuration. Before you start to configure the RAID function, you want to set RAID configuration. 2.17 Driver Installation Guide To install the drivers to your system, please insert ...

User Manual
Page 43
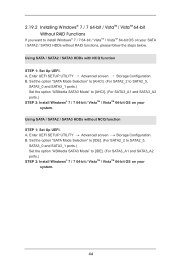
.... 2.19.1 Installing Windows® XP / XP 64-bit Without RAID Functions If you want to [IDE]. (For SATA3_A1 and SATA3_A2 ports.) STEP 2: Install Windows® XP / XP 64-bit OS on your system. 43 Enter UEFI SETUP UTILITY Advanced screen Storage Configuration. A. AHCI mode is not supported under...SATA3 HDDs without NCQ function STEP 1: Set Up UEFI. B. 2.19 Installing Windows® 7 / 7 64-bit / VistaTM / VistaTM 64-bit / XP / XP 64-bit Without RAID Functions If you want to install Windows® 7 / 7 64-bit / VistaTM / VistaTM 64-bit / XP / XP 64-bit OS on your SATA / SATA2 / SATA3 ...
.... 2.19.1 Installing Windows® XP / XP 64-bit Without RAID Functions If you want to [IDE]. (For SATA3_A1 and SATA3_A2 ports.) STEP 2: Install Windows® XP / XP 64-bit OS on your system. 43 Enter UEFI SETUP UTILITY Advanced screen Storage Configuration. A. AHCI mode is not supported under...SATA3 HDDs without NCQ function STEP 1: Set Up UEFI. B. 2.19 Installing Windows® 7 / 7 64-bit / VistaTM / VistaTM 64-bit / XP / XP 64-bit Without RAID Functions If you want to install Windows® 7 / 7 64-bit / VistaTM / VistaTM 64-bit / XP / XP 64-bit OS on your SATA / SATA2 / SATA3 ...
User Manual
Page 44
...SATA / SATA2 / SATA3 HDDs with NCQ function STEP 1: Set Up UEFI. Using SATA / SATA2 / SATA3 HDDs without RAID functions, please follow the steps below. Enter UEFI SETUP UTILITY Advanced screen Storage Configuration. Set the option "SATA Mode Selection" to [AHCI]. (For SATA2_2 to SATA2_5, SATA3_0 and... / SATA2 / SATA3 HDDs without NCQ function STEP 1: Set Up UEFI. A. Enter UEFI SETUP UTILITY Advanced screen Storage Configuration. 2.19.2 Installing Windows® 7 / 7 64-bit / VistaTM / VistaTM 64-bit Without RAID Functions If you want to install Windows® 7 / 7 64-bit / VistaTM / ...
...SATA / SATA2 / SATA3 HDDs with NCQ function STEP 1: Set Up UEFI. Using SATA / SATA2 / SATA3 HDDs without RAID functions, please follow the steps below. Enter UEFI SETUP UTILITY Advanced screen Storage Configuration. Set the option "SATA Mode Selection" to [AHCI]. (For SATA2_2 to SATA2_5, SATA3_0 and... / SATA2 / SATA3 HDDs without NCQ function STEP 1: Set Up UEFI. A. Enter UEFI SETUP UTILITY Advanced screen Storage Configuration. 2.19.2 Installing Windows® 7 / 7 64-bit / VistaTM / VistaTM 64-bit Without RAID Functions If you want to install Windows® 7 / 7 64-bit / VistaTM / ...

Quick Installation Guide
Page 35
... / SATA3 HDDs without RAID functions, please follow the procedures below . Enter UEFI SETUP UTILITY Advanced screen Storage Configuration. 2.12 Driver Installation Guide To install the drivers to your system, please insert the support CD to your SATA / SATA2 / SATA3 HDDs without RAID functions, please follow the...can be auto-detected and listed on your optical drive first. Please follow the order from top to bottom to your system. 35 ASRock Z77 Pro4 Motherboard English B. Set the option "SATA Mode Selection" to [IDE]. (For SATA2_2 to SATA2_5, SATA3_0 and SATA3_1 ports.) Set the...
... / SATA3 HDDs without RAID functions, please follow the procedures below . Enter UEFI SETUP UTILITY Advanced screen Storage Configuration. 2.12 Driver Installation Guide To install the drivers to your system, please insert the support CD to your SATA / SATA2 / SATA3 HDDs without RAID functions, please follow the...can be auto-detected and listed on your optical drive first. Please follow the order from top to bottom to your system. 35 ASRock Z77 Pro4 Motherboard English B. Set the option "SATA Mode Selection" to [IDE]. (For SATA2_2 to SATA2_5, SATA3_0 and SATA3_1 ports.) Set the...

Quick Installation Guide
Page 36
... 7 64-bit / VistaTM / VistaTM 64-bit OS on your system. 36 ASRock Z77 Pro4 Motherboard English B. A. A. Using SATA / SATA2 / SATA3 HDDs without RAID functions, please follow the steps below. B. Enter UEFI SETUP UTILITY Advanced screen Storage Configuration. 2.14.2 Installing Windows® 7 / 7 64...-bit / VistaTM / VistaTM 64-bit Without RAID Functions If you want to install Windows® 7...
... 7 64-bit / VistaTM / VistaTM 64-bit OS on your system. 36 ASRock Z77 Pro4 Motherboard English B. A. A. Using SATA / SATA2 / SATA3 HDDs without RAID functions, please follow the steps below. B. Enter UEFI SETUP UTILITY Advanced screen Storage Configuration. 2.14.2 Installing Windows® 7 / 7 64...-bit / VistaTM / VistaTM 64-bit Without RAID Functions If you want to install Windows® 7...

RAID Installation Guide
Page 4
... size without losing any data. This configuration has the same fault tolerance as RAID 1, and has the same overhead for this setup. RAID 5 RAID 5 stripes both data and parity information across three or more hard disk drives. RAID 10 RAID 10 is best suited for transaction processing, relational database applications, enterprise resource planning, and...
... size without losing any data. This configuration has the same fault tolerance as RAID 1, and has the same overhead for this setup. RAID 5 RAID 5 stripes both data and parity information across three or more hard disk drives. RAID 10 RAID 10 is best suited for transaction processing, relational database applications, enterprise resource planning, and...

RAID Installation Guide
Page 6
...to the document in the Support CD, "Guide to SATA Hard Disks Installation and RAID Configuration", which is not supported under Windows® XP / XP 64-bit. STEP 1: Set up BIOS. Enter BIOS SETUP UTILITY Advanced screen Storage Configuration. Before you start to configure... the RAID function, you need to Intel Rapid Storage", which is located in the folder at the following path...
...to the document in the Support CD, "Guide to SATA Hard Disks Installation and RAID Configuration", which is not supported under Windows® XP / XP 64-bit. STEP 1: Set up BIOS. Enter BIOS SETUP UTILITY Advanced screen Storage Configuration. Before you start to configure... the RAID function, you need to Intel Rapid Storage", which is located in the folder at the following path...
RAID Installation Guide
Page 7
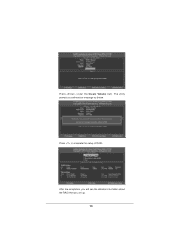
... Configure SATA as to enter BIOS setup utility. Please set the necessary RAID items in the BIOS before you to press . Press . Create RAID Volume window appears. Select the option Create RAID Volume and press . 7 Then, the Intel RAID Utility - Save your change before setting your RAID configuration. Boot your computer. Highlight...
... Configure SATA as to enter BIOS setup utility. Please set the necessary RAID items in the BIOS before you to press . Press . Create RAID Volume window appears. Select the option Create RAID Volume and press . 7 Then, the Intel RAID Utility - Save your change before setting your RAID configuration. Boot your computer. Highlight...
RAID Installation Guide
Page 10
Press to complete the setup of RAID. Press under the Create Volume item. The utility prompts a confirmation message as below. After the completion, you will see the detailed information about the RAID that you set up. 10
Press to complete the setup of RAID. Press under the Create Volume item. The utility prompts a confirmation message as below. After the completion, you will see the detailed information about the RAID that you set up. 10

Intel Smart Response Installation Guide
Page 1
...SRT will enable automatically, and the RST GUI will refresh to build RAID 0 or RAID 1 in system at this point! 3. UI setup instruction: 1. Boot system to a RAID mode system, then install all performance testing, chose "Maximized" mode. 7. Complete initial system setup, including installing the OS to desktop, open , click on the ... version RST driver, please check our website for the latest information: http://www.asrock.com * Before you use the full SSD as Cache device or only 20GB, and if you intend to [RAID Mode]. Once open RST GUI from either Start Menu or by step instructions below...
...SRT will enable automatically, and the RST GUI will refresh to build RAID 0 or RAID 1 in system at this point! 3. UI setup instruction: 1. Boot system to a RAID mode system, then install all performance testing, chose "Maximized" mode. 7. Complete initial system setup, including installing the OS to desktop, open , click on the ... version RST driver, please check our website for the latest information: http://www.asrock.com * Before you use the full SSD as Cache device or only 20GB, and if you intend to [RAID Mode]. Once open RST GUI from either Start Menu or by step instructions below...


