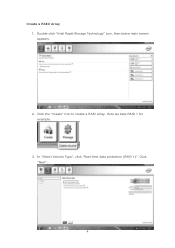
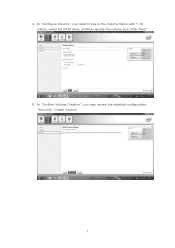
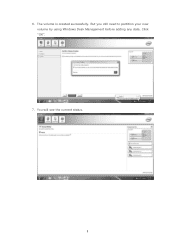
Intel Rapid Storage Guide
Page 6
Create a RAID Array 1. Here we take RAID 1 for example. 3. In "Select Volume Type", click "Real-time data protection (RAID 1)". Click the "Create" icon to create a RAID array. Double-click "Intel Rapid Storage Technology" icon, then below main screen appears. 2. Click "Next". 6
Intel Rapid Storage Guide
Page 7
4. Then click "Create Volume". 7 Click "Next". 5. In "Configure Volume", you may review the selected configuration. In "Confirm Volume Creation", you need to key-in the Volume Name with 1-16 letters, select the RAID disks, and then specify the volume size.
Intel Rapid Storage Guide
Page 8
The volume is created successfully. You will see the current status. 8 6. But you still need to partition your new volume by using Windows Desk Management before adding any data. Click "OK". 7.
Intel Rapid Storage Guide
Page 9
8. Click "OK". 9. Right-click on Disk 0, click "New Simple Volume". 9 In Windows Desk Management, you need to initialize a disk before Logical Disk Management can access it.
Intel Rapid Storage Guide
Page 10
Finally you can start to use RAID 1 function. 10 10. Then follow the instructions on the New Simple Volume Wizard. 11.
Intel Rapid Storage Guide
Page 12
...2. When finished press Enter. 12 Enable RAID in System BIOS Use the instructions included with your motherboard to enable RAID in the system BIOS, a RAID volume must be created, and the F6 installation method must be enabled in the system BIOS. 1. Select the appropriate number of hard drives by using the... up or down arrow keys to select the RAID level and press Enter. 4. Press Enter to select the drive. Select 1: Create RAID Volume and press Enter. 3. Click F2 or Delete to enter the BIOS Setup program after the Power-On-Self-Test (POST) memory test begins. 2. How...
Intel Rapid Storage Guide
Page 13
...to confirm your controller from the list of Windows XP* setup (during operating system setup: 1. Press Enter. 5. At this point, you to confirm volume creation. 10. Use the up and down arrow keys to install a third party SCSI or RAID driver. Press Enter to Specify Additional Device. 3. ...Select the volume size and press Enter. 8. Use the Floppy Configuration Utility to create a floppy disk with a screen asking you have successfully installed the driver ...
Intel Rapid Storage Guide
Page 14
... the system reboots. During Windows setup, create a partition and file system on any physical disk. the floppy disk in Windows, you would on the RAID volume as needed. 7. Windows setup will need to copy the files again from the floppy to the Windows installation folders.
Intel Rapid Storage Guide
Page 15
..., followed by a reboot. Install Intel® Rapid Storage Technology. 2. Turn on your system does not have a RAID ICH, you will need to a RAID volume that includes that hard drive plus the newly added hard drive(s). You can still use RAID as long as the following conditions are met, use...enabling the RAID controller is not recommended or supported when a SATA hard drive is already installed, you will not be able to create a RAID volume. 1. If you wish to create a RAID volume. Use the Intel Rapid Storage Technology user interface to enable it, you can also create a new RAID...
Intel Smart Response Installation Guide
Page 2
... like this. Your GUI window will now change to Accelerate. The "System View" area (Green) now shows the SSD broken up as a Cache Volume and the spare capacity volume (Yellow) if applicable. Click "OK" button. 3. Enabling Intel Smart Response Technology Setup through Start menu. Open RST GUI, either double-click on front...
Intel Smart Response Installation Guide
Page 4
Resetting SSD to Available will now look like this. Note that the SSD is now reset to "Available": 1. The "Accelerate" tab window will delete all data on the Spare Capacity Volume! Resetting SSD to Available" button (Orange). WARNING! The SSD can now be used as a normal storage device, or you can also re-enable Acceleration through the normal enable process. The SSD is still divided into a Cache and Spare Cap Volume. To reset SSD to a non-Cache-disk state, Click the "Reset to "Available". Resetting SSD to Available.
RAID Installation Guide
Page 1
Guide to RAID Configurations 3 2.1 Introduction of RAID 3 2.2 RAID Configuration Precautions 5 2.3 Installing Windows® 7 / 7 64-bit / VistaTM / VistaTM 64-bit With RAID Functions 6 2.4 Setting the BIOS RAID Items 7 2.5 Configuring the Intel RAID BIOS 7 2.6 Deleting RAID Volumes 11 1 Guide to SATA Hard Disks Installation 2 1.1 Serial ATA (SATA) Hard Disks Installation 2 2. Guide to SATA Hard Disks Installation and RAID Configuration 1.
RAID Installation Guide
Page 7
...;guration. Then, the Intel RAID Utility - Highlight Advanced and press , then the main interface of BIOS setup utility will appear. Create RAID Volume window appears. Select the option Create RAID Volume and press . 7 2.4 Setting the BIOS RAID Items After installing the hard disk drives, please set the option Configure SATA...
RAID Installation Guide
Page 8
Press , and then you can select Strip Size. 8 In the Create Volume Menu, under Name item, please key-in a unique name with 1-16 letters for your RAID volume then press . You may select RAID 0 (Stripe), RAID 1 (Mirror), RAID 5 or RAID 10 for your RAID level. Use the up or down arrow keys to select your desired RAID Level.
RAID Installation Guide
Page 10
Press to complete the setup of RAID. Press under the Create Volume item. The utility prompts a confirmation message as below. After the completion, you will see the detailed information about the RAID that you set up. 10
RAID Installation Guide
Page 11
If you want to delete a RAID volume, please select the option Delete RAID Volume, press , and then follow the instructions on the screen. 11 Please note that you are only allowed to create one RAID partition at a time under Windows environment to configure RAID functions after you install OS. 2.6 Deleting RAID Volumes If you want to create an extra RAID partition, please use the RAID utility under BIOS RAID environment.
Quick Installation Guide
Page 39
...switch and system status indicator on the chassis front panel. PWRBTN (Power Switch): Connect to function correctly. The LED keeps blinking when the 39 ASRock Z77 OC Formula Motherboard B. D. System Panel Header (9-pin PANEL1) (see p.2, No. 41) GND PRESENCE# MIC_RET OUT_RET 1 OUT2_L J_SENSE OUT2_R MIC2_R MIC2_L This... of audio devices. 1. Connect Ground (GND) to OUT2_L. MIC_RET and OUT_RET are for AC'97 audio panel. E. Adjust "Recording Volume". RESET (Reset Switch): Connect to the reset switch on the chassis must support HDA to the power switch on when the system is...
Quick Installation Guide
Page 196
...;트 OS "Mixer Recorder Front Mic Windows® 7 / 7 64 비트 / VistaTM / VistaTM 64 비트 OS 의 경 우: Realtek FrontMic "Recording Volume (9 핀 PANEL1) (2 25 한 국 어 196 PWRBTN RESET PLED LED LED S1/S3 LED S4 S5 LED HDLED LED LED LED ASRock Z77 OC Formula Motherboard Mic_IN (MIC) 을 MIC2_L B.
Quick Installation Guide
Page 215
...-bit / VistaTM / VistaTM 64-bit OS の場合 : Realtek FrontMic Recording Volume 9 ピン PANEL1) ページ 2 25 を参照 PWRBTN RESET PLED LED LED LED S1/S3 S4 S5 LED HDLED LED LED LED 215 ASRock Z77 OC Formula Motherboard 日本語 2. Audio_R (RIN) を OUT2_R に、Audio_L (LIN...
Quick Installation Guide
Page 268
... System Restore. Follow Windows® Installation Guide to confirm. Then Click "Turn System Restore Off" to install OS. Then Press "Ok". 268 ASRock Z77 OC Formula Motherboard English a. Disk volume > 2TB), it may take more time to following the Windows® instructions. 5. De-select Local Disks for this problem. E. Please keep the USB...