
User Manual
Page 13
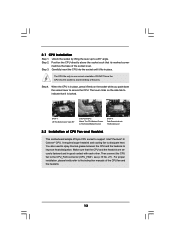
... Corner STEP 2/STEP 3: Match The CPU Marked Corner to The Socket Marked Corner STEP 4: Push Down And Lock The Socket Lever 2.2 Installation of CPU Fan and Heatsink This motherboard adopts 478-pin CPU socket to the instruction manuals of the socket lever. Then connect the CPU fan to a 90° angle. The lever clicks on the...
... Corner STEP 2/STEP 3: Match The CPU Marked Corner to The Socket Marked Corner STEP 4: Push Down And Lock The Socket Lever 2.2 Installation of CPU Fan and Heatsink This motherboard adopts 478-pin CPU socket to the instruction manuals of the socket lever. Then connect the CPU fan to a 90° angle. The lever clicks on the...
Quick Installation Guide
Page 5
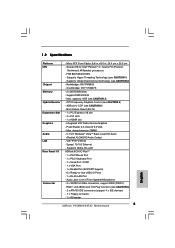
... JBOD) and "Hot Plug" functions (see CAUTION 4) - Northbridge: VIA® P4M900 - Supports Wake-On-LAN ASRock 6CH I /O Connector - Support DDR400/333 - Supports Untied Overclocking Technology (see CAUTION 5) - Pixel Shader 2.0, DirectX 9.0 VGA - Socket 478 for Intel® Pentium® 4 / Celeron® D (Prescott, Northwood, Willamate) processors - Speed: 10/... - 1 x RJ-45 LAN Port - CPU Frequency Stepless Control (see CAUTION 6) - 2 x ATA133 IDE connectors (support 4 x IDE devices) - 1 x Floppy connector - 1 x IR header 5 ASRock P4VM900-SATA2 Motherboard English
... JBOD) and "Hot Plug" functions (see CAUTION 4) - Northbridge: VIA® P4M900 - Supports Wake-On-LAN ASRock 6CH I /O Connector - Support DDR400/333 - Supports Untied Overclocking Technology (see CAUTION 5) - Pixel Shader 2.0, DirectX 9.0 VGA - Socket 478 for Intel® Pentium® 4 / Celeron® D (Prescott, Northwood, Willamate) processors - Speed: 10/... - 1 x RJ-45 LAN Port - CPU Frequency Stepless Control (see CAUTION 6) - 2 x ATA133 IDE connectors (support 4 x IDE devices) - 1 x Floppy connector - 1 x IR header 5 ASRock P4VM900-SATA2 Motherboard English
Quick Installation Guide
Page 10
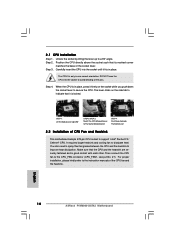
...174; 4 / Celeron® CPU. Step 3. Carefully insert the CPU into the socket to avoid bending of CPU Fan and Heatsink This motherboard adopts 478-pin CPU socket to the instruction manuals of the socket lever. Then connect the CPU fan to improve heat dissipation. Step 2. Position the...Socket Marked Corner STEP 1: Lift The Socket Lever Up to 90° STEP 2/STEP 3: Match The CPU Marked Corner to secure the CPU. You also need to spray thermal grease between the CPU and the heatsink to the CPU_FAN connector (CPU_FAN1, see p.2 No. 27). English 10 ASRock P4VM900-SATA2 Motherboard...
...174; 4 / Celeron® CPU. Step 3. Carefully insert the CPU into the socket to avoid bending of CPU Fan and Heatsink This motherboard adopts 478-pin CPU socket to the instruction manuals of the socket lever. Then connect the CPU fan to improve heat dissipation. Step 2. Position the...Socket Marked Corner STEP 1: Lift The Socket Lever Up to 90° STEP 2/STEP 3: Match The CPU Marked Corner to secure the CPU. You also need to spray thermal grease between the CPU and the heatsink to the CPU_FAN connector (CPU_FAN1, see p.2 No. 27). English 10 ASRock P4VM900-SATA2 Motherboard...


