

RAID Installation Guide
Page 6
The Define LD Menu for the logical drive number you want to define and press to select it. Press the arrow keys to display the Define LD Menu. Press keys, then the FastBuild Utility Main Menu appears. Press 2 on the Main Menu screen to highlight a logical drive number you selected will next appear. 6
The Define LD Menu for the logical drive number you want to define and press to select it. Press the arrow keys to display the Define LD Menu. Press keys, then the FastBuild Utility Main Menu appears. Press 2 on the Main Menu screen to highlight a logical drive number you selected will next appear. 6

RAID Installation Guide
Page 7
... (except for one logical drive or allocating a portion to your logical drive configuration. You have the option of using all of disk drives to the Main Menu. 2. In the Define LD Menu section, press the spacebar to use the full portion of the following actions: 1. Y means this disk drive will be...
... (except for one logical drive or allocating a portion to your logical drive configuration. You have the option of using all of disk drives to the Main Menu. 2. In the Define LD Menu section, press the spacebar to use the full portion of the following actions: 1. Y means this disk drive will be...

RAID Installation Guide
Page 9
Press to exit to exit the Utility. 6. Press again to the Main Menu. 3. You have successfully created a new RAID logical drive. In this example the disk drives in our support CD or "Quick Installation Guide". 9 Press to a ...
Press to exit to exit the Utility. 6. Press again to the Main Menu. 3. You have successfully created a new RAID logical drive. In this example the disk drives in our support CD or "Quick Installation Guide". 9 Press to a ...

User Manual
Page 4
BIOS SETUP UTILITY 38 3.1 Introduction 38 3.1.1 BIOS Menu Bar 38 3.1.2 Navigation Keys 39 3.2 Main Screen 39 3.3 OC Tweaker Screen 40 3.4 Advanced Screen 47 3.4.1 CPU Configuration 48 3.4.2 Chipset Configuration 49 3.4.3 ACPI Configuration 50 3.4.4 Storage Configuration 51 3.4.5 PCIPnP Configuration 53 3.4.6 Floppy ...
BIOS SETUP UTILITY 38 3.1 Introduction 38 3.1.1 BIOS Menu Bar 38 3.1.2 Navigation Keys 39 3.2 Main Screen 39 3.3 OC Tweaker Screen 40 3.4 Advanced Screen 47 3.4.1 CPU Configuration 48 3.4.2 Chipset Configuration 49 3.4.3 ACPI Configuration 50 3.4.4 Storage Configuration 51 3.4.5 PCIPnP Configuration 53 3.4.6 Floppy ...

User Manual
Page 11
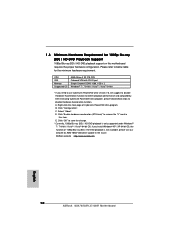
... below table for 1080p Blu-ray (BD) / HD-DVD Playback Support 1080p Blu-ray (BD) / HD-DVD playback support on this item. C. E. Right-click the main page of 1080p Blu-ray (BD) / HD-DVD playback is only supported under Windows® 7 / 7 64-bit / VistaTM / VistaTM 64-bit OS. Click "Configuration". Click... refer to below steps to disable Hardware Acceleration function for AMD 785G VGA driver update in this motherboard requires the proper hardware configuration. A. B. Select "Video". ASRock website http://www.asrock.com 11
... below table for 1080p Blu-ray (BD) / HD-DVD Playback Support 1080p Blu-ray (BD) / HD-DVD playback support on this item. C. E. Right-click the main page of 1080p Blu-ray (BD) / HD-DVD playback is only supported under Windows® 7 / 7 64-bit / VistaTM / VistaTM 64-bit OS. Click "Configuration". Click... refer to below steps to disable Hardware Acceleration function for AMD 785G VGA driver update in this motherboard requires the proper hardware configuration. A. B. Select "Video". ASRock website http://www.asrock.com 11

User Manual
Page 19
... items "This is inserted to your primary monitor, and then select "Primary". Click the "Identify" button to display a large number on VGA card is my main monitor" and "Extend the desktop onto this monitor". Click the number "2" icon. Use Surround Display. Install the onboard VGA driver and the add-on PCI...
... items "This is inserted to your primary monitor, and then select "Primary". Click the "Identify" button to display a large number on VGA card is my main monitor" and "Extend the desktop onto this monitor". Click the number "2" icon. Use Surround Display. Install the onboard VGA driver and the add-on PCI...

User Manual
Page 38
Because the BIOS software is constantly being updated, the following selections: Main To set up the system time/date information OC Tweaker To set up overclocking features Advanced To set up the advanced BIOS features H/W Monitor To ...
Because the BIOS software is constantly being updated, the following selections: Main To set up the system time/date information OC Tweaker To set up overclocking features Advanced To set up the advanced BIOS features H/W Monitor To ...

User Manual
Page 39
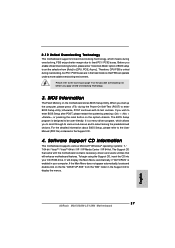
... When you enter the BIOS SETUP UTILITY, the Main screen will appear and display the system overview. BIOS SETUP UTILITY Main OC Tweaker Advanced H/W Monitor System Overview System Time System Date [17:00:09] [Fri 10/02/2009] BIOS Version : M3A785GM-LE/128M P1.0 Processor Type : AMD Phenom(tm) II X3 720 Processor (64bit) Processor...
... When you enter the BIOS SETUP UTILITY, the Main screen will appear and display the system overview. BIOS SETUP UTILITY Main OC Tweaker Advanced H/W Monitor System Overview System Time System Date [17:00:09] [Fri 10/02/2009] BIOS Version : M3A785GM-LE/128M P1.0 Processor Type : AMD Phenom(tm) II X3 720 Processor (64bit) Processor...

User Manual
Page 40
... CPU OC Setting You can set up overclocking features. Load Optimized mGPU OC Setting You can use this to adjust CPU frequency. BIOS SETUP UTILITY Main OC Tweaker Advanced H/W Monitor Boot Security Exit EZ Overclocking Load Optimized CPU OC Setting [Press Enter] Load Optimized mGPU OC Setting [Press Enter] CPU Configuration...
... CPU OC Setting You can set up overclocking features. Load Optimized mGPU OC Setting You can use this to adjust CPU frequency. BIOS SETUP UTILITY Main OC Tweaker Advanced H/W Monitor Boot Security Exit EZ Overclocking Load Optimized CPU OC Setting [Press Enter] Load Optimized mGPU OC Setting [Press Enter] CPU Configuration...

User Manual
Page 41
... the value of this item. Processor Maximum Frequency It will see the options "Value (Core 0)", "Value (Core 1)", "Value (Core 2) " and "Value (Core 3)". BIOS SETUP UTILITY Main OC Tweaker Advanced H/W Monitor Boot Security Exit EZ Overclocking Load Optimized CPU OC Setting [Press Enter] Load Optimized mGPU OC Setting [Press Enter] CPU Configuration...
... the value of this item. Processor Maximum Frequency It will see the options "Value (Core 0)", "Value (Core 1)", "Value (Core 2) " and "Value (Core 3)". BIOS SETUP UTILITY Main OC Tweaker Advanced H/W Monitor Boot Security Exit EZ Overclocking Load Optimized CPU OC Setting [Press Enter] Load Optimized mGPU OC Setting [Press Enter] CPU Configuration...

User Manual
Page 47
...update your BIOS, and reboot your BIOS only in a few clicks without entering operating systems first like MS-DOS or Windows®. ASRock Instant Flash ASRock Instant Flash is a BIOS flash utility embedded in Flash ROM. 3.4 Advanced Screen In this section, you may set the configurations for... CPU WARNING : Setting wrong values in below sections may cause the system to malfunction. BIOS SETUP UTILITY Main OC Tweaker Advanced H/W Monitor ...
...update your BIOS, and reboot your BIOS only in a few clicks without entering operating systems first like MS-DOS or Windows®. ASRock Instant Flash ASRock Instant Flash is a BIOS flash utility embedded in Flash ROM. 3.4 Advanced Screen In this section, you may set the configurations for... CPU WARNING : Setting wrong values in below sections may cause the system to malfunction. BIOS SETUP UTILITY Main OC Tweaker Advanced H/W Monitor ...

User Manual
Page 57
... as [Disabled], the CPU fan will operate in full speed. If you set the target fan speed. The default value is [Disabled]. BIOS SETUP UTILITY Main OC Tweaker Advanced H/W Monitor Boot Security Exit Hardware Health Event Monitoring CPU Temperature M / B Temperature CPU Fan Speed Chassis Fan Speed Power Fan Speed Vcore + 3.30V...
... as [Disabled], the CPU fan will operate in full speed. If you set the target fan speed. The default value is [Disabled]. BIOS SETUP UTILITY Main OC Tweaker Advanced H/W Monitor Boot Security Exit Hardware Health Event Monitoring CPU Temperature M / B Temperature CPU Fan Speed Chassis Fan Speed Power Fan Speed Vcore + 3.30V...

User Manual
Page 58
... Select Screen Select Item Change Option General Help Load Defaults Save and Exit Exit v02.54 (C) Copyright 1985-2003, American Megatrends, Inc. BIOS SETUP UTILITY Main OC Tweaker Advanced H/W Monitor Boot Security Exit Boot Settings Boot Settings Configuration Configure Settings during System Boot. 1st Boot Device 2nd Boot Device 3rd Boot...
... Select Screen Select Item Change Option General Help Load Defaults Save and Exit Exit v02.54 (C) Copyright 1985-2003, American Megatrends, Inc. BIOS SETUP UTILITY Main OC Tweaker Advanced H/W Monitor Boot Security Exit Boot Settings Boot Settings Configuration Configure Settings during System Boot. 1st Boot Device 2nd Boot Device 3rd Boot...

User Manual
Page 59
.... Boot Up Num-Lock If this section, you enable the option "Full Screen Logo". Configuration options: [Auto], [EuP], [Scenery] and [ASRock]. Currently, the option [Auto] is [Auto]. Select Screen Select Item Enter Change F1 General Help F9 Load Defaults F10 Save and Exit ESC...2005, American Megatrends, Inc. 59 Boot Logo Use this item to enable or disable the Boot From Onboard LAN feature. BIOS SETUP UTILITY Main OC Tweaker Advanced H/W Monitor Boot Security Exit Security Settings Supervisor Password : Not Installed User Password : Not Installed Change Supervisor Password Change ...
.... Boot Up Num-Lock If this section, you enable the option "Full Screen Logo". Configuration options: [Auto], [EuP], [Scenery] and [ASRock]. Currently, the option [Auto] is [Auto]. Select Screen Select Item Enter Change F1 General Help F9 Load Defaults F10 Save and Exit ESC...2005, American Megatrends, Inc. 59 Boot Logo Use this item to enable or disable the Boot From Onboard LAN feature. BIOS SETUP UTILITY Main OC Tweaker Advanced H/W Monitor Boot Security Exit Security Settings Supervisor Password : Not Installed User Password : Not Installed Change Supervisor Password Change ...

User Manual
Page 60
3.8 Exit Screen BIOS SETUP UTILITY Main OC Tweaker Advanced H/W Monitor Boot Security Exit Exit Options Save Changes and Exit Discard Changes and Exit Discard Changes Load BIOS Defaults Load Performance Setup ...
3.8 Exit Screen BIOS SETUP UTILITY Main OC Tweaker Advanced H/W Monitor Boot Security Exit Exit Options Save Changes and Exit Discard Changes and Exit Discard Changes Load BIOS Defaults Load Performance Setup ...

User Manual
Page 61
...the file "ASSETUP.EXE" from the BIN folder in this chapter for more about ASRock, welcome to install it. 4.2.4 Contact Information If you may contact your dealer for further information. 61 If the Main Menu did not appear automatically, locate and double click on a specific item then... follow the installation wizard to visit ASRock's website at http://www.asrock.com; Refer to display the menus. 4.2.2 Drivers Menu The Drivers ...
...the file "ASSETUP.EXE" from the BIN folder in this chapter for more about ASRock, welcome to install it. 4.2.4 Contact Information If you may contact your dealer for further information. 61 If the Main Menu did not appear automatically, locate and double click on a specific item then... follow the installation wizard to visit ASRock's website at http://www.asrock.com; Refer to display the menus. 4.2.2 Drivers Menu The Drivers ...
Quick Installation Guide
Page 10
...main page of 1080p Blu-ray (BD) / HD-DVD playback is only supported under Windows® 7 / 7 64-bit / VistaTM / VistaTM 64-bit OS. C. D. E. Click "OK" to disable Hardware Acceleration function. After executing CyberLink PowerDVD Ultra program, please follow below table for the minimum hardware requirement. Click "Configuration". ASRock... website http://www.asrock.com English 10 ASRock M3A785GM-LE/128M Motherboard B. Select "Video". Click "Enable hardware acceleration (ATI Avivo...
...main page of 1080p Blu-ray (BD) / HD-DVD playback is only supported under Windows® 7 / 7 64-bit / VistaTM / VistaTM 64-bit OS. C. D. E. Click "OK" to disable Hardware Acceleration function. After executing CyberLink PowerDVD Ultra program, please follow below table for the minimum hardware requirement. Click "Configuration". ASRock... website http://www.asrock.com English 10 ASRock M3A785GM-LE/128M Motherboard B. Select "Video". Click "Enable hardware acceleration (ATI Avivo...

Quick Installation Guide
Page 16
... VGA/D-Sub function when the add-on PCI Express VGA card driver to enable the function of your monitors that you wish to another. 16 ASRock M3A785GM-LE/128M Motherboard English Click the number "2" icon. Click "OK" to display a large number on each monitor. Click and drag the display icons to use multiple ... install them again. 5. Click "Extend my Windows desktop onto this monitor". 3. Install the onboard VGA driver and the add-on VGA card is my main monitor" and "Extend the desktop onto this monitor". The placement of the multi-monitor according to the steps below .
... VGA/D-Sub function when the add-on PCI Express VGA card driver to enable the function of your monitors that you wish to another. 16 ASRock M3A785GM-LE/128M Motherboard English Click the number "2" icon. Click "OK" to display a large number on each monitor. Click and drag the display icons to use multiple ... install them again. 5. Click "Extend my Windows desktop onto this monitor". 3. Install the onboard VGA driver and the add-on VGA card is my main monitor" and "Extend the desktop onto this monitor". The placement of the multi-monitor according to the steps below .
Quick Installation Guide
Page 27
...environment. It is designed to fixed PCI / PCIE buses. To begin using the Support CD, insert the CD into your computer. If the Main Menu does not appear automatically, locate and double-click on the file "ASSETUP.EXE" from [Auto] to enter BIOS Setup after POST, ... display the Main Menu automatically if "AUTORUN" is untied during the Power-On-Self-Test (POST) to select among the predetermined choices. Therefore, CPU FSB is enabled in the fixed mode so that will enhance motherboard features. Please refer to display the menus. 27 ASRock M3A785GM-LE/128M Motherboard English If...
...environment. It is designed to fixed PCI / PCIE buses. To begin using the Support CD, insert the CD into your computer. If the Main Menu does not appear automatically, locate and double-click on the file "ASSETUP.EXE" from [Auto] to enter BIOS Setup after POST, ... display the Main Menu automatically if "AUTORUN" is untied during the Power-On-Self-Test (POST) to select among the predetermined choices. Therefore, CPU FSB is enabled in the fixed mode so that will enhance motherboard features. Please refer to display the menus. 27 ASRock M3A785GM-LE/128M Motherboard English If...