User Manual
Page 6
... without notice. In this documentation occur, the updated version will be subject to quality and endurance. ASRock website http://www.asrock.com. 1.1 Package Contents • ASRock H310CM-HDV / H310CM-DVS Motherboard (Micro ATX Form Factor) • ASRock H310CM-HDV / H310CM-DVS Quick Installation Guide • ASRock H310CM-HDV / H310CM-DVS Support CD • 1 x I/O Panel Shield • 2 x Serial ATA (SATA) Data Cables (Optional) 1 English Because the motherboard specifications...
... without notice. In this documentation occur, the updated version will be subject to quality and endurance. ASRock website http://www.asrock.com. 1.1 Package Contents • ASRock H310CM-HDV / H310CM-DVS Motherboard (Micro ATX Form Factor) • ASRock H310CM-HDV / H310CM-DVS Quick Installation Guide • ASRock H310CM-HDV / H310CM-DVS Support CD • 1 x I/O Panel Shield • 2 x Serial ATA (SATA) Data Cables (Optional) 1 English Because the motherboard specifications...
User Manual
Page 8
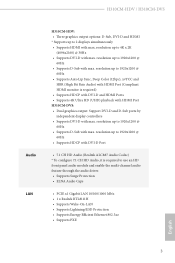
... is required) • Supports HDCP with DVI-D and HDMI Ports • Supports 4K Ultra HD (UHD) playback with HDMI Port H310CM-DVS: • Dual graphics output: Support DVI-D and D-Sub ports by independent display controllers • Supports DVI-D with HDMI Port (...-On-LAN • Supports Lightning/ESD Protection • Supports Energy Efficient Ethernet 802.3az • Supports PXE English 3 H310CM-HDV / H310CM-DVS Audio LAN H310CM-HDV: • Three graphics output options: D-Sub, DVI-D and HDMI * Supports up to 2 displays simultaneously • Supports HDMI with max.
... is required) • Supports HDCP with DVI-D and HDMI Ports • Supports 4K Ultra HD (UHD) playback with HDMI Port H310CM-DVS: • Dual graphics output: Support DVI-D and D-Sub ports by independent display controllers • Supports DVI-D with HDMI Port (...-On-LAN • Supports Lightning/ESD Protection • Supports Energy Efficient Ethernet 802.3az • Supports PXE English 3 H310CM-HDV / H310CM-DVS Audio LAN H310CM-HDV: • Three graphics output options: D-Sub, DVI-D and HDMI * Supports up to 2 displays simultaneously • Supports HDMI with max.
User Manual
Page 9
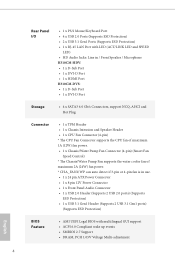
...; 1 x RJ-45 LAN Port with LED (ACT/LINK LED and SPEED LED) • HD Audio Jacks: Line in / Front Speaker / Microphone H310CM-HDV: • 1 x D-Sub Port • 1 x DVI-D Port • 1 x HDMI Port H310CM-DVS: • 1 x D-Sub Port • 1 x DVI-D Port Storage • 4 x SATA3 6.0 Gb/s Connectors, support NCQ, AHCI and Hot Plug Connector • 1 x TPM...
...; 1 x RJ-45 LAN Port with LED (ACT/LINK LED and SPEED LED) • HD Audio Jacks: Line in / Front Speaker / Microphone H310CM-HDV: • 1 x D-Sub Port • 1 x DVI-D Port • 1 x HDMI Port H310CM-DVS: • 1 x D-Sub Port • 1 x DVI-D Port Storage • 4 x SATA3 6.0 Gb/s Connectors, support NCQ, AHCI and Hot Plug Connector • 1 x TPM...
User Manual
Page 10
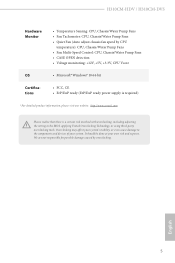
... information, please visit our website: http://www.asrock.com Please realize that there is a certain risk involved with overclocking, including adjusting the setting in the BIOS, applying Untied Overclocking Technology, or using third-party overclocking tools. English 5 It should be done at your system. H310CM-HDV / H310CM-DVS Hardware Monitor • Temperature Sensing: CPU, Chassis...
... information, please visit our website: http://www.asrock.com Please realize that there is a certain risk involved with overclocking, including adjusting the setting in the BIOS, applying Untied Overclocking Technology, or using third-party overclocking tools. English 5 It should be done at your system. H310CM-HDV / H310CM-DVS Hardware Monitor • Temperature Sensing: CPU, Chassis...
User Manual
Page 11
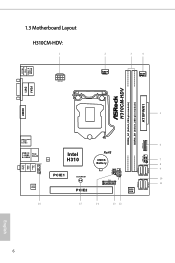
USB 2.0 T: USB1 B: USB2 PS2 Keyboard /Mouse HDMI1 1.3 Motherboard Layout H310CM-HDV: 1 ATX12V1 2 CPU_FAN1 3 4 CHA_FAN1/WP ATXPWR1 H310CM-HDV DDR4_A1 (64 bit, 288-pin module) DDR4_B1 (64 bit, 288-pin module) VGA1 DVI1 5 USB 3.1 Gen1 T: USB1 B: USB2 6 USB3_3_4 Top: LINE IN Center: FRONT Bottom: MIC IN USB 2.0 Top: T: USB3 RJ-45 B: USB4 LAN HD_AUDIO1 Intel H310 RoHS CMOS Battery USB_5_6 1 7 1 8 9 SATA3_2 SATA3_3 SPK_CI1 1 PLED PWRBTN PANEL1 1 HDLED RESET 1 PCIE1 CLRCMOS1 10 TPMS1 1 11 SATA3_0 SATA3_1 AUDIO CODEC PCIE2 BIOS ROM 16 15 14 13 12 English 6
USB 2.0 T: USB1 B: USB2 PS2 Keyboard /Mouse HDMI1 1.3 Motherboard Layout H310CM-HDV: 1 ATX12V1 2 CPU_FAN1 3 4 CHA_FAN1/WP ATXPWR1 H310CM-HDV DDR4_A1 (64 bit, 288-pin module) DDR4_B1 (64 bit, 288-pin module) VGA1 DVI1 5 USB 3.1 Gen1 T: USB1 B: USB2 6 USB3_3_4 Top: LINE IN Center: FRONT Bottom: MIC IN USB 2.0 Top: T: USB3 RJ-45 B: USB4 LAN HD_AUDIO1 Intel H310 RoHS CMOS Battery USB_5_6 1 7 1 8 9 SATA3_2 SATA3_3 SPK_CI1 1 PLED PWRBTN PANEL1 1 HDLED RESET 1 PCIE1 CLRCMOS1 10 TPMS1 1 11 SATA3_0 SATA3_1 AUDIO CODEC PCIE2 BIOS ROM 16 15 14 13 12 English 6
User Manual
Page 12
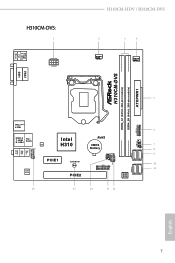
USB 2.0 T: USB1 B: USB2 PS2 Keyboard /Mouse H310CM-DVS: 1 ATX12V1 H310CM-HDV / H310CM-DVS 2 CPU_FAN1 3 4 CHA_FAN1/WP ATXPWR1 H310CM-DVS DDR4_A1 (64 bit, 288-pin module) DDR4_B1 (64 bit, 288-pin module) VGA1 DVI1 5 USB 3.1 Gen1 T: USB1 B: USB2 6 USB3_3_4 Top: LINE IN Center: FRONT Bottom: MIC IN USB 2.0 Top: T: USB3 RJ-45 B: USB4 LAN HD_AUDIO1 Intel H310 RoHS CMOS Battery USB_5_6 1 7 1 8 9 SATA3_2 SATA3_3 SPK_CI1 1 PLED PWRBTN PANEL1 1 HDLED RESET 1 PCIE1 CLRCMOS1 10 TPMS1 1 11 SATA3_0 SATA3_1 AUDIO CODEC PCIE2 BIOS ROM 16 15 14 13 12 English 7
USB 2.0 T: USB1 B: USB2 PS2 Keyboard /Mouse H310CM-DVS: 1 ATX12V1 H310CM-HDV / H310CM-DVS 2 CPU_FAN1 3 4 CHA_FAN1/WP ATXPWR1 H310CM-DVS DDR4_A1 (64 bit, 288-pin module) DDR4_B1 (64 bit, 288-pin module) VGA1 DVI1 5 USB 3.1 Gen1 T: USB1 B: USB2 6 USB3_3_4 Top: LINE IN Center: FRONT Bottom: MIC IN USB 2.0 Top: T: USB3 RJ-45 B: USB4 LAN HD_AUDIO1 Intel H310 RoHS CMOS Battery USB_5_6 1 7 1 8 9 SATA3_2 SATA3_3 SPK_CI1 1 PLED PWRBTN PANEL1 1 HDLED RESET 1 PCIE1 CLRCMOS1 10 TPMS1 1 11 SATA3_0 SATA3_1 AUDIO CODEC PCIE2 BIOS ROM 16 15 14 13 12 English 7
User Manual
Page 16
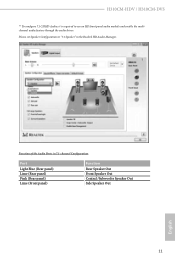
Please set Speaker Configuration to use an HD front panel audio module and enable the multichannel audio feature through the audio driver. Function of the Audio Ports in the Realtek HD Audio Manager. H310CM-HDV / H310CM-DVS ** To configure 7.1 CH HD Audio, it is required to "7.1 Speaker"in 7.1-channel Configuration: Port Light Blue (Rear panel) Lime (Rear panel) Pink (Rear panel) Lime (Front panel) Function Rear Speaker Out Front Speaker Out Central /Subwoofer Speaker Out Side Speaker Out 11 English
Please set Speaker Configuration to use an HD front panel audio module and enable the multichannel audio feature through the audio driver. Function of the Audio Ports in the Realtek HD Audio Manager. H310CM-HDV / H310CM-DVS ** To configure 7.1 CH HD Audio, it is required to "7.1 Speaker"in 7.1-channel Configuration: Port Light Blue (Rear panel) Lime (Rear panel) Pink (Rear panel) Lime (Front panel) Function Rear Speaker Out Front Speaker Out Central /Subwoofer Speaker Out Side Speaker Out 11 English

User Manual
Page 18
Do not force to insert the CPU into the socket, please check if the PnP cap is on the socket, if the CPU surface is found. Unplug all power cables before installing the CPU. 1 A B 2 13 English Otherwise, the CPU will be seriously damaged. 2. H310CM-HDV / H310CM-DVS 2.1 Installing the CPU 1. Before you insert the 1151-Pin CPU into the socket if above situation is unclean, or if there are any bent pins in the socket.
Do not force to insert the CPU into the socket, please check if the PnP cap is on the socket, if the CPU surface is found. Unplug all power cables before installing the CPU. 1 A B 2 13 English Otherwise, the CPU will be seriously damaged. 2. H310CM-HDV / H310CM-DVS 2.1 Installing the CPU 1. Before you insert the 1151-Pin CPU into the socket if above situation is unclean, or if there are any bent pins in the socket.

User Manual
Page 20
H310CM-HDV / H310CM-DVS Please save and replace the cover if the processor is removed. The cover must be placed if you wish to return the motherboard for after service. 15 English
H310CM-HDV / H310CM-DVS Please save and replace the cover if the processor is removed. The cover must be placed if you wish to return the motherboard for after service. 15 English

User Manual
Page 22
... a DDR, DDR2 or DDR3 memory module into the slot at incorrect orientation. 17 English For dual channel configuration, you force the DIMM into a DDR4 slot; H310CM-HDV / H310CM-DVS 2.3 Installing Memory Modules (DIMM) This motherboard provides two 288-pin DDR4 (Double Data Rate 4) DIMM slots, and supports Dual Channel Memory Technology. 1. otherwise, this motherboard...
... a DDR, DDR2 or DDR3 memory module into the slot at incorrect orientation. 17 English For dual channel configuration, you force the DIMM into a DDR4 slot; H310CM-HDV / H310CM-DVS 2.3 Installing Memory Modules (DIMM) This motherboard provides two 288-pin DDR4 (Double Data Rate 4) DIMM slots, and supports Dual Channel Memory Technology. 1. otherwise, this motherboard...
User Manual
Page 24
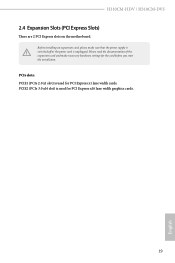
PCIe slots: PCIE1 (PCIe 2.0 x1 slot) is used for PCI Express x16 lane width graphics cards. 19 English Before installing an expansion card, please make necessary hardware settings for PCI Express x1 lane width cards. Please read the documentation of the expansion card and make sure that the power supply is switched off or the power cord is used for the card before you start the installation. PCIE2 (PCIe 3.0 x16 slot) is unplugged. H310CM-HDV / H310CM-DVS 2.4 Expansion Slots (PCI Express Slots) There are 2 PCI Express slots on the motherboard.
PCIe slots: PCIE1 (PCIe 2.0 x1 slot) is used for PCI Express x16 lane width graphics cards. 19 English Before installing an expansion card, please make necessary hardware settings for PCI Express x1 lane width cards. Please read the documentation of the expansion card and make sure that the power supply is switched off or the power cord is used for the card before you start the installation. PCIE2 (PCIe 3.0 x16 slot) is unplugged. H310CM-HDV / H310CM-DVS 2.4 Expansion Slots (PCI Express Slots) There are 2 PCI Express slots on the motherboard.
User Manual
Page 26
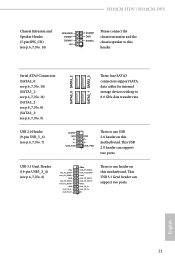
... (9-pin USB_5_6) (see p.6, 7, No. 9) SATA3_0 SATA3_2 SATA3_1 SATA3_3 These four SATA3 connectors support SATA data cables for internal storage devices with up to this motherboard. H310CM-HDV / H310CM-DVS Chassis Intrusion and Speaker Header (7-pin SPK_CI1) (see p.6, 7, No. 14) SPEAKER DUMMY DUMMY +5V DUMMY GND SIGNAL 1 Please connect the chassis intrusion and the chassis...
... (9-pin USB_5_6) (see p.6, 7, No. 9) SATA3_0 SATA3_2 SATA3_1 SATA3_3 These four SATA3 connectors support SATA data cables for internal storage devices with up to this motherboard. H310CM-HDV / H310CM-DVS Chassis Intrusion and Speaker Header (7-pin SPK_CI1) (see p.6, 7, No. 14) SPEAKER DUMMY DUMMY +5V DUMMY GND SIGNAL 1 Please connect the chassis intrusion and the chassis...
User Manual
Page 28
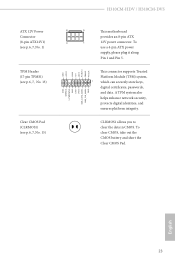
... p.6, 7, No. 13) Clear CMOS Pad (CLRMOS1) (see p.6, 7, No. 15) GND SERIRQ # S_PWRDWN # GN D LAD1 LAD2 SMB_DATA_MAIN SMB_CLK_MAIN GN D +3VS B LAD0 +3V LAD3 PCIRST # FRAM E PCICLK H310CM-HDV / H310CM-DVS 8 5 This motherboard provides an 8-pin ATX 4 1 12V power connector. A TPM system also helps enhance network security, protects digital identities, and ensures platform integrity. English 23...
... p.6, 7, No. 13) Clear CMOS Pad (CLRMOS1) (see p.6, 7, No. 15) GND SERIRQ # S_PWRDWN # GN D LAD1 LAD2 SMB_DATA_MAIN SMB_CLK_MAIN GN D +3VS B LAD0 +3V LAD3 PCIRST # FRAM E PCICLK H310CM-HDV / H310CM-DVS 8 5 This motherboard provides an 8-pin ATX 4 1 12V power connector. A TPM system also helps enhance network security, protects digital identities, and ensures platform integrity. English 23...
User Manual
Page 30
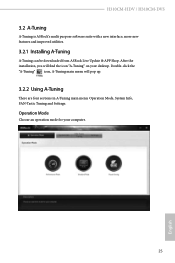
H310CM-HDV / H310CM-DVS 3.2 A-Tuning A-Tuning is ASRock's multi purpose software suite with a new interface, more new features and improved utilities. 3.2.1 Installing A-Tuning A-Tuning can be downloaded from ASRock Live Update & APP Shop. Double-click the "A-Tuning" icon, A-Tuning main menu will find the icon "A-Tuning" on your computer. 25 English Operation Mode Choose an operation mode for your desktop. After the installation, you will pop up. 3.2.2 Using A-Tuning There are four sections in A-Tuning main menu: Operation Mode, System Info, FAN-Tastic Tuning and Settings.
H310CM-HDV / H310CM-DVS 3.2 A-Tuning A-Tuning is ASRock's multi purpose software suite with a new interface, more new features and improved utilities. 3.2.1 Installing A-Tuning A-Tuning can be downloaded from ASRock Live Update & APP Shop. Double-click the "A-Tuning" icon, A-Tuning main menu will find the icon "A-Tuning" on your computer. 25 English Operation Mode Choose an operation mode for your desktop. After the installation, you will pop up. 3.2.2 Using A-Tuning There are four sections in A-Tuning main menu: Operation Mode, System Info, FAN-Tastic Tuning and Settings.
User Manual
Page 32
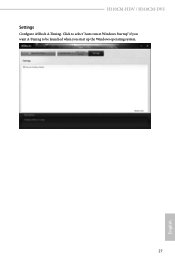
H310CM-HDV / H310CM-DVS Settings Configure ASRock A-Tuning. Click to select "Auto run at Windows Startup" if you want A-Tuning to be launched when you start up the Windows operating system. 27 English
H310CM-HDV / H310CM-DVS Settings Configure ASRock A-Tuning. Click to select "Auto run at Windows Startup" if you want A-Tuning to be launched when you start up the Windows operating system. 27 English
User Manual
Page 34
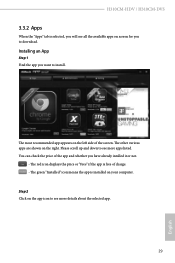
The other various apps are shown on the left side of the screen. You can check the price of charge. - H310CM-HDV / H310CM-DVS 3.3.2 Apps When the "Apps" tab is selected, you will see more details about the selected app. 29 English The green "Installed" icon means the app ...
The other various apps are shown on the left side of the screen. You can check the price of charge. - H310CM-HDV / H310CM-DVS 3.3.2 Apps When the "Apps" tab is selected, you will see more details about the selected app. 29 English The green "Installed" icon means the app ...

User Manual
Page 36
Step 1 Click on the yellow icon to see more details. English 31 Step 2 Click on the app icon to start upgrading. H310CM-HDV / H310CM-DVS Upgrading an App You can only upgrade the apps you will find the mark of "New Version" appears below the installed app icon. When there is an available new version for your app, you have already installed.
Step 1 Click on the yellow icon to see more details. English 31 Step 2 Click on the app icon to start upgrading. H310CM-HDV / H310CM-DVS Upgrading an App You can only upgrade the apps you will find the mark of "New Version" appears below the installed app icon. When there is an available new version for your app, you have already installed.

User Manual
Page 38
H310CM-HDV / H310CM-DVS 3.3.4 Setting In the "Setting" page, you can change the language, select the server location, and determine if you want to automatically run the ASRock Live Update & APP Shop on Windows startup. 33 English
H310CM-HDV / H310CM-DVS 3.3.4 Setting In the "Setting" page, you can change the language, select the server location, and determine if you want to automatically run the ASRock Live Update & APP Shop on Windows startup. 33 English
User Manual
Page 40
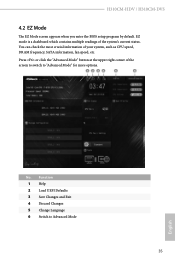
... system's current status. EZ mode is a dashboard which contains multiple readings of your system, such as CPU speed, DRAM frequency, SATA information, fan speed, etc. H310CM-HDV / H310CM-DVS 4.2 EZ Mode The EZ Mode screen appears when you enter the BIOS setup program by default.
... system's current status. EZ mode is a dashboard which contains multiple readings of your system, such as CPU speed, DRAM frequency, SATA information, fan speed, etc. H310CM-HDV / H310CM-DVS 4.2 EZ Mode The EZ Mode screen appears when you enter the BIOS setup program by default.

User Manual
Page 42
...(s) Description + / - Please check the following table for all the settings Save changes and exit the SETUP UTILITY Print screen Jump to click your required item. H310CM-HDV / H310CM-DVS 4.3.2 Navigation Keys Use < > key or < > key to choose among the selections on the menu bar, and use the mouse to the Exit Screen or exit...
...(s) Description + / - Please check the following table for all the settings Save changes and exit the SETUP UTILITY Print screen Jump to click your required item. H310CM-HDV / H310CM-DVS 4.3.2 Navigation Keys Use < > key or < > key to choose among the selections on the menu bar, and use the mouse to the Exit Screen or exit...
