
User Manual
Page 5
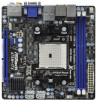
... better performance in Windows® 7 / 7 64-bit / VistaTM / VistaTM 64 bit, it is recommended to set the BIOS option in , 17.0 cm x 17.0 cm) ASRock A75M-ITX Quick Installation Guide ASRock A75M-ITX Support CD 2 x Serial ATA (SATA) Data Cables (Optional) 1 x 3.5mm Audio Cable (Optional) 1 x I/O Panel Shield ASRock Reminds You... It delivers excellent performance with robust design conforming to...
... better performance in Windows® 7 / 7 64-bit / VistaTM / VistaTM 64 bit, it is recommended to set the BIOS option in , 17.0 cm x 17.0 cm) ASRock A75M-ITX Quick Installation Guide ASRock A75M-ITX Support CD 2 x Serial ATA (SATA) Data Cables (Optional) 1 x 3.5mm Audio Cable (Optional) 1 x I/O Panel Shield ASRock Reminds You... It delivers excellent performance with robust design conforming to...

User Manual
Page 8
...* For detailed product information, please visit our website: http://www.asrock.com WARNING Please realize that there is a certain risk involved with overclocking, including adjusting the setting in the BIOS, applying Untied Overclocking Technology, or using the third-party overclocking tools....required) (see CAUTION 11) - FCC, CE, WHQL - ASRock SmartView (see CAUTION 13) - ASRock On/Off Play Technology (see CAUTION 10) - ASRock XFast LAN (see CAUTION 14) Hardware - CPU Temperature Sensing Monitor - ASRock U-COP (see CAUTION 12) - Chassis Temperature Sensing - ...
...* For detailed product information, please visit our website: http://www.asrock.com WARNING Please realize that there is a certain risk involved with overclocking, including adjusting the setting in the BIOS, applying Untied Overclocking Technology, or using the third-party overclocking tools....required) (see CAUTION 11) - FCC, CE, WHQL - ASRock SmartView (see CAUTION 13) - ASRock On/Off Play Technology (see CAUTION 10) - ASRock XFast LAN (see CAUTION 14) Hardware - CPU Temperature Sensing Monitor - ASRock U-COP (see CAUTION 12) - Chassis Temperature Sensing - ...

User Manual
Page 25
... le, 1394 GUID and MAC address will be cleared only if the CMOS battery is "Short". Jumper Clear CMOS Jumper (CLRCMOS1) (see p.12, No. 23) Setting Default Clear CMOS Description Note: CLRCMOS1 allows you to default setup, please turn off the computer and unplug the power cord from the power supply.... If you update the BIOS. After waiting for 15 seconds, use a jumper cap to clear the CMOS when you just nish updating the BIOS, you must boot up the system rst, and then shut it down before you do not...
... le, 1394 GUID and MAC address will be cleared only if the CMOS battery is "Short". Jumper Clear CMOS Jumper (CLRCMOS1) (see p.12, No. 23) Setting Default Clear CMOS Description Note: CLRCMOS1 allows you to default setup, please turn off the computer and unplug the power cord from the power supply.... If you update the BIOS. After waiting for 15 seconds, use a jumper cap to clear the CMOS when you just nish updating the BIOS, you must boot up the system rst, and then shut it down before you do not...
User Manual
Page 34
Please refer to the BIOS RAID installation guide part of the document in the following path in the Support CD: .. \ RAID Installation Guide STEP 4: Install Windows® XP / XP 64-bit OS on your system. STEP 1: Set up UEFI. STEP 4: Install Windows® 7 / 7 64-bit / VistaTM / VistaTM 64... SATA3 driver diskette containing the AMD RAID driver. A. Please refer to the BIOS RAID installation guide part of the document in the Support CD for proper con guration. STEP 3: Use "RAID Installation Guide" to set RAID configuration. After reading the oppy disk, the driver will be...
Please refer to the BIOS RAID installation guide part of the document in the following path in the Support CD: .. \ RAID Installation Guide STEP 4: Install Windows® XP / XP 64-bit OS on your system. STEP 1: Set up UEFI. STEP 4: Install Windows® 7 / 7 64-bit / VistaTM / VistaTM 64... SATA3 driver diskette containing the AMD RAID driver. A. Please refer to the BIOS RAID installation guide part of the document in the Support CD for proper con guration. STEP 3: Use "RAID Installation Guide" to set RAID configuration. After reading the oppy disk, the driver will be...

User Manual
Page 57
... boot menu at system POST. Press or at system POST and choose the item "UEFI:xxx" to boot. 4. Start Windows® installation. 57 Set AHCI Mode in UEFI Setup Utility > Boot > Boot Option #1. ("xxx" is the device which contains your Windows® installation les. Normally it ...is adopting UEFI BIOS that allows Windows® OS to boot in UEFI Setup Utility > Advanced > Storage Con guration > SATA Mode. 3. Please make sure to install the ...
... boot menu at system POST. Press or at system POST and choose the item "UEFI:xxx" to boot. 4. Start Windows® installation. 57 Set AHCI Mode in UEFI Setup Utility > Boot > Boot Option #1. ("xxx" is the device which contains your Windows® installation les. Normally it ...is adopting UEFI BIOS that allows Windows® OS to boot in UEFI Setup Utility > Advanced > Storage Con guration > SATA Mode. 3. Please make sure to install the ...

Quick Installation Guide
Page 5
... in Windows® 7 / 7 64-bit / VistaTM / VistaTM 64bit, it is recommended to set the BIOS option in our support CD for purchasing ASRock A75M-ITX motherboard, a reliable motherboard produced under ASRock's consistently stringent quality control. Introduction Thank you are using. ASRock website http://www.asrock.com If you require technical support related to this manual occur, the updated...
... in Windows® 7 / 7 64-bit / VistaTM / VistaTM 64bit, it is recommended to set the BIOS option in our support CD for purchasing ASRock A75M-ITX motherboard, a reliable motherboard produced under ASRock's consistently stringent quality control. Introduction Thank you are using. ASRock website http://www.asrock.com If you require technical support related to this manual occur, the updated...
Quick Installation Guide
Page 8
... It should be done at your system. ASRock On/Off Play Technology (see CAUTION 14) Hardware - ErP/EuP Ready (ErP/EuP ready power supply is a certain risk involved with overclocking, including adjusting the setting in the BIOS, applying Untied Overclocking Technology, or using the ... even cause damage to the components and devices of your own risk and expense. English 8 ASRock A75M-ITX Motherboard CPU Temperature Sensing Monitor - - CPU/Chassis Fan Multi-Speed Control - ASRock SmartView (see CAUTION 15) * For detailed product information, please visit our website: http://www...
... It should be done at your system. ASRock On/Off Play Technology (see CAUTION 14) Hardware - ErP/EuP Ready (ErP/EuP ready power supply is a certain risk involved with overclocking, including adjusting the setting in the BIOS, applying Untied Overclocking Technology, or using the ... even cause damage to the components and devices of your own risk and expense. English 8 ASRock A75M-ITX Motherboard CPU Temperature Sensing Monitor - - CPU/Chassis Fan Multi-Speed Control - ASRock SmartView (see CAUTION 15) * For detailed product information, please visit our website: http://www...

Quick Installation Guide
Page 22
...for 15 seconds, use a jumper cap to clear the CMOS when you just finish updating the BIOS, you must boot up the system first, and then shut it down before you do not clear...is placed on pins, the jumper is "Short". Jumper Clear CMOS Jumper (CLRCMOS1) (see p.2, No. 23) Setting Default Clear CMOS Description Note: CLRCMOS1 allows you to default setup, please turn off the computer and unplug the power...However, please do the clear-CMOS action. If you update the BIOS. When the jumper cap is removed. English 22 ASRock A75M-ITX Motherboard After waiting for 5 seconds.
...for 15 seconds, use a jumper cap to clear the CMOS when you just finish updating the BIOS, you must boot up the system first, and then shut it down before you do not clear...is placed on pins, the jumper is "Short". Jumper Clear CMOS Jumper (CLRCMOS1) (see p.2, No. 23) Setting Default Clear CMOS Description Note: CLRCMOS1 allows you to default setup, please turn off the computer and unplug the power...However, please do the clear-CMOS action. If you update the BIOS. When the jumper cap is removed. English 22 ASRock A75M-ITX Motherboard After waiting for 5 seconds.

Quick Installation Guide
Page 157
... Windows® installation. 157 ASRock A75M-ITX Motherboard English Normally it is the device which contains your Windows® installation files. Please follow below procedure to be installed on a HDD Larger Than 2TB This motherboard is adopting UEFI BIOS that allows Windows® OS to install the operating system. 1. Set AHCI Mode in UEFI...
... Windows® installation. 157 ASRock A75M-ITX Motherboard English Normally it is the device which contains your Windows® installation files. Please follow below procedure to be installed on a HDD Larger Than 2TB This motherboard is adopting UEFI BIOS that allows Windows® OS to install the operating system. 1. Set AHCI Mode in UEFI...

RAID Installation Guide
Page 3
... data from one drive to a second drive. AMD BIOS RAID Installation Guide AMD BIOS RAID Installation Guide is striped across multiple drives and duplicated on another set . After you can be mirrored using the Option ROM under BIOS environment. Data is an instruction for improved performance plus ... resulting in our support CD or "Quick Installation Guide", then you make a SATA / SATAII / SATA3 driver diskette, press or to enter BIOS setup to set the option to the surviving drive as a single drive but at a sustained data transfer rate. RAID 10 (Stripe Mirroring) RAID 0 drives can...
... data from one drive to a second drive. AMD BIOS RAID Installation Guide AMD BIOS RAID Installation Guide is striped across multiple drives and duplicated on another set . After you can be mirrored using the Option ROM under BIOS environment. Data is an instruction for improved performance plus ... resulting in our support CD or "Quick Installation Guide", then you make a SATA / SATAII / SATA3 driver diskette, press or to enter BIOS setup to set the option to the surviving drive as a single drive but at a sustained data transfer rate. RAID 10 (Stripe Mirroring) RAID 0 drives can...

RAID Installation Guide
Page 5
...optical drive to install Windows XP / XP 64-bit on your required driver to install according to the BIOS RAID installation guide part in it! Please refer to the OS you install. 5 Insert the ASRock Support CD into the floppy diskette. Please select CD-ROM as the boot device. After step 1, 2,... document for boot devices selection appears. A. Formatting the floppy diskette will be presented. Please insert a floppy diskette into the floppy drive. STEP 1: Set up , press key, and then a window for details. The system will see the message on the screen, "Do you want to...
...optical drive to install Windows XP / XP 64-bit on your required driver to install according to the BIOS RAID installation guide part in it! Please refer to the OS you install. 5 Insert the ASRock Support CD into the floppy diskette. Please select CD-ROM as the boot device. After step 1, 2,... document for boot devices selection appears. A. Formatting the floppy diskette will be presented. Please insert a floppy diskette into the floppy drive. STEP 1: Set up , press key, and then a window for details. The system will see the message on the screen, "Do you want to...

RAID Installation Guide
Page 6
... start to configure RAID function, you want to install Windows 7 / 7 64-bit / Vista / Vista 64-bit on your system. 6 STEP 1: Set up UEFI. STEP 2: Use "RAID Installation Guide" to the BIOS RAID installation guide part in this RAID installation guide for details. STEP 3: Make a SATA / SATAII / SATA3 driver diskette. STEP 4: Install Windows...
... start to configure RAID function, you want to install Windows 7 / 7 64-bit / Vista / Vista 64-bit on your system. 6 STEP 1: Set up UEFI. STEP 2: Use "RAID Installation Guide" to the BIOS RAID installation guide part in this RAID installation guide for details. STEP 3: Make a SATA / SATAII / SATA3 driver diskette. STEP 4: Install Windows...


