
RAID Installation Guide
Page 4
Insert the ASRock Support CD into the floppy drive, and press any key. D. Formatting the floppy... press . After reading the floppy disk, the driver will lose ALL data in this RAID installation guide for boot devices selection appears. When you see these messages, Please insert a diskette into the floppy diskette. Select the ...optical drive to install Windows® 7 / 7 64-bit / VistaTM / VistaTM 64-bit on your system. Before you want to boot your system. After step 1, 2, 3, you need to install a third-party RAID driver. A. B. B. Then you will start to...
Insert the ASRock Support CD into the floppy drive, and press any key. D. Formatting the floppy... press . After reading the floppy disk, the driver will lose ALL data in this RAID installation guide for boot devices selection appears. When you see these messages, Please insert a diskette into the floppy diskette. Select the ...optical drive to install Windows® 7 / 7 64-bit / VistaTM / VistaTM 64-bit on your system. Before you want to boot your system. After step 1, 2, 3, you need to install a third-party RAID driver. A. B. B. Then you will start to...

RAID Installation Guide
Page 6
... your physical drives as RAID logical drives. Monitoring RAID status - Diagnosing critical and offline RAID logical drives - If this is the first time you have booted with tools to set up your system. 1.4 Create Disk Array Power on physical drives - The RAID Option ROM includes a Utility with the disk drives installed...
... your physical drives as RAID logical drives. Monitoring RAID status - Diagnosing critical and offline RAID logical drives - If this is the first time you have booted with tools to set up your system. 1.4 Create Disk Array Power on physical drives - The RAID Option ROM includes a Utility with the disk drives installed...

RAID Installation Guide
Page 10
If you are not supported. Boot the PC or server, launch Windows, and log in folder _jvm under Windows environment. AMD Windows RAID Installation Guide AMD Windows RAID Installation Guide is ...
If you are not supported. Boot the PC or server, launch Windows, and log in folder _jvm under Windows environment. AMD Windows RAID Installation Guide AMD Windows RAID Installation Guide is ...

RAID Installation Guide
Page 16
... screen appears again, where you can create an additional logical drive. You cannot change this setting. 12. This is None. Erases the reserve and master boot sectors of the physical drives being added to the nearest whole gigabyte. No initialization. Select an Initialization policy from the dropdown menu. This choice is...
... screen appears again, where you can create an additional logical drive. You cannot change this setting. 12. This is None. Erases the reserve and master boot sectors of the physical drives being added to the nearest whole gigabyte. No initialization. Select an Initialization policy from the dropdown menu. This choice is...

User Manual
Page 4
...figuration 49 3.4.5 Super IO Configuration 50 3.4.6 ACPI Configuration 51 3.4.7 USB Configuration 52 3.5 Hardware Health Event Monitoring Screen 53 3.6 Boot Screen 54 3.7 Security Screen 55 3.8 Exit Screen 56 4. Software Support 57 4.1 Install Operating System 57 4.2 Support CD Information 57 4.2.1 Running Support CD 57 4.2.2 Drivers Menu...
...figuration 49 3.4.5 Super IO Configuration 50 3.4.6 ACPI Configuration 51 3.4.7 USB Configuration 52 3.5 Hardware Health Event Monitoring Screen 53 3.6 Boot Screen 54 3.7 Security Screen 55 3.8 Exit Screen 56 4. Software Support 57 4.1 Install Operating System 57 4.2 Support CD Information 57 4.2.1 Running Support CD 57 4.2.2 Drivers Menu...

User Manual
Page 8
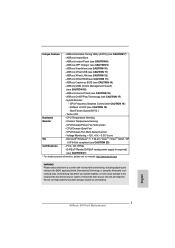
... system stability, or even cause damage to the components and devices of your own risk and expense. ASRock Instant Boot - ASRock APP Charger (see CAUTION 13) - CPU/Chassis/Power Fan Tachometer - Voltage Monitoring: +12V, +5V, +3.3V, Vcore OS - ASRock XFast RAM (see CAUTION 9) - Chassis Temperature Sensing - CPU/Chassis Fan Multi-Speed Control - Unique Feature...
... system stability, or even cause damage to the components and devices of your own risk and expense. ASRock Instant Boot - ASRock APP Charger (see CAUTION 13) - CPU/Chassis/Power Fan Tachometer - Voltage Monitoring: +12V, +5V, +3.3V, Vcore OS - ASRock XFast RAM (see CAUTION 9) - Chassis Temperature Sensing - CPU/Chassis Fan Multi-Speed Control - Unique Feature...
User Manual
Page 21
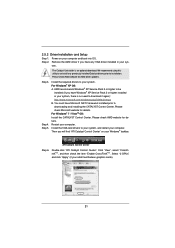
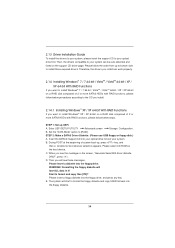
... need to downloading and installing the CATALYST Control Center. Step 5. You must have Windows® XP Service Pack 2 or higher installed in your computer and boot into OS. For Windows® 7 / VistaTM OS: Install the CATALYST Control Center. Select "2 GPUs" and click "Apply" (if you will find "ATI Catalyst Control...
... need to downloading and installing the CATALYST Control Center. Step 5. You must have Windows® XP Service Pack 2 or higher installed in your computer and boot into OS. For Windows® 7 / VistaTM OS: Install the CATALYST Control Center. Select "2 GPUs" and click "Apply" (if you will find "ATI Catalyst Control...

User Manual
Page 23
...23 Connect the front USB cable to the front USB port. Install Multi-Angle CIR Receiver to the USB_PWR USB 2.0 header (as below procedures for ASRock motherboard with CIR header. Enter Windows. Step5. Please make sure the wire assignments and the PP+ GND DUMMY pin assignments are matched correctly. 1... 23 45 GND IRTX IRRX ATX+5VSB Step3. Boot up your system and install Multi-Angle CIR Receiver to enter BIOS Setup Utility. Press or to the other front USB port then try again....
...23 Connect the front USB cable to the front USB port. Install Multi-Angle CIR Receiver to the USB_PWR USB 2.0 header (as below procedures for ASRock motherboard with CIR header. Enter Windows. Step5. Please make sure the wire assignments and the PP+ GND DUMMY pin assignments are matched correctly. 1... 23 45 GND IRTX IRRX ATX+5VSB Step3. Boot up your system and install Multi-Angle CIR Receiver to enter BIOS Setup Utility. Press or to the other front USB port then try again....

User Manual
Page 24
Please refer to connect it before you boot the system. * ASRock Smart Remote is enabled, the other port will remain USB function. 2. The Multi-Angle ...it on the market. 3. 3 CIR sensors in different angles 1. When the CIR function is only supported by some of ASRock motherboards. Multi-Angle CIR Receiver is compatible with most of the front USB port can receive the multi-direction infrared signals ...(top, down and front), which is used for the motherboard support list: http://www.asrock.com 24 Only one of the chassis on the rear panel. Please do not use the rear USB bracket to...
Please refer to connect it before you boot the system. * ASRock Smart Remote is enabled, the other port will remain USB function. 2. The Multi-Angle ...it on the market. 3. 3 CIR sensors in different angles 1. When the CIR function is only supported by some of ASRock motherboards. Multi-Angle CIR Receiver is compatible with most of the front USB port can receive the multi-direction infrared signals ...(top, down and front), which is used for the motherboard support list: http://www.asrock.com 24 Only one of the chassis on the rear panel. Please do not use the rear USB bracket to...

User Manual
Page 25
... no jumper cap is placed on these 2 pins. If you need to clear the CMOS when you just finish updating the BIOS, you must boot up the system first, and then shut it down before you do not clear the CMOS right after you to default setup, please turn...
... no jumper cap is placed on these 2 pins. If you need to clear the CMOS when you just finish updating the BIOS, you must boot up the system first, and then shut it down before you do not clear the CMOS right after you to default setup, please turn...
User Manual
Page 34
... install those required drivers. When you will lose ALL data in it! Then you see these messages, Please insert a diskette into your optical drive to boot your system. Please follow the order from up UEFI. A. STEP 2: Make a SATA3 Driver Diskette. (Please use USB floppy or floppy disk.) ... If you want to install Windows® XP / XP 64-bit on the support CD driver page. Please select CD-ROM as the boot device. Insert the ASRock Support CD into the floppy drive. B. Formatting the floppy diskette will see the message on the screen, "Generate Serial ATA...
... install those required drivers. When you will lose ALL data in it! Then you see these messages, Please insert a diskette into your optical drive to boot your system. Please follow the order from up UEFI. A. STEP 2: Make a SATA3 Driver Diskette. (Please use USB floppy or floppy disk.) ... If you want to install Windows® XP / XP 64-bit on the support CD driver page. Please select CD-ROM as the boot device. Insert the ASRock Support CD into the floppy drive. B. Formatting the floppy diskette will see the message on the screen, "Generate Serial ATA...

User Manual
Page 38
... system time/date information OC Tweaker To set up overclocking features Advanced To set up the advanced UEFI features H/W Monitor To display current hardware status Boot To set up the default system device to get into the sub screen. 38 You may not exactly match what you start up the security...
... system time/date information OC Tweaker To set up overclocking features Advanced To set up the advanced UEFI features H/W Monitor To display current hardware status Boot To set up the default system device to get into the sub screen. 38 You may not exactly match what you start up the security...

User Manual
Page 48
... feature. Onboard LAN This allows you want to set the power state after an unexpected AC/power loss. Good Night LED Enable this item to boot up when the power recovers. If you to turn off when the power recovers. 3.4.3 South Bridge Configuration Onboard HD Audio Select [Auto], [Enabled] or [Disabled...
... feature. Onboard LAN This allows you want to set the power state after an unexpected AC/power loss. Good Night LED Enable this item to boot up when the power recovers. If you to turn off when the power recovers. 3.4.3 South Bridge Configuration Onboard HD Audio Select [Auto], [Enabled] or [Disabled...

User Manual
Page 54
...Guard Enable or disable the feature of seconds to wait for you want to configure the boot settings and the boot priority. Boot Failure Guard Count Enable or disable the feature of Boot Failure Guard Count. AddOn ROM Display Use this item is set to adjust AddOn ROM Display. The...]. Bootup Num-Lock If this option to [On], it will automatically activate the Numeric Lock function after boot-up. Full Screen Logo Use this item to enable or disable OEM Logo. 3.6 Boot Screen In this section, it will display the available devices on your system for setup activation key. 65535...
...Guard Enable or disable the feature of seconds to wait for you want to configure the boot settings and the boot priority. Boot Failure Guard Count Enable or disable the feature of Boot Failure Guard Count. AddOn ROM Display Use this item is set to adjust AddOn ROM Display. The...]. Bootup Num-Lock If this option to [On], it will automatically activate the Numeric Lock function after boot-up. Full Screen Logo Use this item to enable or disable OEM Logo. 3.6 Boot Screen In this section, it will display the available devices on your system for setup activation key. 65535...

User Manual
Page 58
Press or at system POST and choose the item "UEFI:xxx" to launch boot menu at system POST. Normally it is an optical drive.) You can also press to boot. 4. Start Windows® installation. 58 Please follow below procedure to use Windows® VistaTM 64-bit (with SP1 or... 7 64-bit. 2. Please make sure to install the operating system. 1. Set AHCI Mode in UEFI Setup Utility > Boot > Boot Option #1. ("xxx" is adopting UEFI BIOS that allows Windows® OS to boot in UEFI Setup Utility > Advanced > Storage Configuration > SATA Mode. 3. Choose the item "UEFI:xxx" to...
Press or at system POST and choose the item "UEFI:xxx" to launch boot menu at system POST. Normally it is an optical drive.) You can also press to boot. 4. Start Windows® installation. 58 Please follow below procedure to use Windows® VistaTM 64-bit (with SP1 or... 7 64-bit. 2. Please make sure to install the operating system. 1. Set AHCI Mode in UEFI Setup Utility > Boot > Boot Option #1. ("xxx" is adopting UEFI BIOS that allows Windows® OS to boot in UEFI Setup Utility > Advanced > Storage Configuration > SATA Mode. 3. Choose the item "UEFI:xxx" to...

User Manual
Page 59
... number], for example you will see below procedure to install the operating system. 1. Please follow below : Drv[4E] Ctrl[B5] Lang[eng] 6. Press to enter Boot Manual. Choose UEFI : Built - Installing OS on a HDD Larger Than 2TB in EFI Shell. 5. Choose onboard RAID 3TB+ unlocker > UEFI Mode For GPT partition. in...
... number], for example you will see below procedure to install the operating system. 1. Please follow below : Drv[4E] Ctrl[B5] Lang[eng] 6. Press to enter Boot Manual. Choose UEFI : Built - Installing OS on a HDD Larger Than 2TB in EFI Shell. 5. Choose onboard RAID 3TB+ unlocker > UEFI Mode For GPT partition. in...
User Manual
Page 61
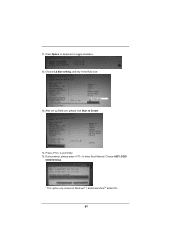
Choose Ld Size setting, and key in the Raid size. 13. Choose UEFI: SCSI CD/DVD Drive. * This option only shows on keyboard to Create. 14. During reboot, please press to exit Utility. 15. Press to enter Boot Manual. Press Space on Windows® 7 64-bit and VistaTM 64-bit OS. 61 11. After set up Raid size, please click Start to toggle checkbox. 12.
Choose Ld Size setting, and key in the Raid size. 13. Choose UEFI: SCSI CD/DVD Drive. * This option only shows on keyboard to Create. 14. During reboot, please press to exit Utility. 15. Press to enter Boot Manual. Press Space on Windows® 7 64-bit and VistaTM 64-bit OS. 61 11. After set up Raid size, please click Start to toggle checkbox. 12.

User Manual
Page 62
... install OS. Disable System Restore. De-select Local Disks for this problem. Then Press "Ok". 62 Then press "Enter". Follow Windows® Installation Guide to boot into Windows® or install driver/ utilities. Type "systempropertiesprotection" in a large hard disk (ex. Then Click "Turn System Restore Off" to fix this problem. Below...
... install OS. Disable System Restore. De-select Local Disks for this problem. Then Press "Ok". 62 Then press "Enter". Follow Windows® Installation Guide to boot into Windows® or install driver/ utilities. Type "systempropertiesprotection" in a large hard disk (ex. Then Click "Turn System Restore Off" to fix this problem. Below...

User Manual
Page 64
Reboot your system. (It may take about 5 mins to boot.) D. Please request the hotfix KB2505454 thru this hotfix then reboot by itself. D. Windows® 7 64-bit: A. After installing Windows® 7 64-bit, install the hotfix kb2505454. (This may take long time; >30 mins.) C. Reboot your system. E. Finish. 64 C. Please start to install motherboard drivers and utilities. 17. The Windows® will install this link: http://support.microsoft.com/kb/2505454/ B. After reboot, please start to install motherboard drivers and utilities.
Reboot your system. (It may take about 5 mins to boot.) D. Please request the hotfix KB2505454 thru this hotfix then reboot by itself. D. Windows® 7 64-bit: A. After installing Windows® 7 64-bit, install the hotfix kb2505454. (This may take long time; >30 mins.) C. Reboot your system. E. Finish. 64 C. Please start to install motherboard drivers and utilities. 17. The Windows® will install this link: http://support.microsoft.com/kb/2505454/ B. After reboot, please start to install motherboard drivers and utilities.
Quick Installation Guide
Page 7
... - FCC, CE, WHQL - We are not responsible for possible damage caused by overclocking. ASRock Extreme Tuning Utility (AXTU) (see CAUTION 12) - CPU Temperature Sensing Monitor - ASRock Instant Boot - ASRock XFast LAN (see CAUTION 7) - ErP/EuP Ready (ErP/EuP ready power supply is required... It should be done at your system. ASRock U-COP (see CAUTION 11) - English 7 ASRock 970 Pro3 Motherboard Hybrid Booster: - CPU/Chassis Fan Multi-Speed Control - CPU/Chassis Quiet Fan - ASRock XFast USB (see CAUTION 19) - ASRock OMG (Online Management Guard) (see CAUTION 15...
... - FCC, CE, WHQL - We are not responsible for possible damage caused by overclocking. ASRock Extreme Tuning Utility (AXTU) (see CAUTION 12) - CPU Temperature Sensing Monitor - ASRock Instant Boot - ASRock XFast LAN (see CAUTION 7) - ErP/EuP Ready (ErP/EuP ready power supply is required... It should be done at your system. ASRock U-COP (see CAUTION 11) - English 7 ASRock 970 Pro3 Motherboard Hybrid Booster: - CPU/Chassis Fan Multi-Speed Control - CPU/Chassis Quiet Fan - ASRock XFast USB (see CAUTION 19) - ASRock OMG (Online Management Guard) (see CAUTION 15...


