
RAID Installation Guide
Page 1
ATI RAID Installation Guide 1. ATI Windows RAID Installation Guide 8 2.1 Components of WebPAM Installation Software 8 2.2 Browser Support 8 2.3 Installing WebPAM 8 2.4 Log-in to RAID 2 1.2 RAID Configurations Precautions 2 1.3 Create Disk Array 3 2. ATI BIOS RAID Installation Guide 2 1.1 Introduction to WebPAM 11 2.5 Create RAID in WebPAM 12 1
ATI RAID Installation Guide 1. ATI Windows RAID Installation Guide 8 2.1 Components of WebPAM Installation Software 8 2.2 Browser Support 8 2.3 Installing WebPAM 8 2.4 Log-in to RAID 2 1.2 RAID Configurations Precautions 2 1.3 Create Disk Array 3 2. ATI BIOS RAID Installation Guide 2 1.1 Introduction to WebPAM 11 2.5 Create RAID in WebPAM 12 1

RAID Installation Guide
Page 2
... be mirrored using the onboard FastBuild BIOS utility under BIOS environment. Please use the onboard FastBuild BIOS utility to configure RAID. 1.1 Introduction to RAID The term "RAID" stands for "Redundant Array of Independent Disks", which is recommended to read and write data in our support CD ...plus resiliency. For example, if one drive to the surviving drive as a single drive but at a sustained data transfer rate. RAID 0 (Data Striping) RAID 0 is striped across multiple drives and duplicated on another set . It will improve data access and storage since the disk array ...
... be mirrored using the onboard FastBuild BIOS utility under BIOS environment. Please use the onboard FastBuild BIOS utility to configure RAID. 1.1 Introduction to RAID The term "RAID" stands for "Redundant Array of Independent Disks", which is recommended to read and write data in our support CD ...plus resiliency. For example, if one drive to the surviving drive as a single drive but at a sustained data transfer rate. RAID 0 (Data Striping) RAID 0 is striped across multiple drives and duplicated on another set . It will improve data access and storage since the disk array ...

RAID Installation Guide
Page 3
... display the following screen. All rights reserved. No Array is 60GB. 3. Press to create a RAID 1 (mirroring) array for data protection (the new drive must be the base storage size. If this RAID 0 set is 120GB. 2. Please verify the status of the same size or larger than the existing...recommended to "Clear Disk Data" or not. AHCI (tm) BIOS Version 2 . 5 . 1540 . 12 (c) 2004-2005 ATI Technology, Inc. Please backup your new RAID array. WARNING!! capacity and the other hard disk has 60GB, the maximum storage capacity for this is the first time you have booted with the...
... display the following screen. All rights reserved. No Array is 60GB. 3. Press to create a RAID 1 (mirroring) array for data protection (the new drive must be the base storage size. If this RAID 0 set is 120GB. 2. Please verify the status of the same size or larger than the existing...recommended to "Clear Disk Data" or not. AHCI (tm) BIOS Version 2 . 5 . 1540 . 12 (c) 2004-2005 ATI Technology, Inc. Please backup your new RAID array. WARNING!! capacity and the other hard disk has 60GB, the maximum storage capacity for this is the first time you have booted with the...

RAID Installation Guide
Page 5
... 5 Assign the appropriate number of disk drives to your logical drive configuration. Press Ctrl-Y to Modify Array Capacity or press any available RAID level for your bootable logical drive, it . While you are allowed to use any other key to use maximum capacity... One Logical ...for each available drive. Use the full capacity of the following actions: 1. Press to exit to cycle through logical drive types, including RAID 0, RAID 1, and RAID 10. Press the arrow key to move to save your logical drive. Y means this disk drive will next appear. Then please follow...
... 5 Assign the appropriate number of disk drives to your logical drive configuration. Press Ctrl-Y to Modify Array Capacity or press any available RAID level for your bootable logical drive, it . While you are allowed to use any other key to use maximum capacity... One Logical ...for each available drive. Use the full capacity of the following actions: 1. Press to exit to cycle through logical drive types, including RAID 0, RAID 1, and RAID 10. Press the arrow key to move to save your logical drive. Y means this disk drive will next appear. Then please follow...

RAID Installation Guide
Page 6
... desired capacity (MB) for the first logical drive and press . Please install the operating system to the first logical drive. You have successfully created a new RAID logical drive. Then please follow the steps below. 1. 2. Two Logical Drives After selecting the logical drive in Disk Assignments as the above-mentioned procedures, press...
... desired capacity (MB) for the first logical drive and press . Please install the operating system to the first logical drive. You have successfully created a new RAID logical drive. Then please follow the steps below. 1. 2. Two Logical Drives After selecting the logical drive in Disk Assignments as the above-mentioned procedures, press...

RAID Installation Guide
Page 7
...their capacity belongs to restart the computer. Press to a logical drive. 4. Press to the first logical drive. You have successfully created a new RAID logical drive. 2. Note that the disk drives in our support CD or "Quick Installation Guide". 7 Press again to your logical drive configuration. 5. ...Choose the RAID level and options for the second logical drive. Please install the operating system to exit the Utility. 6. Press the up and down arrow...
...their capacity belongs to restart the computer. Press to a logical drive. 4. Press to the first logical drive. You have successfully created a new RAID logical drive. 2. Note that the disk drives in our support CD or "Quick Installation Guide". 7 Press again to your logical drive configuration. 5. ...Choose the RAID level and options for the second logical drive. Please install the operating system to exit the Utility. 6. Press the up and down arrow...

RAID Installation Guide
Page 8
...The first WebPAM installation dialog box appears. 8 WebPAM uses this guide carefully and follow the instructions below to configure and manage RAID functions. 2.1 Components of WebPAM Installation Software WebPAM installation software will install two major components to launch it the default browser. Other... ATI SB600 SATA logical drives that may be present on your system. 2.2 Browser Support On the Host PC with the ATI SB600 SATA RAID Controller (the "Host PC"). 2. 2. Java Runtime Environment (in a private folder): The WebPAM installation program installs a private JRE in ...
...The first WebPAM installation dialog box appears. 8 WebPAM uses this guide carefully and follow the instructions below to configure and manage RAID functions. 2.1 Components of WebPAM Installation Software WebPAM installation software will install two major components to launch it the default browser. Other... ATI SB600 SATA logical drives that may be present on your system. 2.2 Browser Support On the Host PC with the ATI SB600 SATA RAID Controller (the "Host PC"). 2. 2. Java Runtime Environment (in a private folder): The WebPAM installation program installs a private JRE in ...

RAID Installation Guide
Page 12
Click 127.0.01., ATI SB600 SATA Controller, and then Controller 1 to WebPAM, you can click the button on the left. 4. After you successfully log-in to WebPAM, you are allowed to click the button on the top such as "Language", "Help", or "Logout" for other requirement. 2.5 Create RAID in WebPAM After you log-in to view the controller information. 12
Click 127.0.01., ATI SB600 SATA Controller, and then Controller 1 to WebPAM, you can click the button on the left. 4. After you successfully log-in to WebPAM, you are allowed to click the button on the top such as "Language", "Help", or "Logout" for other requirement. 2.5 Create RAID in WebPAM After you log-in to view the controller information. 12

RAID Installation Guide
Page 13
Click Logical Drive View. Click the Create button to select RAID level. Then you wish, click Next for example. 13 Here we take RAID 1 for the next page. After selecting the RAID level that you can start to create RAID array.
Click Logical Drive View. Click the Create button to select RAID level. Then you wish, click Next for example. 13 Here we take RAID 1 for the next page. After selecting the RAID level that you can start to create RAID array.

RAID Installation Guide
Page 14
You can select drive group. You can choose to create RAID. Select drives. Click Next. Click Next for one logical drive that you plan to use maximum capacity or key in the logical drive size in (GB). Then select the drives that has free space. Please select a free drive(s) for the next page. 14
You can select drive group. You can choose to create RAID. Select drives. Click Next. Click Next for one logical drive that you plan to use maximum capacity or key in the logical drive size in (GB). Then select the drives that has free space. Please select a free drive(s) for the next page. 14

RAID Installation Guide
Page 16
In the future, if you may click the Delete or Synchronization Schedule on your RAID requirement. 16 Finally, in Logical Drive Overview page, you can see the RAID configuration you just made on the top to configure other RAID functions, you plan to meet your system, including Assigned Name, RAID Level, Status, Background Activity, and Capacity.
In the future, if you may click the Delete or Synchronization Schedule on your RAID requirement. 16 Finally, in Logical Drive Overview page, you can see the RAID configuration you just made on the top to configure other RAID functions, you plan to meet your system, including Assigned Name, RAID Level, Status, Background Activity, and Capacity.

User Manual
Page 3
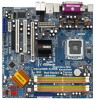
... Installing Windows® 2000 / XP / XP 64-bit / VistaTM / VistaTM 64-bit With RAID Functions 35 2.17.1 Installing Windows® 2000 / XP / XP 64-bit With RAID Functions 35 2.17.2 Installing Windows® VistaTM / VistaTM 64-bit With RAID Functions 37 3 Installation 14 2.1 Screw Holes 14 2.2 Pre-installation Precautions 14 2.3 CPU Installation 15... 1080p Blu-ray (BD) / HD-DVD Playback Support 10 1.5 1080p Blu-ray (BD) / HD-DVD Films Which Pass Our Lab Test 11 1.6 Motherboard Layout 12 1.7 ASRock DVI_1394 I/O 13 2. Contents 1.
... Installing Windows® 2000 / XP / XP 64-bit / VistaTM / VistaTM 64-bit With RAID Functions 35 2.17.1 Installing Windows® 2000 / XP / XP 64-bit With RAID Functions 35 2.17.2 Installing Windows® VistaTM / VistaTM 64-bit With RAID Functions 37 3 Installation 14 2.1 Screw Holes 14 2.2 Pre-installation Precautions 14 2.3 CPU Installation 15... 1080p Blu-ray (BD) / HD-DVD Playback Support 10 1.5 1080p Blu-ray (BD) / HD-DVD Films Which Pass Our Lab Test 11 1.6 Motherboard Layout 12 1.7 ASRock DVI_1394 I/O 13 2. Contents 1.

User Manual
Page 4
2.18 Installing Windows® 2000 / XP / XP 64-bit / VistaTM / VistaTM 64-bit Without RAID Functions 37 2.18.1 Installing Windows® 2000 / XP / XP 64-bit Without RAID Functions 38 2.18.2 Installing Windows® VistaTM / VistaTM 64-bit Without RAID Functions 39 2.19 Untied Overclocking Technology 40 3. BIOS SETUP UTILITY 41 3.1 Introduction 41 3.1.1 BIOS...
2.18 Installing Windows® 2000 / XP / XP 64-bit / VistaTM / VistaTM 64-bit Without RAID Functions 37 2.18.1 Installing Windows® 2000 / XP / XP 64-bit Without RAID Functions 38 2.18.2 Installing Windows® VistaTM / VistaTM 64-bit Without RAID Functions 39 2.19 Untied Overclocking Technology 40 3. BIOS SETUP UTILITY 41 3.1 Introduction 41 3.1.1 BIOS...

User Manual
Page 7
...Wake Up Events - CPU Quiet Fan - CD in /Front Speaker/Microphone (see CAUTION 10) - 4 x Serial ATAII 3.0Gb/s connectors, support RAID (RAID 0, RAID 1, RAID 0+1, JBOD and RAID 10), NCQ, AHCI and "Hot Plug" functions (see CAUTION 9) - 1 x Parallel Port (ECP/EPP Support) - 4 x Ready-to...Rear Speaker/Central/Bass/ Line in header - Supports jumperfree - Supports "Plug and Play" - Rear Panel I/O Connector BIOS Feature Support CD Hardware Monitor OS Certifications ASRock DVI_1394 I/O - 1 x PS/2 Mouse Port - 1 x PS/2 Keyboard Port - 1 x VGA/D-Sub Port - 1 x VGA/DVI-D Port (see ...
...Wake Up Events - CPU Quiet Fan - CD in /Front Speaker/Microphone (see CAUTION 10) - 4 x Serial ATAII 3.0Gb/s connectors, support RAID (RAID 0, RAID 1, RAID 0+1, JBOD and RAID 10), NCQ, AHCI and "Hot Plug" functions (see CAUTION 9) - 1 x Parallel Port (ECP/EPP Support) - 4 x Ready-to...Rear Speaker/Central/Bass/ Line in header - Supports jumperfree - Supports "Plug and Play" - Rear Panel I/O Connector BIOS Feature Support CD Hardware Monitor OS Certifications ASRock DVI_1394 I/O - 1 x PS/2 Mouse Port - 1 x PS/2 Keyboard Port - 1 x VGA/D-Sub Port - 1 x VGA/DVI-D Port (see ...

User Manual
Page 31
... data storage purpose, and your chassis. You need to enter WebPAM to create JBOD first, which means, after you need to use RAID 0+1, JBOD or RAID 10 function, you enter WebPAM, please click "Logical Drive View" "Create" "JBOD". STEP 4: Connect the other end of the ...2.12 Serial ATA (SATA) / Serial ATAII (SATAII) Hard Disks Installation This motherboard adopts ATITM SB600 southbridge chipset that , you need to use RAID 0 or RAID 1 function, you can find the empty SATA / SATAII HDDs information in our support CD for detailed operation procedures.) 31 After that supports Serial ...
... data storage purpose, and your chassis. You need to enter WebPAM to create JBOD first, which means, after you need to use RAID 0+1, JBOD or RAID 10 function, you enter WebPAM, please click "Logical Drive View" "Create" "JBOD". STEP 4: Connect the other end of the ...2.12 Serial ATA (SATA) / Serial ATAII (SATAII) Hard Disks Installation This motherboard adopts ATITM SB600 southbridge chipset that , you need to use RAID 0 or RAID 1 function, you can find the empty SATA / SATAII HDDs information in our support CD for detailed operation procedures.) 31 After that supports Serial ...

User Manual
Page 32
What is still power-on and in working condition. AHCI also provides usability enhancements such as RAID 1 then it is called "Hot Plug" for the action to insert and remove the SATA / SATAII HDDs while the ... Hot Plug Function? If the SATA / SATAII HDDs are built as Hot Plug. If SATA / SATAII HDDs are NOT set for RAID configuration, it cannot perform Hot Plug if the OS has been installed into the SATA / SATAII HDD. ATITM SB600 southbridge chipset provides ... Swap functions for SATA / SATAII Devices in working condition. 32 NOTE What is still power-on and in RAID / AHCI mode.
What is still power-on and in working condition. AHCI also provides usability enhancements such as RAID 1 then it is called "Hot Plug" for the action to insert and remove the SATA / SATAII HDDs while the ... Hot Plug Function? If the SATA / SATAII HDDs are built as Hot Plug. If SATA / SATAII HDDs are NOT set for RAID configuration, it cannot perform Hot Plug if the OS has been installed into the SATA / SATAII HDD. ATITM SB600 southbridge chipset provides ... Swap functions for SATA / SATAII Devices in working condition. 32 NOTE What is still power-on and in RAID / AHCI mode.
User Manual
Page 35
...website in your disk, please visit the below then. 1. Please visit our website for proper procedures of 2 or more SATA / SATAII HDDs with RAID functions, please follow the order from our support CD to your system now, but in the future, you do not insert HDMR card to this... If you finish installing all drivers to your system. For Windows® VistaTM / VistaTM 64-bit OS, the SATA / SATAII RAID driver keeps on a RAID disk composed of making a SP4 disk: http://www.microsoft.com/Windows2000/downloads/servicepacks/sp4/spdeploy. Please follow below steps. 35 2.15 Driver ...
...website in your disk, please visit the below then. 1. Please visit our website for proper procedures of 2 or more SATA / SATAII HDDs with RAID functions, please follow the order from our support CD to your system now, but in the future, you do not insert HDMR card to this... If you finish installing all drivers to your system. For Windows® VistaTM / VistaTM 64-bit OS, the SATA / SATAII RAID driver keeps on a RAID disk composed of making a SP4 disk: http://www.microsoft.com/Windows2000/downloads/servicepacks/sp4/spdeploy. Please follow below steps. 35 2.15 Driver ...
User Manual
Page 36
... configuration. When prompted, insert the SATA / SATAII driver diskette containing the ATITM RAID driver. If you need to set up BIOS. Enter BIOS SETUP UTILITY Advanced screen IDE Configuration. Insert the ASRock Support CD into floppy drive A: press any key. C. At the beginning of...174; XP 64-bit on IDE HDDs and want to manage (create, convert, delete, or rebuild) RAID functions on your system. (There are two ASRock Support CD in the Support CD: .. \ RAID Installation Guide NOTE2. Please select CD- D. E. The system will be presented. After reading the floppy...
... configuration. When prompted, insert the SATA / SATAII driver diskette containing the ATITM RAID driver. If you need to set up BIOS. Enter BIOS SETUP UTILITY Advanced screen IDE Configuration. Insert the ASRock Support CD into floppy drive A: press any key. C. At the beginning of...174; XP 64-bit on IDE HDDs and want to manage (create, convert, delete, or rebuild) RAID functions on your system. (There are two ASRock Support CD in the Support CD: .. \ RAID Installation Guide NOTE2. Please select CD- D. E. The system will be presented. After reading the floppy...
User Manual
Page 37
...VistaTM 64-bit optical disk into the optical drive to boot your system. When you see "Where do you want to set RAID configuration. NOTE. page, please insert the ASRock Support CD into your optical drive, and click the "Load Driver" button on the left on your system. STEP 1: Set...following path in our Support CD: (There are in the following path in the Support CD: .. \ RAID Installation Guide 37 Then, please set up BIOS. ATITM RAID drivers are two ASRock Support CD in the motherboard gift box pack, please choose the one for proper configuration. If you install Windows...
...VistaTM 64-bit optical disk into the optical drive to boot your system. When you see "Where do you want to set RAID configuration. NOTE. page, please insert the ASRock Support CD into your optical drive, and click the "Load Driver" button on the left on your system. STEP 1: Set...following path in our Support CD: (There are in the following path in the Support CD: .. \ RAID Installation Guide 37 Then, please set up BIOS. ATITM RAID drivers are two ASRock Support CD in the motherboard gift box pack, please choose the one for proper configuration. If you install Windows...

User Manual
Page 38
... 38 If you install. NOTE2. Before installing Windows® 2000 to your system, your system. If there is still suggested to the BIOS RAID installation guide part of "Using SATA / SATAII HDDs with NCQ and Hot Plug functions STEP 1: Set Up BIOS. A. Set the "SATA ...path in the following section 2.17.1 step 2 on SATA / SATAII HDD. For the proper operating procedures of creating JBOD, please refer to use RAID functions. Using SATA / SATAII HDDs with NCQ and Hot Plug functions" below website for Windows® VistaTM / VistaTM 64-bit users. NOTE1. ...
... 38 If you install. NOTE2. Before installing Windows® 2000 to your system, your system. If there is still suggested to the BIOS RAID installation guide part of "Using SATA / SATAII HDDs with NCQ and Hot Plug functions STEP 1: Set Up BIOS. A. Set the "SATA ...path in the following section 2.17.1 step 2 on SATA / SATAII HDD. For the proper operating procedures of creating JBOD, please refer to use RAID functions. Using SATA / SATAII HDDs with NCQ and Hot Plug functions" below website for Windows® VistaTM / VistaTM 64-bit users. NOTE1. ...


