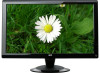

2236Vw Spec Sheet
Page 1
... are trademarks or registered trademarks of High-Definition contents. **Wall mount arm & bracket not included. A02/09 2236Vw Cabinet Color Panel Pixel Pitch Display Area Brightness Contrast Ratio Response Time Viewing Angle Scanning Frequency Pixel Frequency Maximum Resolution...FCC, CE, TUV/S, ROHS, Certified for Windows Vista Logo, EPEAT Gold Touch Sensitive Controls, USB Pass-thru, User Friendly Graphical OSD Menu, VESA 100mm Wall Mount Compliant**, Kensington Security Slot, includes AOC proprietory i-Menu software OSD Dimensions (WxHxD mm) Dimensions (WxHxD inches) Weight Monitor:...
... are trademarks or registered trademarks of High-Definition contents. **Wall mount arm & bracket not included. A02/09 2236Vw Cabinet Color Panel Pixel Pitch Display Area Brightness Contrast Ratio Response Time Viewing Angle Scanning Frequency Pixel Frequency Maximum Resolution...FCC, CE, TUV/S, ROHS, Certified for Windows Vista Logo, EPEAT Gold Touch Sensitive Controls, USB Pass-thru, User Friendly Graphical OSD Menu, VESA 100mm Wall Mount Compliant**, Kensington Security Slot, includes AOC proprietory i-Menu software OSD Dimensions (WxHxD mm) Dimensions (WxHxD inches) Weight Monitor:...

User's Manual 2236Vw
Page 17
Windows XP For Windows XP: 1 Click START. 2 Click SETTINGS. 3 Click CONTROL PANEL. 4 Click Appearance and Themes. 5 Double click DISPLAY. 17
Windows XP For Windows XP: 1 Click START. 2 Click SETTINGS. 3 Click CONTROL PANEL. 4 Click Appearance and Themes. 5 Double click DISPLAY. 17

User's Manual 2236Vw
Page 18
Windows ME/2000 For Windows ME/2000: 1 Click START. 2 Click SETTINGS. 3 Click CONTROL PANEL. 4 Double click DISPLAY. 5 Click SETTINGS. 6 Set the resolution SLIDE-BAR to 1920 by 1080. 18 6 Click SETTINGS. 7 Set the resolution SLIDE-BAR to 1920 by 1080.
Windows ME/2000 For Windows ME/2000: 1 Click START. 2 Click SETTINGS. 3 Click CONTROL PANEL. 4 Double click DISPLAY. 5 Click SETTINGS. 6 Set the resolution SLIDE-BAR to 1920 by 1080. 18 6 Click SETTINGS. 7 Set the resolution SLIDE-BAR to 1920 by 1080.
User's Manual 2236Vw
Page 20
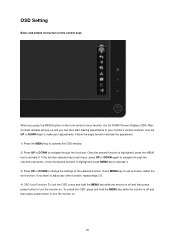
...UP or DOWN to change the settings of your monitor, the On DOWN Screen Display (OSD) Main Controls window will pop up and you can then start making adjustments to navigate through the sub-menu functions.... OSD Setting Basic and simple instruction on the front control of the selected function. Press MENU key to turn the monitor on . 20 To unlock the...the UP or DOWN keys to turn the monitor on . If you press the MENU button on the control keys. When you want to adjust any other function, repeat steps 2-3. 4) OSD Lock Function: To ...
...UP or DOWN to change the settings of your monitor, the On DOWN Screen Display (OSD) Main Controls window will pop up and you can then start making adjustments to navigate through the sub-menu functions.... OSD Setting Basic and simple instruction on the front control of the selected function. Press MENU key to turn the monitor on . 20 To unlock the...the UP or DOWN keys to turn the monitor on . If you press the MENU button on the control keys. When you want to adjust any other function, repeat steps 2-3. 4) OSD Lock Function: To ...

User's Manual 2236Vw
Page 37
...® Me 2. Select 'Specify the location of the known drivers for this device so that I can see the 'Digital Signature Not Found' window, click on 'Control Panel'. 3. Click on the 'Next' button. 10. Select the 'Settings' tab then click on the 'Next' button. 7. If the 'Properties' button is inactive, it means... on the 'OK' button. 10. Click on the 'Open' button, then click on 'Properties' button. Please stop installation. - Select your monitor model and click on 'Control Panel'. 3. Start Windows® 2000 2. Select 'Monitor' -
...® Me 2. Select 'Specify the location of the known drivers for this device so that I can see the 'Digital Signature Not Found' window, click on 'Control Panel'. 3. Click on the 'Next' button. 10. Select the 'Settings' tab then click on the 'Next' button. 7. If the 'Properties' button is inactive, it means... on the 'OK' button. 10. Click on the 'Open' button, then click on 'Properties' button. Please stop installation. - Select your monitor model and click on 'Control Panel'. 3. Start Windows® 2000 2. Select 'Monitor' -

User's Manual 2236Vw
Page 38
Click on the 'Start' button and then click on the 'Display' Item. 38 Click on 'Control Panel'. 3. Windows XP 1. Start Windows® XP 2. Select and click on the category „Appearance and Themes‟ 4.
Click on the 'Start' button and then click on the 'Display' Item. 38 Click on 'Control Panel'. 3. Windows XP 1. Start Windows® XP 2. Select and click on the category „Appearance and Themes‟ 4.

User's Manual 2236Vw
Page 41
Windows Vista 1. Click "Advanced Settings...". 41 Click "Personalization" and then "Display Settings". 3. Click "Start " and "Control Panel". Then, double-click on "Appearance and Personalization". 2.
Windows Vista 1. Click "Advanced Settings...". 41 Click "Personalization" and then "Display Settings". 3. Click "Start " and "Control Panel". Then, double-click on "Appearance and Personalization". 2.

User's Manual 2236Vw
Page 43
Windows 7 1.Start Windows® 7 2.Click on the 'Start' button and then click on the "Change display settings" button. 43 Click on the 'Display' icon. 4.Ckick on 'Control Panel'. 3.
Windows 7 1.Start Windows® 7 2.Click on the 'Start' button and then click on the "Change display settings" button. 43 Click on the 'Display' icon. 4.Ckick on 'Control Panel'. 3.

User's Manual 2236Vw
Page 48
... cord connection and power supply. Can you are not using . 48 Picture Is Fuzzy & Has Ghosting Shadowing Problem Adjust the Contrast and Brightness Controls. Make sure you see "Input Not Supported" on the back . We recommend plugging the monitor directly to the video card output connector on the ...screen? Make sure the AOC Monitor Drivers are using an extension cable or switch box. Use the maximum refresh rate your monitor is not available on the screen Is the...
... cord connection and power supply. Can you are not using . 48 Picture Is Fuzzy & Has Ghosting Shadowing Problem Adjust the Contrast and Brightness Controls. Make sure you see "Input Not Supported" on the back . We recommend plugging the monitor directly to the video card output connector on the ...screen? Make sure the AOC Monitor Drivers are using an extension cable or switch box. Use the maximum refresh rate your monitor is not available on the screen Is the...