Operating Instructions
Page 1
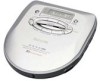
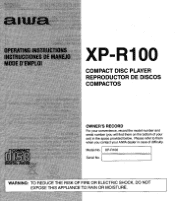
aura OPERATING INSTRUCTIONS INSTRUCCIONES DE MANEJO MODE D'EMPLOI XP-R100 COMPACT DISC PLAYER REPRODUCTOR DE DISCOS COMPACTOS COMPACT 0 DOCK DIG TAL AUDIO OWNER'S RECORD For your set) in case of your convenience, record the model number and serial number (you will find them on the bottom of difficulty. Model No. XP-R100 Serial No. Please refer to them when you contact your AIWA dealer in the space provided below. WARNING: TO REDUCE THE RISK OF FIRE OR ELECTRIC SHOCK, DO NOT EXPOSE THIS APPLIANCE TO RAIN OR MOISTURE.
aura OPERATING INSTRUCTIONS INSTRUCCIONES DE MANEJO MODE D'EMPLOI XP-R100 COMPACT DISC PLAYER REPRODUCTOR DE DISCOS COMPACTOS COMPACT 0 DOCK DIG TAL AUDIO OWNER'S RECORD For your set) in case of your convenience, record the model number and serial number (you will find them on the bottom of difficulty. Model No. XP-R100 Serial No. Please refer to them when you contact your AIWA dealer in the space provided below. WARNING: TO REDUCE THE RISK OF FIRE OR ELECTRIC SHOCK, DO NOT EXPOSE THIS APPLIANCE TO RAIN OR MOISTURE.
Operating Instructions
Page 2
... radio/TV technician for a Class B digital device, pursuant to Part 15 of their useful life, it may void the user's right or authority to dispose the batteries into an outlet on , the user is connected. - CAUTION Modifications or adjustments to this product, which can radiate radio frequency energy and, if not installed and used in accordance with the instructions, may be illegal to operate...
... radio/TV technician for a Class B digital device, pursuant to Part 15 of their useful life, it may void the user's right or authority to dispose the batteries into an outlet on , the user is connected. - CAUTION Modifications or adjustments to this product, which can radiate radio frequency energy and, if not installed and used in accordance with the instructions, may be illegal to operate...
Operating Instructions
Page 4
... sound when playing a disc, DO NOT turn it up high because music could suddenly start at moderate volumes to the eyes. • Make sure that pins or other foreign object do not use or keep the disc compartment lid closed after use. J.,'1'--, -,---,, *:0 ,, , ,,,:t,,,:,a--,:,--,.1 0:0-'.,1,,,,4,,3 i'+,y i,7,,;,-,.`t4,-.k 1,,-,-::;44,,.,:.,,,,',6;;,,r4,..:,,,:,.,,44-,-_-.4::,,1,,,_-::"0=6"411r-,.*'..t 2.,,,,,',,---4 r_,,,,'r-,.--,,7-'7;-_y2:;,'•--,''D,L : ,-- Turn the volume control to the lowest level before starting playback and slowly turn the volume...
... sound when playing a disc, DO NOT turn it up high because music could suddenly start at moderate volumes to the eyes. • Make sure that pins or other foreign object do not use or keep the disc compartment lid closed after use. J.,'1'--, -,---,, *:0 ,, , ,,,:t,,,:,a--,:,--,.1 0:0-'.,1,,,,4,,3 i'+,y i,7,,;,-,.`t4,-.k 1,,-,-::;44,,.,:.,,,,',6;;,,r4,..:,,,:,.,,44-,-_-.4::,,1,,,_-::"0=6"411r-,.*'..t 2.,,,,,',,---4 r_,,,,'r-,.--,,7-'7;-_y2:;,'•--,''D,L : ,-- Turn the volume control to the lowest level before starting playback and slowly turn the volume...
Operating Instructions
Page 6
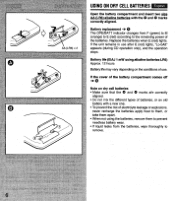
... dry cell batteries • Make sure that the 0 and 0 marks ate correctly aligned. • Do not mix the different types of batteries, or an old battery with the 0 and 0 marks correctly aligned. 0 AA (LR6) x 2 Battery replacement -> 0 The OPE/BATT indicator changes from the batteries, wipe thoroughly to the remaining power of use after E (red) lights, "Lo-bAtt" appears (during CD operation only), and...
... dry cell batteries • Make sure that the 0 and 0 marks ate correctly aligned. • Do not mix the different types of batteries, or an old battery with the 0 and 0 marks correctly aligned. 0 AA (LR6) x 2 Battery replacement -> 0 The OPE/BATT indicator changes from the batteries, wipe thoroughly to the remaining power of use after E (red) lights, "Lo-bAtt" appears (during CD operation only), and...
Operating Instructions
Page 8
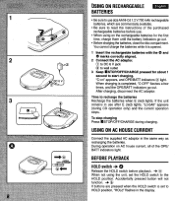
... set the HOLD switch to the HOLD position. Accidentally pressed button will not function. -30. (9 If buttons are commercially available. • Be sure to recharge the batteries Recharge the batteries when E (red) lights. 0 -"NA. After charging, disconnect the AC adaptor. DC 6V a STOP/OFF/CHARG OFF..:NaSME USING ON RECHARGEABLE English BATTERIES • Be sure to use . • When using the unit, set to start charging. Time to read the instructions...
... set the HOLD switch to the HOLD position. Accidentally pressed button will not function. -30. (9 If buttons are commercially available. • Be sure to recharge the batteries Recharge the batteries when E (red) lights. 0 -"NA. After charging, disconnect the AC adaptor. DC 6V a STOP/OFF/CHARG OFF..:NaSME USING ON RECHARGEABLE English BATTERIES • Be sure to use . • When using the unit, set to start charging. Time to read the instructions...
Operating Instructions
Page 10
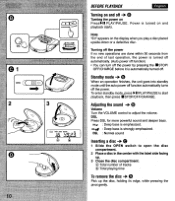
... on and playback starts. Turning off the power If no new operations are done within 30 seconds from the end of tracks ® Total playing time To remove the disc -> Pick up the disc, holding its edge, while pressing the pivot gently. DSL Press DSL for more powerful sound and deeper bass. DSL : Normal sound Inserting a disc -> 0 1 Slide the OPEN switch to open the disc compartment...
... on and playback starts. Turning off the power If no new operations are done within 30 seconds from the end of tracks ® Total playing time To remove the disc -> Pick up the disc, holding its edge, while pressing the pivot gently. DSL Press DSL for more powerful sound and deeper bass. DSL : Normal sound Inserting a disc -> 0 1 Slide the OPEN switch to open the disc compartment...
Operating Instructions
Page 12
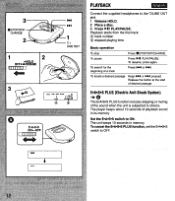
.... 1 Release HOLD. 2 Place a disc. 3 Press PLAY/PAUSE. Release the button at the start of the sound when the unit is subjected to ON. Set the E•A•S•S switch to shocks. To search for the beginning of playback sound in memory. Playback starts from the first track. * track number * elapsed playing time Basic operation To stop Press •STOP/OFF/CHARGE. To resume, press again. The player keeps...
.... 1 Release HOLD. 2 Place a disc. 3 Press PLAY/PAUSE. Release the button at the start of the sound when the unit is subjected to ON. Set the E•A•S•S switch to shocks. To search for the beginning of playback sound in memory. Playback starts from the first track. * track number * elapsed playing time Basic operation To stop Press •STOP/OFF/CHARGE. To resume, press again. The player keeps...
Operating Instructions
Page 14
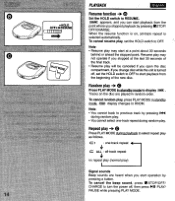
... pressing a button. PLAYBACK English Resume function 4 0 0 Set the HOLD switch to RESUME. •HOLD OFF...RESUME =ODD appears, and you can start playback from the beginning of the final track. • Resume play will be canceled if you open the disc compartment. To cancel random play, press PLAY MODE in standby mode. P. To cancel the beep sound, press • STOP/OFF/ CHARGE to turn the power off , set the HOLD switch to...
... pressing a button. PLAYBACK English Resume function 4 0 0 Set the HOLD switch to RESUME. •HOLD OFF...RESUME =ODD appears, and you can start playback from the beginning of the final track. • Resume play will be canceled if you open the disc compartment. To cancel random play, press PLAY MODE in standby mode. P. To cancel the beep sound, press • STOP/OFF/ CHARGE to turn the power off , set the HOLD switch to...
Operating Instructions
Page 16
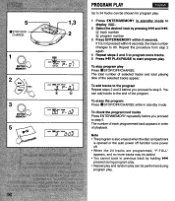
... program play. 1 Press ENTER/MEMORY in standby mode to previous track by pressing l44 and NN. ® track number ® program number 3 Press ENTER/MEMORY within 8 seconds, the track number changes to step 5. The total number of selected tracks and total playing time of the program. You can be added. • You cannot back to display 2 Select the desired track by holding 114 pressed during program play. • Repeat play...
... program play. 1 Press ENTER/MEMORY in standby mode to previous track by pressing l44 and NN. ® track number ® program number 3 Press ENTER/MEMORY within 8 seconds, the track number changes to step 5. The total number of selected tracks and total playing time of the program. You can be added. • You cannot back to display 2 Select the desired track by holding 114 pressed during program play. • Repeat play...
Operating Instructions
Page 18
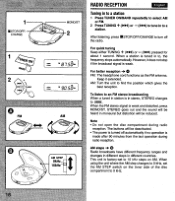
... better reception -> 0 FM: The headphone cord functions as the FM antenna. AM steps -> 0 Radio broadcasts have different frequency ranges and changes in different steps in stereo, STEREO changes to 9 kHz. 18 The buttons will be deactivated. • The power is factory-set the AM STEP switch on AM. After listening, press ■ STOP/OFF/CHARGE to find the position which...
... better reception -> 0 FM: The headphone cord functions as the FM antenna. AM steps -> 0 Radio broadcasts have different frequency ranges and changes in different steps in stereo, STEREO changes to 9 kHz. 18 The buttons will be deactivated. • The power is factory-set the AM STEP switch on AM. After listening, press ■ STOP/OFF/CHARGE to find the position which...
Operating Instructions
Page 20
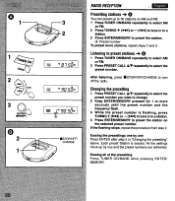
0 1 71INEFIoN SAND 3 ENTER/ MEMORY 0 2 1 3 2 - 90.56 1- 90.55T ESTOP/OFF/ CHARGE RADIO RECEPTION English Presetting stations -> You can preset up by one and the preset numbers are refreshed. Listening to preset stations -> 1 Press TUNER ON/BAND repeatedly to select AM or FM. 2 Press PRESET CALL A/V repeatedly to turn off the radio. Changing the presetting 1 Press PRESET CALL A/7 repeatedly to select the preset number you wish to preset the station on AM and FM. 1 Press TUNER...
0 1 71INEFIoN SAND 3 ENTER/ MEMORY 0 2 1 3 2 - 90.56 1- 90.55T ESTOP/OFF/ CHARGE RADIO RECEPTION English Presetting stations -> You can preset up by one and the preset numbers are refreshed. Listening to preset stations -> 1 Press TUNER ON/BAND repeatedly to select AM or FM. 2 Press PRESET CALL A/V repeatedly to turn off the radio. Changing the presetting 1 Press PRESET CALL A/7 repeatedly to select the preset number you wish to preset the station on AM and FM. 1 Press TUNER...
Operating Instructions
Page 22
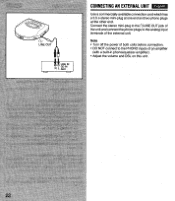
Connect the stereo mini-plug to the 0/LINE OUT jack of the unit and connect the phono plugs to the PHONO inputs of the external unit. Note • Turn off the power of both units before connection. • DO NOT connect to the analog input terminals of an amplifier (with a built-in phonoequalizer-amplifier). • Adjust the volume and DSL on this unit. UNEN RLAux. LINE OUT CONNECTING AN EXTERNAL UNIT English Use a commercially available connection cord which has a 3.5 o stereo mini-plug at one end and two phono plugs at the other end. r."
Connect the stereo mini-plug to the 0/LINE OUT jack of the unit and connect the phono plugs to the PHONO inputs of the external unit. Note • Turn off the power of both units before connection. • DO NOT connect to the analog input terminals of an amplifier (with a built-in phonoequalizer-amplifier). • Adjust the volume and DSL on this unit. UNEN RLAux. LINE OUT CONNECTING AN EXTERNAL UNIT English Use a commercially available connection cord which has a 3.5 o stereo mini-plug at one end and two phono plugs at the other end. r."
Operating Instructions
Page 24
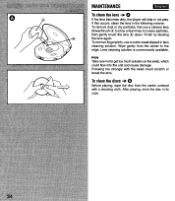
...in its case. 4" I Ft. Note Take care not to the edge. Pressing too strongly with a cleaning cloth. ti g:47 ,72 After playing, store the disc in the following manner. Wipe gently from the center outward with the swab could flow into the unit and cause damage. To remove fingerprints, use a ...camera lens blower/brush (a) to blow a few times to loosen particles, then gently brush the lens iv clean. To clean the discs -> Before playing, wipe the disc from the center to get too much solution on...
...in its case. 4" I Ft. Note Take care not to the edge. Pressing too strongly with a cleaning cloth. ti g:47 ,72 After playing, store the disc in the following manner. Wipe gently from the center outward with the swab could flow into the unit and cause damage. To remove fingerprints, use a ...camera lens blower/brush (a) to blow a few times to loosen particles, then gently brush the lens iv clean. To clean the discs -> Before playing, wipe the disc from the center to get too much solution on...
Operating Instructions
Page 26
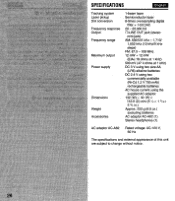
SPECIFICATIONS English Tracking system Laser pickup D/A conversion Frequency response Output Frequency range Maximum output Power supply Tr•-•a- Jr: s• .c.irrAnr • • Dimensions Weight Accessories 1-beam laser Semiconductor laser 8-times oversampling digital filter + 1-bit DAC 20 - 20,000 Hz CLINE OUT jack (stereo mini-jack) AM: 530/531 kHz - 1,710/ 1,602 kHz (10 kHz...
SPECIFICATIONS English Tracking system Laser pickup D/A conversion Frequency response Output Frequency range Maximum output Power supply Tr•-•a- Jr: s• .c.irrAnr • • Dimensions Weight Accessories 1-beam laser Semiconductor laser 8-times oversampling digital filter + 1-bit DAC 20 - 20,000 Hz CLINE OUT jack (stereo mini-jack) AM: 530/531 kHz - 1,710/ 1,602 kHz (10 kHz...


