Operating Instructions
Page 6
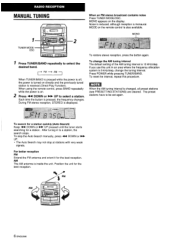
To reset the interval, repeat this unit in to be set again. To stop at stations with very weak signals. A a %, FM 6 ENGLISH MANUAL TUNING When an FM stereo broadcast contains noise Press TUNER MODE/OSC. Each time the button is 10 kHz/step. To change the tuning interval. Press POWER ...while pressing TUNER/BAND. When the AM tuning interval is 9 kHz/step, change the AM tuning interval The default setting of the AM tuning interval is pressed, the...
To reset the interval, repeat this unit in to be set again. To stop at stations with very weak signals. A a %, FM 6 ENGLISH MANUAL TUNING When an FM stereo broadcast contains noise Press TUNER MODE/OSC. Each time the button is 10 kHz/step. To change the tuning interval. Press POWER ...while pressing TUNER/BAND. When the AM tuning interval is 9 kHz/step, change the AM tuning interval The default setting of the AM tuning interval is pressed, the...
Operating Instructions
Page 7
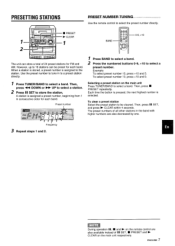
... press +1 O and 5. PRESETTING STATIONS s PRESET > CLEAR The unit can be cleared. z Press II SET to select the preset number directly. Use the remote control to store the station. Then, press II SET, and press > CLEAR within 4 seconds. To select preset number 10, press +1 O and O. To ...operation II, s and k on the main unit respectively. Frequency s Repeat steps 1 and 2. Each time the button is pressed, the next highest number is assigned to 16 stations can store a total of 11 SET, 9 PRESET and E CLEAR on the remote control are also decreased by one. I -.NIJMUtll 1 ...
... press +1 O and 5. PRESETTING STATIONS s PRESET > CLEAR The unit can be cleared. z Press II SET to select the preset number directly. Use the remote control to store the station. Then, press II SET, and press > CLEAR within 4 seconds. To select preset number 10, press +1 O and O. To ...operation II, s and k on the main unit respectively. Frequency s Repeat steps 1 and 2. Each time the button is pressed, the next highest number is assigned to 16 stations can store a total of 11 SET, 9 PRESET and E CLEAR on the remote control are also decreased by one. I -.NIJMUtll 1 ...
Operating Instructions
Page 13
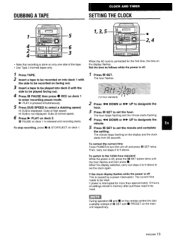
... to be reset. Ii power is off and press II SET twice. During operation 11 and s on the remote control are also available instead of the tape. Set the time as follows while the power is interrupted for the first time, the time on deck 1. HI-DUB is pressed simultaneously. 5 Press... DUB SPEED to select a dubbing speed. Press 11 SET. The minute stops flashing on deck 1 is not displayed:...
... to be reset. Ii power is off and press II SET twice. During operation 11 and s on the remote control are also available instead of the tape. Set the time as follows while the power is interrupted for the first time, the time on deck 1. HI-DUB is pressed simultaneously. 5 Press... DUB SPEED to select a dubbing speed. Press 11 SET. The minute stops flashing on deck 1 is not displayed:...
Operating Instructions
Page 14
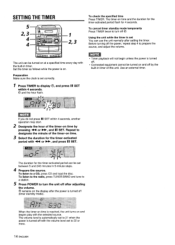
... TIMER. Before turning off the power, repeat step 4 to turn off by pressing + or >, and 1I SET. Repeat to designate the minute of the timer-on at a specified time every day with the volume level set between 5 and 240 minutes in 5-minute steps. 4 Prepare the source. To listen to the radio, press...the built-in timer of this unit. Using the unit while the timer is turned off after the power is set to 21 when the power is reached, the unit turns on time and the duration for the timer-activated period flash for the timer-activated period with the selected source. q ...
... TIMER. Before turning off the power, repeat step 4 to turn off by pressing + or >, and 1I SET. Repeat to designate the minute of the timer-on at a specified time every day with the volume level set between 5 and 240 minutes in 5-minute steps. 4 Prepare the source. To listen to the radio, press...the built-in timer of this unit. Using the unit while the timer is turned off after the power is set to 21 when the power is reached, the unit turns on time and the duration for the timer-activated period flash for the timer-activated period with the selected source. q ...

Operating Instructions
Page 15
...type microphone is recommended to the MIC jack. Each time the button is turned on into deck 1 and press q REC. During dubbing at a specified time. To specify the time until the power is turned off Press SLEEP once. ENGLISH 15 SETTING THE SLEEP TIMER 1 -2 MICROPHONE MIXING The unit ...can be turned off automatically at high speed, the microphone mixing sound is not recorded. Connect a microphone with VOLUME. Specified time To check the time remaining until the power is turned off...
...type microphone is recommended to the MIC jack. Each time the button is turned on into deck 1 and press q REC. During dubbing at a specified time. To specify the time until the power is turned off Press SLEEP once. ENGLISH 15 SETTING THE SLEEP TIMER 1 -2 MICROPHONE MIXING The unit ...can be turned off automatically at high speed, the microphone mixing sound is not recorded. Connect a microphone with VOLUME. Specified time To check the time remaining until the power is turned off...