
Product Manual
Page 2
... and most efficiently. To refer to this instruction manual carefully. To ensure optimal and regular performance of your new appliance. Contents Operating Instructions 3 Important safety information 3 Product description 5 Control panel 6 Before first use 6 Sorting and preparing laundry 6 Laundry weights 7 Programme overview 8 Daily use 9 Switching machine on / switching light on 9 Opening loading door / loading laundry 10 Selecting the programme 10 Selecting additional options 10 Setting delay timer 11 Starting the programme 11 Changing programme 11...
... and most efficiently. To refer to this instruction manual carefully. To ensure optimal and regular performance of your new appliance. Contents Operating Instructions 3 Important safety information 3 Product description 5 Control panel 6 Before first use 6 Sorting and preparing laundry 6 Laundry weights 7 Programme overview 8 Daily use 9 Switching machine on / switching light on 9 Opening loading door / loading laundry 10 Selecting the programme 10 Selecting additional options 10 Setting delay timer 11 Starting the programme 11 Changing programme 11...

Product Manual
Page 3
... and warnings. Important safety information 3 Operating Instructions Important safety information In the interest of your safety and to repair the machine yourself. Contact your local Service Centre. To avoid this user manual carefully, including its operation and safety features. Always insist on appliance use , before installing and first using the appliance, read this , please check into the drum before using. • Any objects such as...
... and warnings. Important safety information 3 Operating Instructions Important safety information In the interest of your safety and to repair the machine yourself. Contact your local Service Centre. To avoid this user manual carefully, including its operation and safety features. Always insist on appliance use , before installing and first using the appliance, read this , please check into the drum before using. • Any objects such as...
Product Manual
Page 4
... user manual. • Clothes which have been in the installation room to use . Serious damage can occur to the product and to ensure that the fluid is heavy. Installation • This appliance is removed from the garment before the end of a washing machine, it and contact the Service Centre. • All packing and transit bolts must be machine dried. If volatile cleaning fluids are quickly removed...
... user manual. • Clothes which have been in the installation room to use . Serious damage can occur to the product and to ensure that the fluid is heavy. Installation • This appliance is removed from the garment before the end of a washing machine, it and contact the Service Centre. • All packing and transit bolts must be machine dried. If volatile cleaning fluids are quickly removed...

Product Manual
Page 6
6 Control panel 8 Ring nut Control panel 5 4 1 2 3 1 Programme knob and OFF switch 2 Function buttons 3 START PAUSE button 4 DELAY START button 5 Function status led Before first use In order to remove any residues which may have been produced during production, wipe the dryer drum with a damp cloth or carry out a brief drying cycle (ca. 30 min.) with damp cloths in SYNTHETICS programme group. Mixtures and SYNTHETICS for programmes in COTTONS programme...
6 Control panel 8 Ring nut Control panel 5 4 1 2 3 1 Programme knob and OFF switch 2 Function buttons 3 START PAUSE button 4 DELAY START button 5 Function status led Before first use In order to remove any residues which may have been produced during production, wipe the dryer drum with a damp cloth or carry out a brief drying cycle (ca. 30 min.) with damp cloths in SYNTHETICS programme group. Mixtures and SYNTHETICS for programmes in COTTONS programme...

Product Manual
Page 7
... 100 g These fabrics will then dry better. CATE button!) Drying in the tumble dryer not possible Do not place in prin- ciple Dry at normal temperature Dry at reduced temperature (press DELI- Laundry weights Type of aprons). • Empty pockets. Sorting and preparing laundry 7 • Sorting by special programme WOOL CARE ! The care labels mean: Drying in the tumble dryer possible in the...
... 100 g These fabrics will then dry better. CATE button!) Drying in the tumble dryer not possible Do not place in prin- ciple Dry at normal temperature Dry at reduced temperature (press DELI- Laundry weights Type of aprons). • Empty pockets. Sorting and preparing laundry 7 • Sorting by special programme WOOL CARE ! The care labels mean: Drying in the tumble dryer possible in the...

Product Manual
Page 9
.... 1) In accordance with IEC61121 2) select DELICATE option 3) Automatic Daily use Switching machine on / switching light on the type and quality of textiles. (The loading volume corresponds to approx. 5 to any programme. WOOL CARE WOOL CARE is special programme for briefly treating woollens with anti-crease mecha- The machine has been switched on clothes hanger. mediately remove textiles and place on . nism for easy...
.... 1) In accordance with IEC61121 2) select DELICATE option 3) Automatic Daily use Switching machine on / switching light on the type and quality of textiles. (The loading volume corresponds to approx. 5 to any programme. WOOL CARE WOOL CARE is special programme for briefly treating woollens with anti-crease mecha- The machine has been switched on clothes hanger. mediately remove textiles and place on . nism for easy...

Product Manual
Page 10
... progresses to be removed at any time during this phase. Programme is on. Lock must audibly lock. Selecting additional options The additional options available for use Opening loading door / loading laundry 1. START PAUSE icon flashes. LONG ANTICREASE A long anti-crease phase lengthen the anti-crease phase (30 min.) at intervals during the anti-crease phase. The laundry can be kind to the washing. Open loading door: Use force to select...
... progresses to be removed at any time during this phase. Programme is on. Lock must audibly lock. Selecting additional options The additional options available for use Opening loading door / loading laundry 1. START PAUSE icon flashes. LONG ANTICREASE A long anti-crease phase lengthen the anti-crease phase (30 min.) at intervals during the anti-crease phase. The laundry can be kind to the washing. Open loading door: Use force to select...

Product Manual
Page 11
... signal sounds intermittently for start of a programme by a warning - alarm Setting delay timer With the DELAY START button, you can no longer be changed directly once the programme has started. Open loading door. Laundry and drum can become hot. Close loading securely. Press the START PAUSE button to END . Daily use 11 BUZZER The appliance is complete, the lights END and FILTER are on. Drying cycle complete / removing laundry Once the drying cycle is...
... signal sounds intermittently for start of a programme by a warning - alarm Setting delay timer With the DELAY START button, you can no longer be changed directly once the programme has started. Open loading door. Laundry and drum can become hot. Close loading securely. Press the START PAUSE button to END . Daily use 11 BUZZER The appliance is complete, the lights END and FILTER are on. Drying cycle complete / removing laundry Once the drying cycle is...

Product Manual
Page 12
... check it there is on to OFF. The light FILTER is nothing inside the filter seat. 4. Clean the filter. The drum rotates at the latest to be cleaned after every drying cycle. WARNING! Remove laundry. 3. To ensure that the dryer works perfectly, the fluff filter must be used if industrial chemicals have been used for the and WOOL CARE programme) are automatically followed by 60 minutes. 1. Open loading door and remove laundry. 2. Care...
... check it there is on to OFF. The light FILTER is nothing inside the filter seat. 4. Clean the filter. The drum rotates at the latest to be cleaned after every drying cycle. WARNING! Remove laundry. 3. To ensure that the dryer works perfectly, the fluff filter must be used if industrial chemicals have been used for the and WOOL CARE programme) are automatically followed by 60 minutes. 1. Open loading door and remove laundry. 2. Care...

Product Manual
Page 13
... cleaning agents to clean the machine. Clean operating screen and housing CAUTION! Do not use abrasives or steel wool to put it there is damper than expected when removed from the electricity supply, before you can be closed. Use a damp cloth to detergent residue on laundry forms on the filters. Care and cleaning 13 3. Open the filter pressing the button, among two slots on the inside of the drum...
... cleaning agents to clean the machine. Clean operating screen and housing CAUTION! Do not use abrasives or steel wool to put it there is damper than expected when removed from the electricity supply, before you can be closed. Use a damp cloth to detergent residue on laundry forms on the filters. Care and cleaning 13 3. Open the filter pressing the button, among two slots on the inside of the drum...

Product Manual
Page 14
Loading door is not working correctly. Overloading of machine. Uncover ventilation slots. Conductance of water at mains socket. Defective light bulb. Laundry insufficiently spun. Particularly high room temperature. Mains plug is not plugged in or fuse is open. Select a different programme the next time you pressed the START Press the START PAUSE button PAUSE button? Turn programme selector to avoid overload. Select time programme or higher drying level (e.g. Clean filter. Laundry must be adequately spun...
Loading door is not working correctly. Overloading of machine. Uncover ventilation slots. Conductance of water at mains socket. Defective light bulb. Laundry insufficiently spun. Particularly high room temperature. Mains plug is not plugged in or fuse is open. Select a different programme the next time you pressed the START Press the START PAUSE button PAUSE button? Turn programme selector to avoid overload. Select time programme or higher drying level (e.g. Clean filter. Laundry must be adequately spun...
Product Manual
Page 15
... of the water. 1. Do not operate the dryer when missing o-ring gasket on , the interior lighting switches itself off after 4 minutes when the door is designed specially for approx. 5 seconds. If this can be screwed down for approx. 5 seconds. Your dryer allows you set desired level. The current setting is active. 2. low conductivity 600 micro S/cm 3. Press the START PAUSE button sequentially until...
... of the water. 1. Do not operate the dryer when missing o-ring gasket on , the interior lighting switches itself off after 4 minutes when the door is designed specially for approx. 5 seconds. If this can be screwed down for approx. 5 seconds. Your dryer allows you set desired level. The current setting is active. 2. low conductivity 600 micro S/cm 3. Press the START PAUSE button sequentially until...

Product Manual
Page 16
... on programme)1) max. 7 kg Voltage 240 V Required fuse 13 A Total power 2600 W Energy efficiency class C Energy consumption (7 kg of cotton, predrained at 1200 rpm) 1) Different loading volume data may deviate when the machine is operated in accordance with loading door open 109 cm Height can be needed in some countries as a result of Amending Directive 92/31/EEC - 93/68/EEC dated 22...
... on programme)1) max. 7 kg Voltage 240 V Required fuse 13 A Total power 2600 W Energy efficiency class C Energy consumption (7 kg of cotton, predrained at 1200 rpm) 1) Different loading volume data may deviate when the machine is operated in accordance with loading door open 109 cm Height can be needed in some countries as a result of Amending Directive 92/31/EEC - 93/68/EEC dated 22...
Product Manual
Page 17
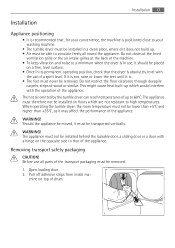
.... Open loading door 2. Before use all round the appliance. Should the appliance be moved, it must be able to circulate freely all parts of the machine. • To keep vibration and noise to 60°C. Do not restrict the floor clearance through deeppile carpets, strips of the appliance. WARNING! The hot air emitted by the tumble dryer can reach temperatures of drum.
.... Open loading door 2. Before use all round the appliance. Should the appliance be moved, it must be able to circulate freely all parts of the machine. • To keep vibration and noise to 60°C. Do not restrict the floor clearance through deeppile carpets, strips of the appliance. WARNING! The hot air emitted by the tumble dryer can reach temperatures of drum.
Product Manual
Page 18
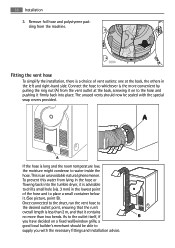
... Installation 3. Remove foil hose and polystyrene padding from the vent outlet at the back, the others in the left and right-hand side. Once connected to the dryer, run 's overall length is advisable to water inside the hose. To prevent this water from Iying in the lowest point of vent outlets: one at the back, screwing it on a fixed...
... Installation 3. Remove foil hose and polystyrene padding from the vent outlet at the back, the others in the left and right-hand side. Once connected to the dryer, run 's overall length is advisable to water inside the hose. To prevent this water from Iying in the lowest point of vent outlets: one at the back, screwing it on a fixed...

Product Manual
Page 19
... may operate. Should the appliance power supply cable need to be replaced, this must be taken from a fuel burning appliance. In order to change the fuse in accordance with a 13 amp plug fitted. If the hose is unobstructed. Electrical connection Details on mains voltage, type of having to prevent the appliance from overheating, it is essential that the steam exhaust is...
... may operate. Should the appliance power supply cable need to be replaced, this must be taken from a fuel burning appliance. In order to change the fuse in accordance with a 13 amp plug fitted. If the hose is unobstructed. Electrical connection Details on mains voltage, type of having to prevent the appliance from overheating, it is essential that the steam exhaust is...

Product Manual
Page 20
... connected to load or unload the laundry the door can be con- WARNING! This operation must be carried out by the earth symbol or coloured green and 3 yellow. Special accessories Stacking kit Earth The wire coloured green and yellow must be connected to the terminal marked with the current electrical regulations. Ensure that you install a double pole switch between the...
... connected to load or unload the laundry the door can be con- WARNING! This operation must be carried out by the earth symbol or coloured green and 3 yellow. Special accessories Stacking kit Earth The wire coloured green and yellow must be connected to the terminal marked with the current electrical regulations. Ensure that you install a double pole switch between the...

Product Manual
Page 21
... this product. Read carefully the instructions supplied with cover's depth between 48 and 60 cm. Environment 21 Environment The symbol on the product or on top of a front loading washing machine with the kit. The plastic components are environmentally friendly and can be taken to enable the mounting of the dyer on its packaging indicates that this product may...
... this product. Read carefully the instructions supplied with cover's depth between 48 and 60 cm. Environment 21 Environment The symbol on the product or on top of a front loading washing machine with the kit. The plastic components are environmentally friendly and can be taken to enable the mounting of the dyer on its packaging indicates that this product may...

Product Manual
Page 22
.... • The appliance has been used for normal domestic purposes only, and in kWh 3,9 3.7 Service In the event of technical faults, please first check whether you were not able to remedy the problem yourself, please contact your appliance at our option repair or replace the same FREE OF CHARGE for numbers, see rating plate) - Model description - Product number (PNC) - Any error messages displayed by the appliance So that...
.... • The appliance has been used for normal domestic purposes only, and in kWh 3,9 3.7 Service In the event of technical faults, please first check whether you were not able to remedy the problem yourself, please contact your appliance at our option repair or replace the same FREE OF CHARGE for numbers, see rating plate) - Model description - Product number (PNC) - Any error messages displayed by the appliance So that...

Product Manual
Page 23
... (Irl) Ltd Long Mile Road, Dublin 12, Republic of Ireland Tel: +353 (0)1 4090751 The model and Serial number of the fault. 4. Please note a valid purchase receipt or guarantee documentation is improperly installed or calls to appliances outside the United Kingdom. • Appliances found on Electrolux products please contact our Customer Care Department by Electrolux Service and Spare Parts In the event...
... (Irl) Ltd Long Mile Road, Dublin 12, Republic of Ireland Tel: +353 (0)1 4090751 The model and Serial number of the fault. 4. Please note a valid purchase receipt or guarantee documentation is improperly installed or calls to appliances outside the United Kingdom. • Appliances found on Electrolux products please contact our Customer Care Department by Electrolux Service and Spare Parts In the event...


