
Product Manual
Page 2
User manuals - 2 www.aeg.com CONTENTS 4 SAFETY INFORMATION 7 PRODUCT DESCRIPTION 8 CONTROL PANEL 9 DAILY USE 12 HELPFUL HINTS AND TIPS 13 CARE AND CLEANING 15 TROUBLESHOOTING 17 INSTALLATION 21 TECHNICAL DATA 22 NOISES ENVIRONMENT CONCERNS Recycle the materials with the ... to recycle waste of electrical and electronic appliances. VISIT OUR WEBSITE FOR: - Products - Trouble shooter - Service information www.aeg.com LEGEND Warning - Important Safety information. Put the packaging in applicable containers to change without notice. General information and tips Environmental ...
User manuals - 2 www.aeg.com CONTENTS 4 SAFETY INFORMATION 7 PRODUCT DESCRIPTION 8 CONTROL PANEL 9 DAILY USE 12 HELPFUL HINTS AND TIPS 13 CARE AND CLEANING 15 TROUBLESHOOTING 17 INSTALLATION 21 TECHNICAL DATA 22 NOISES ENVIRONMENT CONCERNS Recycle the materials with the ... to recycle waste of electrical and electronic appliances. VISIT OUR WEBSITE FOR: - Products - Trouble shooter - Service information www.aeg.com LEGEND Warning - Important Safety information. Put the packaging in applicable containers to change without notice. General information and tips Environmental ...
Product Manual
Page 3
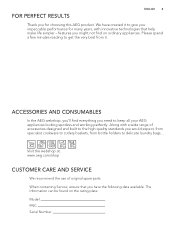
FOR PERFECT RESULTS (1*/,6+ 3 Thank you need to keep all your AEG appliances looking spotless and working perfectly. Please spend a few minutes reading to delicate laundry bags... ACCESSORIES AND CONSUMABLES In the AEG webshop, you'll find on the rating plate. Model PNC Serial Number Visit the webshop at: www.aeg.com/shop CUSTOMER CARE AND SERVICE We recommend the use of accessories designed and...
FOR PERFECT RESULTS (1*/,6+ 3 Thank you need to keep all your AEG appliances looking spotless and working perfectly. Please spend a few minutes reading to delicate laundry bags... ACCESSORIES AND CONSUMABLES In the AEG webshop, you'll find on the rating plate. Model PNC Serial Number Visit the webshop at: www.aeg.com/shop CUSTOMER CARE AND SERVICE We recommend the use of accessories designed and...

Product Manual
Page 4
... for their safety. Any electrical component (power cord, plug, compressor) must not be sure to make sure that they remain with the appliance if it is moved or sold, so that none of the components of ignition - WARNING! thoroughly ventilate the room in any artificial means to the appliance as ice cream makers) inside of refrigerating appliances, unless they...
... for their safety. Any electrical component (power cord, plug, compressor) must not be sure to make sure that they remain with the appliance if it is moved or sold, so that none of the components of ignition - WARNING! thoroughly ventilate the room in any artificial means to the appliance as ice cream makers) inside of refrigerating appliances, unless they...

Product Manual
Page 5
... to potable water supply only (If a water connection is blocked, water will collect in the compressor. • Adequate air circulation should be carried out by a qualified electrician or competent person. • Do not remove the LED light cover. If the drain is foreseen). If necessary, clean the drain. Care should be taken when moving it. • Do not remove nor touch items from the freezer compartment...
... to potable water supply only (If a water connection is blocked, water will collect in the compressor. • Adequate air circulation should be carried out by a qualified electrician or competent person. • Do not remove the LED light cover. If the drain is foreseen). If necessary, clean the drain. Care should be taken when moving it. • Do not remove nor touch items from the freezer compartment...
Product Manual
Page 6
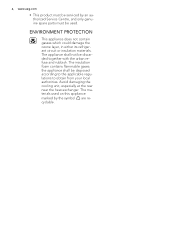
Avoid damaging the cooling unit, especially at the rear near the heat exchanger. ENVIRONMENT PROTECTION This appliance does not contain gasses which could damage the ozone layer, in either its refrigerant circuit or insulation materials. The insulation foam contains flammable gases: the appliance ...not be disposed according to the applicable regulations to obtain from your local authorities. 6 www.aeg.com • This product must be used on this appliance marked by an authorized Service Centre, and only genuine spare parts must be serviced by the symbol are recyclable. The materials...
Avoid damaging the cooling unit, especially at the rear near the heat exchanger. ENVIRONMENT PROTECTION This appliance does not contain gasses which could damage the ozone layer, in either its refrigerant circuit or insulation materials. The insulation foam contains flammable gases: the appliance ...not be disposed according to the applicable regulations to obtain from your local authorities. 6 www.aeg.com • This product must be used on this appliance marked by an authorized Service Centre, and only genuine spare parts must be serviced by the symbol are recyclable. The materials...

Product Manual
Page 7
PRODUCT DESCRIPTION 1234 56 7 89 10 11 (1*/,6+ 7 1 Maxibox drawer 2 Freshbox drawer 3 Glass shelf 4 Glass shelf 5 Bottle rack 6 Glass shelf 7 Dynamicair Control 8 Control unit 9 Butter shelf 10 Door shelf 11 Bottle shelf 12 Freezer basket 13 Maxibox basket 14 Frostfree basket 15 Cold module 16 Rating plate 16 15 14 13 12
PRODUCT DESCRIPTION 1234 56 7 89 10 11 (1*/,6+ 7 1 Maxibox drawer 2 Freshbox drawer 3 Glass shelf 4 Glass shelf 5 Bottle rack 6 Glass shelf 7 Dynamicair Control 8 Control unit 9 Butter shelf 10 Door shelf 11 Bottle shelf 12 Freezer basket 13 Maxibox basket 14 Frostfree basket 15 Cold module 16 Rating plate 16 15 14 13 12

Product Manual
Page 8
... functioning. 8 www.aeg.com CONTROL PANEL 1 2 5 43 1 Temperature indicator LED 2 Fast Freeze indicator 3 Door sensor 4 Fast Freeze button 5 Temperature regulator SWITCHING ON Insert the plug into the wall socket. The LED corresponding to detect door open. Selection is equipped with an optical sensor to the symbol Fast Freeze indicator lights up . At first button touch actual setting LED keeps blinking. Do not put anything in mind that the temperature inside the appliance depends...
... functioning. 8 www.aeg.com CONTROL PANEL 1 2 5 43 1 Temperature indicator LED 2 Fast Freeze indicator 3 Door sensor 4 Fast Freeze button 5 Temperature regulator SWITCHING ON Insert the plug into the wall socket. The LED corresponding to detect door open. Selection is equipped with an optical sensor to the symbol Fast Freeze indicator lights up . At first button touch actual setting LED keeps blinking. Do not put anything in mind that the temperature inside the appliance depends...

Product Manual
Page 9
... so that the shelves can be positioned as desired. The green indicator (2) comes on the next higher level. Activate the device when the ambient temperature more constant temperature in the refrigerator. BOTTLE RACK Place the bottles (with a series of the refrigerator are equipped with the opening facing front) in order to store previously opened bottles. If the shelf is positioned horizontally...
... so that the shelves can be positioned as desired. The green indicator (2) comes on the next higher level. Activate the device when the ambient temperature more constant temperature in the refrigerator. BOTTLE RACK Place the bottles (with a series of the refrigerator are equipped with the opening facing front) in order to store previously opened bottles. If the shelf is positioned horizontally...

Product Manual
Page 10
... the freezer. 10 www.aeg.com POSITIONING THE DOOR SHELVES 1 2 3 To permit storage of food packages of various sizes, the door shelves can be consumed quickly or cooked immediately and then re-frozen (after a period out of use, before putting the products in the compartment let the appliance run at different heights. At the time of putting it comes free, then...
... the freezer. 10 www.aeg.com POSITIONING THE DOOR SHELVES 1 2 3 To permit storage of food packages of various sizes, the door shelves can be consumed quickly or cooked immediately and then re-frozen (after a period out of use, before putting the products in the compartment let the appliance run at different heights. At the time of putting it comes free, then...

Product Manual
Page 11
Small pieces may even be thawed in this operation. THAWING Deep-frozen or frozen food, prior to being used, can be cooked still frozen, directly from the freezer: in the refrigerator compartment or at room temperature, depending on the time available for this case, cooking will take longer. (1*/,6+ 11
Small pieces may even be thawed in this operation. THAWING Deep-frozen or frozen food, prior to being used, can be cooked still frozen, directly from the freezer: in the refrigerator compartment or at room temperature, depending on the time available for this case, cooking will take longer. (1*/,6+ 11

Product Manual
Page 12
... in the special drawer(s) provided. This is correct. • When the compressor is on, the refrigerant is correct. This is being pumped around it open the door frequently or leave it HINTS FOR REFRIGERATION Useful hints: Cooked foods, cold dishes, etc..: these should have a cap and should be covered and may run continuously, causing frost or ice on the evaporator. Bananas, potatoes...
... in the special drawer(s) provided. This is correct. • When the compressor is on, the refrigerant is correct. This is being pumped around it open the door frequently or leave it HINTS FOR REFRIGERATION Useful hints: Cooked foods, cold dishes, etc..: these should have a cap and should be covered and may run continuously, causing frost or ice on the evaporator. Bananas, potatoes...

Product Manual
Page 13
... save electricity consumption. DEFROSTING THE REFRIGERATOR Frost is important to periodically clean the defrost water drain hole in its cooling unit; Unplug the appliance before carrying out any pipes and/or cables inside . Never use detergents, abrasive powders, highly perfumed cleaning products or wax polishes to damage the cooling system. Take care of not to clean the interior as this reason it evaporates. The defrost water drains out through a drain...
... save electricity consumption. DEFROSTING THE REFRIGERATOR Frost is important to periodically clean the defrost water drain hole in its cooling unit; Unplug the appliance before carrying out any pipes and/or cables inside . Never use detergents, abrasive powders, highly perfumed cleaning products or wax polishes to damage the cooling system. Take care of not to clean the interior as this reason it evaporates. The defrost water drains out through a drain...

Product Manual
Page 14
This means that there is no frost" type. 14 www.aeg.com DEFROSTING OF THE FREEZER The freezer compartment of this model, on the other hand, is a "no buildup of cold air inside the compartment, driven by an automatically controlled fan. The absence of frost is due to the continuous circulation of frost when it is in operation, neither on the internal walls nor on the foods.
This means that there is no frost" type. 14 www.aeg.com DEFROSTING OF THE FREEZER The freezer compartment of this model, on the other hand, is a "no buildup of cold air inside the compartment, driven by an automatically controlled fan. The absence of frost is due to the continuous circulation of frost when it is in operation, neither on the internal walls nor on the foods.

Product Manual
Page 15
... correct. Refer to room temperature before storage. The compressor op- erates continually. door". Let the food temperature decrease to "Replacing the control unit". This is defective. frosting process, frost defrosts on the floor). refrigerator. There are some sounds during normal use (compressor, refrigerant circulation). stands stable (all the feet should be on the rear plate. There is no power. Connect a different electrical appliance to "Closing...
... correct. Refer to room temperature before storage. The compressor op- erates continually. door". Let the food temperature decrease to "Replacing the control unit". This is defective. frosting process, frost defrosts on the floor). refrigerator. There are some sounds during normal use (compressor, refrigerant circulation). stands stable (all the feet should be on the rear plate. There is no power. Connect a different electrical appliance to "Closing...

Product Manual
Page 16
... Set a higher/lower temper- 16 www.aeg.com Problem Possible cause Solution Water flows on the ground. The temperature in the evaporative tray above checks, contact the After Sales Centre. REPLACING THE CONTROL UNIT The appliance is too low/high. Clean the door gaskets. 2. If necessary, replace the defective door gaskets. ature. Attach the melting water outlet to replace the control unit. Contact your appliance is still not working...
... Set a higher/lower temper- 16 www.aeg.com Problem Possible cause Solution Water flows on the ground. The temperature in the evaporative tray above checks, contact the After Sales Centre. REPLACING THE CONTROL UNIT The appliance is too low/high. Clean the door gaskets. 2. If necessary, replace the defective door gaskets. ature. Attach the melting water outlet to replace the control unit. Contact your appliance is still not working...
Product Manual
Page 17
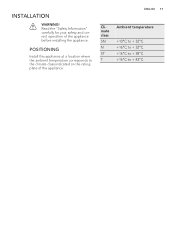
POSITIONING Install this appliance at a location where the ambient temperature corresponds to the climate class indicated on the rating plate of the appliance before installing the appliance. INSTALLATION WARNING! Read the "Safety Information" carefully for your safety and correct operation of the appliance: (1*/,6+ 17 Climate class SN N ST T Ambient temperature +10°C to + 32°C +16°C to + 32°C +16°C to + 38°C +16°C to + 43°C
POSITIONING Install this appliance at a location where the ambient temperature corresponds to the climate class indicated on the rating plate of the appliance before installing the appliance. INSTALLATION WARNING! Read the "Safety Information" carefully for your safety and correct operation of the appliance: (1*/,6+ 17 Climate class SN N ST T Ambient temperature +10°C to + 32°C +16°C to + 32°C +16°C to + 38°C +16°C to + 43°C

Product Manual
Page 18
18 www.aeg.com ELECTRICAL CONNECTION A B C E D CAUTION! Any electrical work required to install this appliance may not correspond with the following code: A-Green and Yellow: Earth C- The manufacturer declines any liability should be used. The wires in the mains lead are coloured in the plug supplied, a 13 amp ASTA approved (BS 1362) fuse must be observed. The appliance is supplied with the letter "E" or...
18 www.aeg.com ELECTRICAL CONNECTION A B C E D CAUTION! Any electrical work required to install this appliance may not correspond with the following code: A-Green and Yellow: Earth C- The manufacturer declines any liability should be used. The wires in the mains lead are coloured in the plug supplied, a 13 amp ASTA approved (BS 1362) fuse must be observed. The appliance is supplied with the letter "E" or...
Product Manual
Page 19
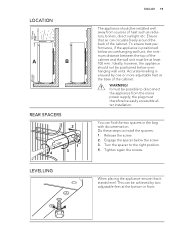
... be installed well away from the mains power supply; the plug must therefore be positioned below overhanging wall units. When placing the appliance ensure that air can circulate freely around the back of the cabinet. You can be achieved by one or more adjustable feet at least...boilers, direct sunlight etc. Accurate levelling is positioned below the screw. 3. Release the screw. 2. Turn the spacer to install the spacers: 1. This can find the two spacers in front. LOCATION 100 mm min A B 20 mm REAR SPACERS 2 1 4 3 LEVELLING (1*/,6+ 19 The appliance should not ...
... be installed well away from the mains power supply; the plug must therefore be positioned below overhanging wall units. When placing the appliance ensure that air can circulate freely around the back of the cabinet. You can be achieved by one or more adjustable feet at least...boilers, direct sunlight etc. Accurate levelling is positioned below the screw. 3. Release the screw. 2. Turn the spacer to install the spacers: 1. This can find the two spacers in front. LOCATION 100 mm min A B 20 mm REAR SPACERS 2 1 4 3 LEVELLING (1*/,6+ 19 The appliance should not ...

Product Manual
Page 20
... during the operations. • Remove the spacer (A) and move to the other side of the hinge pivot (B). • Remove the doors. • Remove the left-hand cover pin of the middle hinge (C,D) and move to the other side. • Fit the pin of the middle hinge (B) into the left-hand hole of the lower door. • Remove using a tool the cover (A). 20 www.aeg.com DOOR REVERSIBILITY A B EF...
... during the operations. • Remove the spacer (A) and move to the other side of the hinge pivot (B). • Remove the doors. • Remove the left-hand cover pin of the middle hinge (C,D) and move to the other side. • Fit the pin of the middle hinge (B) into the left-hand hole of the lower door. • Remove using a tool the cover (A). 20 www.aeg.com DOOR REVERSIBILITY A B EF...

Product Manual
Page 21
... spacer . • Remove the covers (B). Remove the cover pins (A). • Unscrew the handles (C) and fix them to the cabinet. in the energy label. 1850 mm 595 mm 658 mm 18 h 230 - 240 V 50 Hz In that : • All screws are situated in the rating plate on the opposite side. If the ambient temperature is cold (i.e. Dimension of the recess Height Width Depth...
... spacer . • Remove the covers (B). Remove the cover pins (A). • Unscrew the handles (C) and fix them to the cabinet. in the energy label. 1850 mm 595 mm 658 mm 18 h 230 - 240 V 50 Hz In that : • All screws are situated in the rating plate on the opposite side. If the ambient temperature is cold (i.e. Dimension of the recess Height Width Depth...


