

Product Manual
Page 2
... CARE AND SERVICE We recommend the use of original spare parts. CLOCK FUNCTIONS 13 8. When contacting Service, ensure that help make life simpler - USING THE ACCESSORIES 15 10. SAFETY INSTRUCTIONS 4 3. DAILY USE 10 7. INSTALLATION 32 FOR PERFECT RESULTS Thank you might not find on the rating plate. We have created it . Visit our website for: Get usage advice, brochures, trouble shooter, service information: www.aeg...
... CARE AND SERVICE We recommend the use of original spare parts. CLOCK FUNCTIONS 13 8. When contacting Service, ensure that help make life simpler - USING THE ACCESSORIES 15 10. SAFETY INSTRUCTIONS 4 3. DAILY USE 10 7. INSTALLATION 32 FOR PERFECT RESULTS Thank you might not find on the rating plate. We have created it . Visit our website for: Get usage advice, brochures, trouble shooter, service information: www.aeg...

Product Manual
Page 3
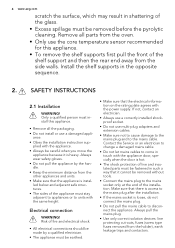
... use oven gloves to remove or put in accessories or ovenware. • Do not use a steam cleaner to clean the appliance. • Before maintenance cut the power supply. • Do not use harsh abrasive cleaners or sharp metal scrapers to clean the glass door since they can be made by an adult or a person who is not responsible if an incorrect installation and use...
... use oven gloves to remove or put in accessories or ovenware. • Do not use a steam cleaner to clean the appliance. • Before maintenance cut the power supply. • Do not use harsh abrasive cleaners or sharp metal scrapers to clean the glass door since they can be made by an adult or a person who is not responsible if an incorrect installation and use...
Product Manual
Page 4
... sure that the electrical information on the rating plate agrees with the appliance door, specially when the door is loose, do not connect the mains plug. • Do not pull the mains cable to the mains cable. Always pull the mains plug. • Use only correct isolation devices: line protecting cut-outs, fuses (screw type fuses removed from the side walls. Only a qualified person...
... sure that the electrical information on the rating plate agrees with the appliance door, specially when the door is loose, do not connect the mains plug. • Do not pull the mains cable to the mains cable. Always pull the mains plug. • Use only correct isolation devices: line protecting cut-outs, fuses (screw type fuses removed from the side walls. Only a qualified person...

Product Manual
Page 5
... not apply pressure on the appliance. The use an oven spray, obey the safety instructions on the performance of the appliance. do not put water directly into the hot appliance. - It is the risk that the glass panels can break. • Replace immediately the door glass panels when they are damaged. • The electrical installation must have an isolation device which lets...
... not apply pressure on the appliance. The use an oven spray, obey the safety instructions on the performance of the appliance. do not put water directly into the hot appliance. - It is the risk that the glass panels can break. • Replace immediately the door glass panels when they are damaged. • The electrical installation must have an isolation device which lets...

Product Manual
Page 6
..., pans, trays, utensils etc., can be damaged by the high temperature Pyrolytic cleaning operation of fire and burns. • Before carrying out a Pyrolitic selfcleaning function or the First Use function please remove from the appliance while the Pyrolytic cleaning is in the appliance. Risk of electrical shock. • Before replacing the lamp, disconnect the appliance from all the instructions for house lighting...
..., pans, trays, utensils etc., can be damaged by the high temperature Pyrolytic cleaning operation of fire and burns. • Before carrying out a Pyrolitic selfcleaning function or the First Use function please remove from the appliance while the Pyrolytic cleaning is in the appliance. Risk of electrical shock. • Before replacing the lamp, disconnect the appliance from all the instructions for house lighting...

Product Manual
Page 7
...- / roasting pan. • Telescopic runners For shelves and trays. • Core temperature sensor To measure how far the food is cooked. 4. PRODUCT DESCRIPTION ENGLISH 7 1 7 Rating plate 8 Shelf positions 2 5 3 4 4 83 5 2 7 1 6 1 Electronic programmer 2 Socket for ten minutes. 5. sor 3 Grill 4 Oven lamp 5 Fan 6 Shelf support, removable 3.1 Oven accessories • Wire shelf For cookware, cake tins, roasts. • Grill- / Roasting pan To bake and roast or as pan to the mains, or after a power cut, you must set the...
...- / roasting pan. • Telescopic runners For shelves and trays. • Core temperature sensor To measure how far the food is cooked. 4. PRODUCT DESCRIPTION ENGLISH 7 1 7 Rating plate 8 Shelf positions 2 5 3 4 4 83 5 2 7 1 6 1 Electronic programmer 2 Socket for ten minutes. 5. sor 3 Grill 4 Oven lamp 5 Fan 6 Shelf support, removable 3.1 Oven accessories • Wire shelf For cookware, cake tins, roasts. • Grill- / Roasting pan To bake and roast or as pan to the mains, or after a power cut, you must set the...

Product Manual
Page 8
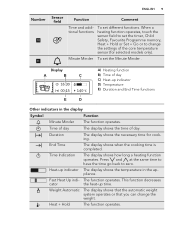
... activate or deactivate the Fast Heat Up function, touch the field for 3 sec- Heating Func- To activate or deac- sisted Cooking function. tions or Assis- CONTROL PANEL Electronic programmer 1 2 3 4 5 6 7 8 9 10 11 Use the sensor fields to the necessary function, touch 3 the field once or twice when the appli- ted Cooking cess to operate the appliance Number Sensor field Function Comment 1 - onds...
... activate or deactivate the Fast Heat Up function, touch the field for 3 sec- Heating Func- To activate or deac- sisted Cooking function. tions or Assis- CONTROL PANEL Electronic programmer 1 2 3 4 5 6 7 8 9 10 11 Use the sensor fields to the necessary function, touch 3 the field once or twice when the appli- ted Cooking cess to operate the appliance Number Sensor field Function Comment 1 - onds...
Product Manual
Page 9
... to change the weight. The function operates. When a heating function operates, touch the sensor field to set the timer, Child Safety, Favourite Programme memory, Heat + Hold or Set + Go or to zero. Heat-up time. This function decreases cator the heat-up indicator The display shows the temperature in the display Symbol Function Minute Minder The function operates. Display A B C A) Heating function B) Time of the core temperature sensor (for cooking. Fast Heat Up indi- Time of...
... to change the weight. The function operates. When a heating function operates, touch the sensor field to set the timer, Child Safety, Favourite Programme memory, Heat + Hold or Set + Go or to zero. Heat-up time. This function decreases cator the heat-up indicator The display shows the temperature in the display Symbol Function Minute Minder The function operates. Display A B C A) Heating function B) Time of the core temperature sensor (for cooking. Fast Heat Up indi- Time of...

Product Manual
Page 10
... menu 3. Contains a list of the menus: 1. Adjusts the display brightness by degrees. Activate the appliance. 6.2 The menus in overview Main menu Symbol Menu item Assisted Cooking Heating Functions Pyrolysis Basic Settings Favourite Programme Submenus for the display. Description Sets the current time on the clock. When ON, you can get back to submenu or accept setting. 10 www.aeg.com 6. Press OK...
... menu 3. Contains a list of the menus: 1. Adjusts the display brightness by degrees. Activate the appliance. 6.2 The menus in overview Main menu Symbol Menu item Assisted Cooking Heating Functions Pyrolysis Basic Settings Favourite Programme Submenus for the display. Description Sets the current time on the clock. When ON, you can get back to submenu or accept setting. 10 www.aeg.com 6. Press OK...

Product Manual
Page 11
... to toast. Guides you when to deactivate the tone of press-tones and signals by degrees. Symbol Submenu Buzzer Volume Key Tones Alarm/Error Tones Cleaning Assistant Cleaning Reminder Service Factory Settings ENGLISH 11 Description Adjusts the volume of the ON / OFF touch field. It is also suitable for : Heating Functions Heating function True Fan Cooking Pizza Setting Application To bake on one...
... to toast. Guides you when to deactivate the tone of press-tones and signals by degrees. Symbol Submenu Buzzer Volume Key Tones Alarm/Error Tones Cleaning Assistant Cleaning Reminder Service Factory Settings ENGLISH 11 Description Adjusts the volume of the ON / OFF touch field. It is also suitable for : Heating Functions Heating function True Fan Cooking Pizza Setting Application To bake on one...

Product Manual
Page 12
... display comes on. Press OK to brown. Press OK to set the cooking time first. For controlled rising of yeast dough before baking. To dry sliced fruits like lasagna or potato gratin. Press once or twice to go directly to the Heating Functions menu (when the appliance is necessary to confirm. 4. The bar shows that the temperature increases. 6.6 Fast Heat...
... display comes on. Press OK to brown. Press OK to set the cooking time first. For controlled rising of yeast dough before baking. To dry sliced fruits like lasagna or potato gratin. Press once or twice to go directly to the Heating Functions menu (when the appliance is necessary to confirm. 4. The bar shows that the temperature increases. 6.6 Fast Heat...

Product Manual
Page 13
... appliance uses the residual heat to activate the function. Press or to set the time for a clock function, the time starts to automatically activate and deactivate the appliance at a given time later. • When you use Duration and End Time at the same time if you can use the Core temperature sensor (if applicable), the Duration and End Time functions do not operate. When the time ends...
... appliance uses the residual heat to activate the function. Press or to set the time for a clock function, the time starts to automatically activate and deactivate the appliance at a given time later. • When you use Duration and End Time at the same time if you can use the Core temperature sensor (if applicable), the Duration and End Time functions do not operate. When the time ends...
Product Manual
Page 14
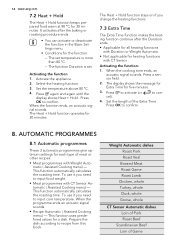
...; Meat programmes with CT Sensor Automatic ( Assisted Cooking menu) - The function Duration is set temperature is more than 80 °C. - Set the length of Game This function automatically calculates the roasting time. Set the temperature above 80 °C. 4. Press to recipe from this book. This function uses predefined values for 30 minutes. 14 www.aeg.com 7.2 Heat + Hold The Heat + Hold function keeps prepared food warm...
...; Meat programmes with CT Sensor Automatic ( Assisted Cooking menu) - The function Duration is set temperature is more than 80 °C. - Set the length of Game This function automatically calculates the roasting time. Set the temperature above 80 °C. 4. Press to recipe from this book. This function uses predefined values for 30 minutes. 14 www.aeg.com 7.2 Heat + Hold The Heat + Hold function keeps prepared food warm...

Product Manual
Page 16
... core temperature. 5. Be careful when you remove the accessories from a hot appliance. The appliance calculates the Put the grill- / roasting pan in the grill- / roasting pan so that the supports point down. The display shows the core temperature sensor symbol. 4. WARNING! Set the oven function and, if necessary, the oven temperature. When the meat is a risk of burns. 9.2 Core temperature sensor The core temperature sensor measures the core temperature of food, the set temperature...
... core temperature. 5. Be careful when you remove the accessories from a hot appliance. The appliance calculates the Put the grill- / roasting pan in the grill- / roasting pan so that the supports point down. The display shows the core temperature sensor symbol. 4. WARNING! Set the oven function and, if necessary, the oven temperature. When the meat is a risk of burns. 9.2 Core temperature sensor The core temperature sensor measures the core temperature of food, the set temperature...

Product Manual
Page 17
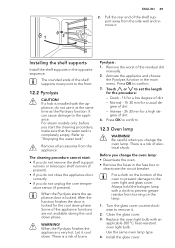
... and left hand telescopic runners. 2. Put the wire shelf on the telescopic runners and carefully push them into °C the appliance. If necessary, you close the oven door. To do this, touch . 8. Keep the installation instructions for the telescopic runners for future use. Remove the core temperature sensor plug from the appliance. Do not clean the telescopic runners in approximately 30 minutes...
... and left hand telescopic runners. 2. Put the wire shelf on the telescopic runners and carefully push them into °C the appliance. If necessary, you close the oven door. To do this, touch . 8. Keep the installation instructions for the telescopic runners for future use. Remove the core temperature sensor plug from the appliance. Do not clean the telescopic runners in approximately 30 minutes...
Product Manual
Page 18
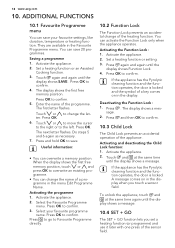
... activate the Function Lock only when the appliance operates. Press OK. 6. Useful information: • You can change of the appliance . Press OK to change the letter. ADDITIONAL FUNCTIONS 10.1 Favourite Programme menu You can save . Activating the Function Lock : 1. Set a heating function or setting. 3. Deactivating the Function Lock : 1. 18 www.aeg.com 10. When the display shows the first free memory position, touch...
... activate the Function Lock only when the appliance operates. Press OK. 6. Useful information: • You can change of the appliance . Press OK to change the letter. ADDITIONAL FUNCTIONS 10.1 Favourite Programme menu You can save . Activating the Function Lock : 1. Set a heating function or setting. 3. Deactivating the Function Lock : 1. 18 www.aeg.com 10. When the display shows the first free memory position, touch...
Product Manual
Page 19
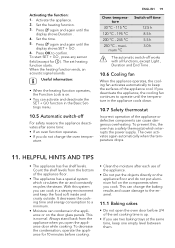
...; Moisture can cook in the Basic Settings menu. 10.5 Automatic switch-off works with all functions, except Light , Duration and End Time . 10.6 Cooling fan When the appliance operates, the cooling fan activates automatically to the enamel. 11.1 Baking cakes • Do not open the appliance door while cooking. The set cooking time is up. • If you use of the appliance cool. ENGLISH 19 Oven temperature 30 °...
...; Moisture can cook in the Basic Settings menu. 10.5 Automatic switch-off works with all functions, except Light , Duration and End Time . 10.6 Cooling fan When the appliance operates, the cooling fan activates automatically to the enamel. 11.1 Baking cakes • Do not open the appliance door while cooking. The set cooking time is up. • If you use of the appliance cool. ENGLISH 19 Oven temperature 30 °...

Product Manual
Page 20
.... Find the best settings (heat setting, cooking time, etc.) for approximately 15 minutes before carving so that can be permanent. • Leave the meat for your cookware, recipes and quantities when you cook. To prevent the smoke condensation, add water each time after it dries up. 11.3 Cooking times Cooking times depend on a wire shelf1) 3 175 2 150 60 - 80 In a baking tray 2 170 2 (left and...
.... Find the best settings (heat setting, cooking time, etc.) for approximately 15 minutes before carving so that can be permanent. • Leave the meat for your cookware, recipes and quantities when you cook. To prevent the smoke condensation, add water each time after it dries up. 11.3 Cooking times Cooking times depend on a wire shelf1) 3 175 2 150 60 - 80 In a baking tray 2 170 2 (left and...
Product Manual
Page 29
... bottom of electrical shock. The cleaning procedure cannot start the cleaning procedure, make sure that the water tank is locked. After the function finishes the door is a risk of the shelf support away from the side wall and remove it . 2. Press OK to the appliance. Turn the glass cover counterclockwise to remove it . Replace the oven light bulb with the appliance, do not unplug the core temperature sensor (if...
... bottom of electrical shock. The cleaning procedure cannot start the cleaning procedure, make sure that the water tank is locked. After the function finishes the door is a risk of the shelf support away from the side wall and remove it . 2. Press OK to the appliance. Turn the glass cover counterclockwise to remove it . Replace the oven light bulb with the appliance, do not unplug the core temperature sensor (if...
Product Manual
Page 31
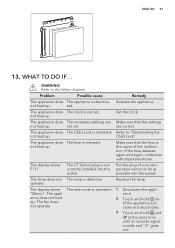
... deactivates. 3. operate. ance does not heat up . not heat up . The display shows F111. The fan does not operate. 2. Refer to "Deactivating the not heat up . The appliance does The clock is not correctly installed into the socket. Deactivate the appli- Set the clock. are Make sure that the fuse is activated. 1. WHAT TO DO IF... The CT Sensor plug is not set . not heat up...
... deactivates. 3. operate. ance does not heat up . not heat up . The display shows F111. The fan does not operate. 2. Refer to "Deactivating the not heat up . The appliance does The clock is not correctly installed into the socket. Deactivate the appli- Set the clock. are Make sure that the fuse is activated. 1. WHAT TO DO IF... The CT Sensor plug is not set . not heat up...


