
User Guide
Page 20
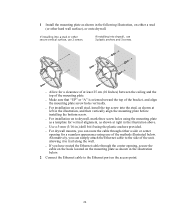
...a clearance of at least 25 cm (10 Inches) between the ceiling and the top of the unit, allowing it to the Ethernet port on the access point. 20 o If you have routed the Ethernet cable through either a stud (or other secure vertical surface, use 3 plastic anchors and 3 screws. ...you can simply attach the Ethernet cable to the side of the mounting plate. o For drywall mounts, you can route the cable through the center opening for a seamless appearance using the plastic anchors provided. If installing into drywall, use 2 screws. o For installation on a wall stud, install the ...
...a clearance of at least 25 cm (10 Inches) between the ceiling and the top of the unit, allowing it to the Ethernet port on the access point. 20 o If you have routed the Ethernet cable through either a stud (or other secure vertical surface, use 3 plastic anchors and 3 screws. ...you can simply attach the Ethernet cable to the side of the mounting plate. o For drywall mounts, you can route the cable through the center opening for a seamless appearance using the plastic anchors provided. If installing into drywall, use 2 screws. o For installation on a wall stud, install the ...
User Guide
Page 21
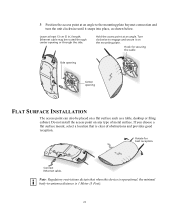
... as shown below. Hook for best reception. Connect Ethernet cable. 3 Position the access point at least 13 cm (5 in.) length. Hold the access point at an angle. Rotate for securing the cable Side opening Center opening or through center opening FLAT SURFACE INSTALLATION The access point can also be routed through the side. If you choose a flat surface mount... the mounting plate bayonet connection and turn the unit clockwise until it on any type of obstructions and provides good reception. Do not install the access point on the mounting plate.
... as shown below. Hook for best reception. Connect Ethernet cable. 3 Position the access point at least 13 cm (5 in.) length. Hold the access point at an angle. Rotate for securing the cable Side opening Center opening or through center opening FLAT SURFACE INSTALLATION The access point can also be routed through the side. If you choose a flat surface mount... the mounting plate bayonet connection and turn the unit clockwise until it on any type of obstructions and provides good reception. Do not install the access point on the mounting plate.
User Guide
Page 30
... the access point automatically uses its default IP address, 169.254.2.1. o Primary DNS Address and Secondary DNS Address-The Domain Name Servers (DNS) map numerical IP addresses to open the ... address, subnet mask and default gateway to the access point. IDENTIFICATION On the Identification page, you can identify the access point by your wireless LAN to save the changes. After making selections ...the Home page, click Advanced Setup to the equivalent domain name (for example, www.3Com.com). ADVANCED SETUP The Advanced Setup pages allow you can configure TCP/IP (Transmission Control...
... the access point automatically uses its default IP address, 169.254.2.1. o Primary DNS Address and Secondary DNS Address-The Domain Name Servers (DNS) map numerical IP addresses to open the ... address, subnet mask and default gateway to the access point. IDENTIFICATION On the Identification page, you can identify the access point by your wireless LAN to save the changes. After making selections ...the Home page, click Advanced Setup to the equivalent domain name (for example, www.3Com.com). ADVANCED SETUP The Advanced Setup pages allow you can configure TCP/IP (Transmission Control...
User Guide
Page 43
... The access point and the wireless devices must also be enabled as described in the User Access List, which determines the users that can associate with the access point. In the User Access List page...configured: o Open System (the default)-Allows access to perform the following actions: To add a new user, click Add Users. The user name and password set on the access point must be deleted...Access List: There must match those set on page 43. In the next page, check the check boxes next to the names to enter a user name and password every time they associate with other 3Com Wireless...
... The access point and the wireless devices must also be enabled as described in the User Access List, which determines the users that can associate with the access point. In the User Access List page...configured: o Open System (the default)-Allows access to perform the following actions: To add a new user, click Add Users. The user name and password set on the access point must be deleted...Access List: There must match those set on page 43. In the next page, check the check boxes next to the names to enter a user name and password every time they associate with other 3Com Wireless...
User Guide
Page 46
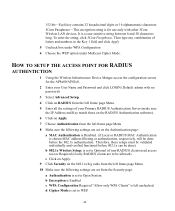
... the following settings are to Open System b Encryption is Enabled c WPA Configuration Required "Allow only WPA Clients" is set to WEP. 46 To enter the string, click 3Com Passphrase. d Cipher Mode is set to Optional (if non-RADIUS clients need access too) or Required (if..., these setups must be validated individually and verified functional before the 802.1x authentication. HOW TO SETUP THE ACCESS POINT FOR RADIUS AUTHENTICTION 1 Using the Wireless Infrastructure Device Manger access the configuration screen for use only with no password) 3 Select Advanced Setup. 4 Click on RADIUS from...
... the following settings are to Open System b Encryption is Enabled c WPA Configuration Required "Allow only WPA Clients" is set to WEP. 46 To enter the string, click 3Com Passphrase. d Cipher Mode is set to Optional (if non-RADIUS clients need access too) or Required (if..., these setups must be validated individually and verified functional before the 802.1x authentication. HOW TO SETUP THE ACCESS POINT FOR RADIUS AUTHENTICTION 1 Using the Wireless Infrastructure Device Manger access the configuration screen for use only with no password) 3 Select Advanced Setup. 4 Click on RADIUS from...
User Guide
Page 47
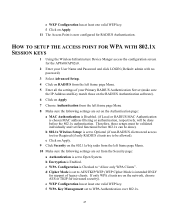
... is Disabled. (if Local or RADIUS MAC Authentication is set to Open System. c Click on Apply. 9 Click Security on the 802.11a/b/g radio from the left frame page Menu. 10 Make sure the following settings are on Apply. 11 The Access Point is set to Optional (if non-RADIUS clients need...done). If only WPA clients are set to WPA Authentication over 802.1x. 47 HOW TO SETUP THE ACCESS POINT FOR WPA WITH 802.1X SESSION KEYS 1 Using the Wireless Infrastructure Device Manger access the configuration screen for support of your User Name and Password and click LOGIN (Default: admin with ...
... is Disabled. (if Local or RADIUS MAC Authentication is set to Open System. c Click on Apply. 9 Click Security on the 802.11a/b/g radio from the left frame page Menu. 10 Make sure the following settings are on Apply. 11 The Access Point is set to Optional (if non-RADIUS clients need...done). If only WPA clients are set to WPA Authentication over 802.1x. 47 HOW TO SETUP THE ACCESS POINT FOR WPA WITH 802.1X SESSION KEYS 1 Using the Wireless Infrastructure Device Manger access the configuration screen for support of your User Name and Password and click LOGIN (Default: admin with ...

User Guide
Page 48
... Wireless Setup: is Checked to Open System. e WEP Configuration has at least one valid WEP key (select the appropriate key length, key type, and key index). f WPA Key Management select WPA Pre-shared Key (PSK) and Key Type. c Click on Apply. 6 Click Security on Apply. 8 The Access Point is...). b Encryption is now configured for WPA Pre-shared Key. 48 HOW TO SETUP THE ACCESS POINT FOR WPA WITH PRE-SHARED (PSK) KEY 1 Using the Wireless Infrastructure Device Manger access the configuration screen for the AP8x00/AP82x0. 2 Enter your User Name and Password and click LOGIN (Default: admin ...
... Wireless Setup: is Checked to Open System. e WEP Configuration has at least one valid WEP key (select the appropriate key length, key type, and key index). f WPA Key Management select WPA Pre-shared Key (PSK) and Key Type. c Click on Apply. 6 Click Security on Apply. 8 The Access Point is...). b Encryption is now configured for WPA Pre-shared Key. 48 HOW TO SETUP THE ACCESS POINT FOR WPA WITH PRE-SHARED (PSK) KEY 1 Using the Wireless Infrastructure Device Manger access the configuration screen for the AP8x00/AP82x0. 2 Enter your User Name and Password and click LOGIN (Default: admin ...
User Guide
Page 49
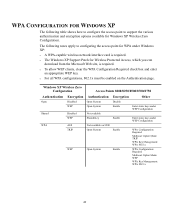
..., clear the WPA Configuration Required check box and enter an appropriate WEP key. Windows XP Wireless Zero Configuration Access Points 8200/8250/8500/8700/8750 Authentication Open Shared WPA Encryption Disabled WEP Disabled WEP AES TKIP WEP Authentication Open System Open System Not available Shared Key Not available on the Authentication page. WPA CONFIGURATION FOR WINDOWS XP...
..., clear the WPA Configuration Required check box and enter an appropriate WEP key. Windows XP Wireless Zero Configuration Access Points 8200/8250/8500/8700/8750 Authentication Open Shared WPA Encryption Disabled WEP Disabled WEP AES TKIP WEP Authentication Open System Open System Not available Shared Key Not available on the Authentication page. WPA CONFIGURATION FOR WINDOWS XP...

User Guide
Page 50
Windows XP Wireless Zero Configuration Access Points 8200/8250/8500/8700/8750 Authentication WPA-PSK Encryption AES TKIP WEP Authentication Not available on 8200 Open System Open System Encryption Enable Enable Other WPA Configuration: Required Multicast Cipher Mode: TKIP WPA Key Management: WPA-PSK Select Key Type and enter Pre-Shared Key WPA Configuration: Required Multicast Cipher Mode: WEP WPA Key Management: WPA-PSK Select Key Type and enter Pre-Shared Key 50
Windows XP Wireless Zero Configuration Access Points 8200/8250/8500/8700/8750 Authentication WPA-PSK Encryption AES TKIP WEP Authentication Not available on 8200 Open System Open System Encryption Enable Enable Other WPA Configuration: Required Multicast Cipher Mode: TKIP WPA Key Management: WPA-PSK Select Key Type and enter Pre-Shared Key WPA Configuration: Required Multicast Cipher Mode: WEP WPA Key Management: WPA-PSK Select Key Type and enter Pre-Shared Key 50
User Guide
Page 62
INDEX Numbers 3Com 3CDaemon Server Tool 25 3Com Network Supervisor 25 3Com Passphrase encryption 46 3Com Wireless Infrastructure Device Manager 25, 26 802.11a, turbo mode 41 802.1x reauthentication refresh rate 34 802.1x setup 33 A access control, 43 access point installation 13 IP address, troubleshooting 52 resetting 39 accounting 32 ...16, 22 comparison data 22 connecting an optional 22 options 22 standard detachable (Access Point 8200) 16 AP management filter 36 AP status 40 authentication 32, 43 local MAC 34 MAC 33 open system 43 RADIUS MAC 33 shared key 43 automatic channel selection 41 B ...
INDEX Numbers 3Com 3CDaemon Server Tool 25 3Com Network Supervisor 25 3Com Passphrase encryption 46 3Com Wireless Infrastructure Device Manager 25, 26 802.11a, turbo mode 41 802.1x reauthentication refresh rate 34 802.1x setup 33 A access control, 43 access point installation 13 IP address, troubleshooting 52 resetting 39 accounting 32 ...16, 22 comparison data 22 connecting an optional 22 options 22 standard detachable (Access Point 8200) 16 AP management filter 36 AP status 40 authentication 32, 43 local MAC 34 MAC 33 open system 43 RADIUS MAC 33 shared key 43 automatic channel selection 41 B ...

User Guide
Page 63
...41 G gateway, default 30 glossary of wireless networking terms 11 I identification 30 IEEE 802.3af power-over-Ethernet 17 infrastructure configuration 9 installation 13 access point 13 antenna 16 cable 13 flat surface...20 N native VLAN ID 36 network configuration and planning 9 NIC, choosing 27 O open system 43 P passphrase 46 password 38 changing for 128-bit Dynamic Security Link 43 planning a network ...9 power 14 connecting 17 requirements 14 supply, 3Com integrated 17, 18 power-over-Ethernet 17 preamble 42 Pre-IP Configuration Wizard 27, 28...
...41 G gateway, default 30 glossary of wireless networking terms 11 I identification 30 IEEE 802.3af power-over-Ethernet 17 infrastructure configuration 9 installation 13 access point 13 antenna 16 cable 13 flat surface...20 N native VLAN ID 36 network configuration and planning 9 NIC, choosing 27 O open system 43 P passphrase 46 password 38 changing for 128-bit Dynamic Security Link 43 planning a network ...9 power 14 connecting 17 requirements 14 supply, 3Com integrated 17, 18 power-over-Ethernet 17 preamble 42 Pre-IP Configuration Wizard 27, 28...