

Owners Manual
Page 5
Toyota will not disclose the recorded data to a third party except: • With the consent of the vehicle owner or with the consent of the lessee ... is not tied to diagnose malfunctions, conduct research and development, and improve quality. The computers do not record conversations, sound or pictures. ● Data usage Toyota may use the data recorded in these computers to a specific vehicle or vehicle owner 21 Vehicle control and operation data recording Your...
Toyota will not disclose the recorded data to a third party except: • With the consent of the vehicle owner or with the consent of the lessee ... is not tied to diagnose malfunctions, conduct research and development, and improve quality. The computers do not record conversations, sound or pictures. ● Data usage Toyota may use the data recorded in these computers to a specific vehicle or vehicle owner 21 Vehicle control and operation data recording Your...

Owners Manual
Page 7
● Disclosure of the EDR data Toyota will not disclose the data recorded in an EDR to a third party except when: • An agreement from the vehicle's owner (or the lessee for a leased vehicle) is obtained • Officially requested by the police or other authorities • For use by Toyota in a law suit • Ordered by a court of law However, if necessary, Toyota will: • • Use the data for research on vehicle safety performance Disclose the data to a third party for research purposes without disclosing information about the specific vehicle or vehicle owner 23
● Disclosure of the EDR data Toyota will not disclose the data recorded in an EDR to a third party except when: • An agreement from the vehicle's owner (or the lessee for a leased vehicle) is obtained • Officially requested by the police or other authorities • For use by Toyota in a law suit • Ordered by a court of law However, if necessary, Toyota will: • • Use the data for research on vehicle safety performance Disclose the data to a third party for research purposes without disclosing information about the specific vehicle or vehicle owner 23

Owners Manual
Page 9
You are informed about what you must or must not do in order to reduce the risk of damage to your Toyota and its equipment if the warning is ignored. NOTICE This is a warning against anything which may cause damage to the vehicle or its equipment. 25 Symbols used throughout this manual Cautions & Notices CAUTION This is a warning against anything which may cause injury to people if the warning is ignored. You are informed about what you must or must not do in order to avoid or reduce the risk of injury to yourself and others.
You are informed about what you must or must not do in order to reduce the risk of damage to your Toyota and its equipment if the warning is ignored. NOTICE This is a warning against anything which may cause damage to the vehicle or its equipment. 25 Symbols used throughout this manual Cautions & Notices CAUTION This is a warning against anything which may cause injury to people if the warning is ignored. You are informed about what you must or must not do in order to avoid or reduce the risk of injury to yourself and others.

Owners Manual
Page 10
a lid opens). 26 Arrows indicating operations Indicates the action (pushing, turning, etc.) used in illustrations Safety symbol The symbol of an operation (e.g. Symbols used to operate switches and other devices. Indicates the outcome of a circle with a slash through it means "Do not", "Do not do this", or "Do not let this happen".
a lid opens). 26 Arrows indicating operations Indicates the action (pushing, turning, etc.) used in illustrations Safety symbol The symbol of an operation (e.g. Symbols used to operate switches and other devices. Indicates the outcome of a circle with a slash through it means "Do not", "Do not do this", or "Do not let this happen".

Owners Manual
Page 11
...) • Mechanical keys Key number plate Vehicles without smart key system Master keys Operating the wireless remote control function (→P. 42) Key number plate Using the mechanical key (vehicles with the vehicle. K e y inform a t ion Ke ys The following keys are provided with smart key system) Take... out the mechanical key. After using the mechanical key, store it in the electronic key. If the electronic key battery is depleted or the smart key system does not operate properly...
...) • Mechanical keys Key number plate Vehicles without smart key system Master keys Operating the wireless remote control function (→P. 42) Key number plate Using the mechanical key (vehicles with the vehicle. K e y inform a t ion Ke ys The following keys are provided with smart key system) Take... out the mechanical key. After using the mechanical key, store it in the electronic key. If the electronic key battery is depleted or the smart key system does not operate properly...

Owners Manual
Page 25
Unlocks the trunk (push and hold) Sounds alarm (push and hold) (→P. 102) 42 Pressing the button again within 3 seconds unlocks the other doors. 1 -2 . Vehicles with smart key system Locks all doors Unlocks all doors Pressing the button unlocks the driver's door. Ope ning, c losing a nd loc k ing t he doors a nd t runk Wire le ss re m ot e c ont rol The wireless remote control can be used to lock and unlock the vehicle and the trunk from outside the vehicle.
Unlocks the trunk (push and hold) Sounds alarm (push and hold) (→P. 102) 42 Pressing the button again within 3 seconds unlocks the other doors. 1 -2 . Vehicles with smart key system Locks all doors Unlocks all doors Pressing the button unlocks the driver's door. Ope ning, c losing a nd loc k ing t he doors a nd t runk Wire le ss re m ot e c ont rol The wireless remote control can be used to lock and unlock the vehicle and the trunk from outside the vehicle.
Owners Manual
Page 29
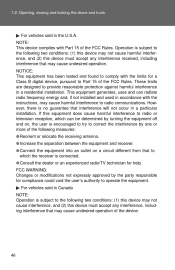
...(2) this equipment does cause harmful interference to radio or television reception, which can radiate radio frequency energy and, if not installed and used in accordance with the instructions, may cause undesired operation. 1-2. NOTE: This device complies with the limits for help. These limits are...this device must accept any interference received, including interference that may cause undesired operation of the FCC Rules. This equipment generates, uses and can be determined by one or more of the FCC Rules. FCC WARNING: Changes or modifications not expressly approved by ...
...(2) this equipment does cause harmful interference to radio or television reception, which can radiate radio frequency energy and, if not installed and used in accordance with the instructions, may cause undesired operation. 1-2. NOTE: This device complies with the limits for help. These limits are...this device must accept any interference received, including interference that may cause undesired operation of the FCC Rules. This equipment generates, uses and can be determined by one or more of the FCC Rules. FCC WARNING: Changes or modifications not expressly approved by ...

Owners Manual
Page 30
Ope ning, c losing a nd loc k ing t he doors a nd t runk Doors The vehicle can be locked and unlocked using the entry function, wireless remote control or door lock switch. 1 -2 .
Ope ning, c losing a nd loc k ing t he doors a nd t runk Doors The vehicle can be locked and unlocked using the entry function, wireless remote control or door lock switch. 1 -2 .
Owners Manual
Page 37
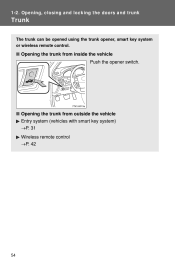
Ope ning, c losing a nd loc k ing t he doors a nd t runk Trunk The trunk can be opened using the trunk opener, smart key system or wireless remote control. 1 -2 .
Ope ning, c losing a nd loc k ing t he doors a nd t runk Trunk The trunk can be opened using the trunk opener, smart key system or wireless remote control. 1 -2 .

Owners Manual
Page 41
... fully close the trunk lid on an incline than genuine Toyota parts to press it lightly on the trunk lid may fall closed again after it is more difficult to open and secure before using the trunk. ● When closing and locking the doors and trunk CAUTION ● The trunk lid may...
... fully close the trunk lid on an incline than genuine Toyota parts to press it lightly on the trunk lid may fall closed again after it is more difficult to open and secure before using the trunk. ● When closing and locking the doors and trunk CAUTION ● The trunk lid may...

Owners Manual
Page 48
1-3. Adjustable components (seats, steering wheel, mirrors) Linking driving position memory with door unlock operation (vehicles with smart key system) Memorized driving positions can be recalled when you unlock the driver's door using the entry function or wireless remote control and open the driver's door.
1-3. Adjustable components (seats, steering wheel, mirrors) Linking driving position memory with door unlock operation (vehicles with smart key system) Memorized driving positions can be recalled when you unlock the driver's door using the entry function or wireless remote control and open the driver's door.
Owners Manual
Page 63
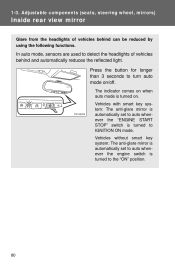
In auto mode, sensors are used to the "ON" position. 80 Vehicles without smart key system: The anti-glare mirror is automatically set to auto whenever the "ENGINE START STOP" switch ... a ble c om pone nt s (se a t s, st e e ring w he e l, m irrors) I nside re a r vie w m ir ror Glare from the headlights of vehicles behind can be reduced by using the following functions. Vehicles with smart key system: The anti-glare mirror is automatically set to auto whenever the engine switch is turned to detect...
In auto mode, sensors are used to the "ON" position. 80 Vehicles without smart key system: The anti-glare mirror is automatically set to auto whenever the "ENGINE START STOP" switch ... a ble c om pone nt s (se a t s, st e e ring w he e l, m irrors) I nside re a r vie w m ir ror Glare from the headlights of vehicles behind can be reduced by using the following functions. Vehicles with smart key system: The anti-glare mirror is automatically set to auto whenever the engine switch is turned to detect...

Owners Manual
Page 65
STEP 1 Select a mirror to fold the mirrors. 82 Left Right STEP 2 Adjust the mirror. Up Right Down Left Folding the mirrors Push backward to adjust. Adjust a ble c om pone nt s (se a t s, st e e ring w he e l, m irrors) Out side re a r vie w m irrors Mirror angle can be adjusted using the switch. 1 -3 .
STEP 1 Select a mirror to fold the mirrors. 82 Left Right STEP 2 Adjust the mirror. Up Right Down Left Folding the mirrors Push backward to adjust. Adjust a ble c om pone nt s (se a t s, st e e ring w he e l, m irrors) Out side re a r vie w m irrors Mirror angle can be adjusted using the switch. 1 -3 .

Owners Manual
Page 68
1 -4 . Use this switch to lock passenger window switches. Lock switch Press the switch down to prevent children from accidentally opening * Opening 1 Before driving *: Pressing the switch in the opposite direction will stop window travel partway. One-touch closing* Closing One-touch opening or closing a passenger window. 85 Ope ning a nd c losing t he w indow s a nd m oon roof Pow e r w indow s The power windows can be opened and closed using the following switches.
1 -4 . Use this switch to lock passenger window switches. Lock switch Press the switch down to prevent children from accidentally opening * Opening 1 Before driving *: Pressing the switch in the opposite direction will stop window travel partway. One-touch closing* Closing One-touch opening or closing a passenger window. 85 Ope ning a nd c losing t he w indow s a nd m oon roof Pow e r w indow s The power windows can be opened and closed using the following switches.

Owners Manual
Page 71
Ope ning a nd c losing t he w indow s a nd m oon roof M oon roof ∗ Use the overhead switches to open, close, and tilt the moon roof up and down. 1 -4 .
Ope ning a nd c losing t he w indow s a nd m oon roof M oon roof ∗ Use the overhead switches to open, close, and tilt the moon roof up and down. 1 -4 .
Owners Manual
Page 108
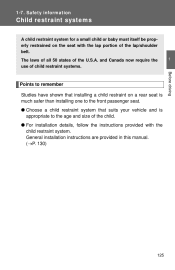
... restraint on the seat with the child restraint system. General installation instructions are provided in this manual. (→P. 130) 125 and Canada now require the use of child restraint systems. 1 Before driving Points to the age and size of the child. ● For installation details, follow the instructions provided with the...
... restraint on the seat with the child restraint system. General installation instructions are provided in this manual. (→P. 130) 125 and Canada now require the use of child restraint systems. 1 Before driving Points to the age and size of the child. ● For installation details, follow the instructions provided with the...

Owners Manual
Page 113
... for the outboard rear seats. (Buttons displaying the location of the anchors are attached to the outboard rear seats using the LATCH anchors or a seat belt. 1 -7 . The lap/shoulder belt can be used if your child restraint system is not compatible with a child restraint locking mechanism (ALR/ELR belts except driver's seat...
... for the outboard rear seats. (Buttons displaying the location of the anchors are attached to the outboard rear seats using the LATCH anchors or a seat belt. 1 -7 . The lap/shoulder belt can be used if your child restraint system is not compatible with a child restraint locking mechanism (ALR/ELR belts except driver's seat...

Owners Manual
Page 116
Safety information Installing child restraints using a seat belt (child restraint lock function belt) 1-7.
Safety information Installing child restraints using a seat belt (child restraint lock function belt) 1-7.

Owners Manual
Page 120
Make sure the top tether strap is securely latched. 137 Safety information Removing a child restraint installed with a seat belt Push the buckle release button and fully retract the seat belt. 1 Before driving Child restraint systems with a top tether strap STEP 1 Secure the child restraint using a seat belt or LATCH anchors, and lock the head restraint in place at the lowest position. STEP 2 Open the anchor bracket cover, latch the hook onto the anchor bracket and tighten the top tether strap. 1-7.
Make sure the top tether strap is securely latched. 137 Safety information Removing a child restraint installed with a seat belt Push the buckle release button and fully retract the seat belt. 1 Before driving Child restraint systems with a top tether strap STEP 1 Secure the child restraint using a seat belt or LATCH anchors, and lock the head restraint in place at the lowest position. STEP 2 Open the anchor bracket cover, latch the hook onto the anchor bracket and tighten the top tether strap. 1-7.

Owners Manual
Page 151
Engine coolant temperature gauge Displays the engine coolant temperature. Tachometer Displays the engine speed in the tank. Fuel gauge Displays the quantity of fuel remaining in revolutions per minute. Low fuel level warning light →P. 482 Odometer/trip meter and trip meter reset button →P. 170 169 Shift position indicator Displays the shift position Speedometer Displays the vehicle speed. 2 -2 . I nst rum e nt c lust e r Ga uge s a nd m e t e rs 2 When driving The units used on the speedometer may differ depending on the target region.
Engine coolant temperature gauge Displays the engine coolant temperature. Tachometer Displays the engine speed in the tank. Fuel gauge Displays the quantity of fuel remaining in revolutions per minute. Low fuel level warning light →P. 482 Odometer/trip meter and trip meter reset button →P. 170 169 Shift position indicator Displays the shift position Speedometer Displays the vehicle speed. 2 -2 . I nst rum e nt c lust e r Ga uge s a nd m e t e rs 2 When driving The units used on the speedometer may differ depending on the target region.


