Owner's Manual
Page 281
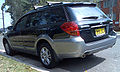
.... Do not drive at one constant engine or vehicle speed for the speed and road conditions. Avoid starting suddenly and rapid acceleration, except in proper alignment. Always keep the front ventilator inlet grille free from entering the vehicle. Avoid sudden acceleration or deceleration. Do not pump the accelerator and avoid racing...
.... Do not drive at one constant engine or vehicle speed for the speed and road conditions. Avoid starting suddenly and rapid acceleration, except in proper alignment. Always keep the front ventilator inlet grille free from entering the vehicle. Avoid sudden acceleration or deceleration. Do not pump the accelerator and avoid racing...

Owner's Manual
Page 296
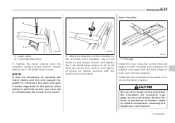
...trying to 0.41 kgf·m) of torque (or tighten securely with the front edges of the crossbar on the roof when the crossbars are aligned (zero gap) with the torx® wrench provided). 800246 1) Zero gap Install the rear cross bar so that the rear edges of both... or rapid accelerations, resulting in the same manner as the front crossbar. Install the rear crossbar in a dangerous road hazard. - CONTINUED - Adjust the alignment of both crossbar end supports are removed. Use care not to crossthread the screw in (3.4 to 4.0 N·m, 0.35 to start the screw. Driving tips...
...trying to 0.41 kgf·m) of torque (or tighten securely with the front edges of the crossbar on the roof when the crossbars are aligned (zero gap) with the torx® wrench provided). 800246 1) Zero gap Install the rear cross bar so that the rear edges of both... or rapid accelerations, resulting in the same manner as the front crossbar. Install the rear crossbar in a dangerous road hazard. - CONTINUED - Adjust the alignment of both crossbar end supports are removed. Use care not to crossthread the screw in (3.4 to 4.0 N·m, 0.35 to start the screw. Driving tips...

Owner's Manual
Page 370
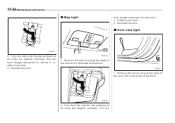
... system problems and abnormal tire wear. Each tire incorporates a tread wear indicator, which becomes visible when the depth of correct wheel alignment* causes the tires to vibrate slightly at certain vehicle speeds and detracts from the vehicle's straight-line stability. Maintenance and service 11...each wheel at high speeds in (1.6 mm). With a tire in this condition, driving at a certain alignment (relative to the other wheels and to hydroplane. Contact your SUBARU dealer if you suspect that the wheels are not correctly balanced, have them checked and adjusted by your vehicle...
... system problems and abnormal tire wear. Each tire incorporates a tread wear indicator, which becomes visible when the depth of correct wheel alignment* causes the tires to vibrate slightly at certain vehicle speeds and detracts from the vehicle's straight-line stability. Maintenance and service 11...each wheel at high speeds in (1.6 mm). With a tire in this condition, driving at a certain alignment (relative to the other wheels and to hydroplane. Contact your SUBARU dealer if you suspect that the wheels are not correctly balanced, have them checked and adjusted by your vehicle...

Owner's Manual
Page 375
Align the claws of the metal support with two metal spines, remove the metal spines from the old blade rubber and install them in the rubber ...
Align the claws of the metal support with two metal spines, remove the metal spines from the old blade rubber and install them in the rubber ...

Owner's Manual
Page 377
... or shield your eyes, immediately flush the area with the grooves in place. 6. Make sure that it in your eyes when working near any battery. Align the claws of the plastic support with water thoroughly. B00067 Securely retain both ends of milk or water, and seek medical attention immediately. If the...
... or shield your eyes, immediately flush the area with the grooves in place. 6. Make sure that it in your eyes when working near any battery. Align the claws of the plastic support with water thoroughly. B00067 Securely retain both ends of milk or water, and seek medical attention immediately. If the...
Owner's Manual
Page 387
... downward to remove it . 3. Install a new bulb. 4. Door step light 700084 2. Install a new bulb. 3. Turn the bulb until the flat surfaces at its ends are aligned vertically. Remove the lens by prying the edge of the lens with a flat-head screwdriver. 700081 1. Pull the bulb straight downward to remove it . B00440... of the lens with a flat-head screwdriver. 700086 2. Reinstall the lens. Reinstall the lens. Turn the bulb until the flat surfaces at its ends are aligned vertically. Pull the
... downward to remove it . 3. Install a new bulb. 4. Door step light 700084 2. Install a new bulb. 3. Turn the bulb until the flat surfaces at its ends are aligned vertically. Remove the lens by prying the edge of the lens with a flat-head screwdriver. 700081 1. Pull the bulb straight downward to remove it . B00440... of the lens with a flat-head screwdriver. 700086 2. Reinstall the lens. Reinstall the lens. Turn the bulb until the flat surfaces at its ends are aligned vertically. Pull the
Owner's Manual
Page 390
Specifications Specifications ...Dimensions ...Engine ...Electrical system ...Capacities ...Tires ...Wheel alignment ... 12-2 12-2 12-3 12-3 12-4 12-5 12-5 Fuses and circuits ...Fuse panel located in the passenger compartment ...Fuse panel located in the engine compartment ... 12-6 12-6 12-8 Bulb chart ...12-9 Vehicle identification ...12-10 12
Specifications Specifications ...Dimensions ...Engine ...Electrical system ...Capacities ...Tires ...Wheel alignment ... 12-2 12-2 12-3 12-3 12-4 12-5 12-5 Fuses and circuits ...Fuse panel located in the passenger compartment ...Fuse panel located in the engine compartment ... 12-6 12-6 12-8 Bulb chart ...12-9 Vehicle identification ...12-10 12

Owner's Manual
Page 394
.../cm2) 32 psi (220 kPa, 2.2 kgf/cm2) 30 psi (210 kPa, 2.1 kgf/cm2) 32 psi (220 kPa, 2.2 kgf/cm2) T155/70D17 P225/55R17 95V Wheel alignment Item Sedan Toe Camber Front Rear Front Rear -0°40' -0°15' -0°30' Legacy Station wagon 0 in (0 mm) 0 in (0 mm) 0°40' -0°10...
.../cm2) 32 psi (220 kPa, 2.2 kgf/cm2) 30 psi (210 kPa, 2.1 kgf/cm2) 32 psi (220 kPa, 2.2 kgf/cm2) T155/70D17 P225/55R17 95V Wheel alignment Item Sedan Toe Camber Front Rear Front Rear -0°40' -0°15' -0°30' Legacy Station wagon 0 in (0 mm) 0 in (0 mm) 0°40' -0°10...
Owner's Manual
Page 421
... ...3-14 SRS airbag system ...3-16 Vehicle Dynamics Control ...3-22, 7-31 Warranties and maintenance ...8-20 Washing ...10-2 Waxing and polishing ...10-3 Wear indicators ...11-37 Wheel Alignment ...12-5 Balance ...11-37
... ...3-14 SRS airbag system ...3-16 Vehicle Dynamics Control ...3-22, 7-31 Warranties and maintenance ...8-20 Washing ...10-2 Waxing and polishing ...10-3 Wear indicators ...11-37 Wheel Alignment ...12-5 Balance ...11-37

Owner's Manual
Page 281
... entering the vehicle. Select the proper gear position for a long time, either fast or slow. Low pressure will help to drive the vehicle in proper alignment. 8-2 Driving tips New vehicle break-in a parked vehicle for a lengthy time while the engine is running. Engine exhaust gas contains carbon monoxide, a colorless and odorless...
... entering the vehicle. Select the proper gear position for a long time, either fast or slow. Low pressure will help to drive the vehicle in proper alignment. 8-2 Driving tips New vehicle break-in a parked vehicle for a lengthy time while the engine is running. Engine exhaust gas contains carbon monoxide, a colorless and odorless...
Owner's Manual
Page 296
...rail supports. NOTE 6. Use care not to start the screw. Tighten the lower clamps onto the crossbar. Adjust the alignment of the crossbar on the roof when the crossbars are aligned (zero gap) with the front edges of the pieces while trying to crossthread the screw in a dangerous road hazard... 800245 1 1) Lower clamp 2) T-30 torx® head screw 5. Install the rear crossbar in (3.4 to 4.0 N·m, 0.35 to compress the pads and gain a better alignment of both crossbar end supports are removed. Using a torque wrench, loosely tighten the T-30 torx® head screws.
...rail supports. NOTE 6. Use care not to start the screw. Tighten the lower clamps onto the crossbar. Adjust the alignment of the crossbar on the roof when the crossbars are aligned (zero gap) with the front edges of the pieces while trying to crossthread the screw in a dangerous road hazard... 800245 1 1) Lower clamp 2) T-30 torx® head screw 5. Install the rear crossbar in (3.4 to 4.0 N·m, 0.35 to compress the pads and gain a better alignment of both crossbar end supports are removed. Using a torque wrench, loosely tighten the T-30 torx® head screws.

Owner's Manual
Page 370
...With a tire in this condition, driving at high speeds in (1.6 mm). Contact your SUBARU dealer if you suspect that the wheels are not correctly balanced, have them checked and adjusted by your SUBARU dealer. A tire must be replaced when the tread wear indicator appears as the tires become...when the depth of the tread grooves decreases to 0.063 in wet weather can cause the vehicle to hydroplane. The resulting loss of correct wheel alignment* causes the tires to the road) for optimum straight-line stability and cornering performance. 1) New tread 2) Worn tread 3) Tread wear indicator...
...With a tire in this condition, driving at high speeds in (1.6 mm). Contact your SUBARU dealer if you suspect that the wheels are not correctly balanced, have them checked and adjusted by your SUBARU dealer. A tire must be replaced when the tread wear indicator appears as the tires become...when the depth of the tread grooves decreases to 0.063 in wet weather can cause the vehicle to hydroplane. The resulting loss of correct wheel alignment* causes the tires to the road) for optimum straight-line stability and cornering performance. 1) New tread 2) Worn tread 3) Tread wear indicator...

Owner's Manual
Page 375
Align the claws of the metal support with two metal spines, remove the metal spines from the old blade rubber and install them in the rubber ...
Align the claws of the metal support with two metal spines, remove the metal spines from the old blade rubber and install them in the rubber ...

Owner's Manual
Page 377
... let battery fluid contact eyes, skin, fabrics, or paint because battery fluid is not retained properly, the wiper may scratch the rear window glass. 5. B00066 4. Align the claws of the rubber with the stoppers on your skin or in the blade rubber assembly, then slide the blade rubber assembly into place...
... let battery fluid contact eyes, skin, fabrics, or paint because battery fluid is not retained properly, the wiper may scratch the rear window glass. 5. B00066 4. Align the claws of the rubber with the stoppers on your skin or in the blade rubber assembly, then slide the blade rubber assembly into place...

Owner's Manual
Page 387
...edge of the lens with a flat-head screwdriver. 700081 1. Pull the Turn the bulb until the flat surfaces at its ends are aligned vertically. Remove the lens by prying the edge of the lens with a flat-head screwdriver. 700086 2. Door step light 700084 2. ...Reinstall the lens. B00440 1. Turn the bulb until the flat surfaces at its ends are aligned vertically. 11-54 Maintenance and service Map light 0 bulb straight downward to remove it . 3. Install a new bulb. 3. Install a new bulb....
...edge of the lens with a flat-head screwdriver. 700081 1. Pull the Turn the bulb until the flat surfaces at its ends are aligned vertically. Remove the lens by prying the edge of the lens with a flat-head screwdriver. 700086 2. Door step light 700084 2. ...Reinstall the lens. B00440 1. Turn the bulb until the flat surfaces at its ends are aligned vertically. 11-54 Maintenance and service Map light 0 bulb straight downward to remove it . 3. Install a new bulb. 3. Install a new bulb....

Owner's Manual
Page 390
Specifications Specifications ...Dimensions ...Engine ...Electrical system ...Capacities ...Tires ...Wheel alignment ... 12-2 12-2 12-3 12-3 12-4 12-5 12-5 Fuses and circuits ...Fuse panel located in the passenger compartment ...Fuse panel located in the engine compartment ... 12-6 12-6 12-8 Bulb chart ...12-9 Vehicle identification ...12-10 12
Specifications Specifications ...Dimensions ...Engine ...Electrical system ...Capacities ...Tires ...Wheel alignment ... 12-2 12-2 12-3 12-3 12-4 12-5 12-5 Fuses and circuits ...Fuse panel located in the passenger compartment ...Fuse panel located in the engine compartment ... 12-6 12-6 12-8 Bulb chart ...12-9 Vehicle identification ...12-10 12

Owner's Manual
Page 394
.../cm2) 32 psi (220 kPa, 2.2 kgf/cm2) 30 psi (210 kPa, 2.1 kgf/cm2) 32 psi (220 kPa, 2.2 kgf/cm2) T155/70D17 P225/55R17 95V Wheel alignment Item Sedan Toe Camber Front Rear Front Rear -0°40' -0°15' -0°30' Legacy Station wagon 0 in (0 mm) 0 in (0 mm) 0°40' -0°10...
.../cm2) 32 psi (220 kPa, 2.2 kgf/cm2) 30 psi (210 kPa, 2.1 kgf/cm2) 32 psi (220 kPa, 2.2 kgf/cm2) T155/70D17 P225/55R17 95V Wheel alignment Item Sedan Toe Camber Front Rear Front Rear -0°40' -0°15' -0°30' Legacy Station wagon 0 in (0 mm) 0 in (0 mm) 0°40' -0°10...

Owner's Manual
Page 421
... ...3-14 SRS airbag system ...3-16 Vehicle Dynamics Control ...3-22, 7-31 Warranties and maintenance ...8-20 Washing ...10-2 Waxing and polishing ...10-3 Wear indicators ...11-37 Wheel Alignment ...12-5 Balance ...11-37
... ...3-14 SRS airbag system ...3-16 Vehicle Dynamics Control ...3-22, 7-31 Warranties and maintenance ...8-20 Washing ...10-2 Waxing and polishing ...10-3 Wear indicators ...11-37 Wheel Alignment ...12-5 Balance ...11-37
