
Owner's Manual
Page 5
... what to do if you have a problem while driving, such as a flat tire or engine overheating. Chapter 2: Keys and doors This chapter informs you how to operate your SUBARU. Chapter 9: In case of fourteen chapters. Each chapter begins with a brief table of your audio system. Chapter 5:... Audio 2 This chapter informs you how to operate the keys, locks and windows. Chapter 6: Interior equipment This chapter...
... what to do if you have a problem while driving, such as a flat tire or engine overheating. Chapter 2: Keys and doors This chapter informs you how to operate your SUBARU. Chapter 9: In case of fourteen chapters. Each chapter begins with a brief table of your audio system. Chapter 5:... Audio 2 This chapter informs you how to operate the keys, locks and windows. Chapter 6: Interior equipment This chapter...

Owner's Manual
Page 16
Table of contents Seat, seatbelt and SRS airbags Keys and doors Instruments and controls Climate control Audio Interior equipment Starting and operating Driving tips In case of emergency Appearance care Maintenance and service Specifications Consumer information and Reporting safety defects Index 1 2 3 4 5 6 7 8 9 10 11 12 13 14
Table of contents Seat, seatbelt and SRS airbags Keys and doors Instruments and controls Climate control Audio Interior equipment Starting and operating Driving tips In case of emergency Appearance care Maintenance and service Specifications Consumer information and Reporting safety defects Index 1 2 3 4 5 6 7 8 9 10 11 12 13 14

Owner's Manual
Page 52
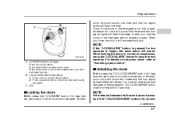
Neatly store the tongue plates in the recess in , and the connector (tongue) plate will disconnect from the buckle. You should hold the webbing end and guide it back into the retractor while it in the retractor and then insert the connector (tongue) plate into the - CONTINUED - 1-25 Seat, seatbelt and SRS airbags 0 slot in the connector (buckle) on the right-hand side and push it is rolling up the belt. HS1063BA HS1065BA 2. HS1064BA 1. Allow the retractor to roll up . Insert a key or other hard pointed object into the slot located at the front of the recess.
Neatly store the tongue plates in the recess in , and the connector (tongue) plate will disconnect from the buckle. You should hold the webbing end and guide it back into the retractor while it in the retractor and then insert the connector (tongue) plate into the - CONTINUED - 1-25 Seat, seatbelt and SRS airbags 0 slot in the connector (buckle) on the right-hand side and push it is rolling up the belt. HS1063BA HS1065BA 2. HS1064BA 1. Allow the retractor to roll up . Insert a key or other hard pointed object into the slot located at the front of the recess.

Owner's Manual
Page 57
... control module (including impact sensors) Seatbelt pretensioner (driver's side) Seatbelt pretensioner (Passenger's side) All related wiring And all other reasons, consult your SUBARU dealer. Unless checked and repaired, the seatbelt pretensioners and SRS airbag will illuminate. There- 1-30 The following , the vehicle should be taken promptly to... front seatbelt retractor assemblies or scrapping the entire car due to collision damage or for about 6 seconds when the ignition key is turned to the "ON" position. Seat, seatbelt and SRS airbags belt pretensioners, see your nearest...
... control module (including impact sensors) Seatbelt pretensioner (driver's side) Seatbelt pretensioner (Passenger's side) All related wiring And all other reasons, consult your SUBARU dealer. Unless checked and repaired, the seatbelt pretensioners and SRS airbag will illuminate. There- 1-30 The following , the vehicle should be taken promptly to... front seatbelt retractor assemblies or scrapping the entire car due to collision damage or for about 6 seconds when the ignition key is turned to the "ON" position. Seat, seatbelt and SRS airbags belt pretensioners, see your nearest...

Owner's Manual
Page 98
... not designed to the "ON" position. vated on the first impact, it will show normal system operation by lighting for about 6 seconds when the ignition key is turned to deploy if the vehicle is involved in a frontal collision or is struck from the side more than once, the SRS side airbag...
... not designed to the "ON" position. vated on the first impact, it will show normal system operation by lighting for about 6 seconds when the ignition key is turned to deploy if the vehicle is involved in a frontal collision or is struck from the side more than once, the SRS side airbag...
Owner's Manual
Page 102
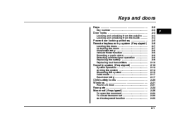
Keys and doors Keys ...Key number ... 2-2 2-2 Door locks ...Locking and unlocking from the outside ...Locking and unlocking from the inside ... 2-3 2-3 2-4 2 Power door locking switches ...Remote keyless entry system (if equipped) ...
Keys and doors Keys ...Key number ... 2-2 2-2 Door locks ...Locking and unlocking from the outside ...Locking and unlocking from the inside ... 2-3 2-3 2-4 2 Power door locking switches ...Remote keyless entry system (if equipped) ...

Owner's Manual
Page 103
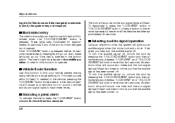
... box 2-2 You can keep it inside the vehicle. 1) 2) 3) 4) Master key Submaster key Valet key Key number plate Three types of keys are provided for your vehicle. The master key and submaster key fit all locks on the metal plate attached to either key. Keys and doors Keys Keys and doors 1 2 3 The valet key fits only the ignition switch and driver's door lock...
... box 2-2 You can keep it inside the vehicle. 1) 2) 3) 4) Master key Submaster key Valet key Key number plate Three types of keys are provided for your vehicle. The master key and submaster key fit all locks on the metal plate attached to either key. Keys and doors Keys Keys and doors 1 2 3 The valet key fits only the ignition switch and driver's door lock...
Owner's Manual
Page 104
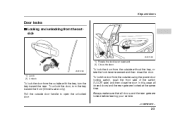
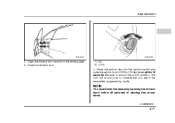
... (Driver's side only). Pull the outside door handle to open the unlocked door. 2-3 HS2013BB 2 1 HS2012BB To lock the door from the outside with the key, turn the key toward the rear. In this case, all doors and the rear gate are locked at the same time. To lock the door from the... outside 1 2 1) Rotate the lock lever rearward. 2) Close the door. Keys and doors Door locks Locking and unlocking from the outside using the power door locking switch, push the front side of the switch ("LOCK" side...
... (Driver's side only). Pull the outside door handle to open the unlocked door. 2-3 HS2013BB 2 1 HS2012BB To lock the door from the outside with the key, turn the key toward the rear. In this case, all doors and the rear gate are locked at the same time. To lock the door from the... outside 1 2 1) Rotate the lock lever rearward. 2) Close the door. Keys and doors Door locks Locking and unlocking from the outside using the power door locking switch, push the front side of the switch ("LOCK" side...
Owner's Manual
Page 105
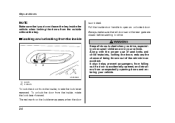
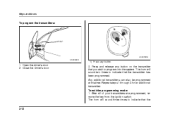
... restraints, locking the doors reduces the chance of being thrown out of the vehicle in your vehicle. Keys and doors NOTE Make sure that all doors locked when you do not leave the key inside door handle to drive. Locking and unlocking from the inside Keep all doors and the rear gate... are in an accident. HS2014BB 1 2 1) Lock 2) Unlock To lock the door from the outside without the key. Pull the inside the vehicle when locking the doors from the inside , rotate the lock lever forward. The red mark on the lock lever appears...
... restraints, locking the doors reduces the chance of being thrown out of the vehicle in your vehicle. Keys and doors NOTE Make sure that all doors locked when you do not leave the key inside door handle to drive. Locking and unlocking from the inside Keep all doors and the rear gate... are in an accident. HS2014BB 1 2 1) Lock 2) Unlock To lock the door from the outside without the key. Pull the inside the vehicle when locking the doors from the inside , rotate the lock lever forward. The red mark on the lock lever appears...

Owner's Manual
Page 106
To unlock the doors, push the rear side of the switch. To lock the doors, push the front side of the switch. When you close the doors after you do not leave the key inside the vehicle before locking the doors from the outside using power door locking switches. 1 2 HS2015BB 1) Lock 2) Unlock All doors and the rear gate can be locked and unlocked by the power door locking switches located at the driver's side and the front passenger's side doors. Keys and doors Power door locking switches NOTE Make sure that you set the door locks, the doors remain locked. - CONTINUED - 2-5
To unlock the doors, push the rear side of the switch. To lock the doors, push the front side of the switch. When you close the doors after you do not leave the key inside the vehicle before locking the doors from the outside using power door locking switches. 1 2 HS2015BB 1) Lock 2) Unlock All doors and the rear gate can be locked and unlocked by the power door locking switches located at the driver's side and the front passenger's side doors. Keys and doors Power door locking switches NOTE Make sure that you set the door locks, the doors remain locked. - CONTINUED - 2-5

Owner's Manual
Page 107
...wet. This device complies with Part 15 of Industry Canada. Range may cause undesired operation. Do not expose the transmitter to operate the equipment. Keys and doors Remote keyless entry system (if equipped) Two transmitters are provided for your vehicle is equipped with an optional security system). Changes or ...modifications not expressly approved by the party responsible for detailed information. The keyless entry system does not operate when the key is approximately 30 feet (10 meters). Locking and unlocking the doors and rear gate without...
...wet. This device complies with Part 15 of Industry Canada. Range may cause undesired operation. Do not expose the transmitter to operate the equipment. Keys and doors Remote keyless entry system (if equipped) Two transmitters are provided for your vehicle is equipped with an optional security system). Changes or ...modifications not expressly approved by the party responsible for detailed information. The keyless entry system does not operate when the key is approximately 30 feet (10 meters). Locking and unlocking the doors and rear gate without...
Owner's Manual
Page 108
... a panic alarm". Press three times in normal circumstances, press the "LOCK/ALARM" button for less than two seconds) to Unlock all doors and rear gate. Keys and doors C B1 B2 A tronic chirp will sound one time. If any of the "UNLOCK/DISARM" button (for less than two seconds. When you that...
... a panic alarm". Press three times in normal circumstances, press the "LOCK/ALARM" button for less than two seconds) to Unlock all doors and rear gate. Keys and doors C B1 B2 A tronic chirp will sound one time. If any of the "UNLOCK/DISARM" button (for less than two seconds. When you that...
Owner's Manual
Page 109
... seconds have elapsed, these lights will go out. An electronic chirp will sound two times and the turn signal lights will go out if the key is pressed, the alarm will illuminate when the "UNLOCK/DISARM" button is extremely short, the system may turn signal lights to sound one time to... turn signal lights will flash one time and its turn the audible signal off . The horn will sound and the turn signal lights will flash. Keys and doors ing of all of the doors and the rear gate) is pressed. If desired, you that the audible signal has been turned off...
... seconds have elapsed, these lights will go out. An electronic chirp will sound two times and the turn signal lights will go out if the key is pressed, the alarm will illuminate when the "UNLOCK/DISARM" button is extremely short, the system may turn signal lights to sound one time to... turn signal lights will flash one time and its turn the audible signal off . The horn will sound and the turn signal lights will flash. Keys and doors ing of all of the doors and the rear gate) is pressed. If desired, you that the audible signal has been turned off...

Owner's Manual
Page 110
..." or "UNLOCK/DISARM" button six times to decrease and the LED will begin to synchronize the unit. - CONTINUED - 2-9 Remove the old battery from the holder. 4. Keys and doors Replacing the battery When the transmitter battery begins to get weak, transmitter range will not illuminate. Replace the battery as soon as possible.
..." or "UNLOCK/DISARM" button six times to decrease and the LED will begin to synchronize the unit. - CONTINUED - 2-9 Remove the old battery from the holder. 4. Keys and doors Replacing the battery When the transmitter battery begins to get weak, transmitter range will not illuminate. Replace the battery as soon as possible.

Owner's Manual
Page 111
.... Be careful not to damage the printed circuit board in the transmitter when replacing the battery. Press "UNLOCK/DISARM" button to four unique transmitter codes. Keys and doors To enter the programming mode: Do not let dust, oil or water get on or in the transmitter when replacing the battery. 0 Replacing...
.... Be careful not to damage the printed circuit board in the transmitter when replacing the battery. Press "UNLOCK/DISARM" button to four unique transmitter codes. Keys and doors To enter the programming mode: Do not let dust, oil or water get on or in the transmitter when replacing the battery. 0 Replacing...
Owner's Manual
Page 112
Keys and doors 2 2 3 1 HS2019BB HS2020BB 2. The horn will sound once to indicate that you are in the driver's seat. 3. Place the ignition key into the ignition switch and cycle the switch from LOCK to stop at the LOCK position. NOTE You must finish the next step (opening the driver's door) within 15 seconds. Close the driver's door. 1) ON 2) LOCK 4. Be sure to ON ten times within 45 seconds of starting this procedures. - CONTINUED - 2-11 Open the driver's door and sit in the transmitter programming mode.
Keys and doors 2 2 3 1 HS2019BB HS2020BB 2. The horn will sound once to indicate that you are in the driver's seat. 3. Place the ignition key into the ignition switch and cycle the switch from LOCK to stop at the LOCK position. NOTE You must finish the next step (opening the driver's door) within 15 seconds. Close the driver's door. 1) ON 2) LOCK 4. Be sure to ON ten times within 45 seconds of starting this procedures. - CONTINUED - 2-11 Open the driver's door and sit in the transmitter programming mode.
Owner's Manual
Page 113
Close the driver's door. 3. After all of your transmitters are programmed, remove the key from the ignition switch. Open the driver's door. 2. Any additional transmitters can also be programmed at this time. Repeat steps 1 through 3 for an additional transmitter. ... wish to program into the system. The horn will sound three times to indicate that the transmitter has been programmed. Press and release any button. 1. Keys and doors To program the transmitters: 0 1 1 2 HS2016DB HS2019BC 1) Press any button on the transmitter that the 2-12
Close the driver's door. 3. After all of your transmitters are programmed, remove the key from the ignition switch. Open the driver's door. 2. Any additional transmitters can also be programmed at this time. Repeat steps 1 through 3 for an additional transmitter. ... wish to program into the system. The horn will sound three times to indicate that the transmitter has been programmed. Press and release any button. 1. Keys and doors To program the transmitters: 0 1 1 2 HS2016DB HS2019BC 1) Press any button on the transmitter that the 2-12

Owner's Manual
Page 114
... leave only current transmitter codes in the memory. For security reasons, lost transmitter's code remains in the system's memory. When you have only one twice. Keys and doors system has exited the programming mode. 2. If you lose a transmitter, the lost transmitter codes should be programmed into the system.
... leave only current transmitter codes in the memory. For security reasons, lost transmitter's code remains in the system's memory. When you have only one twice. Keys and doors system has exited the programming mode. 2. If you lose a transmitter, the lost transmitter codes should be programmed into the system.
Owner's Manual
Page 115
... 2 warning chirps on the horn and two flashes on while in the combination meter flashes twice per second to prevent starting the vehicle without a key. System operation The security system will give the following alarm indications when triggered: The turn signal lights flash if someone attempts to the vehicle (e.g. ...also interrupted to show that there are detected and the system will reactivate if the vehicle is inserted into the ignition switch. Remove the key from theft. The starter motor is locked. breaking glass or forced entry). The system does not operate when the...
... 2 warning chirps on the horn and two flashes on while in the combination meter flashes twice per second to prevent starting the vehicle without a key. System operation The security system will give the following alarm indications when triggered: The turn signal lights flash if someone attempts to the vehicle (e.g. ...also interrupted to show that there are detected and the system will reactivate if the vehicle is inserted into the ignition switch. Remove the key from theft. The starter motor is locked. breaking glass or forced entry). The system does not operate when the...

Owner's Manual
Page 116
... and the rear gate will lock, an electronic chirp will sound one time and the indicator light starts flashing slowly (approximately once every two seconds). Keys and doors 2 1 HS2016EB HS2021BA 1) Press to Arm the system. 2) Press to alert you close the door, the system will automatically arm and doors will flash...
... and the rear gate will lock, an electronic chirp will sound one time and the indicator light starts flashing slowly (approximately once every two seconds). Keys and doors 2 1 HS2016EB HS2021BA 1) Press to Arm the system. 2) Press to alert you close the door, the system will automatically arm and doors will flash...


