
Owner's Manual
Page 12
A ABS (Anti-Lock Brake system) ...7-30 ABS warning light ...3-11 ACC (Ignition switch) ...7-12 Accessories installing ...5-12/10-53 Accessory power socket In the instrument panel ...6-7 In the luggage compartment ...6-7 Aiming (Headlights) ...10-53 Air cleaner element ...10-20 Location ...10-5/10-6 Replacing ...10-21 ...
A ABS (Anti-Lock Brake system) ...7-30 ABS warning light ...3-11 ACC (Ignition switch) ...7-12 Accessories installing ...5-12/10-53 Accessory power socket In the instrument panel ...6-7 In the luggage compartment ...6-7 Aiming (Headlights) ...10-53 Air cleaner element ...10-20 Location ...10-5/10-6 Replacing ...10-21 ...
Owner's Manual
Page 21
Index Flat tires ...8-6 Hazard warning flasher ...8-2 Jump starting ...8-4 Sunroof manual operation ...1-20 Towing ...8-14 Indicator lights (See "Warning lights") Inside mirror ...3-25 Installation of accessories ...5-12/10-53 Instrument panel overview ...3-2 Interior Cleaning ...9-6 Illustrated index ...Foreword xiii Interior light Interior light ...6-12 Interior light (Bulb replacement) ...10-61 Spotlight ...6-13 ...
Index Flat tires ...8-6 Hazard warning flasher ...8-2 Jump starting ...8-4 Sunroof manual operation ...1-20 Towing ...8-14 Indicator lights (See "Warning lights") Inside mirror ...3-25 Installation of accessories ...5-12/10-53 Instrument panel overview ...3-2 Interior Cleaning ...9-6 Illustrated index ...Foreword xiii Interior light Interior light ...6-12 Interior light (Bulb replacement) ...10-61 Spotlight ...6-13 ...
Owner's Manual
Page 22
... compartment (Glove box) ...6-3 Power door locks ...1-6 Trunk lid (Sedan and coupe) ...1-11 Rear gate (Wagon) ...1-13 Low fuel warning light ...3-13 Luggage room (wagon only) Accessory power socket ...6-7 Cargo anchorage eyelets ...6-16 Illustrated index ...Foreword xiv Luggage cover ...6-14 Shopping bag hook ...6-16 M Main fuse and fusible link ...10-52 Maintenance...
... compartment (Glove box) ...6-3 Power door locks ...1-6 Trunk lid (Sedan and coupe) ...1-11 Rear gate (Wagon) ...1-13 Low fuel warning light ...3-13 Luggage room (wagon only) Accessory power socket ...6-7 Cargo anchorage eyelets ...6-16 Illustrated index ...Foreword xiv Luggage cover ...6-14 Shopping bag hook ...6-16 M Main fuse and fusible link ...10-52 Maintenance...

Owner's Manual
Page 90
... the SRS AIRBAG deploys, those objects could interfere with its proper operation and could seriously injure vehicle occupants. WARNING HS0244 HS0245 2-38 D Do not attach accessories to the windshield, or fit an extrawide mirror over the rear view mirror. Installation of "custom" steering wheels or additional trim material, or badges over... and/or wiring is not advisable. J Precautions for vehicle modification D Do not put any objects over the steering wheel pad and dashboard Do not attach accessories to the windshield, or fit an extra-wide mirror over the rear view mirror.
... the SRS AIRBAG deploys, those objects could interfere with its proper operation and could seriously injure vehicle occupants. WARNING HS0244 HS0245 2-38 D Do not attach accessories to the windshield, or fit an extrawide mirror over the rear view mirror. Installation of "custom" steering wheels or additional trim material, or badges over... and/or wiring is not advisable. J Precautions for vehicle modification D Do not put any objects over the steering wheel pad and dashboard Do not attach accessories to the windshield, or fit an extra-wide mirror over the rear view mirror.

Owner's Manual
Page 91
...construction from the original tire's listed on the tire placard attached to your SUBARU dealer if you want to install any equipment (brush bar, winches, snow plow, skid plate, etc.) other than SUBARU genuine accessory parts to the front end. Such modifications can interfere with proper operation ...of the suspension system and front end structure. Seat, seat belt and SRS AIRBAG CAUTION Do not perform any of any accessory parts to the door jamb. D ...
...construction from the original tire's listed on the tire placard attached to your SUBARU dealer if you want to install any equipment (brush bar, winches, snow plow, skid plate, etc.) other than SUBARU genuine accessory parts to the front end. Such modifications can interfere with proper operation ...of the suspension system and front end structure. Seat, seat belt and SRS AIRBAG CAUTION Do not perform any of any accessory parts to the door jamb. D ...

Owner's Manual
Page 131
... and eject button ( ) ...Tape program sensor button (TPS) ...Dolby NR button (BNR) ...Metal tape button (MTL) ...CLOCK FUNCTION ...Display mode ...Setting the time ... 5 Installation of accessories ... 5-12
... and eject button ( ) ...Tape program sensor button (TPS) ...Dolby NR button (BNR) ...Metal tape button (MTL) ...CLOCK FUNCTION ...Display mode ...Setting the time ... 5 Installation of accessories ... 5-12
Owner's Manual
Page 142
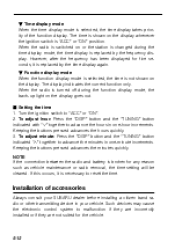
... time display mode, the time display is not shown on the display. When the radio is selected, the time display takes priority of accessories Always consult your vehicle. To adjust hour: Press the "DISP" button and the "TUNING" button indicated with "∨" together to advance...quickly. 3. To adjust minute: Press the "DISP" button and the "TUNING" button indicated "∧" together to advance the hours in your SUBARU dealer before installing a citizen band radio or other transmitting device in one -minute increments. However, after the frequency has been displayed for five ...
... time display mode, the time display is not shown on the display. When the radio is selected, the time display takes priority of accessories Always consult your vehicle. To adjust hour: Press the "DISP" button and the "TUNING" button indicated with "∨" together to advance...quickly. 3. To adjust minute: Press the "DISP" button and the "TUNING" button indicated "∧" together to advance the hours in your SUBARU dealer before installing a citizen band radio or other transmitting device in one -minute increments. However, after the frequency has been displayed for five ...
Owner's Manual
Page 143
... equipment Sun visors ...Vanity mirror (if equipped) ... 6-2 6-2 Storage compartment ... 6-2 6-3 6-3 6-5 6-5 Glove compartment ...Center console ...Dashboard storage compartment ...Coin tray ... Accessory power socket ... 6-7 6-7 6-7 Electrical power socket located on the lower part of the instrument panel ...Accessory power socket in the luggage compartment (if equipped) ... Cigarette lighter and front ashtray (option) ...Cigarette lighter ...Front ashtray...
... equipment Sun visors ...Vanity mirror (if equipped) ... 6-2 6-2 Storage compartment ... 6-2 6-3 6-3 6-5 6-5 Glove compartment ...Center console ...Dashboard storage compartment ...Coin tray ... Accessory power socket ... 6-7 6-7 6-7 Electrical power socket located on the lower part of the instrument panel ...Accessory power socket in the luggage compartment (if equipped) ... Cigarette lighter and front ashtray (option) ...Cigarette lighter ...Front ashtray...

Owner's Manual
Page 149
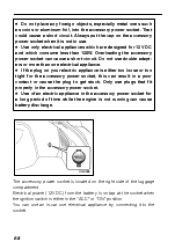
... Interior equipment J Front passenger's cup holder HS0305 HG0306 The front passenger's cup holder is designed to the Cigarette lighter and ashtray section in this chapter. Accessory power socket J Electrical power socket located on the lower part of the instrument panel CAUTION The electrical power socket located on the lower part of... the console and open the holder. Refer to use , fold the holder and close the lid. When not in use only a SUBARU genuine cigarette lighter plug. To use the cup holder, open the lid of the instrument panel is built in a fire.
... Interior equipment J Front passenger's cup holder HS0305 HG0306 The front passenger's cup holder is designed to the Cigarette lighter and ashtray section in this chapter. Accessory power socket J Electrical power socket located on the lower part of the instrument panel CAUTION The electrical power socket located on the lower part of... the console and open the holder. Refer to use , fold the holder and close the lid. When not in use only a SUBARU genuine cigarette lighter plug. To use the cup holder, open the lid of the instrument panel is built in a fire.
Owner's Manual
Page 150
...120W. You can cause battery discharge. D Do not place any foreign objects, especially metal ones such as coins or aluminum foil, into the accessory power socket. Electrical power (12V DC) from the battery is on the right side of time while the engine is not in the "ACC...a short circuit. D Use of an electric appliance in a poor contact or cause the plug to the socket. 6-8 Overloading the accessory power socket can result in the accessory power socket for 12V DC and which are designed for a long period of the luggage compartment. D Use only electrical appliances which ...
...120W. You can cause battery discharge. D Do not place any foreign objects, especially metal ones such as coins or aluminum foil, into the accessory power socket. Electrical power (12V DC) from the battery is on the right side of time while the engine is not in the "ACC...a short circuit. D Use of an electric appliance in a poor contact or cause the plug to the socket. 6-8 Overloading the accessory power socket can result in the accessory power socket for 12V DC and which are designed for a long period of the luggage compartment. D Use only electrical appliances which ...
Owner's Manual
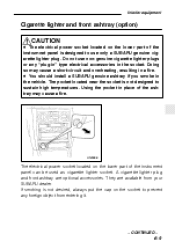
Page 151
...from entering it. - CONTINUED - 6-9 The pocket located near the socket is designed to use non-genuine cigarette lighter plugs or any foreign object from your SUBARU dealer. CAUTION HG0299 The electrical power socket located on the lower part of the ashtray may cause a short-circuit and overheating, resulting in the vehicle... (option) D The electrical power socket located on the lower part of the instrumnet panel is not designed to prevent any "plug-in" type electrical accessories in place of the instrument panel can be used as cigarette lighter socket. They are optional...
...from entering it. - CONTINUED - 6-9 The pocket located near the socket is designed to use non-genuine cigarette lighter plugs or any foreign object from your SUBARU dealer. CAUTION HG0299 The electrical power socket located on the lower part of the ashtray may cause a short-circuit and overheating, resulting in the vehicle... (option) D The electrical power socket located on the lower part of the instrumnet panel is not designed to prevent any "plug-in" type electrical accessories in place of the instrument panel can be used as cigarette lighter socket. They are optional...
Owner's Manual
Page 171
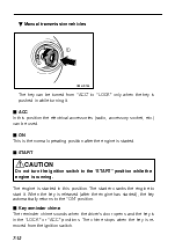
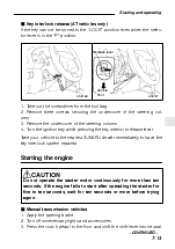
... switch to the "START" position while the engine is removed from "ACC" to "LOCK" only when the key is pushed in this position the electrical accessories (radio, accessory socket, etc.) can be used. The chime stops when the key is running. The starter cranks the engine to start it . B Manual transmission vehicles...
... switch to the "START" position while the engine is removed from "ACC" to "LOCK" only when the key is pushed in this position the electrical accessories (radio, accessory socket, etc.) can be used. The chime stops when the key is running. The starter cranks the engine to start it . B Manual transmission vehicles...
Owner's Manual
Page 172
Take your vehicle to the nearest SUBARU dealer immediately to ten seconds, wait for ten seconds or more than ten seconds. Manual transmission vehicles Apply the parking brake. Take out the screwdriver from the tool bag. 2. Turn off unnecessary lights and accessories. Remove the undercover of the steering column. 3. If the engine fails...
Take your vehicle to the nearest SUBARU dealer immediately to ten seconds, wait for ten seconds or more than ten seconds. Manual transmission vehicles Apply the parking brake. Take out the screwdriver from the tool bag. 2. Turn off unnecessary lights and accessories. Remove the undercover of the steering column. 3. If the engine fails...
Owner's Manual
Page 173
... brake. 2. Shift the selector lever to Warning and Indicator Lights section (chapter 3). 5. Confirm that all warning and indicator lights have gone off unnecessary lights and accessories. 3. Turn off after the engine has started . Refer to the "P" or "N" position (preferably "P" position). Release the key immediately after the engine has started . If the...
... brake. 2. Shift the selector lever to Warning and Indicator Lights section (chapter 3). 5. Confirm that all warning and indicator lights have gone off unnecessary lights and accessories. 3. Turn off after the engine has started . Refer to the "P" or "N" position (preferably "P" position). Release the key immediately after the engine has started . If the...

Owner's Manual
Page 205
... for your vehicle. Also, drilling the frame or under -body of your vehicle to follow all cargo is dangerous, or even lethal, if inhaled. SUBARU does not offer accessory trailer hitches. Never load the trailer with a professional hitch supplier to prevent a change in weight distribution while driving. To check both the left...
... for your vehicle. Also, drilling the frame or under -body of your vehicle to follow all cargo is dangerous, or even lethal, if inhaled. SUBARU does not offer accessory trailer hitches. Never load the trailer with a professional hitch supplier to prevent a change in weight distribution while driving. To check both the left...
Owner's Manual
Page 214
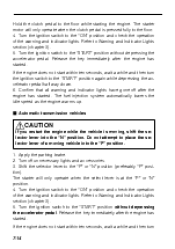
Turn off all unnecessary lights and accessories. 4. Start the engine of the vehicle with the booster battery and run down (discharged) battery, the vehicle may be jump started by connecting your vehicle ...
Turn off all unnecessary lights and accessories. 4. Start the engine of the vehicle with the booster battery and run down (discharged) battery, the vehicle may be jump started by connecting your vehicle ...
Owner's Manual
Page 235
...-40 Clutch pedal (Manual transmission) ... 10-41 10-42 Checking the clutch function ...10-41 Checking the clutch pedal free play ...10-41 Replacement of accessories ...10-53 Checking the headlight aim ...10-53 To check the headlight aim ... 10-53 Replacing bulbs ... 10-55 10-55 10-56 10-57...
...-40 Clutch pedal (Manual transmission) ... 10-41 10-42 Checking the clutch function ...10-41 Checking the clutch pedal free play ...10-41 Replacement of accessories ...10-53 Checking the headlight aim ...10-53 To check the headlight aim ... 10-53 Replacing bulbs ... 10-55 10-55 10-56 10-57...

Owner's Manual
Page 282
Handle them with genuine SUBARU parts designed for tire rotation or to change a flat, always check the tightness of the wheel nuts after driving approximately 600 miles (1,000 km). If ... and service Aluminum wheels (if equipped) Aluminum wheels can be sure to replace them carefully to maintain their appearance, performance, and safety. D When any lights, accessories or other electrical controls do not operate, inspect the corresponding fuse.
Handle them with genuine SUBARU parts designed for tire rotation or to change a flat, always check the tightness of the wheel nuts after driving approximately 600 miles (1,000 km). If ... and service Aluminum wheels (if equipped) Aluminum wheels can be sure to replace them carefully to maintain their appearance, performance, and safety. D When any lights, accessories or other electrical controls do not operate, inspect the corresponding fuse.
Owner's Manual
Page 283
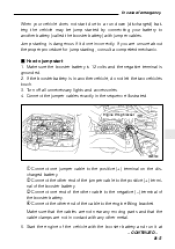
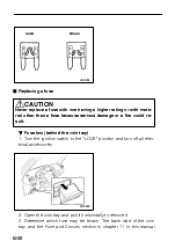
The back side of the coin tray and the Fuse and Circuits section in chapter 11 in this manual 10-50 Good Blown HS0204 J Replacing a fuse CAUTION Never replace a fuse with one having a higher rating or with material other than a fuse because serious damage or a fire could result. HS0202 2. Open the coin tray and pull it horizontally to the "LOCK" position and turn off all electrical accessories. Turn the ignition switch to remove it. 3. Determine which fuse may be blown. B Fuse box (behind the coin tray) 1.
The back side of the coin tray and the Fuse and Circuits section in chapter 11 in this manual 10-50 Good Blown HS0204 J Replacing a fuse CAUTION Never replace a fuse with one having a higher rating or with material other than a fuse because serious damage or a fire could result. HS0202 2. Open the coin tray and pull it horizontally to the "LOCK" position and turn off all electrical accessories. Turn the ignition switch to remove it. 3. Determine which fuse may be blown. B Fuse box (behind the coin tray) 1.

Owner's Manual
Page 284
... are stored in the main fuse box cover in the engine compartment. 5. Turn the ignition switch to the "LOCK" position and turn off all electrical accessories. 2. Determine which fuse may be blown. Inspect the fuse. The fuse box cover and Fuse and Circuits section in chapter 11 in the engine compartment... and service show the circuit for each fuse. Pull out the fuse with a spare fuse of the same rating. Open the engine hood. 3. Contact your SUBARU dealer for repairs. Remove the main fuse box cover. 4. Fuse puller Fuse puller HS0207 Spare fuse HS0208 4.
... are stored in the main fuse box cover in the engine compartment. 5. Turn the ignition switch to the "LOCK" position and turn off all electrical accessories. 2. Determine which fuse may be blown. Inspect the fuse. The fuse box cover and Fuse and Circuits section in chapter 11 in the engine compartment... and service show the circuit for each fuse. Pull out the fuse with a spare fuse of the same rating. Open the engine hood. 3. Contact your SUBARU dealer for repairs. Remove the main fuse box cover. 4. Fuse puller Fuse puller HS0207 Spare fuse HS0208 4.