

Owner's Manual
Page 2
... ...5-3 Fuel ...5-5 Checking Things Under 5-10 the Hood ...All-Wheel Drive ...5-47 Bulb Replacement ...5-49 Windshield Wiper Blade Replacement ...5-54 Tires ...5-55 Appearance Care ...5-89 Vehicle Identification ...5-97 Electrical System ...5-98 Capacities and Specifications ...5-1 04 Nnrrnal Maintenance R e p l s p m ~ n P3t-t~ ..." The 2003 PontiacAztekOwnerManual SeatsandRestraintSystems ...1-1 Front Seats ...1-2 Rear Seats ...1-7 Safety Belts ...1-13 Child Restraints ...1-39 Air Bag Systems ...1-59 Restraint System Check ...1-68 Features and Controls ...2-1 Keys ...2-3 Doors and Locks...
... ...5-3 Fuel ...5-5 Checking Things Under 5-10 the Hood ...All-Wheel Drive ...5-47 Bulb Replacement ...5-49 Windshield Wiper Blade Replacement ...5-54 Tires ...5-55 Appearance Care ...5-89 Vehicle Identification ...5-97 Electrical System ...5-98 Capacities and Specifications ...5-1 04 Nnrrnal Maintenance R e p l s p m ~ n P3t-t~ ..." The 2003 PontiacAztekOwnerManual SeatsandRestraintSystems ...1-1 Front Seats ...1-2 Rear Seats ...1-7 Safety Belts ...1-13 Child Restraints ...1-39 Air Bag Systems ...1-59 Restraint System Check ...1-68 Features and Controls ...2-1 Keys ...2-3 Doors and Locks...

Owner's Manual
Page 16
4. To release the front latches, squeeze the angled latch release bar toward the rear of the vehicle and then pulling it out. The seat can stay in this position or it slightly toward the straight crossbar. Remove the seat by following the next VI" 6. ctonc r-. Repeat these steps for the other section of the seat, to release the rear latches from the vehicle by rocking it can be removed from the floor pins and flip the seat forward. 5. Pull the lever, located at the base on the outboard side of the split bench seat. 1-9
4. To release the front latches, squeeze the angled latch release bar toward the rear of the vehicle and then pulling it out. The seat can stay in this position or it slightly toward the straight crossbar. Remove the seat by following the next VI" 6. ctonc r-. Repeat these steps for the other section of the seat, to release the rear latches from the vehicle by rocking it can be removed from the floor pins and flip the seat forward. 5. Pull the lever, located at the base on the outboard side of the split bench seat. 1-9
Owner's Manual
Page 78
... Locks ...2-1 1 Rear Door Security Locks ...2-1 1 Lockout Protection ...2-12 Leaving Y G G ~ Vehicle ..._ 3 3-1 Liftgatenailgate ...2-13 Windows ...2-15 Power Windows ...2-16 S u n Visors ...2-17 Theft-Deterrent Systems ...2-18 Cnntent Theft-Deterrent ...2-18 PASS-Key@Ill ...2-19 PASS-Key@Ill Operation ...2-20 Starting and Operating Your Vehicle ...2-22 New Vehicle Break-In ...2-22 Ignition Positions ...2-22 Starting Your Engine ...2-24 1 .& - 2-1 Section 2 Features and Controls Engine Coolant Heater ...2.25 Automatic Transaxle Operation ...2.26 Parking Brake ...2-30 Shifting Into Park...
... Locks ...2-1 1 Rear Door Security Locks ...2-1 1 Lockout Protection ...2-12 Leaving Y G G ~ Vehicle ..._ 3 3-1 Liftgatenailgate ...2-13 Windows ...2-15 Power Windows ...2-16 S u n Visors ...2-17 Theft-Deterrent Systems ...2-18 Cnntent Theft-Deterrent ...2-18 PASS-Key@Ill ...2-19 PASS-Key@Ill Operation ...2-20 Starting and Operating Your Vehicle ...2-22 New Vehicle Break-In ...2-22 Ignition Positions ...2-22 Starting Your Engine ...2-24 1 .& - 2-1 Section 2 Features and Controls Engine Coolant Heater ...2.25 Automatic Transaxle Operation ...2.26 Parking Brake ...2-30 Shifting Into Park...

Owner's Manual
Page 93
... the windows when the ignition is in ON, ACCESSORY, or when Retained Accessory Power is active. Press the rear of the switch to the first position to close the window. 2-16 The driver's power window switch has two down positions. See "Retained Accessory Power (RAP)" under Ignition Positions on the drivers door armrest control each passenger's door has a window switch. Push the rear of any switch to lower the window normally. In addition, each of any passenger window switch...
... the windows when the ignition is in ON, ACCESSORY, or when Retained Accessory Power is active. Press the rear of the switch to the first position to close the window. 2-16 The driver's power window switch has two down positions. See "Retained Accessory Power (RAP)" under Ignition Positions on the drivers door armrest control each passenger's door has a window switch. Push the rear of any switch to lower the window normally. In addition, each of any passenger window switch...

Owner's Manual
Page 94
... the WDO LOCK switch to stop the window while it . The window will lower completely. Visor Vanity Mirror Pull down feature. There may be an extension on . To stop rear passengers from the center mount and swing them to the second position, then release it is labeled AUTO. This switch is lowering, press the front of the driver's window switch to the side. Window Lock Out The driver's window controls also include a lock-out switch. Press...
... the WDO LOCK switch to stop the window while it . The window will lower completely. Visor Vanity Mirror Pull down feature. There may be an extension on . To stop rear passengers from the center mount and swing them to the second position, then release it is labeled AUTO. This switch is lowering, press the front of the driver's window switch to the side. Window Lock Out The driver's window controls also include a lock-out switch. Press...

Owner's Manual
Page 100
... the engine is running. When the engine starts, release the key. or C (ON): This is turned to OFF and none of these works, then your electrical power accessories, and to operate your vehicle needs service. Retained Accessory Power (RAP) With RAP, the power windows, the audio system, the sunroof and the Automatic Level Control will continue to work up to 10 minutes after the ignition key is the position that allow you turn the steering wheel...
... the engine is running. When the engine starts, release the key. or C (ON): This is turned to OFF and none of these works, then your electrical power accessories, and to operate your vehicle needs service. Retained Accessory Power (RAP) With RAP, the power windows, the audio system, the sunroof and the Automatic Level Control will continue to work up to 10 minutes after the ignition key is the position that allow you turn the steering wheel...

Owner's Manual
Page 117
... down to the back of your garage door opener, follow these instructions: Storage Compartment To open position. 1 . Once the opener is a different size. 7. Press the button on the garage door opener with the opening in the garage door opener compartment. 8. Then pull the compartment...door opener does not work you will need to change the pegs until it firmly to the full open the storage compartment, located at the front of the garage door opener compartment. 2-40 Peel the protective backing from the top of the overhead console, press the release latch forward. Garage Door ...
... down to the back of your garage door opener, follow these instructions: Storage Compartment To open position. 1 . Once the opener is a different size. 7. Press the button on the garage door opener with the opening in the garage door opener compartment. 8. Then pull the compartment...door opener does not work you will need to change the pegs until it firmly to the full open the storage compartment, located at the front of the garage door opener compartment. 2-40 Peel the protective backing from the top of the overhead console, press the release latch forward. Garage Door ...

Owner's Manual
Page 163
... air, so you know that air conditioning is pressed, an indicator light in the button will come on . It also helps the system to operate more quickly. Select the highest fan speed. 4. (Outside Air): Press this button to turn the outside air and odors from entering your vehicle or help with floor, defog, defrost or outside air from coming in engine performance when the air-conditioning compressor...
... air, so you know that air conditioning is pressed, an indicator light in the button will come on . It also helps the system to operate more quickly. Select the highest fan speed. 4. (Outside Air): Press this button to turn the outside air and odors from entering your vehicle or help with floor, defog, defrost or outside air from coming in engine performance when the air-conditioning compressor...
Owner's Manual
Page 175
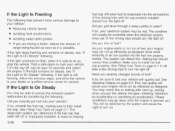
... go away once the engine is possible. A loose or missing 3-38 Turn the key off . If the light remains on fuel? As your dealer or qualified service center for service. You may not run as efficiently as stalling after start-up .) This will usually be sure to fuel your vehicle with the cap properly installed should turn on acceleration. (These conditions may be able to...
... go away once the engine is possible. A loose or missing 3-38 Turn the key off . If the light remains on fuel? As your dealer or qualified service center for service. You may not run as efficiently as stalling after start-up .) This will usually be sure to fuel your vehicle with the cap properly installed should turn on acceleration. (These conditions may be able to...

Owner's Manual
Page 238
... second row seats only. Slide the battery door shut. In severe or extreme temperature conditions your warranty. To resume operation, shut off the entertainment system, pull down the video screen and heat or cool the vehicle until the temperature is within the operating range. Keep the headphones stored in heat or direct sunlight. An indicator light will keep them in a cool, dry...
... second row seats only. Slide the battery door shut. In severe or extreme temperature conditions your warranty. To resume operation, shut off the entertainment system, pull down the video screen and heat or cool the vehicle until the temperature is within the operating range. Keep the headphones stored in heat or direct sunlight. An indicator light will keep them in a cool, dry...

Owner's Manual
Page 253
..., avoiding excessive speed, sudden or abrupt turns and drunken or aggressive driving can be limited (such as other types of safety belts. Knowing how these give the driver a better view of the road, but also give utility vehicles a higher center of vehicles. Vehicle Design According to help you understand how your vehicle handles and what you drive more capable for any motor vehicle - See Safety Belts: They Are...
..., avoiding excessive speed, sudden or abrupt turns and drunken or aggressive driving can be limited (such as other types of safety belts. Knowing how these give the driver a better view of the road, but also give utility vehicles a higher center of vehicles. Vehicle Design According to help you understand how your vehicle handles and what you drive more capable for any motor vehicle - See Safety Belts: They Are...

Owner's Manual
Page 263
... their work where the tires meet the road. Here's why: Experienced driver or beginner, each of physics when driving on page 3-46. Both control systems - See All-Wheel Drive Disable Warning Message on curves. Suppose you suddenly accelerate. If the vehicle is not functioning, you can lose control. Steering Power Steering If you lose power steering assist because the engine stops or the system is exposed to change...
... their work where the tires meet the road. Here's why: Experienced driver or beginner, each of physics when driving on page 3-46. Both control systems - See All-Wheel Drive Disable Warning Message on curves. Suppose you suddenly accelerate. If the vehicle is not functioning, you can lose control. Steering Power Steering If you lose power steering assist because the engine stops or the system is exposed to change...

Owner's Manual
Page 300
... proper maintenance of 87 or higher. Gasoline meeting these specifications could provide improved driveability and emission control system performance compared to other gasoline. Canada Only 5-5 A little pinging noise when you drive. If you might damage your engine needs service. In Canada, look for better vehicle performance and engine protection. If the octane is less than 87, you may get a heavy knocking noise when...
... proper maintenance of 87 or higher. Gasoline meeting these specifications could provide improved driveability and emission control system performance compared to other gasoline. Canada Only 5-5 A little pinging noise when you drive. If you might damage your engine needs service. In Canada, look for better vehicle performance and engine protection. If the octane is less than 87, you may get a heavy knocking noise when...
Owner's Manual
Page 322
... after high-speed driving. 0 3. Idle for a minute or so: 1. If you get service help right away. 5-27 Just to get the overheat warning with no coolant, your vehicle can drive normally. If the warning doesn't come back on a hot day. Tow a trailer. See "Overheated Engine Protection Operating Mode" in traffic. If your heater to a safe place in a traffic jam, shift to the highest gear while driving - If...
... after high-speed driving. 0 3. Idle for a minute or so: 1. If you get service help right away. 5-27 Just to get the overheat warning with no coolant, your vehicle can drive normally. If the warning doesn't come back on a hot day. Tow a trailer. See "Overheated Engine Protection Operating Mode" in traffic. If your heater to a safe place in a traffic jam, shift to the highest gear while driving - If...

Owner's Manual
Page 365
... store a full-size or a flat road tire under the vehicle. Continue turning the wrench until the spare tire can be pulled out from the cable, tilt the retainer and slip it through the wheel opening. 5. See "Storing a Flat (Vehicles without the Sliding Rear Convenience Tray)" and "Storing a Flat (Vehicles with the Sliding Rear Convenience Tray)" later in this section. Spare Tire 4. Hoist Assembly D. Spring F.
... store a full-size or a flat road tire under the vehicle. Continue turning the wrench until the spare tire can be pulled out from the cable, tilt the retainer and slip it through the wheel opening. 5. See "Storing a Flat (Vehicles without the Sliding Rear Convenience Tray)" and "Storing a Flat (Vehicles with the Sliding Rear Convenience Tray)" later in this section. Spare Tire 4. Hoist Assembly D. Spring F.

Owner's Manual
Page 429
... Canada) in the diagnosis and service of your vehicle. Or, write: General Motors of Canada Limited. RETAIL SELL PRICE: $120.00 Reporting Safety Defects to General Motors In addition to notifying General Motors of Canada Limited Custome: CGmmGnication Centre, 163-005 1908 Colonel Sam Drive Oshawa, Ontario L1H 8P7 Transmission, Transaxle, Transfer Case Unit Repair Manual This manual provides information on engines, transmission, axle, suspension, brakes, electrical, steering, body, etc.
... Canada) in the diagnosis and service of your vehicle. Or, write: General Motors of Canada Limited. RETAIL SELL PRICE: $120.00 Reporting Safety Defects to General Motors In addition to notifying General Motors of Canada Limited Custome: CGmmGnication Centre, 163-005 1908 Colonel Sam Drive Oshawa, Ontario L1H 8P7 Transmission, Transaxle, Transfer Case Unit Repair Manual This manual provides information on engines, transmission, axle, suspension, brakes, electrical, steering, body, etc.
Owner's Manual
Page 433
... Anti-lock Brake System (ABS) ...4-7 Anti-Lock Brake, System Warning Light ...3-35 5-89 Appearance Care ...Care of Safety Belts ...5-92 5-95 Chemical Paint Spotting ...Cleaning the Inside ofYour Vehicle ...5-89 Cleaning the Outside ofYour Vehicle ...5-92 Finish Damage ...5-94 GM Vehicle CarelAppearance Materials ...5-95 Sheet Metal Damage ...5-94 Underbody Maintenance ...5-95 Weatherstrips ...5-92 Arming with the Power Lock Switch ...2-19 Arming with the Remote Keyless Entry Transmitter ...2-19 Ashtrays ...3-21 Audio Speakers ...3-102 Audio Systems Audio Steering Wheel Controls...
... Anti-lock Brake System (ABS) ...4-7 Anti-Lock Brake, System Warning Light ...3-35 5-89 Appearance Care ...Care of Safety Belts ...5-92 5-95 Chemical Paint Spotting ...Cleaning the Inside ofYour Vehicle ...5-89 Cleaning the Outside ofYour Vehicle ...5-92 Finish Damage ...5-94 GM Vehicle CarelAppearance Materials ...5-95 Sheet Metal Damage ...5-94 Underbody Maintenance ...5-95 Weatherstrips ...5-92 Arming with the Power Lock Switch ...2-19 Arming with the Remote Keyless Entry Transmitter ...2-19 Ashtrays ...3-21 Audio Speakers ...3-102 Audio Systems Audio Steering Wheel Controls...

Owner's Manual
Page 438
... Tire, Changing ...5-67 Floor Console Fuse Block ...5-99 6 Engine Air CleanedFilter ...5-18 Battery ...5-41 Change Oil Message ...3-44 Check and Service Engine Soon Light ...3-36 Coolant ...5-22 Coolant Heater ...2-25 3-36 Coolant Temperature Gage ...Coolant Temperature Warning Message ...3-42 Cooling System Inspection ...6-13 Engine Compartment Overview ...5-12 Exhaust ...2-34 Low Oil Level Message ...3-43 Oil ...5-13 Overheating ...5-25 Starting ...2-24 6-9 Engine Coolant Level Check ...Engine Oil Additives ...5-17 Engine Oil Level Check ...6-9 Engine Oil Scheduled Maintenance ...6-5 Engine...
... Tire, Changing ...5-67 Floor Console Fuse Block ...5-99 6 Engine Air CleanedFilter ...5-18 Battery ...5-41 Change Oil Message ...3-44 Check and Service Engine Soon Light ...3-36 Coolant ...5-22 Coolant Heater ...2-25 3-36 Coolant Temperature Gage ...Coolant Temperature Warning Message ...3-42 Cooling System Inspection ...6-13 Engine Compartment Overview ...5-12 Exhaust ...2-34 Low Oil Level Message ...3-43 Oil ...5-13 Overheating ...5-25 Starting ...2-24 6-9 Engine Coolant Level Check ...Engine Oil Additives ...5-17 Engine Oil Level Check ...6-9 Engine Oil Scheduled Maintenance ...6-5 Engine...

Owner's Manual
Page 442
... Leaving Your Vehicle ...2-13 Lockout Protection ...2-12 Power Door ...2-10 Programmable Automatic Door Locks ...2-1 1 Rear Door Security Locks ...2-1 1 Loss of Control ...4-16 Low Brake Fluid Warning Message ...3-47 Low Engine Oil Level Message ...3-43 Low Fuel Warning Message ...3-47 Low Oil Pressure Message ...3-43 Low Tire Message ...3-44 Low Washer Fluid Warning Message ...3-46 Lumbar Manual Controls ...1-3 M Maintenance. RecommendedFluids and Lubricants ...6-15 Part E - Owner Checks and Services ...6-9 Part C - Normal Replacement Parts ...5-106 Maintenance Schedule At Each Fuel Fill...
... Leaving Your Vehicle ...2-13 Lockout Protection ...2-12 Power Door ...2-10 Programmable Automatic Door Locks ...2-1 1 Rear Door Security Locks ...2-1 1 Loss of Control ...4-16 Low Brake Fluid Warning Message ...3-47 Low Engine Oil Level Message ...3-43 Low Fuel Warning Message ...3-47 Low Oil Pressure Message ...3-43 Low Tire Message ...3-44 Low Washer Fluid Warning Message ...3-46 Lumbar Manual Controls ...1-3 M Maintenance. RecommendedFluids and Lubricants ...6-15 Part E - Owner Checks and Services ...6-9 Part C - Normal Replacement Parts ...5-106 Maintenance Schedule At Each Fuel Fill...

Owner's Manual
Page 445
... ...4-34 Remote Alarm ...2-7 Remote Control ...3-105 Remote Door Unlock ...3-59 Remote Driver Unlock Control ...2-57 Remote Keyless Entry System ...2-5 Remote Keyless Entry System, Operation ...2-6 Remote Keyless Entry Transmitter Battery LowWarning Message ...3-49 Remote Lock and Unlock Confirmation ...2-58 Removing the Flat Tire and Installing the Spare Tire ...5-79 Removing the Floor Track Assembly ...2-49 Removing the Sliding Rear Convenience Tray ...2-48 Removing the Spare Tire and Tools ...5-68 Removing the Split Bench Seat ...1-8 Replacement Bulbs ...5-53 5-41 Replacing Brake System...
... ...4-34 Remote Alarm ...2-7 Remote Control ...3-105 Remote Door Unlock ...3-59 Remote Driver Unlock Control ...2-57 Remote Keyless Entry System ...2-5 Remote Keyless Entry System, Operation ...2-6 Remote Keyless Entry Transmitter Battery LowWarning Message ...3-49 Remote Lock and Unlock Confirmation ...2-58 Removing the Flat Tire and Installing the Spare Tire ...5-79 Removing the Floor Track Assembly ...2-49 Removing the Sliding Rear Convenience Tray ...2-48 Removing the Spare Tire and Tools ...5-68 Removing the Split Bench Seat ...1-8 Replacement Bulbs ...5-53 5-41 Replacing Brake System...


