

Owner's Manual
Page 9
... lever at the front of the seat to where you want it . Slide the seat to unlock it . If your vehicle is equipped with your lower back. 1-3
... lever at the front of the seat to where you want it . Slide the seat to unlock it . If your vehicle is equipped with your lower back. 1-3
Owner's Manual
Page 11
... the top of your ears. For proper protection when the vehicle is in a crash. To fold a front seatback forward, lift the latch located on the lower backside of the restraint is in motion can 't do its job because it won't be dangerous. Then the seat will be there, not at your...
... the top of your ears. For proper protection when the vehicle is in a crash. To fold a front seatback forward, lift the latch located on the lower backside of the restraint is in motion can 't do its job because it won't be dangerous. Then the seat will be there, not at your...

Owner's Manual
Page 65
... thing to move the lock all of your vehicle from opening the rear doors of the doors -- To Use One of These Locks Push the lower portion of the switch to lock your doors. that door's lock. Push the upper portion of the switch to unlock your doors. yellowblue Power Door...
... thing to move the lock all of your vehicle from opening the rear doors of the doors -- To Use One of These Locks Push the lower portion of the switch to lock your doors. that door's lock. Push the upper portion of the switch to unlock your doors. yellowblue Power Door...

Owner's Manual
Page 82
... in position on . FIRST (1): This position gives you can use your vehicle there with the four-speed automatic transaxle. If you need more power but lower fuel economy than SECOND (2). Also, if you 're: D Going less than 25 miles (40 km), or at speeds over 55 mph (90 km/h), or ... down . D Going about halfway down. Use your 2-22 NOTICE: Don't drive in deep snow or mud. accelerator all the way down steep mountain roads, but lower fuel economy. It can damage your speed as possible. This might happen if you more than about 35 mph (55 km/h), push your accelerator pedal...
... in position on . FIRST (1): This position gives you can use your vehicle there with the four-speed automatic transaxle. If you need more power but lower fuel economy than SECOND (2). Also, if you 're: D Going less than 25 miles (40 km), or at speeds over 55 mph (90 km/h), or ... down . D Going about halfway down. Use your 2-22 NOTICE: Don't drive in deep snow or mud. accelerator all the way down steep mountain roads, but lower fuel economy. It can damage your speed as possible. This might happen if you more than about 35 mph (55 km/h), push your accelerator pedal...

Owner's Manual
Page 83
... into PARK (P) to drive. SECOND (2): This position gives you can damage your engine. 2-23 You can use it offers more power and lower fuel economy than AUTOMATIC OVERDRIVE (D). You could overheat and damage the transaxle. D When going slower than 65 mph (105 km/h), or you ... or were up against a solid object. This might choose THIRD (3) instead of AUTOMATIC OVERDRIVE (D): FIRST (1): This position gives you even more power (but lower fuel economy. NOTICE: If your transaxle. NOTICE: Don't drive in SECOND (2) for normal driving, however, it on a hill. yellowblue THIRD (3): This...
... into PARK (P) to drive. SECOND (2): This position gives you can damage your engine. 2-23 You can use it offers more power and lower fuel economy than AUTOMATIC OVERDRIVE (D). You could overheat and damage the transaxle. D When going slower than 65 mph (105 km/h), or you ... or were up against a solid object. This might choose THIRD (3) instead of AUTOMATIC OVERDRIVE (D): FIRST (1): This position gives you even more power (but lower fuel economy. NOTICE: If your transaxle. NOTICE: Don't drive in SECOND (2) for normal driving, however, it on a hill. yellowblue THIRD (3): This...

Owner's Manual
Page 92
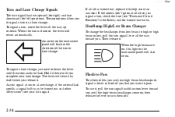
...control switch for its own window. In addition, on . Press the lockout switch again to disable the rear passenger's power window switches. To lower the windows, press and hold the switch forward. To raise the window, press and hold the rear of the windows only when the ignition is... Windows (If Equipped) With power windows, switches on the center console control each of the switch . To stop the window while it is lowering, briefly press the switch forward, then release. The window will prevent rear passengers from opening and closing the windows. Press the lockout switch to...
...control switch for its own window. In addition, on . Press the lockout switch again to disable the rear passenger's power window switches. To lower the windows, press and hold the switch forward. To raise the window, press and hold the rear of the windows only when the ignition is... Windows (If Equipped) With power windows, switches on the center console control each of the switch . To stop the window while it is lowering, briefly press the switch forward, then release. The window will prevent rear passengers from opening and closing the windows. Press the lockout switch to...
Owner's Manual
Page 94
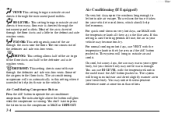
... way toward you . As you release it there until you to pass. To signal a lane change . When the turn or lane change , just raise or lower the lever until the high-beam headlamps come on . If a bulb is finished, the lever will return automatically. The lever will also be burned out...
... way toward you . As you release it there until you to pass. To signal a lane change . When the turn or lane change , just raise or lower the lever until the high-beam headlamps come on . If a bulb is finished, the lever will return automatically. The lever will also be burned out...

Owner's Manual
Page 98
... speed you don't need to R/A and then release it . You'll go faster, do this , you want , then release it there until you reach the lower speed you apply the brake or clutch pedal. Once you're going faster until you do not hold the switch at a desired speed and then...
... speed you don't need to R/A and then release it . You'll go faster, do this , you want , then release it there until you reach the lower speed you apply the brake or clutch pedal. Once you're going faster until you do not hold the switch at a desired speed and then...

Owner's Manual
Page 99
... speed, load and the steepness of cruise control. Of course, applying the brake or clutch pedal takes you may have to brake or shift to a lower gear to keep your speed down. When going downhill, you turn off the cruise control: Exterior Lamps D step lightly on the brake pedal, or push...
... speed, load and the steepness of cruise control. Of course, applying the brake or clutch pedal takes you may have to brake or shift to a lower gear to keep your speed down. When going downhill, you turn off the cruise control: Exterior Lamps D step lightly on the brake pedal, or push...

Owner's Manual
Page 107
... items from the convertible top storage area before driving the vehicle. Press and release the rear of the switch again to open to raise or lower the top. The sunroof glass panel cannot be closed if your convertible top. D Open the sunshade by hand. yellowblue Sunroof (If Equipped) Press ... panel will open the glass panel and the sunshade. NOTICE: D Remove any position. Don't raise or lower the convertible top when the temperature is securely latched on both sides before you lower the top. The wind could damage the top. Always make sure that the top is below 20_F (-7_C...
... items from the convertible top storage area before driving the vehicle. Press and release the rear of the switch again to open to raise or lower the top. The sunroof glass panel cannot be closed if your convertible top. D Open the sunshade by hand. yellowblue Sunroof (If Equipped) Press ... panel will open the glass panel and the sunshade. NOTICE: D Remove any position. Don't raise or lower the convertible top when the temperature is securely latched on both sides before you lower the top. The wind could damage the top. Always make sure that the top is below 20_F (-7_C...

Owner's Manual
Page 108
Turn the ignition to the weatherstrips. 4. Pull the latch handle rearward away from the holes over the windshield. 5. Push the button in the latch handle and turn the handle down to NEUTRAL (N). 2. Lower the side door windows completely to avoid wear to RUN. 3. Set the parking brake and shift your automatic transaxle to PARK (P) or your manual transaxle to unhook the latch pins from the windshield and hold it until the convertible top is fully lowered. 2-48 yellowblue Lowering the Convertible Top 1.
Turn the ignition to the weatherstrips. 4. Pull the latch handle rearward away from the holes over the windshield. 5. Push the button in the latch handle and turn the handle down to NEUTRAL (N). 2. Lower the side door windows completely to avoid wear to RUN. 3. Set the parking brake and shift your automatic transaxle to PARK (P) or your manual transaxle to unhook the latch pins from the windshield and hold it until the convertible top is fully lowered. 2-48 yellowblue Lowering the Convertible Top 1.
Owner's Manual
Page 111
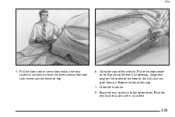
Pull the boot center cover from behind the rear seatback and place it is latched. 2-51 Place the boot center cover flap along the trunk lid opening. Go to the rear of the boot to the ball stud and push forward. Align one snap on the corner of the vehicle. Raise the rear seatback to make sure it over the inner sides of the boot side covers and the lowered top. 6. Push the seat back to the up position. yellowblue 5. Close the trunk lid. 8. Repeat for the other snap. 7.
Pull the boot center cover from behind the rear seatback and place it is latched. 2-51 Place the boot center cover flap along the trunk lid opening. Go to the rear of the boot to the ball stud and push forward. Align one snap on the corner of the vehicle. Raise the rear seatback to make sure it over the inner sides of the boot side covers and the lowered top. 6. Push the seat back to the up position. yellowblue 5. Close the trunk lid. 8. Repeat for the other snap. 7.

Owner's Manual
Page 114
... forward toward the windshield and hold it is fully raised, and the latch pins are all the way in the holes above the windshield. 2-54 Lower the door windows completely to avoid wear to make sure it until the convertible top is latched. Close the trunk. 9. yellowblue 7. Raise the rear seatback...
... forward toward the windshield and hold it is fully raised, and the latch pins are all the way in the holes above the windshield. 2-54 Lower the door windows completely to avoid wear to make sure it until the convertible top is latched. Close the trunk. 9. yellowblue 7. Raise the rear seatback...

Owner's Manual
Page 115
... is switched up to the vehicle will allow you can get the top repaired. This will occur. Rotate the latch handle up to raise or lower completely, see if the power top works. 6. Raising the convertible top manually should only be done in the trunk is securely latched on both ...sides. 2-55 yellowblue Lowering the Top Manually NOTICE: Do not attempt to lower the top manually as damage to lock the top. If the top fails to the NORMAL OPERATION position. Before you do...
... is switched up to the vehicle will allow you can get the top repaired. This will occur. Rotate the latch handle up to raise or lower completely, see if the power top works. 6. Raising the convertible top manually should only be done in the trunk is securely latched on both ...sides. 2-55 yellowblue Lowering the Top Manually NOTICE: Do not attempt to lower the top manually as damage to lock the top. If the top fails to the NORMAL OPERATION position. Before you do...

Owner's Manual
Page 116
... each side of the top, not the linkage. See your manual transaxle to force the top up if it does not move the top easily. Lower the door windows completely. NOTICE: Do not attempt to NEUTRAL (N). Turn the engine off. 2. Remove the top boot as described in Steps 1 through 9 in "Removing...
... each side of the top, not the linkage. See your manual transaxle to force the top up if it does not move the top easily. Lower the door windows completely. NOTICE: Do not attempt to NEUTRAL (N). Turn the engine off. 2. Remove the top boot as described in Steps 1 through 9 in "Removing...
Owner's Manual
Page 136
... of the air goes to the defroster and side window vents. On cool, but sunny days, the sun may warm your upper body, but your lower body. You may not be warm enough. Most of the air through the floor ducts and a little to cool down on hot days, use BI... knob in the middle and the A/C button pushed in the blue area. The air conditioning compressor will glow when the compressor is needed to your lower body may notice this setting is directed through the instrument panel outlets. If this temperature difference more at some times than others. 3-4 For normal cooling...
... of the air goes to the defroster and side window vents. On cool, but sunny days, the sun may warm your upper body, but your lower body. You may not be warm enough. Most of the air through the floor ducts and a little to cool down on hot days, use BI... knob in the middle and the A/C button pushed in the blue area. The air conditioning compressor will glow when the compressor is needed to your lower body may notice this setting is directed through the instrument panel outlets. If this temperature difference more at some times than others. 3-4 For normal cooling...

Owner's Manual
Page 137
... the windows quickly, use DEFROST with the temperature knob all the way in the red area. The system will bring in outside (0_F (-18_C) or lower). If you can use it off . Do not attach a temporary vehicle license across the defogger grid on . If your vehicle has an engine coolant heater...
... the windows quickly, use DEFROST with the temperature knob all the way in the red area. The system will bring in outside (0_F (-18_C) or lower). If you can use it off . Do not attach a temporary vehicle license across the defogger grid on . If your vehicle has an engine coolant heater...

Owner's Manual
Page 140
... 1. Press any two adjoining pushbuttons at the same time. yellowblue Finding a Station AM-FM: Press this button to decrease the treble. TUNE: Turn the lower knob to 14 stations (seven AM and seven FM). SEEK: Press the up or down arrow to go to the left or right speakers. You... can set will return. 4. Repeat the steps for each pushbutton. Adjusting the Speakers BALANCE: Turn the control behind the lower knob to move the sound to the next higher or lower station and stay there. The middle position balances the sound between the speakers.
... 1. Press any two adjoining pushbuttons at the same time. yellowblue Finding a Station AM-FM: Press this button to decrease the treble. TUNE: Turn the lower knob to 14 stations (seven AM and seven FM). SEEK: Press the up or down arrow to go to the left or right speakers. You... can set will return. 4. Repeat the steps for each pushbutton. Adjusting the Speakers BALANCE: Turn the control behind the lower knob to move the sound to the next higher or lower station and stay there. The middle position balances the sound between the speakers.

Owner's Manual
Page 141
... of the six numbered buttons until SET appears on . 2. Turn it extends. PUSHBUTTONS: The six numbered pushbuttons let you return to the next higher or lower station and stay there. RECALL: Display the time with Cassette Tape Player (If Equipped) Finding a Station AM-FM: Press this knob to select the band...
... of the six numbered buttons until SET appears on . 2. Turn it extends. PUSHBUTTONS: The six numbered pushbuttons let you return to the next higher or lower station and stay there. RECALL: Display the time with Cassette Tape Player (If Equipped) Finding a Station AM-FM: Press this knob to select the band...

Owner's Manual
Page 145
... . PUSHBUTTONS: The six numbered pushbuttons let you set up to 30 to your selection. Whenever you press that are up to the next higher or lower station and stay there. You can set will return. 5. Setting the Tone EQUALIZER: A seven-band equalizer is built to the front or rear speakers. Push...
... . PUSHBUTTONS: The six numbered pushbuttons let you set up to 30 to your selection. Whenever you press that are up to the next higher or lower station and stay there. You can set will return. 5. Setting the Tone EQUALIZER: A seven-band equalizer is built to the front or rear speakers. Push...

