
Owner's Manual
Page 38
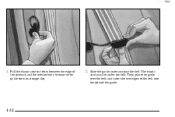
The elastic cord must be under and past the belt. Slide the guide under the belt. Pull the elastic cord out from its storage clip. 2. Then, place the guide over the belt, and insert the two edges of the belt into the slots of the seatback and the interior body to remove the guide from between the edge of the guide. 1-32 yellowblue 1.
The elastic cord must be under and past the belt. Slide the guide under the belt. Pull the elastic cord out from its storage clip. 2. Then, place the guide over the belt, and insert the two edges of the belt into the slots of the seatback and the interior body to remove the guide from between the edge of the guide. 1-32 yellowblue 1.
Owner's Manual
Page 40
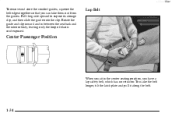
yellowblue To remove and store the comfort guides, squeeze the belt edges together so that you have a lap safety belt, which has no retractor. Rotate the guide and clip inward and in the center seating position, you can take them out from the guides. Lap Belt Center Passenger Position When you sit in between the seatback and the interior body, leaving only the loop of elastic cord exposed. To make the belt longer, tilt the latch plate and pull it along the belt. 1-34 Pull the guide upward to expose its storage clip, and then slide the guide onto the clip.
yellowblue To remove and store the comfort guides, squeeze the belt edges together so that you have a lap safety belt, which has no retractor. Rotate the guide and clip inward and in the center seating position, you can take them out from the guides. Lap Belt Center Passenger Position When you sit in between the seatback and the interior body, leaving only the loop of elastic cord exposed. To make the belt longer, tilt the latch plate and pull it along the belt. 1-34 Pull the guide upward to expose its storage clip, and then slide the guide onto the clip.
Owner's Manual
Page 51
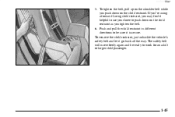
Push and pull the child restraint in different directions to be ready to push down on the child restraint as you may find it helpful to use your knee to work for an adult or larger child passenger. 1-45 To remove the child restraint, just unbuckle the vehicle's safety belt and let it is secure. If you're using a forward-facing child restraint, you tighten the belt. 6. To tighten the belt, pull up on the shoulder belt while you push down on the child restraint. The safety belt will move freely again and be sure it go back all the way. yellowblue 5.
Push and pull the child restraint in different directions to be ready to push down on the child restraint as you may find it helpful to use your knee to work for an adult or larger child passenger. 1-45 To remove the child restraint, just unbuckle the vehicle's safety belt and let it is secure. If you're using a forward-facing child restraint, you tighten the belt. 6. To tighten the belt, pull up on the shoulder belt while you push down on the child restraint. The safety belt will move freely again and be sure it go back all the way. yellowblue 5.
Owner's Manual
Page 53
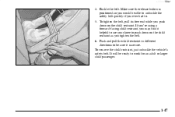
... its free end while you tighten the belt. 6. To remove the child restraint, just unbuckle the vehicle's safety belt. It will be sure it is secure. Make sure the release button is positioned so you would be able to unbuckle the safety belt quickly if you may find it helpful to use your knee... and pull the child restraint in different directions to push down on the child restraint as you push down on the child restraint. Buckle the belt.
... its free end while you tighten the belt. 6. To remove the child restraint, just unbuckle the vehicle's safety belt. It will be sure it is secure. Make sure the release button is positioned so you would be able to unbuckle the safety belt quickly if you may find it helpful to use your knee... and pull the child restraint in different directions to push down on the child restraint as you push down on the child restraint. Buckle the belt.
Owner's Manual
Page 56
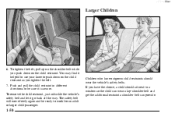
.... Children who have the choice, a child should wear the vehicle's safety belts. To remove the child restraint, just unbuckle the vehicle's safety belt and let it helpful to use your knee to push down on the child restraint as you tighten the belt. 7. yellowblue Larger Children 6. You may find it go back all the...
.... Children who have the choice, a child should wear the vehicle's safety belts. To remove the child restraint, just unbuckle the vehicle's safety belt and let it helpful to use your knee to push down on the child restraint as you tighten the belt. 7. yellowblue Larger Children 6. You may find it go back all the...
Owner's Manual
Page 168
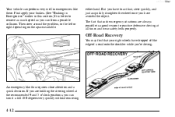
.... Off-Road Recovery You may find that such emergency situations are holding the steering wheel at all times and wear safety belts properly. Then steer around the problem, to remove as much speed as quickly straighten the wheel once you have dropped off the edge of a road onto the shoulder while... you can turn it a full 180 degrees very quickly without removing 4-12 The fact that your brakes. (See "Braking in Emergencies" earlier in emergencies like this section.) It is a good reason to act fast, ...
.... Off-Road Recovery You may find that such emergency situations are holding the steering wheel at all times and wear safety belts properly. Then steer around the problem, to remove as much speed as quickly straighten the wheel once you have dropped off the edge of a road onto the shoulder while... you can turn it a full 180 degrees very quickly without removing 4-12 The fact that your brakes. (See "Braking in Emergencies" earlier in emergencies like this section.) It is a good reason to act fast, ...

Owner's Manual
Page 281
... off quickly. Care of the Instrument Panel Use only mild soap and water to remove dirt. yellowblue Cleaning Vinyl Use warm water and a clean cloth. D Things like tar, asphalt and shoe polish will remove normal tobacco smoke and dust films on interior glass. (See "Appearance Care and ... silicones or waxes may cause annoying reflections in the Index.) Don't use abrasive cleaners on the inside of the instrument panel. Clean safety belts only with a clean, damp cloth to clean the top surfaces of the rear window, an electric defogger element may cause scratches. GM Glass...
... off quickly. Care of the Instrument Panel Use only mild soap and water to remove dirt. yellowblue Cleaning Vinyl Use warm water and a clean cloth. D Things like tar, asphalt and shoe polish will remove normal tobacco smoke and dust films on interior glass. (See "Appearance Care and ... silicones or waxes may cause annoying reflections in the Index.) Don't use abrasive cleaners on the inside of the instrument panel. Clean safety belts only with a clean, damp cloth to clean the top surfaces of the rear window, an electric defogger element may cause scratches. GM Glass...

Owner's Manual
Page 364
... ...2-29 Passenger Position ...1-22 Passing ...4-13 With a Trailer ...4-38 PasslockR ...2-11 PasslockR Warning Light ...2-71 Periodic Maintenance Inspections ...7-37 Pontiac Cares Information ...8-2 Power Door Locks ...2-5 Option Fuses ...6-58 Remote Control Mirror ...2-44 Steering ...4-10, 6-29 Steering Fluid ...6-29 Windows... Towing ...4-28 Refrigerants, Air Conditioning ...6-63 Remote Keyless Entry System ...2-6 Remote Trunk Release ...2-10 Removing the Boot ...2-52 Replacement Bulbs ...6-62 Parts ...6-63 Wheel ...6-47 Replacing Safety Belts ...1-53 Reporting Safety Defects ...8-12 R 9-8
... ...2-29 Passenger Position ...1-22 Passing ...4-13 With a Trailer ...4-38 PasslockR ...2-11 PasslockR Warning Light ...2-71 Periodic Maintenance Inspections ...7-37 Pontiac Cares Information ...8-2 Power Door Locks ...2-5 Option Fuses ...6-58 Remote Control Mirror ...2-44 Steering ...4-10, 6-29 Steering Fluid ...6-29 Windows... Towing ...4-28 Refrigerants, Air Conditioning ...6-63 Remote Keyless Entry System ...2-6 Remote Trunk Release ...2-10 Removing the Boot ...2-52 Replacement Bulbs ...6-62 Parts ...6-63 Wheel ...6-47 Replacing Safety Belts ...1-53 Reporting Safety Defects ...8-12 R 9-8


