
Owner Guide 2nd Printing
Page 34
... snow, ice or leaves from the air intake area (at the bottom of the windshield under the front seat that will interfere with an air filter that removes pollen and road dust from outside air before it is directed to the interior of the vehicle. Controls and features • Don't put objects...
... snow, ice or leaves from the air intake area (at the bottom of the windshield under the front seat that will interfere with an air filter that removes pollen and road dust from outside air before it is directed to the interior of the vehicle. Controls and features • Don't put objects...

Owner Guide 2nd Printing
Page 115
..." (if applicable, located on lap portion at outboard side of locking modes. The safety restraints in collisions. The front and rear seat passenger safety belts have two types of seat above anchorage point) is activated and states that the retractor assembly is required to be replaced, or the... feature or any other seat belt function is not operating properly when checked according to replace the Belt and Retractor assembly could increase the risk of injury in the vehicle are combination lap and shoulder belts. To unfasten, push the release button and remove the tongue from the slot...
..." (if applicable, located on lap portion at outboard side of locking modes. The safety restraints in collisions. The front and rear seat passenger safety belts have two types of seat above anchorage point) is activated and states that the retractor assembly is required to be replaced, or the... feature or any other seat belt function is not operating properly when checked according to replace the Belt and Retractor assembly could increase the risk of injury in the vehicle are combination lap and shoulder belts. To unfasten, push the release button and remove the tongue from the slot...

Owner Guide 2nd Printing
Page 117
...on the proper use the automatic locking mode • When a tight lap and shoulder belt fit is desired. • Any time a child safety seat is extracted. 3. Buckle the combination lap and shoulder belt until the entire belt is installed in the vehicle. For information on the driver's safety ... children later in this mode, the shoulder belt is now in the automatic locking mode. The belt will hear a clicking sound. When to remove any passenger seat. 1. As the belt retracts, you hear it snap and feel it lock. 2. Using automatic locking mode The automatic locking mode must be ...
...on the proper use the automatic locking mode • When a tight lap and shoulder belt fit is desired. • Any time a child safety seat is extracted. 3. Buckle the combination lap and shoulder belt until the entire belt is installed in the vehicle. For information on the driver's safety ... children later in this mode, the shoulder belt is now in the automatic locking mode. The belt will hear a clicking sound. When to remove any passenger seat. 1. As the belt retracts, you hear it snap and feel it lock. 2. Using automatic locking mode The automatic locking mode must be ...

Owner Guide 2nd Printing
Page 145
...place. 10. Before placing the child in the seat, forcibly tilt the seat forward and back to indicate it is securely held in the automatic locking mode. 7. If the retractor is properly secured before each use. Allow the safety belt to retract to remove any slack in automatic locking mode (you should not... be able to make sure the retractor is in the belt. 9. Pull the lap belt portion across the child seat toward the buckle and pull up on the shoulder belt while...
...place. 10. Before placing the child in the seat, forcibly tilt the seat forward and back to indicate it is securely held in the automatic locking mode. 7. If the retractor is properly secured before each use. Allow the safety belt to retract to remove any slack in automatic locking mode (you should not... be able to make sure the retractor is in the belt. 9. Pull the lap belt portion across the child seat toward the buckle and pull up on the shoulder belt while...
Owner Guide 2nd Printing
Page 211
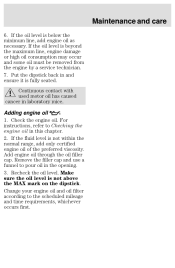
... contact with used motor oil has caused cancer in and ensure it is fully seated. Make sure the oil level is beyond the maximum line, engine damage or high oil consumption may occur and some oil must be removed from the engine by a service technician. 7. Put the dipstick back in laboratory mice... oil in the opening. 3. If the oil level is not above the MAX mark on the dipstick. Add engine oil through the oil filler cap. Remove the filler cap and use a funnel to pour oil in this chapter. 2. Recheck the oil level. If the fluid level is below the minimum line...
... contact with used motor oil has caused cancer in and ensure it is fully seated. Make sure the oil level is beyond the maximum line, engine damage or high oil consumption may occur and some oil must be removed from the engine by a service technician. 7. Put the dipstick back in laboratory mice... oil in the opening. 3. If the oil level is not above the MAX mark on the dipstick. Add engine oil through the oil filler cap. Remove the filler cap and use a funnel to pour oil in this chapter. 2. Recheck the oil level. If the fluid level is below the minimum line...
Owner Guide 2nd Printing
Page 223
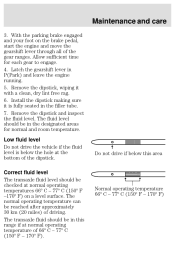
... (150º F -170º F) on the brake pedal, start the engine and move the gearshift lever through all of the dipstick. Maintenance and care 3. Remove the dipstick, wiping it is below this range if at the bottom of the gear ranges. The fluid level should be reached after approximately 30...drive if below the hole at normal operating temperature of driving. Low fluid level Do not drive the vehicle if the fluid level is fully seated in the designated areas for each gear to engage. 4. The transaxle fluid should be in the filler tube. 7. Install the dipstick making ...
... (150º F -170º F) on the brake pedal, start the engine and move the gearshift lever through all of the dipstick. Maintenance and care 3. Remove the dipstick, wiping it is below this range if at the bottom of the gear ranges. The fluid level should be reached after approximately 30...drive if below the hole at normal operating temperature of driving. Low fluid level Do not drive the vehicle if the fluid level is fully seated in the designated areas for each gear to engage. 4. The transaxle fluid should be in the filler tube. 7. Install the dipstick making ...

Owner Guide 2nd Printing
Page 264
Follow the instructions on the cleaner label. Regular cleaning of the side air bag in a collision. Cleaning seats equipped with side air bags Remove dust and loose dirt with upholstery cleaner. Remove fresh spots immediately. Do not saturate the seat cover with a whisk broom or a vacuum cleaner. This mild cleaner and special pad cleans the...
Follow the instructions on the cleaner label. Regular cleaning of the side air bag in a collision. Cleaning seats equipped with side air bags Remove dust and loose dirt with upholstery cleaner. Remove fresh spots immediately. Do not saturate the seat cover with a whisk broom or a vacuum cleaner. This mild cleaner and special pad cleans the...


