
Owner Guide 1st Printing
Page 7
... OBD II system also assists the service technician in the fuel. 3. If it comes on solid: This means that your vehicle continues to check the bulb. The light may not have been properly installed and securely tightened. 7 The fuel cap may illuminate without a driveability concern being noted. What you should do...
... OBD II system also assists the service technician in the fuel. 3. If it comes on solid: This means that your vehicle continues to check the bulb. The light may not have been properly installed and securely tightened. 7 The fuel cap may illuminate without a driveability concern being noted. What you should do...

Owner Guide 1st Printing
Page 9
... ON and the engine is turned ON to remind you to fasten your safety belts. Turn signal Illuminates when the left or right turn signal bulb. Instrumentation Air bag readiness Momentarily illuminates when the ignition is off . Anti-lock brake system (ABS) (If equipped) Momentarily illuminates when the ignition is turned...
... ON and the engine is turned ON to remind you to fasten your safety belts. Turn signal Illuminates when the left or right turn signal bulb. Instrumentation Air bag readiness Momentarily illuminates when the ignition is off . Anti-lock brake system (ABS) (If equipped) Momentarily illuminates when the ignition is turned...

Owner Guide 1st Printing
Page 10
Engine oil pressure Illuminates when the oil pressure falls below the normal range. Switch off . Check the oil level and add oil if needed. Instrumentation bulbs in the Controls and features chapter. This lamp also illuminates when the ignition is turned to ON and the engine is low and more needs ...
Engine oil pressure Illuminates when the oil pressure falls below the normal range. Switch off . Check the oil level and add oil if needed. Instrumentation bulbs in the Controls and features chapter. This lamp also illuminates when the ignition is turned to ON and the engine is low and more needs ...

Owner Guide 1st Printing
Page 156
... eight hours without starting the engine. Then, start the engine and complete the above driving cycle is a good idea to its normal operating temperature. EXTERIOR BULBS It is complete. Once started, do not turn off the engine until the above driving cycle. Allow the vehicle to sit for at least four...
... eight hours without starting the engine. Then, start the engine and complete the above driving cycle is a good idea to its normal operating temperature. EXTERIOR BULBS It is complete. Once started, do not turn off the engine until the above driving cycle. Allow the vehicle to sit for at least four...
Owner Guide 1st Printing
Page 157
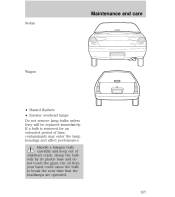
Grasp the bulb only by its plastic base and do not touch the glass; Handle a halogen bulb carefully and keep out of time, contaminants may enter the lamp housings and affect performance. the oil from your hand could cause the bulb to break the next time that the headlamps are operated. 157 Maintenance and care Sedan Wagon • Hazard flashers • Interior overhead lamps Do not remove lamp bulbs unless they will be replaced immediately. If a bulb is removed for an extended period of children's reach.
Grasp the bulb only by its plastic base and do not touch the glass; Handle a halogen bulb carefully and keep out of time, contaminants may enter the lamp housings and affect performance. the oil from your hand could cause the bulb to break the next time that the headlamps are operated. 157 Maintenance and care Sedan Wagon • Hazard flashers • Interior overhead lamps Do not remove lamp bulbs unless they will be replaced immediately. If a bulb is removed for an extended period of children's reach.

Owner Guide 1st Printing
Page 158
...158 Maintenance and care Replacing headlamp bulbs 1. Make sure that the headlamps are turned OFF. 2. Replace the bulb by pushing a new one straight in -line connector. Remove the protective dust shield from its socket by rotating it . 7. Remove the bulb retaining ring by pulling it easier ...to change the bulb. 3. Remove the old bulb from the housing by pulling it straight out. 5. Open the hood and find the headlamp wiring ...
...158 Maintenance and care Replacing headlamp bulbs 1. Make sure that the headlamps are turned OFF. 2. Replace the bulb by pushing a new one straight in -line connector. Remove the protective dust shield from its socket by rotating it . 7. Remove the bulb retaining ring by pulling it easier ...to change the bulb. 3. Remove the old bulb from the housing by pulling it straight out. 5. Open the hood and find the headlamp wiring ...

Owner Guide 1st Printing
Page 159
Maintenance and care may need to turn the bulb slightly to align the grooves in the plastic base with two fastener clips and an assembly cover on the package tray. Replace the protective dust ... The brake lamp is mounted with the tabs in -line connector. Reconnect the headlamp wiring socket to the bulb. 10. Sedan 159 Reconnect the electrical connector to the in the bulb socket. 8. Slip the bulb retaining ring over the plastic base and lock the ring by rotating it clockwise until it locks into...
Maintenance and care may need to turn the bulb slightly to align the grooves in the plastic base with two fastener clips and an assembly cover on the package tray. Replace the protective dust ... The brake lamp is mounted with the tabs in -line connector. Reconnect the headlamp wiring socket to the bulb. 10. Sedan 159 Reconnect the electrical connector to the in the bulb socket. 8. Slip the bulb retaining ring over the plastic base and lock the ring by rotating it clockwise until it locks into...

Owner Guide 1st Printing
Page 160
Follow the same steps to replace either bulb. Tail lamps/Backup lamps The tail lamp assemblies and the backup bulb assemblies are located in the same portion of the vehicle rear, one just below the other. Detach the socket from the package tray. 2. Remove the push pins and cover from the housing and remove the bulb. 3. Replace the housing cover and secure with the push pins. Maintenance and care Wagon 1. Replace the bulb and ease the socket back into the housing. 4. Sedan 160
Follow the same steps to replace either bulb. Tail lamps/Backup lamps The tail lamp assemblies and the backup bulb assemblies are located in the same portion of the vehicle rear, one just below the other. Detach the socket from the package tray. 2. Remove the push pins and cover from the housing and remove the bulb. 3. Replace the housing cover and secure with the push pins. Maintenance and care Wagon 1. Replace the bulb and ease the socket back into the housing. 4. Sedan 160

Owner Guide 1st Printing
Page 161
... of the lamp. 2. Position the tail lamp on the vehicle and gently tap the lens to expose the tail lamp assembly. Pull the burned-out bulb from the front of the lamp assembly. 4. Install the screws. 161 Remove the two screws from the socket and install the new... bulb. 5. The tail lamp has hidden fasteners which can be disengaged by rotating it by hitting the lamp, with the side of your hand, toward the ...
... of the lamp. 2. Position the tail lamp on the vehicle and gently tap the lens to expose the tail lamp assembly. Pull the burned-out bulb from the front of the lamp assembly. 4. Install the screws. 161 Remove the two screws from the socket and install the new... bulb. 5. The tail lamp has hidden fasteners which can be disengaged by rotating it by hitting the lamp, with the side of your hand, toward the ...

Owner Guide 1st Printing
Page 162
... both tabs at the top of the lamp lens and popping the lamp lens up on the assembly. Pull out the burned-out bulb and install a new one. 3. Install the lamp lens by applying pressure to both sides of the lamp and pulling lens downward. 2. Maintenance and care ...License plate lamps To change the license plate bulbs: 1. Replace the lamp lens, assembly and screws. OFF DOOR ON 162 Carefully remove screws and pull the license plate lamp assembly from the assembly. 3....
... both tabs at the top of the lamp lens and popping the lamp lens up on the assembly. Pull out the burned-out bulb and install a new one. 3. Install the lamp lens by applying pressure to both sides of the lamp and pulling lens downward. 2. Maintenance and care ...License plate lamps To change the license plate bulbs: 1. Replace the lamp lens, assembly and screws. OFF DOOR ON 162 Carefully remove screws and pull the license plate lamp assembly from the assembly. 3....

Owner Guide 1st Printing
Page 163
... low beam Rear license plate lamps High-mount brake lamp Backup lamps Brake lamps Interior overhead lamp Warning lights Instrument panel gauge Map lamps For bulb replacement, see a qualified service technician or your VHAD system. If your vehicle are calibrated. The headlamps on your vehicle is equipped with a Vehicle Headlamp Aim...
... low beam Rear license plate lamps High-mount brake lamp Backup lamps Brake lamps Interior overhead lamp Warning lights Instrument panel gauge Map lamps For bulb replacement, see a qualified service technician or your VHAD system. If your vehicle are calibrated. The headlamps on your vehicle is equipped with a Vehicle Headlamp Aim...

Owner Guide 1st Printing
Page 178
... checking and adding ...129 Brakes ...85 anti-lock ...85 anti-lock brake system (ABS) warning light ...86 fluid, checking and adding ...129 Break-in period ...2 Bulbs, replacing ...156 rear lamps ...160 specifications ...163 Cargo cover ...37 Changing a tire ...108 Child safety seats ...64 Chime headlamps on ...11 Cleaning your vehicle ...166...
... checking and adding ...129 Brakes ...85 anti-lock ...85 anti-lock brake system (ABS) warning light ...86 fluid, checking and adding ...129 Break-in period ...2 Bulbs, replacing ...156 rear lamps ...160 specifications ...163 Cargo cover ...37 Changing a tire ...108 Child safety seats ...64 Chime headlamps on ...11 Cleaning your vehicle ...166...
Scheduled Maintenance Guide 2nd Printing
Page 26
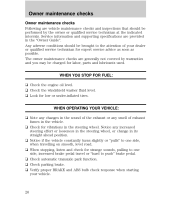
... or any increased steering effort or looseness in the steering wheel, or change in the "Owner Guide". u Check parking brake. u Verify proper BRAKE and ABS bulb check response when starting your dealer or qualified service technician for vibrations in the vehicle. u Check the windshield washer fluid level. u When stopping, listen and...
... or any increased steering effort or looseness in the steering wheel, or change in the "Owner Guide". u Check parking brake. u Verify proper BRAKE and ABS bulb check response when starting your dealer or qualified service technician for vibrations in the vehicle. u Check the windshield washer fluid level. u When stopping, listen and...


