1997 Mercury Tracer Support Question
1997 Mercury Tracer Support Question
Find answers below for this question about 1997 Mercury Tracer.Need a 1997 Mercury Tracer manual? We have 3 online manuals for this item!
Question posted by szilradt on December 15th, 2013
97 Tail Light Bulb Remove /replace Mercury Tracer How To
The person who posted this question about this Mercury automobile did not include a detailed explanation. Please use the "Request More Information" button to the right if more details would help you to answer this question.
Current Answers
Related Manual Pages
Owner's Manual - Page 26
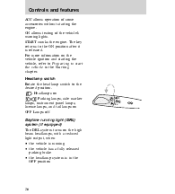
... returns to the desired position. For more information on the high beam headlamps, with a reduced light output, when: • the vehicle is running • the vehicle has a fully released ...on Parking lamps, side marker lamps, instrument panel lamps, license lamps, and tail lamps on OFF Lamps off
OFF
Daytime running light (DRL) system (if equipped) The DRL system turns on the vehicle ignition...
Owner's Manual - Page 27
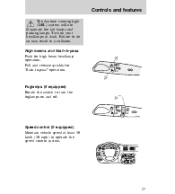
... ON BAL 1 SIDE 1-2 2 3 4 5 COMP 1 SIDE 1-2 FADE SCAN BASS EJ REW FF - + TREB TAPE CD
LO
OFF
HI
*A/C *MAX A/C
27
Controls and features
The daytime running light (DRL) system will not illuminate the tail lamps and parking lamps.
Owner's Manual - Page 50
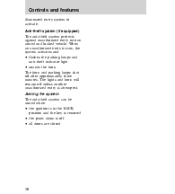
... shut off unless another unauthorized entry is off • all doors are closed
50 The lights and horn will remain off after approximately three minutes. Controls and features
illuminated entry system to... can be armed when: • the ignition is in the LOCK position and the key is removed • the panic alarm is attempted. Anti-theft system (if equipped) The anti-theft system protects...
Owner's Manual - Page 97
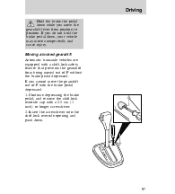
... opening and push down , your vehicle may move the gearshift lever from being moved out of P with a 2.5 cm (1 inch) or longer screwdriver. 2.
P R N D D L
97 Continue depressing the brake pedal, and remove the shift-lock override cap with the brake pedal depressed: 1. Driving
Hold the brake the pedal down while you move unexpectedly and...
Owner's Manual - Page 98
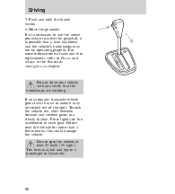
... a fuse has blown and the vehicle's brakelamps may not be rocked out of the spot. Push and hold the thumb button. 4. Driving
3. Press lightly on fuses and fuse replacement, refer to move the gearshift, it is necessary to use the above procedure to Fuses and relays in mud or snow it is...
Owner's Manual - Page 111
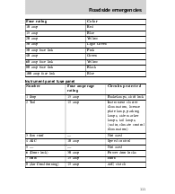
...fuse link Color Red Blue Yellow Light Green Pink Green Yellow Black Blue
Instrument panel fuse panel Number Fuse amperage rating 1 Stop 2 Tail 15 amp 15 amp
Circuits protected... Brakelamps, shift lock Instrument cluster illumination, license plate lamp, parking lamps, side marker lamps, tail lamps, (radio, climate control illumination) Not used Speed control Not used Power door locks Horn...
Owner's Manual - Page 124

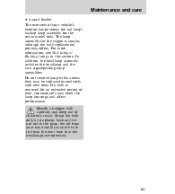
Check the Warranty Information Guide to make servicing your vehicle as easy as the headlamp bulbs) may be replaced without tools. • We provide you : • We highlight do not require servicing. Here are covered. Maintenance and care
SERVICE RECOMMENDATIONS Whenever possible, Ford has ...
Owner's Manual - Page 160

Maintenance and care
EXTERIOR LAMPS
REPLACING THE EXTERIOR BULBS Check the operation of the following lamps frequently: • headlamps • foglamps (if equipped) • high-mount brakelamp • license plate lamp • tail lamps/backup lamps • interior overhead lamp 160
Owner's Manual - Page 161
... signal/parking lamp assemblies Do not remove lamp bulbs unless they may enter the lamp housings and affect performance. the oil from your vehicle's exterior lamps shows the tail lamp/ backup lamp assembly for an extended period of time, contaminants may be replaced immediately with new ones. Handle a halogen bulb carefully and keep out of...
Owner's Manual - Page 162
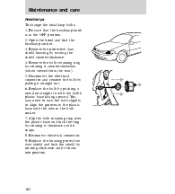
... counterclockwise (when viewed from the rear). 5. Disconnect the electrical connector and remove the bulb by rotating it straight out. 6. Slip the bulb retaining ring over the plastic base and lock the ring by pushing a new one straight in the OFF position. 2. Replace the bulb by rotating it clockwise until it snaps. 8. You may need to...
Owner's Manual - Page 164
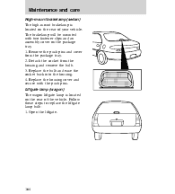
... brakelamp is located on the package tray. 1. Detach the socket from the package tray. 2. Replace the housing cover and secure with two fastener clips and an assembly cover on the rear of your... vehicle. The brakelamp will be mounted with the push pins. Replace the bulb and ease the socket back into the housing. 4. Liftgate lamp (wagon) The wagon liftgate lamp...
Owner's Manual - Page 165
... ease the socket back into the housing. 5. Carefully pull the lamp lens from the rear bumper. 2.
Replace the lamp lens, the assembly, and the screws.
165 To remove the liftgate lamp bulb assembly cover mounted on the liftgate's interior rear window: • press in the inner portion of the two mounting screws on...
Owner's Manual - Page 167
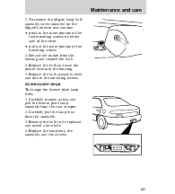
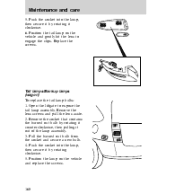
... from the socket and replace it out of the vehicle. 3. Remove the socket that contains the burned out bulb by hitting the lamp, with a new bulb.
167 Open the trunk lid to replace either bulb. 1. Pull the burned out bulb from the front of the vehicle rear, one just below the other. The tail lamp has hidden fasteners...
Owner's Manual - Page 168
Maintenance and care
5. Position the tail lamp on the vehicle and replace the screws.
168 Replace the screws. Tail lamps/Backup lamps (wagon) To replace the tail lamp bulbs: 1. Open the liftgate to engage the clips. Remove the lens screws and pull the lens aside. 2. Remove the socket that contains the burned out bulb by rotating it counterclockwise, then pulling it...
Owner's Manual - Page 170
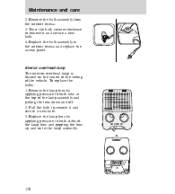
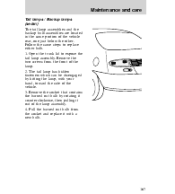
Replace the bulb assembly in the interior recess and replace the access panel. Pull the bulb to remove it and secure a new bulb. 3. Maintenance and care
2. OFF DOOR ON
170
OFF DOOR ON Twist the bulb counterclockwise to remove it and secure a new bulb. 4. Remove the lamp lens by applying pressure to both tabs at the top of the vehicle. Replace the...
Owner's Manual - Page 171
... several different tools.
A warning chime will give you between eight and ten minutes to headlamps left on . For bulb replacement, see your dealer for replacement of the map lamp bulbs. Replacement of the two bulbs requires removal of the bulb assembly cover and the use of the interior overhead lamp assembly. The timer will sound when the engine...
Owner's Manual - Page 187
... ...141 fluid, checking ...140 Battery ...142 servicing ...143 Brakes ...93 anti-lock ...93 anti-lock brake system (ABS) warning light ...9 fluid, checking and adding ...133 power braking ...93 Break-in period ...2 Bulbs, replacing ...160 halogen ...161 headlamps ...162 high-mount brakelamp ...164 rear lamps ...164,165,167,168 specifications ...172 Cargo area shade...
Owner's Manual - Page 188
...97 GVWR (Gross Vehicle Weight Rating) ...101 definition ...101 Hazard flashers ...29,107 Head restraints ...54 Headlamps daytime running lights ...26 replacing bulbs ...162 turning on and off ...26 188 High beams indicator light ...9 operation ...27 High-mount brakelamp replacing the bulb... ...122 Lamps ...160 bulb replacement specifications chart ...172 daytime running light system ..26 dome lamps...
Owner's Manual - Page 190
... start your vehicle ...86 starting a cold engine ...89 starting a warm engine ...89 Steering wheel tilting ...29 Tail lamps bulb replacement ...167,168 Tilt steering wheel ...29 Tire types ...152 Tires ...148 changing ...114 checking the pressure ...150 replacing ...151 rotating ...151 snow tires and chains ...152 tire grades ...148 treadwear ...148 Trailer towing ...102...
Warranty Guide 1st Printing - Page 21
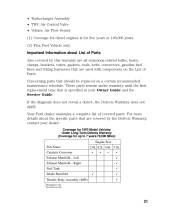
These parts remain under warranty until the first replacement time that are covered by this warranty are all emissions-related bulbs, hoses, clamps, brackets, tubes, gaskets, seals, belts.
Left Exhaust Manifold - Right Fuel Tank Intake Manifold Throttle Body Assembly (MFI)
1 Mountaineer only 2 Escort/Tracer only
2.0L 4.2L 4.6L 5.0L 1 •1 •1 •2 •1 •...
Similar Questions

How To Remove Brake Light Bulb Mercury Tracer 1999
(Posted by ddkitGlanz 9 years ago)

How To Remove Mercury Tracer Side Marker Light Bulb
(Posted by jwhure 10 years ago)

How To Replace A Mercury Tracer Tail Light With Plastic Clips
(Posted by ulisehd 10 years ago)

How To Change Rear Tail Light 1997 Mercury Tracer
(Posted by kenmancbucc 10 years ago)

Removing Tail Light Assembly To Change Bulbs.
How do the plastic "pins," inside the trunk, that hold the forward part of the assembly, come off?
How do the plastic "pins," inside the trunk, that hold the forward part of the assembly, come off?
(Posted by markbowwow5 11 years ago)