1997 Mercury Tracer Support Question
1997 Mercury Tracer Support Question
Find answers below for this question about 1997 Mercury Tracer.Need a 1997 Mercury Tracer manual? We have 3 online manuals for this item!
Question posted by markbowwow5 on August 22nd, 2012
Removing Tail Light Assembly To Change Bulbs.
How do the plastic "pins," inside the trunk, that hold the forward part of the assembly, come off?
Current Answers
Related Manual Pages
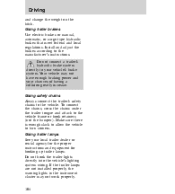
Owner's Manual - Page 26
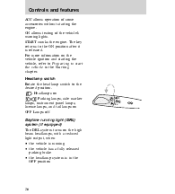
... more information on the high beam headlamps, with a reduced light output, when: • the vehicle is running light (DRL) system (if equipped) The DRL system turns on... to the desired position. Headlamps on Parking lamps, side marker lamps, instrument panel lamps, license lamps, and tail lamps on OFF Lamps off
OFF
Daytime running • the vehicle has a fully released parking brake •...
Owner's Manual - Page 27
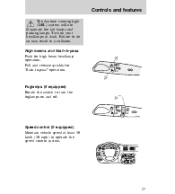
... beams and flash-to do so may result in a collision. Pull and release quickly for high beam headlamp operation.
Controls and features
The daytime running light (DRL) system will not illuminate the tail lamps and parking lamps. OFF
OFF
Speed control (if equipped) Maintain vehicle speed at dusk.
Owner's Manual - Page 50
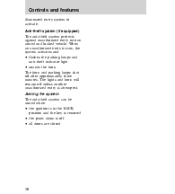
...; all doors are closed
50 The lights and horn will remain off unless another unauthorized entry is off after approximately three minutes. Arming the system The anti-theft system can be armed when: • the ignition is in the LOCK position and the key is removed • the panic alarm is attempted...
Owner's Manual - Page 104
...the vehicle frame or hook retainers (not the bumper). Do not hook the trailer lights directly into the vehicle's lighting system wiring. Install and adjust the brakes according to the vehicle. Using trailer ...instructions. If the trailer lamps are not installed properly, the warning lights in the instrument cluster may not have enough braking power and your chances of having a ...
Owner's Manual - Page 111
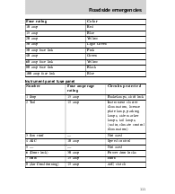
...fuse link Color Red Blue Yellow Light Green Pink Green Yellow Black Blue
Instrument panel fuse panel Number Fuse amperage rating 1 Stop 2 Tail 15 amp 15 amp
Circuits protected... Brakelamps, shift lock Instrument cluster illumination, license plate lamp, parking lamps, side marker lamps, tail lamps, (radio, climate control illumination) Not used Speed control Not used Power door locks Horn...
Owner's Manual - Page 115
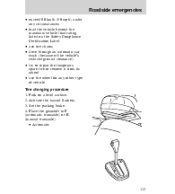
... tire chains • drive through an automatic car wash (because of the vehicle's reduced ground clearance) • try to repair the temporary spare tire or remove it from its wheel • use the wheel for any circumstances • load the vehicle beyond the maximum vehicle load rating listed on a level surface...
Owner's Manual - Page 146
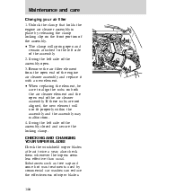
... air cleaner assembly. Remove the air filter element from the open end of the assembly closed and secure the locking clamp. CHECKING AND CHANGING YOUR WIPER ...assembly. 2. Unlock the clamp that holds the engine air cleaner assembly in place by commercial car washes can reduce the effectiveness of the assembly open and remain attached to align the nubs on the front portion of the assembly...
Owner's Manual - Page 158

...remove an emission control device or prevent it may become a legal requirement to pass an I/M test of a metal collector may melt or deform plastic parts. The emission system heats up the engine compartment and exhaust system, which can increase the temperature of the engine or exhaust system. Changes... ground cover. Do not make any unauthorized changes to the vehicle or engine. The use...
Owner's Manual - Page 161
... out of children's reach. the oil from your vehicle's exterior lamps shows the tail lamp/ backup lamp assembly for the sedan model only. In addition, the headlamp assembly includes the headlamp and the turn signal/parking lamp assemblies Do not remove lamp bulbs unless they may enter the lamp housings and affect performance. For more information...
Owner's Manual - Page 162
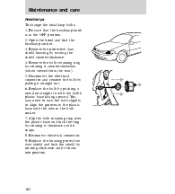
... is in the plastic base with the bulb's plastic base facing upward. Remove the protective dust shield housing by rotating it straight out. 6. Disconnect the electrical connector and remove the bulb by rotating clockwise until it locks into position.
162 Maintenance and care
Headlamps To change the headlamp bulbs: 1. Slip the bulb retaining ring over the plastic base and lock...
Owner's Manual - Page 163
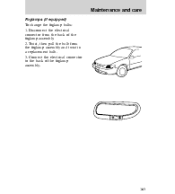
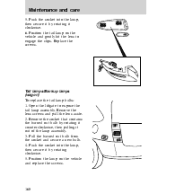
Twist, then pull the bulb from the back of the foglamp assembly.
163 Connect the electrical connector to the back of the foglamp assembly. 2. Disconnect the electrical connector from the foglamp assembly and twist in a replacement bulb. 3. Maintenance and care
Foglamps (if equipped) To change the foglamp bulbs: 1.
Owner's Manual - Page 164
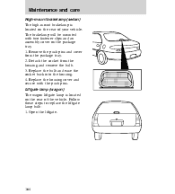
... mounted with the push pins. Follow these steps to replace the liftgate lamp bulb: 1. Open the liftgate.
164 Replace the bulb and ease the socket back into the housing. 4. Remove the push pins and cover from the housing and remove the bulb. 3. Replace the housing cover and secure with two fastener clips and an assembly cover on the...
Owner's Manual - Page 165
... be replaced and install a new bulb. 4.
License plate lamps To change the license plate lamp bulbs: 1. Replace the bulb assembly cover and secure the mounting screws. Replace the lamp lens, the assembly, and the screws.
165 To remove the liftgate lamp bulb assembly cover mounted on the liftgate's interior rear window: • press in the inner portion of the...
Owner's Manual - Page 167
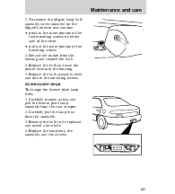
... the side of the lamp assembly. 4. Remove the two screws from the socket and replace it out of the vehicle. 3. Pull the burned out bulb from the front of the vehicle rear, one just below the other. Maintenance and care
Tail lamps / Backup lamps (sedan) The tail lamp assemblies and the backup bulb assemblies are located in the...
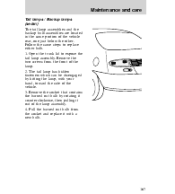
Owner's Manual - Page 168
... by rotating it out of the lamp assembly. 3. Push the socket into the lamp, then secure it by rotating it counterclockwise, then pulling it clockwise. 6. Tail lamps/Backup lamps (wagon) To replace the tail lamp bulbs: 1. Pull the burned out bulb from the socket and secure a new bulb. 4. Position the tail lamp on the vehicle and replace...
Owner's Manual - Page 170
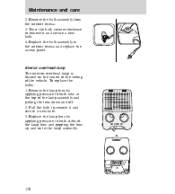
... the lamp lens and popping the lens up and on the center of the ceiling of the lamp assembly and pulling the lens down and off. 2. Remove the bulb assembly form the interior recess. 3. Replace the bulb assembly in the interior recess and replace the access panel. OFF DOOR ON
170
OFF DOOR ON
Replace the...
Owner's Manual - Page 171
..., refer to Using the hazard switch in the rear portion of the interior overhead lamp assembly. If the door is left open, closed properly, the battery saver control system timer ... the interior overhead lamp. Replacement of the two bulbs requires removal of the bulb assembly cover and the use of the map lamp bulbs.
For bulb replacement, see your dealer for replacement of several different...
Owner's Manual - Page 187
...brake system (ABS) warning light ...9 fluid, checking and adding ...133 power braking ...93 Break-in period ...2 Bulbs, replacing ...160 halogen ...161...Changing a tire ...114 Charging system warning light ...9 Child safety seats and air bags ...185 Childproof locks ...33 Cleaning your vehicle ...175 built-in child seat ...178 engine compartment ...177 exterior ...177 instrument panel ...177 plastic...
Owner's Manual - Page 188
... specifications chart ...172 daytime running light system ..26 dome lamps ...170 fog lamps ...27,163 headlamps ...26,162 high beams ...27 high-mount brakelamp ...164 illuminated entry system ...33 interior lamps ...31,170 map lamps ...31,171 replacing bulbs ...160 tail lamps ...167,168 License plate lamps ...165 Liftgate ...40,164 warning light ...10
Owner's Manual - Page 190
... preparing to start your vehicle ...86 starting a cold engine ...89 starting a warm engine ...89 Steering wheel tilting ...29 Tail lamps bulb replacement ...167,168 Tilt steering wheel ...29 Tire types ...152 Tires ...148 changing ...114 checking the pressure ...150 replacing ...151 rotating ...151 snow tires and chains ...152 tire grades ...148 treadwear ...148...
Similar Questions


How To Remove Brake Light Bulb Mercury Tracer 1999
(Posted by ddkitGlanz 9 years ago)

97 Tail Light Bulb Remove /replace Mercury Tracer How To
(Posted by szilradt 10 years ago)

How To Replace A Mercury Tracer Tail Light With Plastic Clips
(Posted by ulisehd 10 years ago)

How To Change Rear Tail Light 1997 Mercury Tracer
(Posted by kenmancbucc 10 years ago)