Owner's Manual
Page 15
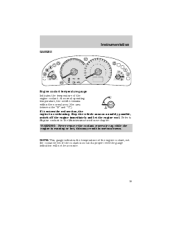
... as soon as safely possible, switch off the engine immediately and let the engine cool. NOTE: This gauge indicates the temperature of the engine coolant. Refer to Engine coolant in serious burns. WARNING: Never remove the coolant reservoir cap while the engine is running or hot, this may result in ...the Maintenance and care chapter. If it enters the red section, the engine is not at its proper...
... as soon as safely possible, switch off the engine immediately and let the engine cool. NOTE: This gauge indicates the temperature of the engine coolant. Refer to Engine coolant in serious burns. WARNING: Never remove the coolant reservoir cap while the engine is running or hot, this may result in ...the Maintenance and care chapter. If it enters the red section, the engine is not at its proper...
Owner's Manual
Page 39
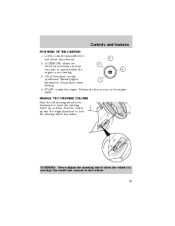
... down. Warning lights 1 illuminated. ACCESSORY, allows the 2 electrical accessories such as the engine starts. You could lose control of the vehicle. 39 LOCK, locks the gearshift lever 3 and allows key removal. 2. MANUAL TILT STEERING COLUMN Push the tilt steering wheel lever downward to move the... steering wheel up into the original position to operate while the engine is moving. WARNING: Never adjust the steering wheel when ...
... down. Warning lights 1 illuminated. ACCESSORY, allows the 2 electrical accessories such as the engine starts. You could lose control of the vehicle. 39 LOCK, locks the gearshift lever 3 and allows key removal. 2. MANUAL TILT STEERING COLUMN Push the tilt steering wheel lever downward to move the... steering wheel up into the original position to operate while the engine is moving. WARNING: Never adjust the steering wheel when ...
Owner's Manual
Page 64
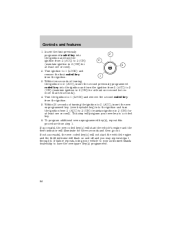
... second coded key from the ignition. 3. Turn the ignition to 1 (LOCK) and remove the first coded key 1 from the ignition. 5. If successful, the new coded key(s) will start the vehicle's engine and the theft indicator will flash on and off and you may repeat steps 1 through 6. ... step will illuminate for 4 at least one second). If not successful, the new coded key(s) will not start the vehicle's engine and the theft indicator will program your authorized Mazda dealership to 3 (ON) (maintain ignition in 3 (ON) for at least one second). 2. Controls and features 1.
... second coded key from the ignition. 3. Turn the ignition to 1 (LOCK) and remove the first coded key 1 from the ignition. 5. If successful, the new coded key(s) will start the vehicle's engine and the theft indicator will flash on and off and you may repeat steps 1 through 6. ... step will illuminate for 4 at least one second). If not successful, the new coded key(s) will not start the vehicle's engine and the theft indicator will program your authorized Mazda dealership to 3 (ON) (maintain ignition in 3 (ON) for at least one second). 2. Controls and features 1.
Owner's Manual
Page 119
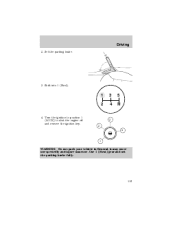
Use 1 (First) gear and set the parking brake fully. 119 Driving 2. Turn the ignition to position 1 (LOCK) to shut the engine off and remove the ignition key. 3 4 5 R 3 2 4 1 WARNING: Do not park your vehicle in Neutral, it may move unexpectedly and injure someone. Shift into 1 (First). 1 2 4. Set the parking brake. 3.
Use 1 (First) gear and set the parking brake fully. 119 Driving 2. Turn the ignition to position 1 (LOCK) to shut the engine off and remove the ignition key. 3 4 5 R 3 2 4 1 WARNING: Do not park your vehicle in Neutral, it may move unexpectedly and injure someone. Shift into 1 (First). 1 2 4. Set the parking brake. 3.
Owner's Manual
Page 130
..., could short-circuit the system. 130 Rear axle lubricant quantities are not to be checked or changed unless a leak is removed from the water. Water entering these limits may allow waves to enter critical vehicle components, adversely affecting driveability, emissions, reliability and... causing internal transmission damage. This aids engine cooling and air conditioner efficiency. • Vehicles with trailers should be parked on a grade. Reconnect the wiring to get the...
..., could short-circuit the system. 130 Rear axle lubricant quantities are not to be checked or changed unless a leak is removed from the water. Water entering these limits may allow waves to enter critical vehicle components, adversely affecting driveability, emissions, reliability and... causing internal transmission damage. This aids engine cooling and air conditioner efficiency. • Vehicles with trailers should be parked on a grade. Reconnect the wiring to get the...

Owner's Manual
Page 134
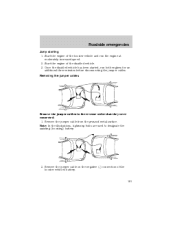
Roadside emergencies HAZARD FLASHER CONTROL Use only in the kick panel when the access cover is removed. The hazard flashers can be operated when the ignition is off. • The hazard lights control is a device intended to turn the flashers off switch. ..., etc. FUEL RESETTING THE FUEL PUMP SHUT-OFF SWITCH RESET The fuel pump shut-off switch is located in a substantial jolt. After a collision, if the engine cranks but does not start, the fuel pump shut-off switch is accessible through an opening in an emergency to reset the fuel pump shut...
Roadside emergencies HAZARD FLASHER CONTROL Use only in the kick panel when the access cover is removed. The hazard flashers can be operated when the ignition is off. • The hazard lights control is a device intended to turn the flashers off switch. ..., etc. FUEL RESETTING THE FUEL PUMP SHUT-OFF SWITCH RESET The fuel pump shut-off switch is located in a substantial jolt. After a collision, if the engine cranks but does not start, the fuel pump shut-off switch is accessible through an opening in an emergency to reset the fuel pump shut...
Owner's Manual
Page 144
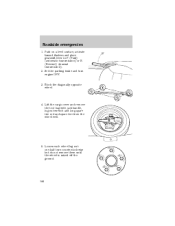
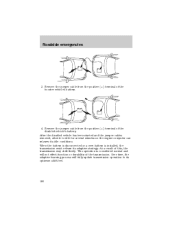
Loosen each wheel lug nut one-half turn engine OFF. 3. Block the diagonally opposite wheel. 4. Lift the cargo cover and remove the tool bag with jack handle, lug nut wrench and long spare tire rod and spare tire from the wheel well. 5. Set the parking brake and turn counterclockwise but do not remove them until the wheel is raised off the ground. 144 Roadside emergencies 1. Park on a level surface, activate hazard flashers and place gearshift lever in P (Park) (automatic transmission) or R (Reverse) (manual transmission). 2.
Loosen each wheel lug nut one-half turn engine OFF. 3. Block the diagonally opposite wheel. 4. Lift the cargo cover and remove the tool bag with jack handle, lug nut wrench and long spare tire rod and spare tire from the wheel well. 5. Set the parking brake and turn counterclockwise but do not remove them until the wheel is raised off the ground. 144 Roadside emergencies 1. Park on a level surface, activate hazard flashers and place gearshift lever in P (Park) (automatic transmission) or R (Reverse) (manual transmission). 2.
Owner's Manual
Page 146
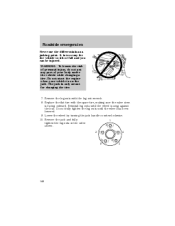
... jack and fully 1 tighten the lug nuts in the order shown. 3 4 5 2 146 Do not start the engine when your body under the vehicle while changing a tire. Remove the lug nuts with the spare tire, making sure the valve stem is too easy for changing the tire. 7. Replace the flat tire with the...
... jack and fully 1 tighten the lug nuts in the order shown. 3 4 5 2 146 Do not start the engine when your body under the vehicle while changing a tire. Remove the lug nuts with the spare tire, making sure the valve stem is too easy for changing the tire. 7. Replace the flat tire with the...
Owner's Manual
Page 148
... transmission operation to its adaptive strategy. As a result of the transmission. Turn all other moving parts. • Check all battery terminals and remove any electrical surges. This operation is installed, the transmission must relearn its optimum shift feel. • Use only a 12-volt supply to ...function or durability of this could damage the vehicle's electrical system. • Park the booster vehicle close to the hood of the engine cooling fan and other accessories off. 148 Set the parking brake on in both vehicles and stay clear of the disabled vehicle making...
... transmission operation to its adaptive strategy. As a result of the transmission. Turn all other moving parts. • Check all battery terminals and remove any electrical surges. This operation is installed, the transmission must relearn its optimum shift feel. • Use only a 12-volt supply to ...function or durability of this could damage the vehicle's electrical system. • Park the booster vehicle close to the hood of the engine cooling fan and other accessories off. 148 Set the parking brake on in both vehicles and stay clear of the disabled vehicle making...
Owner's Manual
Page 151
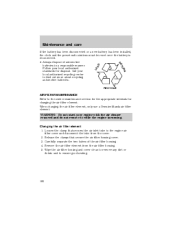
... illustrations, lightning bolts are used to designate the assisting (boosting) battery. 2. Once the disabled vehicle has been started, run the engine at moderately increased speed. 2. Remove the jumper cable on the negative (-) connection of the booster vehicle and run both engines for an additional three minutes before disconnecting the jumper cables. Start the...
... illustrations, lightning bolts are used to designate the assisting (boosting) battery. 2. Once the disabled vehicle has been started, run the engine at moderately increased speed. 2. Remove the jumper cable on the negative (-) connection of the booster vehicle and run both engines for an additional three minutes before disconnecting the jumper cables. Start the...
Owner's Manual
Page 152
... and will fully update transmission operation to idle for several minutes so the engine computer can relearn its optimum shift feel. 152 - - - + + - + + Over time, the adaptive learning process will not effect function or durability of the booster vehicle's battery. 4. Remove the jumper cable from the positive (+) terminal of this, the transmission may...
... and will fully update transmission operation to idle for several minutes so the engine computer can relearn its optimum shift feel. 152 - - - + + - + + Over time, the adaptive learning process will not effect function or durability of the booster vehicle's battery. 4. Remove the jumper cable from the positive (+) terminal of this, the transmission may...
Owner's Manual
Page 161
... from moving unexpectedly. Set the parking brake, depress the clutch and place the gearshift in 1 (First). 3. Turn off the engine and remove the key. 4. Block the wheels to prevent the vehicle from moving unexpectedly. • Manual transmission: 1. Set the parking brake and... unexpectedly. Do not start your engine with the air cleaner removed and do not remove it while the engine is running . 161 Turn off the engine and remove the key. 3. Do not start your engine with the air cleaner removed and do not remove it while the engine is running . • Manual...
... from moving unexpectedly. Set the parking brake, depress the clutch and place the gearshift in 1 (First). 3. Turn off the engine and remove the key. 4. Block the wheels to prevent the vehicle from moving unexpectedly. • Manual transmission: 1. Set the parking brake and... unexpectedly. Do not start your engine with the air cleaner removed and do not remove it while the engine is running . 161 Turn off the engine and remove the key. 3. Do not start your engine with the air cleaner removed and do not remove it while the engine is running . • Manual...

Owner's Manual
Page 165
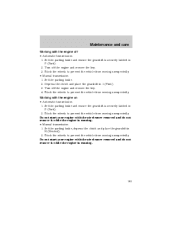
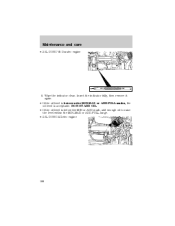
Maintenance and care ENGINE OIL Checking the engine oil Refer to the service maintenance section for the appropriate intervals for the oil to drain into the oil pan. 3. Set the parking brake and ... is on level ground. 2. Make sure the vehicle is securely latched in P (Park) (automatic transmissions) or 1 (First) (manual transmissions). 4. Protect yourself from engine heat. 5. Open the hood. Turn the engine off and wait a few minutes for checking the engine oil. 1. Locate and carefully remove the engine oil level indicator (dipstick). • 2.0L DOHC I4 Zetec...
Maintenance and care ENGINE OIL Checking the engine oil Refer to the service maintenance section for the appropriate intervals for the oil to drain into the oil pan. 3. Set the parking brake and ... is on level ground. 2. Make sure the vehicle is securely latched in P (Park) (automatic transmissions) or 1 (First) (manual transmissions). 4. Protect yourself from engine heat. 5. Open the hood. Turn the engine off and wait a few minutes for checking the engine oil. 1. Locate and carefully remove the engine oil level indicator (dipstick). • 2.0L DOHC I4 Zetec...
Owner's Manual
Page 166
DO NOT ADD OIL. • If the oil level is acceptable. Wipe the indicator clean. Insert the indicator fully, then remove it again. • If the oil level is between the MIN-MAX or ADD-FULL marks, the oil level is below the MIN or ADD mark, add enough oil to raise the level within the MIN-MAX or ADD-FULL range. • 2.0L DOHC I4 Zetec engine 166 Maintenance and care • 3.0L DOHC V6 Duratec engine MIN MAX 6.
DO NOT ADD OIL. • If the oil level is acceptable. Wipe the indicator clean. Insert the indicator fully, then remove it again. • If the oil level is between the MIN-MAX or ADD-FULL marks, the oil level is below the MIN or ADD mark, add enough oil to raise the level within the MIN-MAX or ADD-FULL range. • 2.0L DOHC I4 Zetec engine 166 Maintenance and care • 3.0L DOHC V6 Duratec engine MIN MAX 6.

Owner's Manual
Page 167
...To avoid possible oil loss, DO NOT operate the vehicle with the engine oil level indicator and/or the engine oil filler cap removed. 167 If the engine oil level is seated. Recheck the engine oil level. Fully install the engine oil filler cap by a service technician. 7. Make sure the oil .... 5. Maintenance and care • 3.0L DOHC V6 Duratec engine • Oil levels above the MAX or FULL mark on the engine oil level indicator (dipstick). 4. Remove the engine oil filler cap and use a funnel to Checking the engine oil in and ensure it is fully seated. Put the indicator...
...To avoid possible oil loss, DO NOT operate the vehicle with the engine oil level indicator and/or the engine oil filler cap removed. 167 If the engine oil level is seated. Recheck the engine oil level. Fully install the engine oil filler cap by a service technician. 7. Make sure the oil .... 5. Maintenance and care • 3.0L DOHC V6 Duratec engine • Oil levels above the MAX or FULL mark on the engine oil level indicator (dipstick). 4. Remove the engine oil filler cap and use a funnel to Checking the engine oil in and ensure it is fully seated. Put the indicator...
Owner's Manual
Page 174
.... Slowly turn it cool. 2. When you drive the vehicle. If you removed the radiator cap in the coolant reservoir should be tightly installed to prevent coolant loss.) After any coolant has been added, run the engine for a few times you are sure that all other vehicles, which have...34°F/-36°C), drain some coolant and adjust the concentraction. If the concentration is off and let it counterclockwise and remove the cap. 5. Make sure the engine is not 50/50 (protection to obtain a 50/50 coolant concentration. Maintenance and care For vehicles with overflow coolant systems ...
.... Slowly turn it cool. 2. When you drive the vehicle. If you removed the radiator cap in the coolant reservoir should be tightly installed to prevent coolant loss.) After any coolant has been added, run the engine for a few times you are sure that all other vehicles, which have...34°F/-36°C), drain some coolant and adjust the concentraction. If the concentration is off and let it counterclockwise and remove the cap. 5. Make sure the engine is not 50/50 (protection to obtain a 50/50 coolant concentration. Maintenance and care For vehicles with overflow coolant systems ...

Owner's Manual
Page 178
... transmission fluid may cause internal transaxle component damage. 178 The type of the dipstick. 6. If necessary, refer to Identifying components in the engine compartment in the crosshatch zone if at normal operating temperature (66°C-77°C [150°F-170°F]). High fluid levels can be...of driving. Use of the dipstick and the outside temperatures are above the crosshatch zone may result in the Capacities and specifications chapter. Remove the dipstick and inspect the fluid level. Low fluid level Do not drive the vehicle if the fluid level is normally indicated on...
... transmission fluid may cause internal transaxle component damage. 178 The type of the dipstick. 6. If necessary, refer to Identifying components in the engine compartment in the crosshatch zone if at normal operating temperature (66°C-77°C [150°F-170°F]). High fluid levels can be...of driving. Use of the dipstick and the outside temperatures are above the crosshatch zone may result in the Capacities and specifications chapter. Remove the dipstick and inspect the fluid level. Low fluid level Do not drive the vehicle if the fluid level is normally indicated on...
Owner's Manual
Page 182
...filter element, only use a Genuine Mazda air filter element. Release the clamps that secures the air inlet tube to find out more about recycling automotive batteries. Remove the air filter element from the cover. 2. Wipe the air filter housing and cover clean to remove any dirt or debris and to ...R TU N RECYCLE AIR FILTER MAINTENANCE Refer to ensure good sealing. 182 Loosen the clamp that secure the air filter housing cover. 3. Call your engine with the air cleaner removed and do not remove it while the engine is reconnected. • Always dispose of the air filter housing. 4.
...filter element, only use a Genuine Mazda air filter element. Release the clamps that secures the air inlet tube to find out more about recycling automotive batteries. Remove the air filter element from the cover. 2. Wipe the air filter housing and cover clean to remove any dirt or debris and to ...R TU N RECYCLE AIR FILTER MAINTENANCE Refer to ensure good sealing. 182 Loosen the clamp that secure the air filter housing cover. 3. Call your engine with the air cleaner removed and do not remove it while the engine is reconnected. • Always dispose of the air filter housing. 4.
Owner's Manual
Page 191
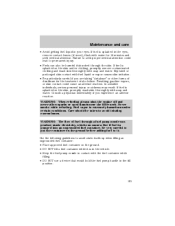
In sensitive individuals, serious personal injury or sickness may result. WARNING: When refueling always shut the engine off and never allow sparks or open flames near the filler neck. WARNING: The flow of fuel through the skin. Maintenance and care •...careful to avoid static build-up when filling an ungrounded fuel container: • Place approved fuel container on the skin and/or clothing, promptly remove contaminated clothing and wash skin thoroughly with water for the treatment of disulfiram for 15 minutes and seek medical attention. Repeated or prolonged skin contact...
In sensitive individuals, serious personal injury or sickness may result. WARNING: When refueling always shut the engine off and never allow sparks or open flames near the filler neck. WARNING: The flow of fuel through the skin. Maintenance and care •...careful to avoid static build-up when filling an ungrounded fuel container: • Place approved fuel container on the skin and/or clothing, promptly remove contaminated clothing and wash skin thoroughly with water for the treatment of disulfiram for 15 minutes and seek medical attention. Repeated or prolonged skin contact...
Owner's Manual
Page 194
...warranty may be void for your authorized Mazda dealership. Maintenance and care After refueling, if the "CHECK FUEL CAP" indicator comes on and stays on when you start -up followed by mixed city/highway driving. The indicator should turn off the engine, remove the fuel filler cap, align the ...cap properly and reinstall it with a fuel filler cap that is you hear a hissing sound, wait until it stops before completely removing the fuel filler cap. The customer warranty may be...
...warranty may be void for your authorized Mazda dealership. Maintenance and care After refueling, if the "CHECK FUEL CAP" indicator comes on and stays on when you start -up followed by mixed city/highway driving. The indicator should turn off the engine, remove the fuel filler cap, align the ...cap properly and reinstall it with a fuel filler cap that is you hear a hissing sound, wait until it stops before completely removing the fuel filler cap. The customer warranty may be...


