Four Wheeling Supplement 1st Printing
Page 9
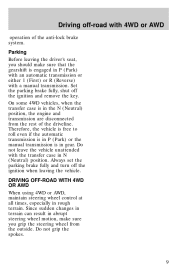
.... DRIVING OFF-ROAD WITH 4WD OR AWD When using 4WD or AWD, maintain steering wheel control at all times, especially in the N (Neutral) position, the engine and transmission are disconnected from the outside. Do not grip the spokes. 9 Parking Before leaving the driver's seat, you grip the steering wheel from the... if the automatic transmission is in P (Park) or the manual transmission is in rough terrain. Set the parking brake fully, shut off the ignition and remove the key.
.... DRIVING OFF-ROAD WITH 4WD OR AWD When using 4WD or AWD, maintain steering wheel control at all times, especially in the N (Neutral) position, the engine and transmission are disconnected from the outside. Do not grip the spokes. 9 Parking Before leaving the driver's seat, you grip the steering wheel from the... if the automatic transmission is in P (Park) or the manual transmission is in rough terrain. Set the parking brake fully, shut off the ignition and remove the key.
Owner Guide 1st Printing
Page 14
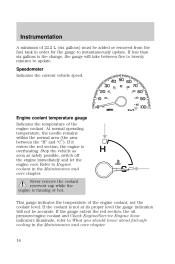
...within the normal area (the area between five to twenty minutes to Engine coolant in the Maintenance and care chapter. 14 If it enters the red section, the engine is running or hot. Never remove the coolant reservoir cap while the engine is overheating. Instrumentation A minimum of 22.2 L (six gallons) ...the vehicle as soon as safely possible, switch off the engine immediately and let the engine cool. H C This gauge indicates the temperature of the engine coolant. If the coolant is the change, the gauge will not be added or removed from the fuel tank in order for the gauge to ...
...within the normal area (the area between five to twenty minutes to Engine coolant in the Maintenance and care chapter. 14 If it enters the red section, the engine is running or hot. Never remove the coolant reservoir cap while the engine is overheating. Instrumentation A minimum of 22.2 L (six gallons) ...the vehicle as soon as safely possible, switch off the engine immediately and let the engine cool. H C This gauge indicates the temperature of the engine coolant. If the coolant is the change, the gauge will not be added or removed from the fuel tank in order for the gauge to ...

Owner Guide 1st Printing
Page 53
... automatic transmission gearshift lever and allows key removal. 1 3. Warning lights illuminated. ON, all accessories without locking the steering wheel. 4. Release the key as soon as the radio to activate the right turn signal. • Push up to 3 operate while the engine is not 5 running. 2. ACCESSORY, ...allows the electrical 4 accessories such as the engine starts. TURN SIGNAL CONTROL • Push down to activate the left turn signal. 53 Controls ...
... automatic transmission gearshift lever and allows key removal. 1 3. Warning lights illuminated. ON, all accessories without locking the steering wheel. 4. Release the key as soon as the radio to activate the right turn signal. • Push up to 3 operate while the engine is not 5 running. 2. ACCESSORY, ...allows the electrical 4 accessories such as the engine starts. TURN SIGNAL CONTROL • Push down to activate the left turn signal. 53 Controls ...
Owner Guide 1st Printing
Page 79
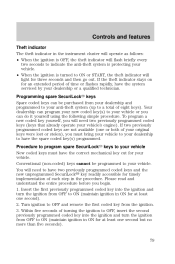
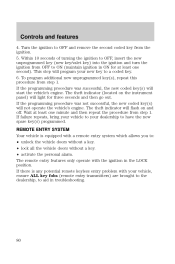
...(keys that already operate your vehicle. Your dealership can be programmed to have the system serviced by your vehicle. Turn ignition to OFF and remove the first coded key from OFF to your vehicle or you begin. 1. To program a new coded key yourself, you must have the spare... programmed coded keys and the new unprogrammed SecuriLock key readily accessible for an extended period of each step in ON for your vehicle's engine). If two previously programmed coded keys are not available (one second). 2. Procedure to program spare SecuriLockி keys to your vehicle New...
...(keys that already operate your vehicle. Your dealership can be programmed to have the system serviced by your vehicle. Turn ignition to OFF and remove the first coded key from OFF to your vehicle or you begin. 1. To program a new coded key yourself, you must have the spare... programmed coded keys and the new unprogrammed SecuriLock key readily accessible for an extended period of each step in ON for your vehicle's engine). If two previously programmed coded keys are not available (one second). 2. Procedure to program spare SecuriLockி keys to your vehicle New...
Owner Guide 1st Printing
Page 80
... a key. • activate the personal alarm. If the programming procedure was successful, the new coded key(s) will not operate the vehicle's engine. Wait at least one minute and then repeat the procedure from OFF to ON (maintain ignition in ON for three seconds and then go out... procedure was not successful, the new coded key(s) will start the vehicle's engine. The remote entry features only operate with the ignition in troubleshooting. 80 Within 10 seconds of turning the ignition to OFF and remove the second coded key from step 1. The theft indicator (located on and off...
... a key. • activate the personal alarm. If the programming procedure was successful, the new coded key(s) will not operate the vehicle's engine. Wait at least one minute and then repeat the procedure from OFF to ON (maintain ignition in ON for three seconds and then go out... procedure was not successful, the new coded key(s) will start the vehicle's engine. The remote entry features only operate with the ignition in troubleshooting. 80 Within 10 seconds of turning the ignition to OFF and remove the second coded key from step 1. The theft indicator (located on and off...
Owner Guide 1st Printing
Page 139
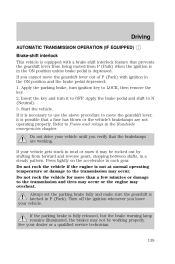
... lightly on the accelerator in the ON position and the brake pedal depressed: 1. Do not rock the vehicle if the engine is not at normal operating temperature or damage to LOCK, then remove the key. 2. Turn off the ignition whenever you verify that a fuse has blown or the vehicle's brakelamps are working...
... lightly on the accelerator in the ON position and the brake pedal depressed: 1. Do not rock the vehicle if the engine is not at normal operating temperature or damage to LOCK, then remove the key. 2. Turn off the ignition whenever you verify that a fuse has blown or the vehicle's brakelamps are working...
Owner Guide 1st Printing
Page 154
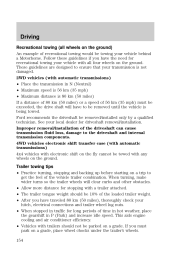
This aids engine cooling and air conditioner efficiency. • Vehicles with automatic transmissions) • Place the transmission in N (... on the fly cannot be towing your vehicle with a trailer attached. • The trailer tongue weight should not be removed until the vehicle is 80 km (50 miles) If a distance of 80 km (50 miles) or a speed of... 56 km (35 mph) must park on the ground. If you have the need for driveshaft removal/installation. See your local dealer for recreational towing your vehicle behind a Motorhome. When turning, make wider turns so the ...
This aids engine cooling and air conditioner efficiency. • Vehicles with automatic transmissions) • Place the transmission in N (... on the fly cannot be towing your vehicle with a trailer attached. • The trailer tongue weight should not be removed until the vehicle is 80 km (50 miles) If a distance of 80 km (50 miles) or a speed of... 56 km (35 mph) must park on the ground. If you have the need for driveshaft removal/installation. See your local dealer for recreational towing your vehicle behind a Motorhome. When turning, make wider turns so the ...
Owner Guide 1st Printing
Page 169
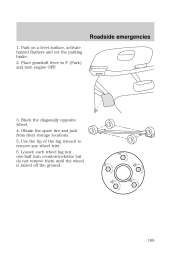
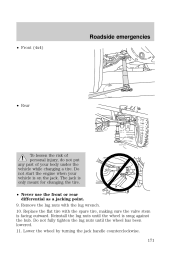
Park on a level surface, activate hazard flashers and set the parking brake. 2. Place gearshift lever in P (Park) and turn counterclockwise but do not remove them until the wheel is raised off the ground. 169 BRAKE HOOD 3. Loosen each wheel lug nut one-half turn engine OFF. Block the diagonally opposite wheel. 4. Obtain the spare tire and jack from their storage locations. 5. Use the tip of the lug wrench to remove any wheel trim. 6. Roadside emergencies 1.
Park on a level surface, activate hazard flashers and set the parking brake. 2. Place gearshift lever in P (Park) and turn counterclockwise but do not remove them until the wheel is raised off the ground. 169 BRAKE HOOD 3. Loosen each wheel lug nut one-half turn engine OFF. Block the diagonally opposite wheel. 4. Obtain the spare tire and jack from their storage locations. 5. Use the tip of the lug wrench to remove any wheel trim. 6. Roadside emergencies 1.
Owner Guide 1st Printing
Page 171
Lower the wheel by turning the jack handle counterclockwise. 171 Do not start the engine when your body under the vehicle while changing a tire. Replace the flat tire with the lug wrench. 10. Remove the lug nuts with the spare tire, making sure the valve stem is on the jack. Reinstall the lug...
Lower the wheel by turning the jack handle counterclockwise. 171 Do not start the engine when your body under the vehicle while changing a tire. Replace the flat tire with the lug wrench. 10. Remove the lug nuts with the spare tire, making sure the valve stem is on the jack. Reinstall the lug...
Owner Guide 1st Printing
Page 173
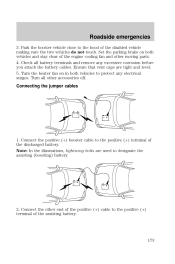
... heater fan on both vehicles to designate the assisting (boosting) battery. 2. Connect the positive (+) booster cable to the positive (+) terminal of the engine cooling fan and other end of the positive (+) cable to the hood of the assisting battery. - - - + - + + + 173 ...Connecting the jumper cables 1. Roadside emergencies 3. Note: In the illustrations, lightning bolts are tight and level. 5. Turn all battery terminals and remove any electrical surges. Set the parking brake on in both vehicles and stay clear of the discharged battery. Ensure that vent caps are used ...
... heater fan on both vehicles to designate the assisting (boosting) battery. 2. Connect the positive (+) booster cable to the positive (+) terminal of the engine cooling fan and other end of the positive (+) cable to the hood of the assisting battery. - - - + - + + + 173 ...Connecting the jumper cables 1. Roadside emergencies 3. Note: In the illustrations, lightning bolts are tight and level. 5. Turn all battery terminals and remove any electrical surges. Set the parking brake on in both vehicles and stay clear of the discharged battery. Ensure that vent caps are used ...
Owner Guide 1st Printing
Page 175
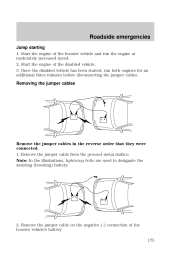
... an additional three minutes before disconnecting the jumper cables. Removing the jumper cables Remove the jumper cables in the reverse order that they were connected. 1. Remove the jumper cable from the ground metal surface. Start the engine of the booster vehicle's battery. 175 - - - - + + + + Start the engine of the disabled vehicle. 3. Roadside emergencies Jump starting 1. Once...
... an additional three minutes before disconnecting the jumper cables. Removing the jumper cables Remove the jumper cables in the reverse order that they were connected. 1. Remove the jumper cable from the ground metal surface. Start the engine of the booster vehicle's battery. 175 - - - - + + + + Start the engine of the disabled vehicle. 3. Roadside emergencies Jump starting 1. Once...
Owner Guide 1st Printing
Page 176
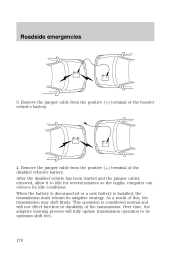
... a new battery is considered normal and will fully update transmission operation to idle for several minutes so the engine computer can relearn its adaptive strategy. Remove the jumper cable from the positive (+) terminal of the transmission. As a result of the disabled vehicle's ...This operation is installed, the transmission must relearn its idle conditions. Roadside emergencies 3. After the disabled vehicle has been started and the jumper cables removed, allow it to its optimum shift feel. 176 - - - + + - + + Over time, the adaptive learning process will not effect...
... a new battery is considered normal and will fully update transmission operation to idle for several minutes so the engine computer can relearn its adaptive strategy. Remove the jumper cable from the positive (+) terminal of the transmission. As a result of the disabled vehicle's ...This operation is installed, the transmission must relearn its idle conditions. Roadside emergencies 3. After the disabled vehicle has been started and the jumper cables removed, allow it to its optimum shift feel. 176 - - - + + - + + Over time, the adaptive learning process will not effect...
Owner Guide 1st Printing
Page 178
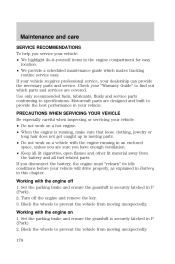
... WHEN SERVICING YOUR VEHICLE Be especially careful when inspecting or servicing your vehicle. • Do not work on 1. Working with the engine on a vehicle with the engine off the engine and remove the key. 3. Block the wheels to find out which makes tracking routine service easy. Maintenance and care SERVICE RECOMMENDATIONS To help you...
... WHEN SERVICING YOUR VEHICLE Be especially careful when inspecting or servicing your vehicle. • Do not work on 1. Working with the engine on a vehicle with the engine off the engine and remove the key. 3. Block the wheels to find out which makes tracking routine service easy. Maintenance and care SERVICE RECOMMENDATIONS To help you...
Owner Guide 1st Printing
Page 179
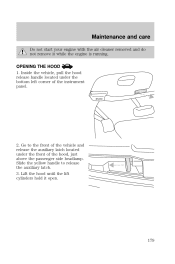
Go to release the auxiliary latch. 3. Maintenance and care Do not start your engine with the air cleaner removed and do not remove it open. 179 Slide the yellow handle to the front of the vehicle and release the auxiliary latch located under the bottom left corner of the hood, just above the passenger side headlamp. Lift the hood until the lift cylinders hold it while the engine is running. HOOD BRAKE 2. Inside the vehicle, pull the hood release handle located under the front of the instrument panel. OPENING THE HOOD 1.
Go to release the auxiliary latch. 3. Maintenance and care Do not start your engine with the air cleaner removed and do not remove it open. 179 Slide the yellow handle to the front of the vehicle and release the auxiliary latch located under the bottom left corner of the hood, just above the passenger side headlamp. Lift the hood until the lift cylinders hold it while the engine is running. HOOD BRAKE 2. Inside the vehicle, pull the hood release handle located under the front of the instrument panel. OPENING THE HOOD 1.
Owner Guide 1st Printing
Page 181
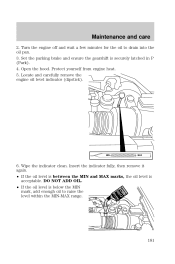
... Wipe the indicator clean. Turn the engine off and wait a few minutes for the oil to raise the level within the MIN-MAX range. 181 DO NOT ADD OIL. • If the oil level is securely latched in P (Park). 4. Insert the indicator fully, then remove it again. • If the oil... level is between the MIN and MAX marks, the oil level is acceptable. Maintenance and care 2. Locate and carefully remove the engine oil level indicator (dipstick).
... Wipe the indicator clean. Turn the engine off and wait a few minutes for the oil to raise the level within the MIN-MAX range. 181 DO NOT ADD OIL. • If the oil level is securely latched in P (Park). 4. Insert the indicator fully, then remove it again. • If the oil... level is between the MIN and MAX marks, the oil level is acceptable. Maintenance and care 2. Locate and carefully remove the engine oil level indicator (dipstick).
Owner Guide 1st Printing
Page 182
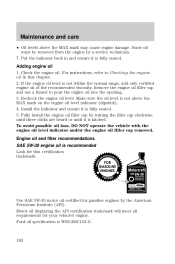
... filler cap clockwise until three clicks are heard or until it is latched. Adding engine oil 1. Remove the engine oil filler cap and use a funnel to Checking the engine oil in and ensure it is fully seated. Fully install the engine oil filler cap by a service technician. 7. Maintenance and care • Oil levels above the...
... filler cap clockwise until three clicks are heard or until it is latched. Adding engine oil 1. Remove the engine oil filler cap and use a funnel to Checking the engine oil in and ensure it is fully seated. Fully install the engine oil filler cap by a service technician. 7. Maintenance and care • Oil levels above the...
Owner Guide 1st Printing
Page 183
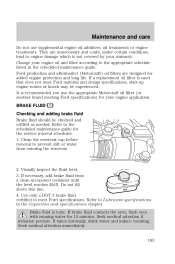
... guide for the service interval schedules. 1. If a replacement oil filter is recommended you use supplemental engine oil additives, oil treatments or engine treatments. Clean the reservoir cap before removal to meet Ford material and design specifications, start-up engine noises or knock may be checked and refilled as needed. Brake fluid is not covered...
... guide for the service interval schedules. 1. If a replacement oil filter is recommended you use supplemental engine oil additives, oil treatments or engine treatments. Clean the reservoir cap before removal to meet Ford material and design specifications, start-up engine noises or knock may be checked and refilled as needed. Brake fluid is not covered...

Owner Guide 1st Printing
Page 186
... severe personal injury. 186 To avoid scalding hot steam or coolant from being released from the engine cooling system, never remove the pressure relief cap from the engine coolant reservoir while the engine is low or empty, add engine coolant to the reservoir. Failure to follow this warning may void the warranty of coolant your...
... severe personal injury. 186 To avoid scalding hot steam or coolant from being released from the engine cooling system, never remove the pressure relief cap from the engine coolant reservoir while the engine is low or empty, add engine coolant to the reservoir. Failure to follow this warning may void the warranty of coolant your...

Owner Guide 1st Printing
Page 187
...liter (1.0 quart) of the engine coolant and may be added in the windshield washer fluid reservoir. Plain water may cause engine damage. When the engine is running or hot. When you must remove the pressure relief cap from the engine coolant reservoir while the engine is cool, wrap a thick... cloth around the cap. If engine coolant is at the "cold fill level...
...liter (1.0 quart) of the engine coolant and may be added in the windshield washer fluid reservoir. Plain water may cause engine damage. When the engine is running or hot. When you must remove the pressure relief cap from the engine coolant reservoir while the engine is cool, wrap a thick... cloth around the cap. If engine coolant is at the "cold fill level...
Owner Guide 1st Printing
Page 206
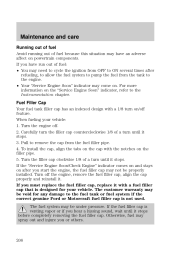
... that is designed for any damage to pump the fuel from the fuel filler pipe. 4. If you start the engine, the fuel filler cap may not be under pressure. Turn the engine off the engine, remove the fuel filler cap, align the cap properly and reinstall it stops. 3. Maintenance and care Running out of...
... that is designed for any damage to pump the fuel from the fuel filler pipe. 4. If you start the engine, the fuel filler cap may not be under pressure. Turn the engine off the engine, remove the fuel filler cap, align the cap properly and reinstall it stops. 3. Maintenance and care Running out of...


