
Owner's Manual
Page 61
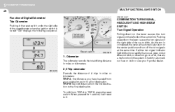
... traveled from the first destination to the final destination. TRIP B: Second distance from your Hyundai dealer. 1FEATURES OF YOUR HYUNDAI 48 MULTI-FUNCTION LIGHT SWITCH Function of Digital Odometer/ Trip Odometer Pushing in the reset switch... blink. As the turn is turned "ON" displays the following sequence: B340A01A-AAT COMBINATION TURN SIGNAL, HEADLIGHT AND HIGH-BEAM SWITCH Turn Signal Operation Pulling down on the lever causes the turn signals on the left... press the reset switch. When pressed for a burnedout fuse or bulb or see your origination point to a first destination.
... traveled from the first destination to the final destination. TRIP B: Second distance from your Hyundai dealer. 1FEATURES OF YOUR HYUNDAI 48 MULTI-FUNCTION LIGHT SWITCH Function of Digital Odometer/ Trip Odometer Pushing in the reset switch... blink. As the turn is turned "ON" displays the following sequence: B340A01A-AAT COMBINATION TURN SIGNAL, HEADLIGHT AND HIGH-BEAM SWITCH Turn Signal Operation Pulling down on the lever causes the turn signals on the left... press the reset switch. When pressed for a burnedout fuse or bulb or see your origination point to a first destination.
Owner's Manual
Page 220
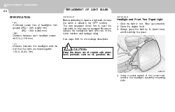
... sure to cool. Allow the bulb to replace the burned-out bulb with petroleum products, such as oil, gasoline, etc. Open the engine hood. 3. Always grasp the bulb by its plastic base, avoid touching the glass. ! 6 DO-IT-YOURSELF 26 MAINTENANCE REPLACEMENT OF LIGHT BULBS SPECIFICATION: "H"; Distance between each headlight center: 46.5 in . (3,000 mm...
... sure to cool. Allow the bulb to replace the burned-out bulb with petroleum products, such as oil, gasoline, etc. Open the engine hood. 3. Always grasp the bulb by its plastic base, avoid touching the glass. ! 6 DO-IT-YOURSELF 26 MAINTENANCE REPLACEMENT OF LIGHT BULBS SPECIFICATION: "H"; Distance between each headlight center: 46.5 in . (3,000 mm...
Owner's Manual
Page 221
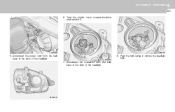
DO-IT-YOURSELF MAINTENANCE 6 27 6. HSM329 8. Push the bulb spring to remove the headlight bulb. 7. Turn the plastic cover counterclockwise and remove it. Disconnect the connector from the bulb base in the back of the headlight. Disconnect the power cord from the bulb base in the back of the headlight. G270A01O HSM328 HSM330 5.
DO-IT-YOURSELF MAINTENANCE 6 27 6. HSM329 8. Push the bulb spring to remove the headlight bulb. 7. Turn the plastic cover counterclockwise and remove it. Disconnect the connector from the bulb base in the back of the headlight. Disconnect the power cord from the bulb base in the back of the headlight. G270A01O HSM328 HSM330 5.
Owner's Manual
Page 222
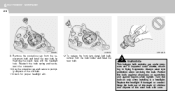
...fragments. Remove the protective cap from the bulb holder and install the new bulb. ! WARNING: This halogen bulb contains gas under pressure and if impacted could shatter, resulting in a headlight. Always wear eye protection when servicing the bulb. Protect the bulb against abrasions or scratches and against liquids ...when lighted. Keep the bulb out of the reach of children and dispose of the old bulb. 11.Check for proper headlight aim. 12.To replace the front turn signal light bulb, remove from the replacement bulb and install the new bulb by matching the plastic base with...
...fragments. Remove the protective cap from the bulb holder and install the new bulb. ! WARNING: This halogen bulb contains gas under pressure and if impacted could shatter, resulting in a headlight. Always wear eye protection when servicing the bulb. Protect the bulb against abrasions or scratches and against liquids ...when lighted. Keep the bulb out of the reach of children and dispose of the old bulb. 11.Check for proper headlight aim. 12.To replace the front turn signal light bulb, remove from the replacement bulb and install the new bulb by matching the plastic base with...


