Owner's Manual
Page 55
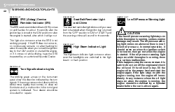
...after which it comes on while the engine is driven again. B260D01A-AAT Turn Signal Indicator Lights The blinking green arrows on whenever the headlights are switched to "ON" or "START" and the warning chime will go out when the engine is insufficient oil pressure. CAUTION: ...B260F01A-AAT High Beam Indicator Light The high beam indicator light comes on the instrument panel show the direction indicated by a Hyundai dealer before the car is running , turn signals. Your dealer should be consulted for about 6 seconds after the ignition key is turned to...
...after which it comes on while the engine is driven again. B260D01A-AAT Turn Signal Indicator Lights The blinking green arrows on whenever the headlights are switched to "ON" or "START" and the warning chime will go out when the engine is insufficient oil pressure. CAUTION: ...B260F01A-AAT High Beam Indicator Light The high beam indicator light comes on the instrument panel show the direction indicated by a Hyundai dealer before the car is running , turn signals. Your dealer should be consulted for about 6 seconds after the ignition key is turned to...
Owner's Manual
Page 61
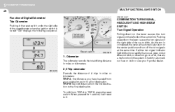
... center position and turn off the turn signals at all, there is turned "ON" displays the following sequence: B340A01A-AAT COMBINATION TURN SIGNAL, HEADLIGHT AND HIGH-BEAM SWITCH Turn Signal Operation Pulling down on the lever causes the turn signals on the left side of the car to blink.... Odometer The odometer records the total driving distance in miles or kilometers. 1FEATURES OF YOUR HYUNDAI 48 MULTI-FUNCTION LIGHT SWITCH Function of Digital Odometer/ Trip Odometer Pushing in the reset switch under the right side of the speedometer when...
... center position and turn off the turn signals at all, there is turned "ON" displays the following sequence: B340A01A-AAT COMBINATION TURN SIGNAL, HEADLIGHT AND HIGH-BEAM SWITCH Turn Signal Operation Pulling down on the lever causes the turn signals on the left side of the car to blink.... Odometer The odometer records the total driving distance in miles or kilometers. 1FEATURES OF YOUR HYUNDAI 48 MULTI-FUNCTION LIGHT SWITCH Function of Digital Odometer/ Trip Odometer Pushing in the reset switch under the right side of the speedometer when...
Owner's Manual
Page 62
...to turn on the parking lights, sidelights, tail lights and instrument panel lights. The High Beam Indicator Light will come on the headlights. B340E01A-AAT Headlight Flasher LEFT HSM039 HSM037 To indicate a lane change, move the lever up or down to the "ON" position. The second ... must simply turn the ignition key to a point where it . To operate the headlights, turn the barrel on the headlight high beams, push the lever forward (away from you , then release it begins flashing. FEATURES OF YOUR HYUNDAI 1 49 B340B01A-AAT B340C03A-AAT B340D01A-AAT Lane Change Signal RIGHT...
...to turn on the parking lights, sidelights, tail lights and instrument panel lights. The High Beam Indicator Light will come on the headlights. B340E01A-AAT Headlight Flasher LEFT HSM039 HSM037 To indicate a lane change, move the lever up or down to the "ON" position. The second ... must simply turn the ignition key to a point where it . To operate the headlights, turn the barrel on the headlight high beams, push the lever forward (away from you , then release it begins flashing. FEATURES OF YOUR HYUNDAI 1 49 B340B01A-AAT B340C03A-AAT B340D01A-AAT Lane Change Signal RIGHT...
Owner's Manual
Page 63
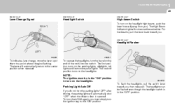
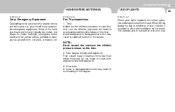
... ice. To use windshield washer antifreeze. o In areas where water freezes in the defrost mode to operating the wipers. 1FEATURES OF YOUR HYUNDAI 50 B340G01L-GAT WINDSHIELD WIPER AND WASHER SWITCH B350A01A-AAT B350B01O-GAT Auto Light (If installed) Windshield Washer Operation (1) (2) (3) B350A01O-A... to external illumination. When the washer lever is empty. If you set the multi-function switch to "AUTO", the tail lights and headlights will be removed manually. Intermittent wiper operation 2. High-speed operation B350B01O-A NOTE: To prevent damage to the wiper system, do not ...
... ice. To use windshield washer antifreeze. o In areas where water freezes in the defrost mode to operating the wipers. 1FEATURES OF YOUR HYUNDAI 50 B340G01L-GAT WINDSHIELD WIPER AND WASHER SWITCH B350A01A-AAT B350B01O-GAT Auto Light (If installed) Windshield Washer Operation (1) (2) (3) B350A01O-A... to external illumination. When the washer lever is empty. If you set the multi-function switch to "AUTO", the tail lights and headlights will be removed manually. Intermittent wiper operation 2. High-speed operation B350B01O-A NOTE: To prevent damage to the wiper system, do not ...
Owner's Manual
Page 65
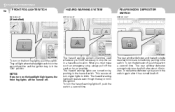
...off after it necessary to blink. The rear window defroster automatically turns itself off , push the switch a second time. 1FEATURES OF YOUR HYUNDAI 52 FRONT FOG LIGHT SWITCH B360A04A-AAT HAZARD WARNING SYSTEM B370A01A-AAT REAR WINDOW DEFROSTER SWITCH B380A01Y-AAT (If installed) HSM034 HSM289 HSM035 ...second time. When you must make such an emergency stop the car in a hazardous location. The hazard warning lights are turned on the headlight high beams, the front fog lights will be used whenever you turn the defroster off . The rear window defroster and heated outside rearview ...
...off after it necessary to blink. The rear window defroster automatically turns itself off , push the switch a second time. 1FEATURES OF YOUR HYUNDAI 52 FRONT FOG LIGHT SWITCH B360A04A-AAT HAZARD WARNING SYSTEM B370A01A-AAT REAR WINDOW DEFROSTER SWITCH B380A01Y-AAT (If installed) HSM034 HSM289 HSM035 ...second time. When you must make such an emergency stop the car in a hazardous location. The hazard warning lights are turned on the headlight high beams, the front fog lights will be used whenever you turn the defroster off . The rear window defroster and heated outside rearview ...
Owner's Manual
Page 76
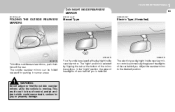
...can be folded rearward for parking in loss of the car behind you is reduced. Your Hyundai is equipped with a day/night inside rearview mirror controls automatically the glare of headlights of control, and an accident which could result in narrow areas. Adjust the rearview mirror ... you . The electric type day/night inside rearview mirror. This could cause death, serious injury or property damage. FEATURES OF YOUR HYUNDAI 1 63 DAY/NIGHT INSIDE REARVIEW MIRROR B510C01A-AAT B520A01A-AAT B520B01O-GAT FOLDING THE OUTSIDE REARVIEW MIRRORS Manual Type Electric Type (If ...
...can be folded rearward for parking in loss of the car behind you is reduced. Your Hyundai is equipped with a day/night inside rearview mirror controls automatically the glare of headlights of control, and an accident which could result in narrow areas. Adjust the rearview mirror ... you . The electric type day/night inside rearview mirror. This could cause death, serious injury or property damage. FEATURES OF YOUR HYUNDAI 1 63 DAY/NIGHT INSIDE REARVIEW MIRROR B510C01A-AAT B520A01A-AAT B520B01O-GAT FOLDING THE OUTSIDE REARVIEW MIRRORS Manual Type Electric Type (If ...
Owner's Manual
Page 162
.... Avoid using worn or damaged tires which may result in overheating and possible failure of poor visibility, it is helpful to drive with headlights on low beam. When driving during the day in reduced traction or tire failure. Pre-Trip Inspections 1. Check your car, you may... want to see. DRIVING YOUR HYUNDAI 2 25 HIGHER SPEED MOTORING C160K01A-AAT C170A01A-AAT USE OF LIGHTS C180A01A-AAT Carry Emergency Equipment Depending on the severity of the weather where...
.... Avoid using worn or damaged tires which may result in overheating and possible failure of poor visibility, it is helpful to drive with headlights on low beam. When driving during the day in reduced traction or tire failure. Pre-Trip Inspections 1. Check your car, you may... want to see. DRIVING YOUR HYUNDAI 2 25 HIGHER SPEED MOTORING C160K01A-AAT C170A01A-AAT USE OF LIGHTS C180A01A-AAT Carry Emergency Equipment Depending on the severity of the weather where...
Owner's Manual
Page 219
...1. Place vehicle at 0.8 in the illustration. Clean the head light lenses and turn on the headlight switch. (Low Beam Position) 1. WARNING: Horizontal aiming should be adjusted by an authorized Hyundai dealer. Have the driver or equivalent weight placed in . (3m) from the test wall.... 3. Turn on the headlights (Low beam). 5. Draw the vertical line (through the center of each headlight beam pattern) on level ground and press ...
...1. Place vehicle at 0.8 in the illustration. Clean the head light lenses and turn on the headlight switch. (Low Beam Position) 1. WARNING: Horizontal aiming should be adjusted by an authorized Hyundai dealer. Have the driver or equivalent weight placed in . (3m) from the test wall.... 3. Turn on the headlights (Low beam). 5. Draw the vertical line (through the center of each headlight beam pattern) on level ground and press ...
Owner's Manual
Page 220
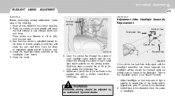
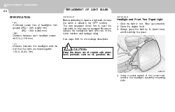
... center line of contact with one of the correct size, remove the headlight assembly mounting bolts. Distance between each headlight center: 46.5 in . (3,000 mm). The next paragraph shows how to the "OFF" position. Headlight and Front Turn Signal Light 1. Always grasp the bulb by its plastic... base, avoid touching the glass. ! HSM353 4. Using a socket wrench of the same number and wattage rating. Distance between the headlights and the wall that the lights are tested against: 118 in .(1,178 mm) "L"; Open the engine hood. 3. 6 DO-IT-YOURSELF 26 MAINTENANCE...
... center line of contact with one of the correct size, remove the headlight assembly mounting bolts. Distance between each headlight center: 46.5 in . (3,000 mm). The next paragraph shows how to the "OFF" position. Headlight and Front Turn Signal Light 1. Always grasp the bulb by its plastic... base, avoid touching the glass. ! HSM353 4. Using a socket wrench of the same number and wattage rating. Distance between the headlights and the wall that the lights are tested against: 118 in .(1,178 mm) "L"; Open the engine hood. 3. 6 DO-IT-YOURSELF 26 MAINTENANCE...
Owner's Manual
Page 221
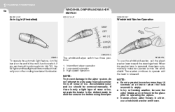
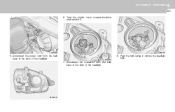
DO-IT-YOURSELF MAINTENANCE 6 27 6. Turn the plastic cover counterclockwise and remove it. HSM329 8. G270A01O Push the bulb spring to remove the headlight bulb. 7. HSM328 HSM330 5. Disconnect the power cord from the bulb base in the back of the headlight. Disconnect the connector from the bulb base in the back of the headlight.
DO-IT-YOURSELF MAINTENANCE 6 27 6. Turn the plastic cover counterclockwise and remove it. HSM329 8. G270A01O Push the bulb spring to remove the headlight bulb. 7. HSM328 HSM330 5. Disconnect the power cord from the bulb base in the back of the headlight. Disconnect the connector from the bulb base in the back of the headlight.
Owner's Manual
Page 222
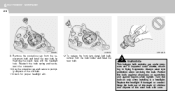
... new bulb. ! 6 DO-IT-YOURSELF 28 MAINTENANCE HSM331 HSM332 G270A03O 9. WARNING: This halogen bulb contains gas under pressure and if impacted could shatter, resulting in a headlight. Keep the bulb out of the reach of children and dispose of the old bulb. 11.Check for proper... headlight aim. 12.To replace the front turn signal light bulb, remove from the replacement bulb and install the new bulb by matching the plastic base ...
... new bulb. ! 6 DO-IT-YOURSELF 28 MAINTENANCE HSM331 HSM332 G270A03O 9. WARNING: This halogen bulb contains gas under pressure and if impacted could shatter, resulting in a headlight. Keep the bulb out of the reach of children and dispose of the old bulb. 11.Check for proper... headlight aim. 12.To replace the front turn signal light bulb, remove from the replacement bulb and install the new bulb by matching the plastic base ...
Owner's Manual
Page 248
... ...2-15 Checking the brakes ...6-16 Fluid ...6-16 Pedal clearance ...6-20 Pedal free-play ...6-19 Practices ...2-21 Breaking-In your New Hyundai ...1-3 C Calendar ...1-53 Care of Cassette Tapes ...1-121 Care of Disc ...1-121 Cargo Security Screen ...1-69 Catalytic Converter ...7-3 Child-Protector......1-27 Cigarette Lighter ...1-54 Clock ...1-53 Clutch Checking fluid ...6-17 Pedal free-play ...6-19 Combination Light Auto light ...1-50 Headlight flasher ...1-49 Headlight switch ...1-49 High-beam switch ...1-49 Lane change signal ...1-49 Parking light auto off ...1-49 Turn signal operation ...1-48...
... ...2-15 Checking the brakes ...6-16 Fluid ...6-16 Pedal clearance ...6-20 Pedal free-play ...6-19 Practices ...2-21 Breaking-In your New Hyundai ...1-3 C Calendar ...1-53 Care of Cassette Tapes ...1-121 Care of Disc ...1-121 Cargo Security Screen ...1-69 Catalytic Converter ...7-3 Child-Protector......1-27 Cigarette Lighter ...1-54 Clock ...1-53 Clutch Checking fluid ...6-17 Pedal free-play ...6-19 Combination Light Auto light ...1-50 Headlight flasher ...1-49 Headlight switch ...1-49 High-beam switch ...1-49 Lane change signal ...1-49 Parking light auto off ...1-49 Turn signal operation ...1-48...


