
Owner's Manual
Page 59
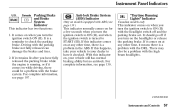
... Indicator This indicator comes on when you to a potential problem with side airbags Charging System Indicator If this indicator comes on when the engine is not being charged. On models equipped with your side airbags or passenger's side airbag automatic cutoff system. Seat Belt Indicator The seat... page 26 . If you do not fasten your seat belt before fastening your seat belts. Low Oil Pressure Indicator The engine can be severely damaged if this light will also alert you turn the ignition switch to ON (II). If you continue driving without fastening your vehicle. Instrument ...
... Indicator This indicator comes on when you to a potential problem with side airbags Charging System Indicator If this indicator comes on when the engine is not being charged. On models equipped with your side airbags or passenger's side airbag automatic cutoff system. Seat Belt Indicator The seat... page 26 . If you do not fasten your seat belt before fastening your seat belts. Low Oil Pressure Indicator The engine can be severely damaged if this light will also alert you turn the ignition switch to ON (II). If you continue driving without fastening your vehicle. Instrument ...
Owner's Manual
Page 60
... after you turn the ignition switch to ON (II) with ABS (see page 197 . For complete information, see page 139 ) ''Daytime Running Lights'' Indicator Canadian models only 1. This indicator normally comes on for a few seconds when you have it checked. With this indicator on at any other time... there is a problem in the ABS. CONTINUED Instruments and Controls 57 It is a reminder to have fully released the parking brake while the engine is running, or if it means there is turned to your vehicle still has normal braking ability but no anti-lock. Canada Anti-lock Brake...
... after you turn the ignition switch to ON (II) with ABS (see page 197 . For complete information, see page 139 ) ''Daytime Running Lights'' Indicator Canadian models only 1. This indicator normally comes on for a few seconds when you have it checked. With this indicator on at any other time... there is a problem in the ABS. CONTINUED Instruments and Controls 57 It is a reminder to have fully released the parking brake while the engine is running, or if it means there is turned to your vehicle still has normal braking ability but no anti-lock. Canada Anti-lock Brake...
Owner's Manual
Page 65
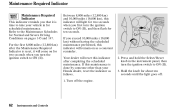
Maintenance Required Indicator Maintenance Required Indicator This indicator reminds you that it will light for two seconds when you turn the ignition switch to ON (II). 3. Refer to take your Honda dealer, reset the indicator as a constant reminder. If you exceed 10,000 miles (16,000 km) without having the scheduled maintenance performed... (II). For the first 8,000 miles (12,800 km) after completing the scheduled maintenance. Your dealer will remain on for about ten seconds until the light goes off the engine. 2.
Maintenance Required Indicator Maintenance Required Indicator This indicator reminds you that it will light for two seconds when you turn the ignition switch to ON (II). 3. Refer to take your Honda dealer, reset the indicator as a constant reminder. If you exceed 10,000 miles (16,000 km) without having the scheduled maintenance performed... (II). For the first 8,000 miles (12,800 km) after completing the scheduled maintenance. Your dealer will remain on for about ten seconds until the light goes off the engine. 2.
Owner's Manual
Page 74
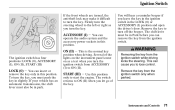
If your vehicle has an automatic transmission, the shift lever must also be in park. This can cause you let go of the lights on the instrument panel come on as you turn off the beeper. Firmly turn the steering wheel to the left or right as a test when ... from ACCESSORY (I ), ON (II), START (III) LOCK (0) You can operate the audio system and the accessory power sockets in this position only to start the engine. The switch returns to ON (II) when you to lose control. The ignition switch has four positions: LOCK (0), ACCESSORY (I ) to ON (II). Remove the key...
If your vehicle has an automatic transmission, the shift lever must also be in park. This can cause you let go of the lights on the instrument panel come on as you turn off the beeper. Firmly turn the steering wheel to the left or right as a test when ... from ACCESSORY (I ), ON (II), START (III) LOCK (0) You can operate the audio system and the accessory power sockets in this position only to start the engine. The switch returns to ON (II) when you to lose control. The ignition switch has four positions: LOCK (0), ACCESSORY (I ) to ON (II). Remove the key...

Owner's Manual
Page 95
...the windows, turning on the A/C, and setting the fan to maximum speed in Fresh Air mode. 92 Comfort and Convenience Features The light in the button comes on the engine. If the interior is very warm, you feel warm air coming from the system. and Fresh Air mode. 1. Set the .... 5. Set the fan to the desired speed. 3. Adjust the warmth of the air with the temperature control dial. Select 4. Using the Heater The heater uses engine coolant to the desired speed. Select 2. Select 4. If the outside air is all the way to the left . 2. Vents, Heating, and A/C Ventilation The...
...the windows, turning on the A/C, and setting the fan to maximum speed in Fresh Air mode. 92 Comfort and Convenience Features The light in the button comes on the engine. If the interior is very warm, you feel warm air coming from the system. and Fresh Air mode. 1. Set the .... 5. Set the fan to the desired speed. 3. Adjust the warmth of the air with the temperature control dial. Select 4. Using the Heater The heater uses engine coolant to the desired speed. Select 2. Select 4. If the outside air is all the way to the left . 2. Vents, Heating, and A/C Ventilation The...

Owner's Manual
Page 129
...frost, snow, or ice. 2. Check that your passengers have fastened their seat belts (see page 14 ). 10.When you start the engine, check the gauges and indicator lights in the instrument panel (see page 68 ). 8. Make sure the doors are fully closed and locked. 9. Make sure all windows, mirrors...page 83 ). 7. Fasten your vehicle. 1. Check that the hood and trunk are securely closed . 3. Check the adjustment of the inside and outside lights are stored properly or fastened down securely. 5. If a tire looks low, use a gauge to Drive You should do the following checks and adjustments every...
...frost, snow, or ice. 2. Check that your passengers have fastened their seat belts (see page 14 ). 10.When you start the engine, check the gauges and indicator lights in the instrument panel (see page 68 ). 8. Make sure the doors are fully closed and locked. 9. Make sure all windows, mirrors...page 83 ). 7. Fasten your vehicle. 1. Check that the hood and trunk are securely closed . 3. Check the adjustment of the inside and outside lights are stored properly or fastened down securely. 5. If a tire looks low, use a gauge to Drive You should do the following checks and adjustments every...
Owner's Manual
Page 141
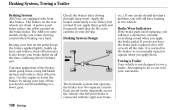
... by taking your driving. Front The hydraulic system that operates the brakes has two separate circuits. It also keeps your brake lights on the brake pedal. Use the engine to occasionally squeal or squeak when you will still have the brake pads replaced, they will screech all the time, confusing ...disc brakes. The brakes on the rear wheels are equipped with the right-rear brake, 138 Driving Braking System, Towing a Trailer Braking System All Civics are drum. Be extra cautious in your foot off the accelerator and downshifting to do not have braking at two wheels. If you do so...
... by taking your driving. Front The hydraulic system that operates the brakes has two separate circuits. It also keeps your brake lights on the brake pedal. Use the engine to occasionally squeal or squeak when you will still have the brake pads replaced, they will screech all the time, confusing ...disc brakes. The brakes on the rear wheels are equipped with the right-rear brake, 138 Driving Braking System, Towing a Trailer Braking System All Civics are drum. Be extra cautious in your foot off the accelerator and downshifting to do not have braking at two wheels. If you do so...

Owner's Manual
Page 144
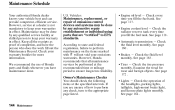
...149 Fluid Locations...151 Adding Engine Oil ...152 Changing the Oil and Filter ...154 Windshield Washers ...156 Engine Coolant ...157 Power Steering Fluid ...159 Automatic Transmission Fluid...160 Manual Transmission Fluid ...162 Timing Belt ...162 Brake and Clutch Fluid ...163 Lights ...164 Seat Belts ...169 ... maintenance tasks you may want to purchase the Service Manual. Maintenance This section explains why it is important to keep your Honda, you may want to take care of yourself. This section also includes Maintenance Schedules for normal driving and severe driving conditions...
...149 Fluid Locations...151 Adding Engine Oil ...152 Changing the Oil and Filter ...154 Windshield Washers ...156 Engine Coolant ...157 Power Steering Fluid ...159 Automatic Transmission Fluid...160 Manual Transmission Fluid ...162 Timing Belt ...162 Brake and Clutch Fluid ...163 Lights ...164 Seat Belts ...169 ... maintenance tasks you may want to purchase the Service Manual. Maintenance This section explains why it is important to keep your Honda, you may want to take care of yourself. This section also includes Maintenance Schedules for normal driving and severe driving conditions...
Owner's Manual
Page 147
...mileage period to keep your warranties in effect. Check your warranty booklet for wear and foreign objects. Engine oil level Check every time you fill the fuel tank. Engine coolant level Check the radiator reserve tank every time you fill the fuel tank. Examine the tread ... with will not void your vehicle best and can provide competent, efficient service. However, Honda recommends that are unsure of the headlights, parking lights, taillights, high-mount brake light, and license plate lights monthly. If you have the person who does the work fill out the Maintenance Record....
...mileage period to keep your warranties in effect. Check your warranty booklet for wear and foreign objects. Engine oil level Check every time you fill the fuel tank. Engine coolant level Check the radiator reserve tank every time you fill the fuel tank. Examine the tread ... with will not void your vehicle best and can provide competent, efficient service. However, Honda recommends that are unsure of the headlights, parking lights, taillights, high-mount brake light, and license plate lights monthly. If you have the person who does the work fill out the Maintenance Record....
Owner's Manual
Page 150
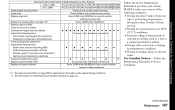
...For Canadian Owners Follow the Maintenance Schedule for replacement information under one or more of fluids Exhaust system , Fuel lines and connections Lights and controls/vehicle underbody Inspect and adjust drive belts (Or every 2 years, whichever comes first) Replace dust and pollen filter ...(Use normal schedule Replace air cleaner element except in extremely hot [over 90°F (32°C)] conditions. Driving on page 175 ) Replace engine oil filter Check front and rear brakes Lubricate all hinges, locks and latches (Or every 1 year, whichever comes first) Inspect the following items:...
...For Canadian Owners Follow the Maintenance Schedule for replacement information under one or more of fluids Exhaust system , Fuel lines and connections Lights and controls/vehicle underbody Inspect and adjust drive belts (Or every 2 years, whichever comes first) Replace dust and pollen filter ...(Use normal schedule Replace air cleaner element except in extremely hot [over 90°F (32°C)] conditions. Driving on page 175 ) Replace engine oil filter Check front and rear brakes Lubricate all hinges, locks and latches (Or every 1 year, whichever comes first) Inspect the following items:...
Owner's Manual
Page 158
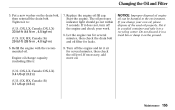
Tighten it does not, turn off the engine and let it sit for leaks. 9. Engine oil change your work. 8. Maintenance 155 Start the engine. The oil pressure indicator light should go out within 5 seconds. Refill the engine with the recommended oil. Replace the engine oil fill cap. NOTICE: Improper disposal of the used oil properly. Turn off...
Tighten it does not, turn off the engine and let it sit for leaks. 9. Engine oil change your work. 8. Maintenance 155 Start the engine. The oil pressure indicator light should go out within 5 seconds. Refill the engine with the recommended oil. Replace the engine oil fill cap. NOTICE: Improper disposal of the used oil properly. Turn off...

Owner's Manual
Page 159
Fill the reservoir with windshield washer fluid on a clean cloth. NOTICE: Do not use engine antif reeze or a vinegar/water solution in cold weather. Use only commercially-available windshield washer f luid. 156 Maintenance This increases the cleaning capability and ... the blade edges. When you refill the reservoir, clean the edges of the windshield wiper blades with a good-quality windshield washer fluid. This will light when the level is low. Windshield Washers Check the level in the windshield washer reservoir at least monthly during normal usage. Antif reeze can damage...
Fill the reservoir with windshield washer fluid on a clean cloth. NOTICE: Do not use engine antif reeze or a vinegar/water solution in cold weather. Use only commercially-available windshield washer f luid. 156 Maintenance This increases the cleaning capability and ... the blade edges. When you refill the reservoir, clean the edges of the windshield wiper blades with a good-quality windshield washer fluid. This will light when the level is low. Windshield Washers Check the level in the windshield washer reservoir at least monthly during normal usage. Antif reeze can damage...
Owner's Manual
Page 169
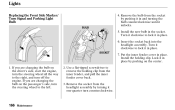
... are changing the bulb on the passenger's side, turn the steering wheel to the right, and turn off the engine. If you are changing the bulb on the driver's side, start the engine, turn counterclockwise. 166 Maintenance Remove the socket from the inner fender, and pull the inner fender cover back. 3. Remove... by turning it in place. 6. SOCKET 7. Lock it in place by pushing it one-quarter turn the steering wheel all the way to the left. 2. Lights Replacing the Front Side Marker/ Turn Signal and Parking...
... are changing the bulb on the passenger's side, turn the steering wheel to the right, and turn off the engine. If you are changing the bulb on the driver's side, start the engine, turn counterclockwise. 166 Maintenance Remove the socket from the inner fender, and pull the inner fender cover back. 3. Remove... by turning it in place. 6. SOCKET 7. Lock it in place by pushing it one-quarter turn the steering wheel all the way to the left. 2. Lights Replacing the Front Side Marker/ Turn Signal and Parking...

Owner's Manual
Page 192
...you do not dim, check the condition of the fuses. With an automatic transmission, it is discharged. If the headlights are very dim or don't light at all . Turn the ignition switch to ON (II). Turn the ignition switch to START (III). If the headlights dim noticeably or go out ... 203 ). You can then try to determine the problem (see page 178 ). Check these things: Check the transmission interlock. Turn on page 191 . The engine's starter motor does not operate at all the way to the floor or the starter will need a qualified technician to start . You may hear a clicking...
...you do not dim, check the condition of the fuses. With an automatic transmission, it is discharged. If the headlights are very dim or don't light at all . Turn the ignition switch to ON (II). Turn the ignition switch to START (III). If the headlights dim noticeably or go out ... 203 ). You can then try to determine the problem (see page 178 ). Check these things: Check the transmission interlock. Turn on page 191 . The engine's starter motor does not operate at all the way to the floor or the starter will need a qualified technician to start . You may hear a clicking...

Owner's Manual
Page 194
...) terminal on your battery. Jump Starting Although this jumper cable to any other part of the engine. 5. You cannot start that vehicle and run it at a fast idle. Connect the other... end to rupture. 2. If the booster battery is in another vehicle, have an assistant start a Honda with a f rozen battery can cause it thaws. If it . 1. Turn off all sparks, open... Care of the electrolyte. Keep all the electrical accessories: heater, A/C, climate control, stereo system, lights, etc. In very cold weather, check the condition of the Unexpected 191 NOTICE: If a battery...
...) terminal on your battery. Jump Starting Although this jumper cable to any other part of the engine. 5. You cannot start that vehicle and run it at a fast idle. Connect the other... end to rupture. 2. If the booster battery is in another vehicle, have an assistant start a Honda with a f rozen battery can cause it thaws. If it . 1. Turn off all sparks, open... Care of the electrolyte. Keep all the electrical accessories: heater, A/C, climate control, stereo system, lights, etc. In very cold weather, check the condition of the Unexpected 191 NOTICE: If a battery...
Owner's Manual
Page 224
...88 Additives, Engine Oil...152 Airbag (SRS) ...10, 22 Air Conditioning System ...91 Air Outlets (Vents) ...90 Air Pressure, Tires ...172 High Speed Driving ...173 Normal Driving ...172 Alcohol in Gasoline ...212 Antifreeze ...157 Anti-lock Brakes (ABS) Indicator Light ...57, ......66 Brights, Headlights ...65 Bulb Replacement Back-up Lights ...167 Brake Lights...167 Front Parking Lights ...166 Front Side Marker Lights...166 Headlights ...164 High-mount Brake Light ...168 Rear Side Marker Lights ...167 Specifications ...209 Turn Signal Lights ...166 Bulbs, Halogen ...164 B Battery Charging System...
...88 Additives, Engine Oil...152 Airbag (SRS) ...10, 22 Air Conditioning System ...91 Air Outlets (Vents) ...90 Air Pressure, Tires ...172 High Speed Driving ...173 Normal Driving ...172 Alcohol in Gasoline ...212 Antifreeze ...157 Anti-lock Brakes (ABS) Indicator Light ...57, ......66 Brights, Headlights ...65 Bulb Replacement Back-up Lights ...167 Brake Lights...167 Front Parking Lights ...166 Front Side Marker Lights...166 Headlights ...164 High-mount Brake Light ...168 Rear Side Marker Lights ...167 Specifications ...209 Turn Signal Lights ...166 Bulbs, Halogen ...164 B Battery Charging System...
Owner's Manual
Page 225
Index CD Changer...100 CD Changer Error Messege ...103 CD Error Messege ...102 CD Player...99 Ceiling Light ...85 Certification Label ...206 Chains ...177 Changing a Flat Tire ...183 Changing Oil How to ...152 When to...145 Charging System Indicator ...56, ...Safety...220 Defog and Defrost ...93 Defogger, Rear Window ...67 Defrosting the Windows ...93 Dimensions ...208 Dimming the Headlights ...65 Dipstick Automatic Transmission...160 Engine Oil ...118 Directional Signals ...65 Disc Brake Wear Indicators ...138 Disposal of Used Oil ...155 Doors Locking and Unlocking ...72 Power Door Locks ...72...
Index CD Changer...100 CD Changer Error Messege ...103 CD Error Messege ...102 CD Player...99 Ceiling Light ...85 Certification Label ...206 Chains ...177 Changing a Flat Tire ...183 Changing Oil How to ...152 When to...145 Charging System Indicator ...56, ...Safety...220 Defog and Defrost ...93 Defogger, Rear Window ...67 Defrosting the Windows ...93 Dimensions ...208 Dimming the Headlights ...65 Dipstick Automatic Transmission...160 Engine Oil ...118 Directional Signals ...65 Disc Brake Wear Indicators ...138 Disposal of Used Oil ...155 Doors Locking and Unlocking ...72 Power Door Locks ...72...
Owner's Manual
Page 227
...114 Fuel Reserve Indicator ...58 Gauge ...60 Octane Requirement ...114 Tank, Filling the...115 Gas Station Procedures...115 Gauges Engine Coolant Temperature ...61 Fuel ...60 Gearshift Lever Positions Automatic Transmission...130 5-speed Manual Transmission...129 Glove Box ...87 Reminder ...Driving ...173 Normal Driving ...172 Inside Mirror ...83 Inspection, Tire ...174 Instrument Panel ...2, 53 Instrument Panel Brightness ...66 Interior Lights ...85 I Identification Number, Vehicle...206 Ignition Keys...69 Switch ...71 Timing Control System ...213 Important Safety Precautions ...6 Indicators ...
...114 Fuel Reserve Indicator ...58 Gauge ...60 Octane Requirement ...114 Tank, Filling the...115 Gas Station Procedures...115 Gauges Engine Coolant Temperature ...61 Fuel ...60 Gearshift Lever Positions Automatic Transmission...130 5-speed Manual Transmission...129 Glove Box ...87 Reminder ...Driving ...173 Normal Driving ...172 Inside Mirror ...83 Inspection, Tire ...174 Instrument Panel ...2, 53 Instrument Panel Brightness ...66 Interior Lights ...85 I Identification Number, Vehicle...206 Ignition Keys...69 Switch ...71 Timing Control System ...213 Important Safety Precautions ...6 Indicators ...
Owner's Manual
Page 228
......129 NOTICE, Explanation of ...i Numbers, Identification ...206 K Keys ...69 M L Label, Certification ...206 Lane Change, Signaling ...65 Lap/Shoulder Belts ...14, 19 Lights Bulb Replacement ...164 Indicator ...56 Parking ...57 Turn Signal ...58 Load Limit ...123 LOCK (Ignition Key Position) ...71 Locks Anti-theft Steering Column ...71 Maintenance... Vehicle...121 O Octane Requirement, Gasoline ...114 Odometer ...60 Odometer, Trip ...60 Oil Change, How to ...154 Change, When to ...145 Checking Engine ...117 Pressure Indicator ...56, 195 Selecting Proper Viscosity Chart ...153 CONTINUED V
......129 NOTICE, Explanation of ...i Numbers, Identification ...206 K Keys ...69 M L Label, Certification ...206 Lane Change, Signaling ...65 Lap/Shoulder Belts ...14, 19 Lights Bulb Replacement ...164 Indicator ...56 Parking ...57 Turn Signal ...58 Load Limit ...123 LOCK (Ignition Key Position) ...71 Locks Anti-theft Steering Column ...71 Maintenance... Vehicle...121 O Octane Requirement, Gasoline ...114 Odometer ...60 Odometer, Trip ...60 Oil Change, How to ...154 Change, When to ...145 Checking Engine ...117 Pressure Indicator ...56, 195 Selecting Proper Viscosity Chart ...153 CONTINUED V
Owner's Manual
Page 229
... ...35 Selecting Child Seats ...36 Using Child Seats with Tethers...42 Using Lower Anchors ...38 Replacement Information Dust and Pollen Filter ...169 Engine Oil and Filter ...154 Fuses ...199 Light Bulbs ...164 Schedule ...143 Spark Plugs...208 Timing Belt ...162 Tires ...172 Wiper Blades ...170 Replacing Seat Belts After a Crash ...21 Reserve...
... ...35 Selecting Child Seats ...36 Using Child Seats with Tethers...42 Using Lower Anchors ...38 Replacement Information Dust and Pollen Filter ...169 Engine Oil and Filter ...154 Fuses ...199 Light Bulbs ...164 Schedule ...143 Spark Plugs...208 Timing Belt ...162 Tires ...172 Wiper Blades ...170 Replacing Seat Belts After a Crash ...21 Reserve...


