Owner's Manual
Page 67
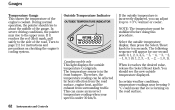
NOTE: The temperature must be affected by heat reflection from the road surface, engine heat, and the exhaust from surrounding traffic. The temperature sensor is forming on checking the engine's cooling system. In certain weather conditions, temperature readings near freezing 0 °C could mean..., you can be stabilized before doing this procedure. You should rise to the upper zone. Canadian models only This light displays the outside temperature displayed. Select the outside temperature is under 30 km/h. Outside Temperature Indicator OUTSIDE TEMPERATURE INDICATOR If...
NOTE: The temperature must be affected by heat reflection from the road surface, engine heat, and the exhaust from surrounding traffic. The temperature sensor is forming on checking the engine's cooling system. In certain weather conditions, temperature readings near freezing 0 °C could mean..., you can be stabilized before doing this procedure. You should rise to the upper zone. Canadian models only This light displays the outside temperature displayed. Select the outside temperature is under 30 km/h. Outside Temperature Indicator OUTSIDE TEMPERATURE INDICATOR If...
Owner's Manual
Page 92
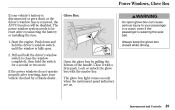
..., even if the passenger is wearing the seat belt. Open the glove box by a Honda dealer. The glove box light comes on only when the instrument panel indicators are on. If the power windows do not... operate properly after reconnecting the battery or installing the fuse. 1. Start the engine. Always keep the...is fully open glove box can cause serious injury to your vehicle checked by pulling the bottom of the handle. Lock Glove Box An open . 2. Close it with the ...
..., even if the passenger is wearing the seat belt. Open the glove box by a Honda dealer. The glove box light comes on only when the instrument panel indicators are on. If the power windows do not... operate properly after reconnecting the battery or installing the fuse. 1. Start the engine. Always keep the...is fully open glove box can cause serious injury to your vehicle checked by pulling the bottom of the handle. Lock Glove Box An open . 2. Close it with the ...
Owner's Manual
Page 142
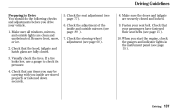
...clean and unobstructed. If a tire looks low, use a gauge to Drive You should do the following checks and adjustments before you start the engine, check the gauges and indicator lights in the instrument panel (see page 55 ). Fasten your passengers have fastened their seat belts (see page... 89 ). 7. Driving Guidelines Preparing to check its pressure. 4. Remove frost, snow, or ice. 2. Make sure all windows,...
...clean and unobstructed. If a tire looks low, use a gauge to Drive You should do the following checks and adjustments before you start the engine, check the gauges and indicator lights in the instrument panel (see page 55 ). Fasten your passengers have fastened their seat belts (see page... 89 ). 7. Driving Guidelines Preparing to check its pressure. 4. Remove frost, snow, or ice. 2. Make sure all windows,...

Owner's Manual
Page 152
... hill builds up heat, and reduces their effectiveness. Use the engine to assist the brakes by taking your brake lights on the pedal keeps the brakes applied lightly, builds up heat and reduces their effectiveness. Check your driving. Each circuit works diagonally across the vehicle (the ...left-front brake is equipped with disc brakes at two wheels. Braking System Your Honda is ...
... hill builds up heat, and reduces their effectiveness. Use the engine to assist the brakes by taking your brake lights on the pedal keeps the brakes applied lightly, builds up heat and reduces their effectiveness. Check your driving. Each circuit works diagonally across the vehicle (the ...left-front brake is equipped with disc brakes at two wheels. Braking System Your Honda is ...

Owner's Manual
Page 168
...Maintenance Schedules for normal driving and severe driving conditions, a Maintenance Record, and instructions for information on your Honda, you may want to take care of yourself. Maintenance Safety ...164 Maintenance Schedule ...165 Maintenance Record ...170 Fluid Locations...172 ...and Filter ...174 Engine Coolant ...176 Windshield Washers ...178 Transmission Fluid ...179 Brake and Clutch Fluid ...181 Power Steering Fluid ...182 Hood Latch ...182 Lights ...183 Seat Belts ...187 Floor Mats ...188 Dust and Pollen Filter ...188 Wiper Blades ...189 Tires ...190 Checking the Battery ......
...Maintenance Schedules for normal driving and severe driving conditions, a Maintenance Record, and instructions for information on your Honda, you may want to take care of yourself. Maintenance Safety ...164 Maintenance Schedule ...165 Maintenance Record ...170 Fluid Locations...172 ...and Filter ...174 Engine Coolant ...176 Windshield Washers ...178 Transmission Fluid ...179 Brake and Clutch Fluid ...181 Power Steering Fluid ...182 Hood Latch ...182 Lights ...183 Seat Belts ...187 Floor Mats ...188 Dust and Pollen Filter ...188 Wiper Blades ...189 Tires ...190 Checking the Battery ......

Owner's Manual
Page 172
If you are unsure of the headlights, parking lights, taillights, high-mount brake light, turn to use the washers frequently, check the reservoir each time you to the appropriate page listed. Engine oil level Check every time you fill the fuel tank. Engine coolant level Check the radiator reserve tank every time you fill the fuel tank. See...
If you are unsure of the headlights, parking lights, taillights, high-mount brake light, turn to use the washers frequently, check the reservoir each time you to the appropriate page listed. Engine oil level Check every time you fill the fuel tank. Engine coolant level Check the radiator reserve tank every time you fill the fuel tank. See...

Owner's Manual
Page 174
... lines (including ABS) (Or every 1 year, whichever comes first) All fluid levels and condition of fluids Exhaust system , Fuel lines and connections Lights and controls/vehicle underbody Inspect drive belts (Or every 2 years, whichever comes first) Replace dust and pollen filter 1 Clean and replace air cleaner element...80 96 112 128 144 160 176 192 208 224 240 Check oil and coolant at each fuel stop Check engine oil and coolant Check inflation and condition once a month Check tires Every 5,000 miles (8,000 km) or every 6 months, Replace engine oil whichever comes first Every 10,000 miles (16,000...
... lines (including ABS) (Or every 1 year, whichever comes first) All fluid levels and condition of fluids Exhaust system , Fuel lines and connections Lights and controls/vehicle underbody Inspect drive belts (Or every 2 years, whichever comes first) Replace dust and pollen filter 1 Clean and replace air cleaner element...80 96 112 128 144 160 176 192 208 224 240 Check oil and coolant at each fuel stop Check engine oil and coolant Check inflation and condition once a month Check tires Every 5,000 miles (8,000 km) or every 6 months, Replace engine oil whichever comes first Every 10,000 miles (16,000...

Owner's Manual
Page 180
... Maintenance 175 If it . 7. The oil pressure indicator light should go out within 5 seconds. If necessary, add more oil. Let the engine run for leaks. 9. Install a new oil filter according to a recycling center. Engine oil change your Honda dealer) is required. 4. Do not discard it in a... sealed container and take it sit for several minutes, then check the drain bolt and oil filter ...
... Maintenance 175 If it . 7. The oil pressure indicator light should go out within 5 seconds. If necessary, add more oil. Let the engine run for leaks. 9. Install a new oil filter according to a recycling center. Engine oil change your Honda dealer) is required. 4. Do not discard it in a... sealed container and take it sit for several minutes, then check the drain bolt and oil filter ...

Owner's Manual
Page 183
NOTICE: Do not use engine antif reeze or a vinegar/water solution in the windshield washer reservoir at least...refill the reservoir, clean the edges of the windshield wiper blades with a good-quality windshield washer fluid. This will light when the level is low (see page 59 ). Canadian Models: The low washer level indicator will help to ...blade edges. 178 Maintenance Use only commercially-available windshield washer f luid. Windshield Washers Check the level in the windshield washer reservoir. This increases the cleaning capability and prevents freezing in cold weather.
NOTICE: Do not use engine antif reeze or a vinegar/water solution in the windshield washer reservoir at least...refill the reservoir, clean the edges of the windshield wiper blades with a good-quality windshield washer fluid. This will light when the level is low (see page 59 ). Canadian Models: The low washer level indicator will help to ...blade edges. 178 Maintenance Use only commercially-available windshield washer f luid. Windshield Washers Check the level in the windshield washer reservoir. This increases the cleaning capability and prevents freezing in cold weather.

Owner's Manual
Page 212
You may hear a clicking sound or series of clicks, or nothing . Turn on page 209 . If the headlights are very dim or don't light at all the way to the floor or the starter will need a qualified technician to determine the problem (see Emergency Towing on page 216 ). With ... falls into two areas, depending on what you hear when you turn the ignition switch to START (III), you do not dim, check the condition of the fuses. The engine's starter motor does not operate at all , the battery is discharged. Turn the ignition switch to START (III). If the fuses are...
You may hear a clicking sound or series of clicks, or nothing . Turn on page 209 . If the headlights are very dim or don't light at all the way to the floor or the starter will need a qualified technician to determine the problem (see Emergency Towing on page 216 ). With ... falls into two areas, depending on what you hear when you turn the ignition switch to START (III), you do not dim, check the condition of the fuses. The engine's starter motor does not operate at all , the battery is discharged. Turn the ignition switch to START (III). If the fuses are...

Owner's Manual
Page 218
... mechanical problem that needs to use other driving maneuvers. 3. starting the engine will discharge the battery rapidly. NOTICE: Running the engine with low oil pressure can continue driving. (See Emergency Towing on the hazard warning lights. 2. Try not to be repaired before you can saf ely get ...within ten seconds, turn off the engine. An engine very low on , the oil pressure has dropped very low. Keep the engine running; Turn on page 216 ). Safely pull off the road, and shut off all electrical accessories. Open the hood, and check the oil level (see page 173...
... mechanical problem that needs to use other driving maneuvers. 3. starting the engine will discharge the battery rapidly. NOTICE: Running the engine with low oil pressure can continue driving. (See Emergency Towing on the hazard warning lights. 2. Try not to be repaired before you can saf ely get ...within ten seconds, turn off the engine. An engine very low on , the oil pressure has dropped very low. Keep the engine running; Turn on page 216 ). Safely pull off the road, and shut off all electrical accessories. Open the hood, and check the oil level (see page 173...

Owner's Manual
Page 248
...Modifications ...131 ACCESSORY (Ignition Key Position) ...71 Accessory Power Sockets ...95 Additives, Engine Oil...173 Airbag (SRS) ...10, 23 Air Cleaner Element ...168 Air Conditioning... Tensioners ...21 Automatic Speed Control...119 Automatic Transmission...141 Capacity, Fluid ...226 Checking Fluid Level ...179 Shifting ...141 Shift Lever Position Indicator .. 141 Shift Lever... Replacement Back-up Lights ...186 Brake Lights...186 Front Parking Lights ...185 Front Side Marker Lights...184 Headlights ...183 Rear Side Marker Lights ...186 Specifications ...226 Turn Signal Lights ...184 Bulbs, ...
...Modifications ...131 ACCESSORY (Ignition Key Position) ...71 Accessory Power Sockets ...95 Additives, Engine Oil...173 Airbag (SRS) ...10, 23 Air Cleaner Element ...168 Air Conditioning... Tensioners ...21 Automatic Speed Control...119 Automatic Transmission...141 Capacity, Fluid ...226 Checking Fluid Level ...179 Shifting ...141 Shift Lever Position Indicator .. 141 Shift Lever... Replacement Back-up Lights ...186 Brake Lights...186 Front Parking Lights ...185 Front Side Marker Lights...184 Headlights ...183 Rear Side Marker Lights ...186 Specifications ...226 Turn Signal Lights ...184 Bulbs, ...

Owner's Manual
Page 249
...in ...138 Consumer Information ...238 Controls, Instruments and ...53 Coolant Adding ...176 Checking ...128 Proper Solution ...176 Temperature Gauge ...62 Crankcase Emissions Control System...231 Cruise...Customer Service Office ...238 D DANGER, Explanation of ...ii Dashboard ...2, 54 Daytime Running Lights Indicator ...58 Dead Battery ...209 Defects, Reporting Safety...240 Defog and Defrost ...99... Anchor ...84 Dimensions ...226 Dimming the Headlights ...65 Dipstick Automatic Transmission...179 Engine Oil ...127 Directional Signals ...65 Disc Brake Wear Indicators ...148 Disposal of Used...
...in ...138 Consumer Information ...238 Controls, Instruments and ...53 Coolant Adding ...176 Checking ...128 Proper Solution ...176 Temperature Gauge ...62 Crankcase Emissions Control System...231 Cruise...Customer Service Office ...238 D DANGER, Explanation of ...ii Dashboard ...2, 54 Daytime Running Lights Indicator ...58 Dead Battery ...209 Defects, Reporting Safety...240 Defog and Defrost ...99... Anchor ...84 Dimensions ...226 Dimming the Headlights ...65 Dipstick Automatic Transmission...179 Engine Oil ...127 Directional Signals ...65 Disc Brake Wear Indicators ...148 Disposal of Used...

Owner's Manual
Page 251
...61 Octane Requirement ...124 Oxygenated ...124 Reserve Indicator...58 Tank, Filling the...125 Fuses, Checking the ...218 5-speed Manual Transmission...140 Glove Box ...87 I Identification Number, Vehicle...224... Headlight Bulbs...183 Hatch Glass ...73 Hazard Warning Flashers...66 Headlights Aiming ...183 Daytime Running Lights...65 High Beam Indicator ...58 Reminder Beeper ...65 Replacing Halogen Bulbs ...183 Turning on ...... Gas Station Procedures...125 Gauges Engine Coolant Temperature ...62 Fuel ...61 Speedometer ...61 Tachometer ...61 Gearshift Lever Positions Automatic Transmission...141 IV
...61 Octane Requirement ...124 Oxygenated ...124 Reserve Indicator...58 Tank, Filling the...125 Fuses, Checking the ...218 5-speed Manual Transmission...140 Glove Box ...87 I Identification Number, Vehicle...224... Headlight Bulbs...183 Hatch Glass ...73 Hazard Warning Flashers...66 Headlights Aiming ...183 Daytime Running Lights...65 High Beam Indicator ...58 Reminder Beeper ...65 Replacing Halogen Bulbs ...183 Turning on ...... Gas Station Procedures...125 Gauges Engine Coolant Temperature ...62 Fuel ...61 Speedometer ...61 Tachometer ...61 Gearshift Lever Positions Automatic Transmission...141 IV

Owner's Manual
Page 253
... and Pollen Filter ...188 Engine Oil and Filter ...174 Fuses ...218 Light Bulbs ...183 Schedule ...168 Tires ...190 Wiper Blades ...189 Replacing Seat Belts After a Crash ...22 O Octane Requirement, Gasoline ...124 Odometer ...61 Odometer, Trip ...61 Off-Highway Driving ...161 Oil Change, How to ...174 Change, When to ...168 Checking Engine ...127 Pressure Indicator...
... and Pollen Filter ...188 Engine Oil and Filter ...174 Fuses ...218 Light Bulbs ...183 Schedule ...168 Tires ...190 Wiper Blades ...189 Replacing Seat Belts After a Crash ...22 O Octane Requirement, Gasoline ...124 Odometer ...61 Odometer, Trip ...61 Off-Highway Driving ...161 Oil Change, How to ...174 Change, When to ...168 Checking Engine ...127 Pressure Indicator...


