Owner's Manual
Page 12
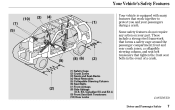
... the event of a crash. (10) (7) (5) (9) (8) (6) (2) (2) (1) Safety Cage (2) Crush Zones (3) Seats and Seat-Backs (4) Head Restraints (5) Collapsible Steering Column (6) Seat Belts (7) Front Airbags (8) Side Airbags (U.S. EX, Canadian EX and EX-L) (9) Front Seat Belt Tensioners (10) Door Locks CONTINUED Driver and Passenger Safety 7 front and rear crush zones, a collapsible steering column, and seat belt tensioners...
... the event of a crash. (10) (7) (5) (9) (8) (6) (2) (2) (1) Safety Cage (2) Crush Zones (3) Seats and Seat-Backs (4) Head Restraints (5) Collapsible Steering Column (6) Seat Belts (7) Front Airbags (8) Side Airbags (U.S. EX, Canadian EX and EX-L) (9) Front Seat Belt Tensioners (10) Door Locks CONTINUED Driver and Passenger Safety 7 front and rear crush zones, a collapsible steering column, and seat belt tensioners...

Owner's Manual
Page 79
... cannot lock it twice to unlock the other button on the remote transmitter or turn the ignition switch to ON (II). On EX model in the U.S., and EX and EX-L models in the ignition switch. 74 Instruments and Controls Remote Transmitter LED LOCK BUTTON HATCH GLASS RELEASE BUTTON UNLOCK BUTTON PANIC BUTTON UNLOCK...
... cannot lock it twice to unlock the other button on the remote transmitter or turn the ignition switch to ON (II). On EX model in the U.S., and EX and EX-L models in the ignition switch. 74 Instruments and Controls Remote Transmitter LED LOCK BUTTON HATCH GLASS RELEASE BUTTON UNLOCK BUTTON PANIC BUTTON UNLOCK...
Owner's Manual
Page 81
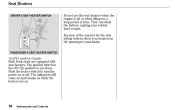
... sensors for the side airbag system, there is no heaters in Canada Both front seats are equipped with seat heaters. PASSENGER'S SEAT HEATER SWITCH On EX-L model in the passenger's seat-backs. The ignition switch in the ON (II) position to start. Push the heater switch to turn the power on...
... sensors for the side airbag system, there is no heaters in Canada Both front seats are equipped with seat heaters. PASSENGER'S SEAT HEATER SWITCH On EX-L model in the passenger's seat-backs. The ignition switch in the ON (II) position to start. Push the heater switch to turn the power on...

Owner's Manual
Page 93
... the bottom of the switch ( ). To open the moonroof in Canada Opening or closing it can damage the moonroof panel or motor. On EX model in the U.S., and EX-L model in below-f reezing temperatures, or when it is covered with snow or ice, you try to operate the moonroof. 88 Instruments and...
... the bottom of the switch ( ). To open the moonroof in Canada Opening or closing it can damage the moonroof panel or motor. On EX model in the U.S., and EX-L model in below-f reezing temperatures, or when it is covered with snow or ice, you try to operate the moonroof. 88 Instruments and...
Owner's Manual
Page 95
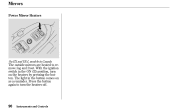
The light in the button comes on the heaters by pressing the button. Press the button again to remove fog and frost. Mirrors Power Mirror Heaters On EX and EX-L models in Canada The outside mirrors are heated to turn on as a reminder. With the ignition switch in the ON (II) position, turn the heaters off. 90 Instruments and Controls
The light in the button comes on the heaters by pressing the button. Press the button again to remove fog and frost. Mirrors Power Mirror Heaters On EX and EX-L models in Canada The outside mirrors are heated to turn on as a reminder. With the ignition switch in the ON (II) position, turn the heaters off. 90 Instruments and Controls
Owner's Manual
Page 107
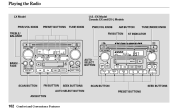
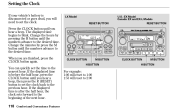
Playing the Radio LX Model U.S.: EX Model Canada: EX and EX-L Models PRESET BUTTONS TUNE KNOB PWR/VOL KNOB AM BUTTON TUNE/MODE KNOB PWR/VOL KNOB TREBLE/ BALANCE FM BUTTON ST INDICATOR BASS/ FADE AUTO SELECT BUTTON SCAN BUTTON FM BUTTON SEEK BUTTONS SCAN BUTTON PRESET BUTTONS SEEK BUTTONS AUTO SELECT BUTTON AM BUTTON 102 Comfort and Convenience Features
Playing the Radio LX Model U.S.: EX Model Canada: EX and EX-L Models PRESET BUTTONS TUNE KNOB PWR/VOL KNOB AM BUTTON TUNE/MODE KNOB PWR/VOL KNOB TREBLE/ BALANCE FM BUTTON ST INDICATOR BASS/ FADE AUTO SELECT BUTTON SCAN BUTTON FM BUTTON SEEK BUTTONS SCAN BUTTON PRESET BUTTONS SEEK BUTTONS AUTO SELECT BUTTON AM BUTTON 102 Comfort and Convenience Features
Owner's Manual
Page 110
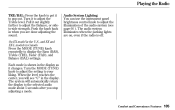
... off. Turn it out slightly farther to adjust the Balance, or sideto-side strength. Pull it to adjust the Treble level. On EX model in the U.S., and EX and EX-L models in Canada Audio System Lighting You can use the instrument panel brightness control knob to adjust the illumination of the audio system...
... off. Turn it out slightly farther to adjust the Balance, or sideto-side strength. Pull it to adjust the Treble level. On EX model in the U.S., and EX and EX-L models in Canada Audio System Lighting You can use the instrument panel brightness control knob to adjust the illumination of the audio system...
Owner's Manual
Page 113
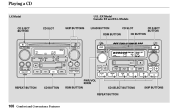
Playing a CD LX Model U.S.: EX Model Canada: EX and EX-L Models CD EJECT BUTTON CD SLOT SKIP BUTTONS LOAD BUTTON RDM BUTTON CD SLOT CD BUTTON CD EJECT BUTTON PWR/VOL KNOB REPEAT BUTTON CD BUTTON RDM BUTTON CD SELECT BUTTONS REPEAT BUTTON SKIP BUTTONS 108 Comfort and Convenience Features
Playing a CD LX Model U.S.: EX Model Canada: EX and EX-L Models CD EJECT BUTTON CD SLOT SKIP BUTTONS LOAD BUTTON RDM BUTTON CD SLOT CD BUTTON CD EJECT BUTTON PWR/VOL KNOB REPEAT BUTTON CD BUTTON RDM BUTTON CD SELECT BUTTONS REPEAT BUTTON SKIP BUTTONS 108 Comfort and Convenience Features
Owner's Manual
Page 114
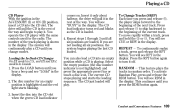
... the same controls used for an empty position is highlighted and the red light starts blinking. 3. Loading the In-Dash CD Changer On EX model in U.S., and EX and EX-L models in random order. You will continuously play a CD until you hear a beep and see ''BUSY'' in the display. Repeat steps 1 through 3 until...
... the same controls used for an empty position is highlighted and the red light starts blinking. 3. Loading the In-Dash CD Changer On EX model in U.S., and EX and EX-L models in random order. You will continuously play a CD until you hear a beep and see ''BUSY'' in the display. Repeat steps 1 through 3 until...
Owner's Manual
Page 118
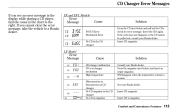
.... If you see an error message in the display while playing a CD player, find the cause in magazine Solution Consult your Honda dealer. Insert CD magazine. Press the magazine eject button, and insert an empty magazine. Insert CD in the CD changer Solution Press the CD eject...and pull out the CDs, check for error message. CD Changer Error Messages If you cannot clear the error message, take the vehicle to a Honda dealer. EX and EX-L Models Error Message Cause FOCUS Error Mechanical Error No CD in magazine. LX Model Error Message Cause CD-changer malfunction CD is in changer...
.... If you see an error message in the display while playing a CD player, find the cause in magazine Solution Consult your Honda dealer. Insert CD magazine. Press the magazine eject button, and insert an empty magazine. Insert CD in the CD changer Solution Press the CD eject...and pull out the CDs, check for error message. CD Changer Error Messages If you cannot clear the error message, take the vehicle to a Honda dealer. EX and EX-L Models Error Message Cause FOCUS Error Mechanical Error No CD in magazine. LX Model Error Message Cause CD-changer malfunction CD is in changer...

Owner's Manual
Page 119
Playing a Tape LX Model FF BUTTON PWR/VOL KNOB PLAY BUTTON REW BUTTON DOLBY BUTTON PWR/VOL KNOB TAPE DIRECTION INDICATOR CASSETTE SLOT DOLBY INDICATOR TAPE EJECT BUTTON U.S.: EX Model Canada: EX and EX-L Models RPT BUTTON RPT BUTTON TAPE DIRECTION INDICATOR PROG BUTTON SKIP BUTTONS PLAY BUTTON PROG BUTTON REW BUTTON SKIP BUTTONS DOLBY BUTTON FF BUTTON TAPE BUTTON TAPE EJECT BUTTON CASSETTE SLOT 114 Comfort and Convenience Features
Playing a Tape LX Model FF BUTTON PWR/VOL KNOB PLAY BUTTON REW BUTTON DOLBY BUTTON PWR/VOL KNOB TAPE DIRECTION INDICATOR CASSETTE SLOT DOLBY INDICATOR TAPE EJECT BUTTON U.S.: EX Model Canada: EX and EX-L Models RPT BUTTON RPT BUTTON TAPE DIRECTION INDICATOR PROG BUTTON SKIP BUTTONS PLAY BUTTON PROG BUTTON REW BUTTON SKIP BUTTONS DOLBY BUTTON FF BUTTON TAPE BUTTON TAPE EJECT BUTTON CASSETTE SLOT 114 Comfort and Convenience Features
Owner's Manual
Page 123
... until you hear a beep, then press the R (RESET) button to set the clock. CLOCK BUTTON M BUTTON CLOCK BUTTON M BUTTON LX Model RESET BUTTON U.S.: EX Model Canada: EX and EX-L Models RESET BUTTON H BUTTON H BUTTON For example: 1:06 will reset to 1:00 1:53 will need to set the clock back to the beginning of...
... until you hear a beep, then press the R (RESET) button to set the clock. CLOCK BUTTON M BUTTON CLOCK BUTTON M BUTTON LX Model RESET BUTTON U.S.: EX Model Canada: EX and EX-L Models RESET BUTTON H BUTTON H BUTTON For example: 1:06 will reset to 1:00 1:53 will need to set the clock back to the beginning of...

Owner's Manual
Page 153
Let the ABS work for EX model in the U.S., and EX and EX-L models in the brake pedal when the ABS activates, and you may hear some noise. Braking System, Anti-lock Brakes (ABS) Brake Wear Indicators If ...
Let the ABS work for EX model in the U.S., and EX and EX-L models in the brake pedal when the ABS activates, and you may hear some noise. Braking System, Anti-lock Brakes (ABS) Brake Wear Indicators If ...

Owner's Manual
Page 206
... your hands up the sides of the Unexpected 201 Changing a Flat Tire 6. and Canada Soft vinyl spare tire cover On LX and EX models in Canada 4. COVER On EX-L model in the U.S. Pull out the cover's two lower flaps. CONTINUED Taking Care of the cover. Turn the jack's end bracket... counterclockwise to loosen it . Zip the cover open. 8. On LX and EX models in the cargo area on the passenger's side. and Canada Your vehicle is equipped with a soft vinyl spare tire cover. Pull the upper flaps...
... your hands up the sides of the Unexpected 201 Changing a Flat Tire 6. and Canada Soft vinyl spare tire cover On LX and EX models in Canada 4. COVER On EX-L model in the U.S. Pull out the cover's two lower flaps. CONTINUED Taking Care of the cover. Turn the jack's end bracket... counterclockwise to loosen it . Zip the cover open. 8. On LX and EX models in the cargo area on the passenger's side. and Canada Your vehicle is equipped with a soft vinyl spare tire cover. Pull the upper flaps...

Owner's Manual
Page 207
... from the the jack under the jacking point. Make sure the turn with the wheel wrench. Changing a Flat Tire Hard plastic spare tire cover On EX-L model in the jack notch. 202 Taking Care of the cover, then gradually pull it off the center spacer. Unzip the flap around the lower...
... from the the jack under the jacking point. Make sure the turn with the wheel wrench. Changing a Flat Tire Hard plastic spare tire cover On EX-L model in the jack notch. 202 Taking Care of the cover, then gradually pull it off the center spacer. Unzip the flap around the lower...

Owner's Manual
Page 210
..., a little at the top of the tire, position the outside edge of the logo. Changing a Flat Tire Soft vinyl spare tire cover On LX and EX models in the U.S. and Canada Make sure the cover is straight. If it's too cold, it won't f it . If needed, pivot the cover until you...
..., a little at the top of the tire, position the outside edge of the logo. Changing a Flat Tire Soft vinyl spare tire cover On LX and EX models in the U.S. and Canada Make sure the cover is straight. If it's too cold, it won't f it . If needed, pivot the cover until you...

Owner's Manual
Page 211
Changing a Flat Tire Hard plastic spare tire cover On EX-L model in Canada SPARE TIRE BRACKET 27.Pull the bottom of the cover over the bottom of the Unexpected If needed , readjust the cover to smooth out any wrinkles. 29.Zip the cover closed . 206 Taking Care of the tire. 31.Make sure the cover is horizontal. 32.Zip the cover closed . 30.Place the top of the cover over the spare tire, then gradually push the bottom of the cover over the tire. 28.If needed , pivot the cover until the cover is horizontal.
Changing a Flat Tire Hard plastic spare tire cover On EX-L model in Canada SPARE TIRE BRACKET 27.Pull the bottom of the cover over the bottom of the Unexpected If needed , readjust the cover to smooth out any wrinkles. 29.Zip the cover closed . 206 Taking Care of the tire. 31.Make sure the cover is horizontal. 32.Zip the cover closed . 30.Place the top of the cover over the spare tire, then gradually push the bottom of the cover over the tire. 28.If needed , pivot the cover until the cover is horizontal.

Owner's Manual
Page 231
Specifications Dimensions Length Width Height Wheelbase Track Front Rear 1 : Canada EX-L model 178.6 in (4,537 mm) 179.1 in (4,550 mm) 70.2 in (1,782 mm) 66.2 in (1,682 mm) 103.1 in (2,620 mm) 60.4 in (1,533 mm) ...
Specifications Dimensions Length Width Height Wheelbase Track Front Rear 1 : Canada EX-L model 178.6 in (4,537 mm) 179.1 in (4,550 mm) 70.2 in (1,782 mm) 66.2 in (1,682 mm) 103.1 in (2,620 mm) 60.4 in (1,533 mm) ...


