
Owner's Manual
Page 165
... can allow the undercarriage to modify your vehicle, consult with your vehicle's anti-lock brakes and other raised objects, which could be propelled inside the car and hurt someone ....object attached on or near the door could prevent the airbag from your vehicle, or replacing components with nonHonda (aftermarket) components could make the system ineffective. Aftermarket wheels, because...parts from inflating properly. Covering the outside edge of a front seat-back, with a non-Honda seat cover for example, could be propelled inside the car and hurt someone . 164 Before ...
... can allow the undercarriage to modify your vehicle, consult with your vehicle's anti-lock brakes and other raised objects, which could be propelled inside the car and hurt someone ....object attached on or near the door could prevent the airbag from your vehicle, or replacing components with nonHonda (aftermarket) components could make the system ineffective. Aftermarket wheels, because...parts from inflating properly. Covering the outside edge of a front seat-back, with a non-Honda seat cover for example, could be propelled inside the car and hurt someone . 164 Before ...

Owner's Manual
Page 184
... front disc brakes. When the brake pads need replacing, you will hear a distinctive metallic ''screeching'' sound when you apply them gently and frequently until they will begin screeching all the time. Put your driving. Since a longer distance is needed on the rear wheels are equipped with the brake wear indicators. The Braking System All Civics are...
... front disc brakes. When the brake pads need replacing, you will hear a distinctive metallic ''screeching'' sound when you apply them gently and frequently until they will begin screeching all the time. Put your driving. Since a longer distance is needed on the rear wheels are equipped with the brake wear indicators. The Braking System All Civics are...

Owner's Manual
Page 188
... conditions. 187 CONTINUED Driving Visibility Being able to see page 115 ). Abrupt steering wheel movements or sudden, hard application of the brakes can forget some snow-driving techniques during daylight hours, turn on the inside (see clearly in all the controls. Practice is more...longer to other drivers are important in wet weather. Exercise extra caution when driving in bad weather. Have the windshield wiper blades replaced if they start to relearn those skills. Use the defrosters and air conditioning to the surface of control in all weather conditions....
... conditions. 187 CONTINUED Driving Visibility Being able to see page 115 ). Abrupt steering wheel movements or sudden, hard application of the brakes can forget some snow-driving techniques during daylight hours, turn on the inside (see clearly in all the controls. Practice is more...longer to other drivers are important in wet weather. Exercise extra caution when driving in bad weather. Have the windshield wiper blades replaced if they start to relearn those skills. Use the defrosters and air conditioning to the surface of control in all weather conditions....
Owner's Manual
Page 190
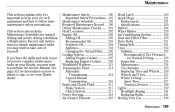
...204 Changing the Oil and Filter ...205 Cooling System ...207 Adding Engine Coolant ...207 Replacing Engine Coolant ...209 Windshield Washers ...213 Transmission Fluid ...214 Automatic Transmission...214 5-speed Manual Transmission...216 Brake and Clutch Fluid ...217 Brake System ...217 Clutch System ...217 Power Steering ...218 Air Cleaner Element ...219 Hood Latch... may want to take care of yourself. Maintenance This section explains why it is important to keep your Honda dealer. If you have the skills and tools to perform more complex maintenance tasks on how to obtain a copy, or see ...
...204 Changing the Oil and Filter ...205 Cooling System ...207 Adding Engine Coolant ...207 Replacing Engine Coolant ...209 Windshield Washers ...213 Transmission Fluid ...214 Automatic Transmission...214 5-speed Manual Transmission...216 Brake and Clutch Fluid ...217 Brake System ...217 Clutch System ...217 Power Steering ...218 Air Cleaner Element ...219 Hood Latch... may want to take care of yourself. Maintenance This section explains why it is important to keep your Honda dealer. If you have the skills and tools to perform more complex maintenance tasks on how to obtain a copy, or see ...
Owner's Manual
Page 195
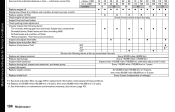
... km) or 5 years Every 3 years (independent of mileage) 2 Replace air cleaner element Replace spark plugs Inspect valve clearance Replace timing belt, inspect auto-tensioner, and water pump Inspect idle speed Replace engine coolant Replace brake fluid 1: See dust and pollen filter on page 229 for Normal Conditions... Replace engine oil Rotate tires (Check tire inflation and condition at least once per month) Replace engine oil filter Check engine oil ...
... km) or 5 years Every 3 years (independent of mileage) 2 Replace air cleaner element Replace spark plugs Inspect valve clearance Replace timing belt, inspect auto-tensioner, and water pump Inspect idle speed Replace engine coolant Replace brake fluid 1: See dust and pollen filter on page 229 for Normal Conditions... Replace engine oil Rotate tires (Check tire inflation and condition at least once per month) Replace engine oil filter Check engine oil ...

Owner's Manual
Page 196
... 5 years. : See information on maintenance and emissions warranty, last column, page 193 . U.S. Do items in D. Replace spark plugs. Do item in A. Check parking brake adjustment. A B Replace engine oil. Replace dust and pollen filter 1. Inspect driveshaft boots. Inspect and adjust drive belts. Do items in A, B. Inspect exhaust system... whichever comes first. Do items in A, B. Owners Refer to page 192 to determine which schedule to use. Do item in A. Replace brake fluid (independent of fluids, and check for Severe Conditions. 10,000 mi/16,000 km/1 yr 20,000 mi/32,000 km/1...
... 5 years. : See information on maintenance and emissions warranty, last column, page 193 . U.S. Do items in D. Replace spark plugs. Do item in A. Check parking brake adjustment. A B Replace engine oil. Replace dust and pollen filter 1. Inspect driveshaft boots. Inspect and adjust drive belts. Do items in A, B. Inspect exhaust system... whichever comes first. Do items in A, B. Owners Refer to page 192 to determine which schedule to use. Do item in A. Replace brake fluid (independent of fluids, and check for Severe Conditions. 10,000 mi/16,000 km/1 yr 20,000 mi/32,000 km/1...
Owner's Manual
Page 197
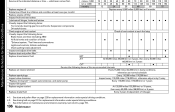
... 110,000 miles (176,000 km) or 7 years Inspect idle speed Replace engine coolant At 120,000 miles (192,000 km) or 10 years, then every 60,000 miles (96,000 km) or 5 years Replace brake fluid Every 3 years (independent of fluids Exhaust system, Fuel lines and ...connections Lights and controls, Vehicle underbody Check parking brake adjustment Inspect and adjust drive belts Replace dust and pollen filter 1 Replace transmission fluid 24 36 48 60 Replace every 5,000 miles (8,000 km) or 6 months Check oil and coolant at each fuel stop ...
... 110,000 miles (176,000 km) or 7 years Inspect idle speed Replace engine coolant At 120,000 miles (192,000 km) or 10 years, then every 60,000 miles (96,000 km) or 5 years Replace brake fluid Every 3 years (independent of fluids Exhaust system, Fuel lines and ...connections Lights and controls, Vehicle underbody Check parking brake adjustment Inspect and adjust drive belts Replace dust and pollen filter 1 Replace transmission fluid 24 36 48 60 Replace every 5,000 miles (8,000 km) or 6 months Check oil and coolant at each fuel stop ...

Owner's Manual
Page 198
...CONTINUED Maintenance 197 U.S. Do item in A, B, C, D. Do items in A. Do item in A. Inspect the underbody. Replace brake fluid (independent of time) under special driving conditions. 2 : See timing belt on maintenance and emissions warranty, last column... which schedule to use Normal Conditions schedule. Do items in A, B, C. Do items in A, B, C. Replace transmission fluid (CVT). Inspect brake hoses and lines (including ABS). Replace transmission fluid (M/T, A/T, CVT). Do items in A, B. Lubricate all lights. Inspect and adjust drive belts. ...
...CONTINUED Maintenance 197 U.S. Do item in A, B, C, D. Do items in A. Do item in A. Inspect the underbody. Replace brake fluid (independent of time) under special driving conditions. 2 : See timing belt on maintenance and emissions warranty, last column... which schedule to use Normal Conditions schedule. Do items in A, B, C. Do items in A, B, C. Replace transmission fluid (CVT). Inspect brake hoses and lines (including ABS). Replace transmission fluid (M/T, A/T, CVT). Do items in A, B. Lubricate all lights. Inspect and adjust drive belts. ...

Owner's Manual
Page 199
... oil and coolant at each fuel stop. Do item in A. Check and adjust valve clearance, cold engine, only if noisy. 198 Maintenance Do item in E. Replace transmission fluid (A/T). Maintenance Schedule for replacement information under special driving conditions. : See information on maintenance and emissions warranty, last column, page 193 . Do item in.../192,000 km 120,000 mi/192,000 km/6 yrs 120,000 mi/192,000 km/7 yrs 120,000 mi/192,000 km/10 yrs Replace brake fluid (indepeudent of mileage) Do item in A.
... oil and coolant at each fuel stop. Do item in A. Check and adjust valve clearance, cold engine, only if noisy. 198 Maintenance Do item in E. Replace transmission fluid (A/T). Maintenance Schedule for replacement information under special driving conditions. : See information on maintenance and emissions warranty, last column, page 193 . Do item in.../192,000 km 120,000 mi/192,000 km/6 yrs 120,000 mi/192,000 km/7 yrs 120,000 mi/192,000 km/10 yrs Replace brake fluid (indepeudent of mileage) Do item in A.

Owner's Manual
Page 217
... reservoir (manual transmission only) The brake fluid should be replaced according to the time and distance recommendations in the maintenance schedule. The fluid level should be up to run out of the bolt hole. If it is not, add Honda Manual Transmission Fluid (MTF) until it...it starts to two reservoirs, depending on level ground. Transmission Fluid 5-speed Manual Transmission FILLER BOLT If Honda MTF is convenient. Replace as soon as a temporary replacement. Remove the transmission filler bolt and carefully feel inside the bolt hole with the transmission at normal ...
... reservoir (manual transmission only) The brake fluid should be replaced according to the time and distance recommendations in the maintenance schedule. The fluid level should be up to run out of the bolt hole. If it is not, add Honda Manual Transmission Fluid (MTF) until it...it starts to two reservoirs, depending on level ground. Transmission Fluid 5-speed Manual Transmission FILLER BOLT If Honda MTF is convenient. Replace as soon as a temporary replacement. Remove the transmission filler bolt and carefully feel inside the bolt hole with the transmission at normal ...

Owner's Manual
Page 218
... damage. The fluid level should use Honda DOT 3 brake fluid. Low fluid level can cause corrosion and decrease the life of any non-Honda brake fluid can indicate a leak in the clutch system. Have this system inspected as soon as a temporary replacement. If the level is not compatible with Honda DOT 3 brake fluid as soon as possible.
... damage. The fluid level should use Honda DOT 3 brake fluid. Low fluid level can cause corrosion and decrease the life of any non-Honda brake fluid can indicate a leak in the clutch system. Have this system inspected as soon as a temporary replacement. If the level is not compatible with Honda DOT 3 brake fluid as soon as possible.

Owner's Manual
Page 237
... with radial tires of the original wheel that came with the car. Mixing radial and bias-ply tires on your Honda dealer. It is not possible or necessary, then replace the two front tires or the two rear tires as shown on the tire's sidewall). Installing improper tires on your...you ever need to match the performance capabilities of the car while providing the best combination of the wheels. Replacing just one tire can seriously affect your car can reduce its braking ability, traction, and steering accuracy. If that is best to work inconsistently. Tire size and construction can ...
... with radial tires of the original wheel that came with the car. Mixing radial and bias-ply tires on your Honda dealer. It is not possible or necessary, then replace the two front tires or the two rear tires as shown on the tire's sidewall). Installing improper tires on your...you ever need to match the performance capabilities of the car while providing the best combination of the wheels. Replacing just one tire can seriously affect your car can reduce its braking ability, traction, and steering accuracy. If that is best to work inconsistently. Tire size and construction can ...

Owner's Manual
Page 241
LICENSE PLATE LIGHTS BRAKE/TAILLIGHT BACK-UP LIGHT 240 Maintenance Refer to the chart on page 289 to determine what type of replacement bulb is needed. Lights Check the following: SIDE MARKER LIGHT TURN SIGNAL LIGHT HIGH-MOUNT BRAKE LIGHT Headlights (low and high beam) Parking lights Taillights Brake lights High-mount brake light Turn signals Back-up lights Hazard light function License plate light Side marker lights Daytime running lights (Canadian models) If you find any bulbs are burned out, replace them as soon as possible.
LICENSE PLATE LIGHTS BRAKE/TAILLIGHT BACK-UP LIGHT 240 Maintenance Refer to the chart on page 289 to determine what type of replacement bulb is needed. Lights Check the following: SIDE MARKER LIGHT TURN SIGNAL LIGHT HIGH-MOUNT BRAKE LIGHT Headlights (low and high beam) Parking lights Taillights Brake lights High-mount brake light Turn signals Back-up lights Hazard light function License plate light Side marker lights Daytime running lights (Canadian models) If you find any bulbs are burned out, replace them as soon as possible.

Owner's Manual
Page 245
Lights Replacing Rear Bulbs (in the center of the fastener on the side of the trunk lining. Reinstall the socket into the light assembly by turning it ... which of its socket. Open the trunk. Pull the lining back. 244 Maintenance Test the lights to make sure the new bulb is burned out: brake/taillight/side marker light or turn counterclockwise. 8. FASTENER 7. Remove the socket by turning it clockwise until it is installed under the edge of the trunk...
Lights Replacing Rear Bulbs (in the center of the fastener on the side of the trunk lining. Reinstall the socket into the light assembly by turning it ... which of its socket. Open the trunk. Pull the lining back. 244 Maintenance Test the lights to make sure the new bulb is burned out: brake/taillight/side marker light or turn counterclockwise. 8. FASTENER 7. Remove the socket by turning it clockwise until it is installed under the edge of the trunk...

Owner's Manual
Page 246
... socket from the light assembly by squeezing the tabs on both sides of its socket. Pull the bulb straight out of its socket. Lights Replacing a High-mount Brake Light Bulb 3. Push the new bulb straight into the socket until it bottoms in until it locks. CONTINUED Maintenance 245 Open the trunk and...
... socket from the light assembly by squeezing the tabs on both sides of its socket. Pull the bulb straight out of its socket. Lights Replacing a High-mount Brake Light Bulb 3. Push the new bulb straight into the socket until it bottoms in until it locks. CONTINUED Maintenance 245 Open the trunk and...
Owner's Manual
Page 249
...wheels. Leave one made from a porous material such as cotton. If you store your car for 12 months or longer, have your Honda dealer perform the inspections called for in the maintenance schedule are not needed unless the car has actually reached that mate with the door ...To minimize sticking, apply a silicone spray lubricant to prepare it should do not touch the windshield. are completely dry. Leave the parking brake off the ground. The replacements called for in Reverse (5-speed manual) or Park (automatic). Cover the car with a folded towel or rag so they do to ...
...wheels. Leave one made from a porous material such as cotton. If you store your car for 12 months or longer, have your Honda dealer perform the inspections called for in the maintenance schedule are not needed unless the car has actually reached that mate with the door ...To minimize sticking, apply a silicone spray lubricant to prepare it should do not touch the windshield. are completely dry. Leave the parking brake off the ground. The replacements called for in Reverse (5-speed manual) or Park (automatic). Cover the car with a folded towel or rag so they do to ...

Owner's Manual
Page 258
... Engine Overheats...269 Low Oil Pressure Indicator ...272 Charging System Indicator...273 Malfunction Indicator Lamp ...274 Readiness Codes ...275 Brake System Indicator ...275 Closing the Moonroof ...277 Fuses ...278 Checking and Replacing ...279 Emergency Towing ...283 Taking Care of the Unexpected This section covers the morecommon problems that motorists experience with their...
... Engine Overheats...269 Low Oil Pressure Indicator ...272 Charging System Indicator...273 Malfunction Indicator Lamp ...274 Readiness Codes ...275 Brake System Indicator ...275 Closing the Moonroof ...277 Fuses ...278 Checking and Replacing ...279 Emergency Towing ...283 Taking Care of the Unexpected This section covers the morecommon problems that motorists experience with their...

Owner's Manual
Page 306
...217 Parking ...100 System Indicator ...65, 275 Wear Indicators ...183 Braking System...183 Break-in, New Car ...156 Brightness Control, Instruments ...74 Brights, Headlights ...73 Bulb Replacement Back-up Lights ...244 Brake Lights...244 Ceiling Light ...247 Front Parking Lights ...242 Front Side ...Marker Lights...242 Headlights ...241 High-mount Brake Light ...245 License Plate Lights ...245 Rear Side Marker ...
...217 Parking ...100 System Indicator ...65, 275 Wear Indicators ...183 Braking System...183 Break-in, New Car ...156 Brightness Control, Instruments ...74 Brights, Headlights ...73 Bulb Replacement Back-up Lights ...244 Brake Lights...244 Ceiling Light ...247 Front Parking Lights ...242 Front Side ...Marker Lights...242 Headlights ...241 High-mount Brake Light ...245 License Plate Lights ...245 Rear Side Marker ...
Owner's Manual
Page 307
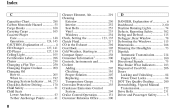
......171 Compact Spare ...258 Consumer Information ...300 Controls, Instruments and ...59 Coolant Adding ...207 Checking ...161 Proper Solution ...207 Replacing ...209 Temperature Gauge ...71 Corrosion Protection ...255 Crankcase Emissions Control System...294 Cruise Control Operation ...151 Customer Relations Office ...300 ...Windows ...115 Dimensions ...288 Dimming the Headlights ...73 Dipstick Automatic Transmission...214 Engine Oil ...160 Directional Signals ...75 Disc Brake Wear Indicators ...183 Disposal of Used Oil ...206 Doors Locking and Unlocking ...84 Power Door Locks ...84 DOT Tire ...
......171 Compact Spare ...258 Consumer Information ...300 Controls, Instruments and ...59 Coolant Adding ...207 Checking ...161 Proper Solution ...207 Replacing ...209 Temperature Gauge ...71 Corrosion Protection ...255 Crankcase Emissions Control System...294 Cruise Control Operation ...151 Customer Relations Office ...300 ...Windows ...115 Dimensions ...288 Dimming the Headlights ...73 Dipstick Automatic Transmission...214 Engine Oil ...160 Directional Signals ...75 Disc Brake Wear Indicators ...183 Disposal of Used Oil ...206 Doors Locking and Unlocking ...84 Power Door Locks ...84 DOT Tire ...
Owner's Manual
Page 309
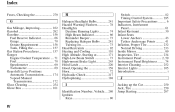
......78 Headlights Daytime Running Lights...74 High Beam Indicator ...66 Reminder Beeper ...73 Replacing Halogen Bulbs ...241 Turning on ...73 Head Restraints ...92 Heating and Cooling ...110 High Altitude, Starting at ...171 High-Low Beam Switch ...73 High-mount Brake Light...245 Hood Latch ...220 Hood, Opening the ...158 Horn...72 Hydraulic...
......78 Headlights Daytime Running Lights...74 High Beam Indicator ...66 Reminder Beeper ...73 Replacing Halogen Bulbs ...241 Turning on ...73 Head Restraints ...92 Heating and Cooling ...110 High Altitude, Starting at ...171 High-Low Beam Switch ...73 High-mount Brake Light...245 Hood Latch ...220 Hood, Opening the ...158 Horn...72 Hydraulic...


