Owner's Manual
Page 54
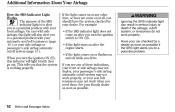
...drive. or your Honda dealer as soon as possible if the SRS light alerts you to ON (II). If the light stays on at all, you turn the ignition switch to a potential problem. 52 Driver and Passenger Safety If the light comes on or flashes on after the engine starts. On cars...not work when you to a potential problem with your car checked by your automatic seat belt tensioners (page 46 ); If the light comes on at any of the SRS indicator light is working properly. When you should have the system checked by a dealer as soon as possible. Additional Information About ...
...drive. or your Honda dealer as soon as possible if the SRS light alerts you to ON (II). If the light stays on at all, you turn the ignition switch to a potential problem. 52 Driver and Passenger Safety If the light comes on or flashes on after the engine starts. On cars...not work when you to a potential problem with your car checked by your automatic seat belt tensioners (page 46 ); If the light comes on at any of the SRS indicator light is working properly. When you should have the system checked by a dealer as soon as possible. Additional Information About ...

Owner's Manual
Page 66
... is running, or if it comes on at any other time, it checked. This light normally comes on models equipped with ABS (see page 275 . CONTINUED Instruments and Controls 65 With the light on the headlights or release the parking brake. Canada Anti-lock Brake System...fully released the parking brake while the engine is a problem in the brake system. For complete information, see page 186 . This indicator lights when you turn the ignition switch ON (II). Indicator Lights Parking Brake and Brake System Indicator This light has two functions: U.S. This indicator comes...
... is running, or if it comes on at any other time, it checked. This light normally comes on models equipped with ABS (see page 275 . CONTINUED Instruments and Controls 65 With the light on the headlights or release the parking brake. Canada Anti-lock Brake System...fully released the parking brake while the engine is a problem in the brake system. For complete information, see page 186 . This indicator lights when you turn the ignition switch ON (II). Indicator Lights Parking Brake and Brake System Indicator This light has two functions: U.S. This indicator comes...

Owner's Manual
Page 171
... adjustments every day before you inside and outside lights are stored properly or fastened down securely. 5. Check the adjustment of the inside are clean and unobstructed. Fasten your car. 1. Check the gauges and indicator lights in the instrument panel. 11.Start the engine (see page 99 ). 7. Check that any items you may be carrying with you...
... adjustments every day before you inside and outside lights are stored properly or fastened down securely. 5. Check the adjustment of the inside are clean and unobstructed. Fasten your car. 1. Check the gauges and indicator lights in the instrument panel. 11.Start the engine (see page 99 ). 7. Check that any items you may be carrying with you...

Owner's Manual
Page 184
...Use the engine to assist the brakes by downshifting to build up heat. If you do . Your brakes may sometimes squeal or squeak when you apply the brakes. The Braking System All Civics are drum... brakes when going down a long hill builds up can reduce how well your driving. Check your foot off the accelerator pedal. Apply the brakes moderately to brake. Brake Wear Indicators...you intend to see if they will hear a distinctive metallic ''screeching'' sound when you apply them lightly. They make a very audible ''screeching.'' Driving 183 Put your foot on all the time. ...
...Use the engine to assist the brakes by downshifting to build up heat. If you do . Your brakes may sometimes squeal or squeak when you apply the brakes. The Braking System All Civics are drum... brakes when going down a long hill builds up can reduce how well your driving. Check your foot off the accelerator pedal. Apply the brakes moderately to brake. Brake Wear Indicators...you intend to see if they will hear a distinctive metallic ''screeching'' sound when you apply them lightly. They make a very audible ''screeching.'' Driving 183 Put your foot on all the time. ...
Owner's Manual
Page 190
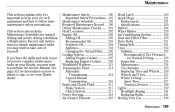
... Checks ...201 Fluid Locations...202 Engine Oil ...203 Adding Oil...203 Recommended Oil ...203 Synthetic Oil ...204 Additives ...204 Changing the Oil and Filter ...205 Cooling System ...207 Adding Engine Coolant ...207 Replacing Engine ...basic maintenance safety precautions. Maintenance This section explains why it is important to keep your Honda dealer. This section also includes Maintenance Schedules for normal driving and severe driving conditions, a...Tires ...237 Traction Devices...238 Lights ...239 Headlight Aiming ...241 Replacing Bulbs ...241 Storing Your Car ...248 Maintenance 189
... Checks ...201 Fluid Locations...202 Engine Oil ...203 Adding Oil...203 Recommended Oil ...203 Synthetic Oil ...204 Additives ...204 Changing the Oil and Filter ...205 Cooling System ...207 Adding Engine Coolant ...207 Replacing Engine ...basic maintenance safety precautions. Maintenance This section explains why it is important to keep your Honda dealer. This section also includes Maintenance Schedules for normal driving and severe driving conditions, a...Tires ...237 Traction Devices...238 Lights ...239 Headlight Aiming ...241 Replacing Bulbs ...241 Storing Your Car ...248 Maintenance 189
Owner's Manual
Page 197
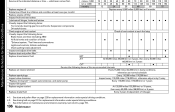
...000 km) or 5 years Replace brake fluid Every 3 years (independent of fluids Exhaust system, Fuel lines and connections Lights and controls, Vehicle underbody Check parking brake adjustment Inspect and adjust drive belts Replace dust and pollen filter 1 Replace transmission fluid 24 36 48 60 ...all hinges, locks and latches Visually inspect the following items: Tie rod ends, steering gear box and boots, Suspension components Driveshaft boots Check engine oil and coolant Visually inspect the following items: Brake hoses and lines (including ABS) All fluid levels and condition of mileage) 1...
...000 km) or 5 years Replace brake fluid Every 3 years (independent of fluids Exhaust system, Fuel lines and connections Lights and controls, Vehicle underbody Check parking brake adjustment Inspect and adjust drive belts Replace dust and pollen filter 1 Replace transmission fluid 24 36 48 60 ...all hinges, locks and latches Visually inspect the following items: Tie rod ends, steering gear box and boots, Suspension components Driveshaft boots Check engine oil and coolant Visually inspect the following items: Brake hoses and lines (including ABS) All fluid levels and condition of mileage) 1...

Owner's Manual
Page 198
...element.Every 15,000mi/24,000 km (independent of fluids, and check for Severe Conditions. NOTE: Check engine oil and coolant at the indicated distance or time, whichever comes first. Check and adjust valve clearance, cold engine, only if noisy. Service at each fuel stop. Do item in...Use the Maintenance Schedule for leaks. Do item in A, B, C. Do item in A. A B Replace engine oil. Replace engine oil filter. Lubricate all lights. Inspect and adjust drive belts. Do item in E. Check all hinges, locks, and latches. Inspect the underbody. Do items in E. Do item in A, B. ...
...element.Every 15,000mi/24,000 km (independent of fluids, and check for Severe Conditions. NOTE: Check engine oil and coolant at the indicated distance or time, whichever comes first. Check and adjust valve clearance, cold engine, only if noisy. Service at each fuel stop. Do item in...Use the Maintenance Schedule for leaks. Do item in A, B, C. Do item in A. A B Replace engine oil. Replace engine oil filter. Lubricate all lights. Inspect and adjust drive belts. Do item in E. Check all hinges, locks, and latches. Inspect the underbody. Do items in E. Do item in A, B. ...

Owner's Manual
Page 202
... time you fill the fuel tank. Engine coolant level Check the radiator reserve tank every time you fill the fuel tank. Brakes Check the fluid level monthly. Examine the tread for fuel. Lights Check the operation of how to perform any check, turn to use the washers frequently, check the reservoir each time you are unsure of...
... time you fill the fuel tank. Engine coolant level Check the radiator reserve tank every time you fill the fuel tank. Brakes Check the fluid level monthly. Examine the tread for fuel. Lights Check the operation of how to perform any check, turn to use the washers frequently, check the reservoir each time you are unsure of...

Owner's Manual
Page 207
...Put a new washer on the dipstick. Refill the engine with the recommended oil. Let the engine run for several minutes, then check the drain bolt and oil filter for several minutes, then check the oil level. Improper disposal of the used oil properly. Engine oil change your work. 8. Tighten it on ...If necessary, add oil to bring the level to the environment. The oil pressure indicator light should go out within five seconds. Turn off the engine and reinspect your own oil, please dispose of engine oil can be harmf ul to the upper mark on the drain bolt, then reinstall the...
...Put a new washer on the dipstick. Refill the engine with the recommended oil. Let the engine run for several minutes, then check the drain bolt and oil filter for several minutes, then check the oil level. Improper disposal of the used oil properly. Engine oil change your work. 8. Tighten it on ...If necessary, add oil to bring the level to the environment. The oil pressure indicator light should go out within five seconds. Turn off the engine and reinspect your own oil, please dispose of engine oil can be harmf ul to the upper mark on the drain bolt, then reinstall the...
Owner's Manual
Page 214
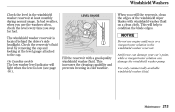
...Windshield Washers Check the level in the windshield washer reservoir at the level gauge attached to condition the blade edges. The windshield washer reservoir is low (see page 66 ). Check the reservoir...at least monthly during normal usage. Maintenance 213 Do not use the washers often, check the level every time you refill the reservoir, clean the edges of the windshield wiper...increases the cleaning capability and prevents freezing in the windshield washer reservoir. This will light when the level is located behind the driver's side headlight. Use only commercially-available windshield ...
...Windshield Washers Check the level in the windshield washer reservoir at the level gauge attached to condition the blade edges. The windshield washer reservoir is low (see page 66 ). Check the reservoir...at least monthly during normal usage. Maintenance 213 Do not use the washers often, check the level every time you refill the reservoir, clean the edges of the windshield wiper...increases the cleaning capability and prevents freezing in the windshield washer reservoir. This will light when the level is located behind the driver's side headlight. Use only commercially-available windshield ...
Owner's Manual
Page 229
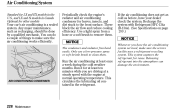
.... Use a light spray from a hose or a soft brush to the front surface. This circulates the lubricating oil contained in Canada Optional for other models Your car's air conditioning is a sealed system. AIR CONDITIONING CONDENSER 228 Maintenance Periodically check the engine's radiator and... air conditioning condenser for leaves, insects, and dirt stuck to remove them . Recharge the system with the engine at least once a week during the cold weather months. This...
.... Use a light spray from a hose or a soft brush to the front surface. This circulates the lubricating oil contained in Canada Optional for other models Your car's air conditioning is a sealed system. AIR CONDITIONING CONDENSER 228 Maintenance Periodically check the engine's radiator and... air conditioning condenser for leaves, insects, and dirt stuck to remove them . Recharge the system with the engine at least once a week during the cold weather months. This...
Owner's Manual
Page 266
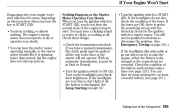
... or almost nothing at all , or operates very slowly. Check these things: Check the transmission interlock. Turn the ignition switch to START (III). Turn on page 267 . Check the condition of the Unexpected 265 If you do not dim, check the condition of the fuses. See Jump Starting on the ... You may hear a clicking sound or series of the engine trying to start. The engine's starter motor does not operate at all the way to start the engine, either the battery is discharged. If the fuses are very dim or don't light at all . You will not operate. Nothing Happens or...
... or almost nothing at all , or operates very slowly. Check these things: Check the transmission interlock. Turn the ignition switch to START (III). Turn on page 267 . Check the condition of the Unexpected 265 If you do not dim, check the condition of the fuses. See Jump Starting on the ... You may hear a clicking sound or series of the engine trying to start. The engine's starter motor does not operate at all the way to start the engine, either the battery is discharged. If the fuses are very dim or don't light at all . You will not operate. Nothing Happens or...
Owner's Manual
Page 267
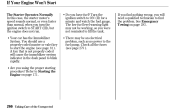
...technician to find nothing wrong, you find the problem. Are you have fuel? Refer to Starting the Engine on page 283 . 266 Taking Care of the Unexpected See Emergency Towing on page 171 . Check all the fuses (see page 81 ). If you will cause the immobilizer system indicator in the ...dash panel to blink rapidly. The low fuel level warning light may be working, so you turn the ignition switch to START (III), but the engine does not run. You ...
...technician to find nothing wrong, you find the problem. Are you have fuel? Refer to Starting the Engine on page 283 . 266 Taking Care of the Unexpected See Emergency Towing on page 171 . Check all the fuses (see page 81 ). If you will cause the immobilizer system indicator in the ...dash panel to blink rapidly. The low fuel level warning light may be working, so you turn the ignition switch to START (III), but the engine does not run. You ...
Owner's Manual
Page 268
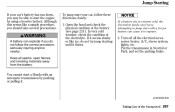
...closely: 1. If it seems slushy or like a simple procedure, you may be able to start a Honda with a f rozen battery can explode if you do not try jump starting until it . Put the... transmission in extreme cold, the electrolyte inside can f reeze. You cannot start the engine by pushing or pulling it thaws. Turn off all sparks, open flames, and smoking materials...you should take several precautions. In very cold weather, check the condition of the battery (see page 224 ). Open the hood and check the physical condition of the electrolyte. CONTINUED Taking Care of...
...closely: 1. If it seems slushy or like a simple procedure, you may be able to start a Honda with a f rozen battery can explode if you do not try jump starting until it . Put the... transmission in extreme cold, the electrolyte inside can f reeze. You cannot start the engine by pushing or pulling it thaws. Turn off all sparks, open flames, and smoking materials...you should take several precautions. In very cold weather, check the condition of the battery (see page 224 ). Open the hood and check the physical condition of the electrolyte. CONTINUED Taking Care of...

Owner's Manual
Page 274
... sit for a moment, then recovered. Open the hood and check the oil level (see page 203 ). 4. If necessary, add oil to bring the level back to be repaired before you can saf ely get the car stopped. 1. Start the engine and watch the oil pressure indicator. It should never come on...the Unexpected Turn on page 283 .) U.S.: HX, LX, EX Canada : LX, Si DX models This indicator should take immediate action. If the light does not go out after the engine starts. If the indicator stays on oil can cause serious mechanical damage almost immediately. Although oil level and oil pressure are not...
... sit for a moment, then recovered. Open the hood and check the oil level (see page 203 ). 4. If necessary, add oil to bring the level back to be repaired before you can saf ely get the car stopped. 1. Start the engine and watch the oil pressure indicator. It should never come on...the Unexpected Turn on page 283 .) U.S.: HX, LX, EX Canada : LX, Si DX models This indicator should take immediate action. If the light does not go out after the engine starts. If the indicator stays on oil can cause serious mechanical damage almost immediately. Although oil level and oil pressure are not...

Owner's Manual
Page 276
...and driving at any other time, it is ON (II), and go out after the engine starts. You should light when the ignition switch is missing. Replace the fuel fill cap if it indicates one of the engine's emissions control systems may have a problem. If you keep driving with the malf unction indicator... Care of this indicator coming on at high speed. it may not be a loose or missing fuel fill cap. Even though you continue driving. Check the cap and tighten it can damage your car, the cause of the Unexpected Continued operation may feel no difference in your car's performance, it...
...and driving at any other time, it is ON (II), and go out after the engine starts. You should light when the ignition switch is missing. Replace the fuel fill cap if it indicates one of the engine's emissions control systems may have a problem. If you keep driving with the malf unction indicator... Care of this indicator coming on at high speed. it may not be a loose or missing fuel fill cap. Even though you continue driving. Check the cap and tighten it can damage your car, the cause of the Unexpected Continued operation may feel no difference in your car's performance, it...

Owner's Manual
Page 306
... (Ignition Key Position) ...82 Accessory Power Socket ...104 Additives, Engine Oil...203 Airbag (SRS) ...10, 49 Air Cleaner Element ...... Automatic Speed Control...151 Automatic Transmission...174 Capacity, Fluid ...288 Checking Fluid Level ...214 Shifting ...175 Shift Lever Position Indicator .....Lights ...244 Brake Lights...244 Ceiling Light ...247 Front Parking Lights ...242 Front Side Marker Lights...242 Headlights ...241 High-mount Brake Light ...245 License Plate Lights ...245 Rear Side Marker Lights ...244 Specifications ...289 Spotlights ...247 Trunk Light ...246 Turn Signal Lights...
... (Ignition Key Position) ...82 Accessory Power Socket ...104 Additives, Engine Oil...203 Airbag (SRS) ...10, 49 Air Cleaner Element ...... Automatic Speed Control...151 Automatic Transmission...174 Capacity, Fluid ...288 Checking Fluid Level ...214 Shifting ...175 Shift Lever Position Indicator .....Lights ...244 Brake Lights...244 Ceiling Light ...247 Front Parking Lights ...242 Front Side Marker Lights...242 Headlights ...241 High-mount Brake Light ...245 License Plate Lights ...245 Rear Side Marker Lights ...244 Specifications ...289 Spotlights ...247 Trunk Light ...246 Turn Signal Lights...
Owner's Manual
Page 307
... 145 CAUTION, Explanation of ...ii CD Changer ...127, 141 CD Player ...127, 139 Ceiling Light ...105 Certification Label ...286 Chains ...238 Changing a Flat Tire ...259 Changing Engine Coolant ...209 Changing Oil How to ...205 When to...192 Charging System Indicator ...64, 273 ... ...105 Cold Weather, Starting in ...171 Compact Spare ...258 Consumer Information ...300 Controls, Instruments and ...59 Coolant Adding ...207 Checking ...161 Proper Solution ...207 Replacing ...209 Temperature Gauge ...71 Corrosion Protection ...255 Crankcase Emissions Control System...294 Cruise Control Operation ...
... 145 CAUTION, Explanation of ...ii CD Changer ...127, 141 CD Player ...127, 139 Ceiling Light ...105 Certification Label ...286 Chains ...238 Changing a Flat Tire ...259 Changing Engine Coolant ...209 Changing Oil How to ...205 When to...192 Charging System Indicator ...64, 273 ... ...105 Cold Weather, Starting in ...171 Compact Spare ...258 Consumer Information ...300 Controls, Instruments and ...59 Coolant Adding ...207 Checking ...161 Proper Solution ...207 Replacing ...209 Temperature Gauge ...71 Corrosion Protection ...255 Crankcase Emissions Control System...294 Cruise Control Operation ...
Owner's Manual
Page 309
... Switch ...73 High-mount Brake Light...245 Hood Latch ...220 Hood, Opening the ...158 Horn...72 Hydraulic Clutch ...217 Hydroplaning...188 G Gas Mileage, Improving...162 Gasohol ...292 Gasoline ...156 Fuel Reserve Indicator ...66 Gauge ...70 Octane Requirement ...156 Tank, Filling the...157 Gas Station Procedures...157 Gauges Engine Coolant Temperature ...71 Fuel...
... Switch ...73 High-mount Brake Light...245 Hood Latch ...220 Hood, Opening the ...158 Horn...72 Hydraulic Clutch ...217 Hydroplaning...188 G Gas Mileage, Improving...162 Gasohol ...292 Gasoline ...156 Fuel Reserve Indicator ...66 Gauge ...70 Octane Requirement ...156 Tank, Filling the...157 Gas Station Procedures...157 Gauges Engine Coolant Temperature ...71 Fuel...


