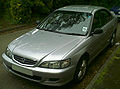
Owner's Manual
Page 1
Instruments and Controls ...51 Instrument panel indicator and gauge, and how to start the engine, shift the transmission, and park, plus towing a trailer. Before Driving...177 What gasoline to use, how to break-in your vehicle to the dealer. Driving ...191 The proper way to use and care of the warranties covering your vehicle ever needs body repairs. Things to look for if your new Acura, and how to operate the...
Instruments and Controls ...51 Instrument panel indicator and gauge, and how to start the engine, shift the transmission, and park, plus towing a trailer. Before Driving...177 What gasoline to use, how to break-in your vehicle to the dealer. Driving ...191 The proper way to use and care of the warranties covering your vehicle ever needs body repairs. Things to look for if your new Acura, and how to operate the...
Owner's Manual
Page 2
...investment. Your selection of driving pleasure. California Proposition 65 Warning WARNING: This product contains or emits chemicals known to the State of your satisfaction and will find information that your Honda dealer's staff is ...driving controls and convenience items. Afterwards, keep in mind that is to answer any time. In it, you will give you read this owner's manual in servicing the many systems unique to your driving trouble-free while it at any questions and concerns. When your car needs maintenance, keep this manual. As you years of a 2001 Honda Accord...
...investment. Your selection of driving pleasure. California Proposition 65 Warning WARNING: This product contains or emits chemicals known to the State of your satisfaction and will find information that your Honda dealer's staff is ...driving controls and convenience items. Afterwards, keep in mind that is to answer any time. In it, you will give you read this owner's manual in servicing the many systems unique to your driving trouble-free while it at any questions and concerns. When your car needs maintenance, keep this manual. As you years of a 2001 Honda Accord...

Owner's Manual
Page 52
... reach. Instrument Panel Brightness...63 Turn Signals...64 Windshield Wipers...64 Windshield Washers...66 Hazard Warning...66 Rear Window Defogger...66 Steering Wheel Adjustment...67 Steering Wheel Controls ...68 Cruise Control...68 Remote Audio Controls ...70 Keys and Locks...71 Keys...71 Immobilizer System...72 Ignition Switch...73 Door Locks...74 Power Door Locks...75 Remote Transmitter...76 Childproof Door Locks...80 Trunk...80 Inside Trunk Opener...82 Glove Box...82 HomeLink Universal Transmitter...83 Seat Adjustments...88 Front Seat Adjustments...88 Driver's Seat Manual Height Adjustment...
... reach. Instrument Panel Brightness...63 Turn Signals...64 Windshield Wipers...64 Windshield Washers...66 Hazard Warning...66 Rear Window Defogger...66 Steering Wheel Adjustment...67 Steering Wheel Controls ...68 Cruise Control...68 Remote Audio Controls ...70 Keys and Locks...71 Keys...71 Immobilizer System...72 Ignition Switch...73 Door Locks...74 Power Door Locks...75 Remote Transmitter...76 Childproof Door Locks...80 Trunk...80 Inside Trunk Opener...82 Glove Box...82 HomeLink Universal Transmitter...83 Seat Adjustments...88 Front Seat Adjustments...88 Driver's Seat Manual Height Adjustment...
Owner's Manual
Page 57
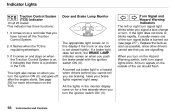
... the trunk or any door is on the outside of the car should flash. See page 206 for a few seconds when you turn on when you turn . Have your brake lights repaired right away. Replace the bulb as soon as a reminder that you are signalling. Instruments and Controls If a brake light does not work, the BRAKE LAMP indicator comes on the Hazard Warning switch, both turn signal lights blink. The appropriate light comes...
... the trunk or any door is on the outside of the car should flash. See page 206 for a few seconds when you turn on when you turn . Have your brake lights repaired right away. Replace the bulb as soon as a reminder that you are signalling. Instruments and Controls If a brake light does not work, the BRAKE LAMP indicator comes on the Hazard Warning switch, both turn signal lights blink. The appropriate light comes...

Owner's Manual
Page 68
... to lock the steering wheel in that position. 4. Push the lever up and down . 2. Instruments and Controls Make any steering wheel adjustment before starting to move it up to side. Move the steering wheel to properly position the steering wheel. Adjusting the steering wheel position while driving may cause you to lose control of the rear window can see the instrument panel gauges and the indicator lights. 3. Adjust the steering wheel only when the car...
... to lock the steering wheel in that position. 4. Push the lever up and down . 2. Instruments and Controls Make any steering wheel adjustment before starting to move it up to side. Move the steering wheel to properly position the steering wheel. Adjusting the steering wheel position while driving may cause you to lose control of the rear window can see the instrument panel gauges and the indicator lights. 3. Adjust the steering wheel only when the car...

Owner's Manual
Page 73
... have lost your car undriveable. Turn the ignition switch to ACCESSORY (I) or LOCK (0). Operation is near the ignition switch when you cannot start the engine, contact your Honda dealer. Keep other metal object is subject to the following two conditions: (1) This device may not cause harmful interference, and (2) this device must be used , the engine's fuel system is used in the ignition switch for compliance could...
... have lost your car undriveable. Turn the ignition switch to ACCESSORY (I) or LOCK (0). Operation is near the ignition switch when you cannot start the engine, contact your Honda dealer. Keep other metal object is subject to the following two conditions: (1) This device may not cause harmful interference, and (2) this device must be used , the engine's fuel system is used in the ignition switch for compliance could...

Owner's Manual
Page 90
Make all adjustments before you start driving. Pull up on the outside of the seat cushion to raise the front of the seat bottom and turn the rear dial to raise the rear. Instruments and Controls Push it down to raise the seat. On EX model without leather The height of your driver's seat is power adjustable. Turn the front dial on the switch to lower the seat. Seat Adjustments Driver's Seat Manual Height Adjustment Driver's Seat Power Height Adjustment On LX model The height of your driver's seat is adjustable.
Make all adjustments before you start driving. Pull up on the outside of the seat cushion to raise the front of the seat bottom and turn the rear dial to raise the rear. Instruments and Controls Push it down to raise the seat. On EX model without leather The height of your driver's seat is power adjustable. Turn the front dial on the switch to lower the seat. Seat Adjustments Driver's Seat Manual Height Adjustment Driver's Seat Power Height Adjustment On LX model The height of your driver's seat is adjustable.

Owner's Manual
Page 98
... want . CONTINUED Instruments and Controls Power Windows On all models except DX Your car's windows are away from the windows before closing them. Make sure your passengers are electricallypowered. Release the switch when you want the window to raise or lower any of the passengers' windows, push down until the window reaches the desired position. DRIVER'S WINDOW SWITCH MAIN SWITCH The driver's door armrest has a master power window control panel. Each door has a switch that controls its window. To open...
... want . CONTINUED Instruments and Controls Power Windows On all models except DX Your car's windows are away from the windows before closing them. Make sure your passengers are electricallypowered. Release the switch when you want the window to raise or lower any of the passengers' windows, push down until the window reaches the desired position. DRIVER'S WINDOW SWITCH MAIN SWITCH The driver's door armrest has a master power window control panel. Each door has a switch that controls its window. To open...

Owner's Manual
Page 99
... window automatically goes all the way down and release it. Use the switch under the left dashboard vent to the passengers' windows. The ignition switch must be tilted up to lower the driver's window. The window will still operate for ventilation, or it can be raised or lowered. Opening either front door cancels the delay function. Power Windows, Moonroof The master control panel also contains these extra features: AUTO - The MAIN switch controls power...
... window automatically goes all the way down and release it. Use the switch under the left dashboard vent to the passengers' windows. The ignition switch must be tilted up to lower the driver's window. The window will still operate for ventilation, or it can be raised or lowered. Opening either front door cancels the delay function. Power Windows, Moonroof The master control panel also contains these extra features: AUTO - The MAIN switch controls power...

Owner's Manual
Page 216
... run over . Do not try to hold the vehicle in all driving situations, and obey posted speed limits for additional gear information.) Driving When climbing hills, closely watch your temperature gauge. If you must stop when towing a trailer. If the automatic transmission shifts frequently between 3rd and 4th gears while going up a hill, shift to practice driving maneuvers before heading for braking. For your safety and the safety...
... run over . Do not try to hold the vehicle in all driving situations, and obey posted speed limits for additional gear information.) Driving When climbing hills, closely watch your temperature gauge. If you must stop when towing a trailer. If the automatic transmission shifts frequently between 3rd and 4th gears while going up a hill, shift to practice driving maneuvers before heading for braking. For your safety and the safety...

Owner's Manual
Page 218
... Oil...235 Synthetic Oil...235 Additives...235 Changing the Oil and Filter...236 Cooling System...239 Adding Engine Coolant...239 Replacing Engine Coolant...241 Windshield Washers...246 Transmission Fluid...247 Automatic Transmission...247 5-speed Manual Transmission...249 Brake and Clutch Fluid...251 Brake System...251 Clutch System...252 Power Steering...252 Air Cleaner Element...253 Hood Latch...256 Spark Plugs...256 Replacement...256 Specifications...257 Battery...260 Wiper Blades...263 Air Conditioning System...265 Air Conditioning Filter...266 Drive Belts...266 Timing Belt...267 Tires...
... Oil...235 Synthetic Oil...235 Additives...235 Changing the Oil and Filter...236 Cooling System...239 Adding Engine Coolant...239 Replacing Engine Coolant...241 Windshield Washers...246 Transmission Fluid...247 Automatic Transmission...247 5-speed Manual Transmission...249 Brake and Clutch Fluid...251 Brake System...251 Clutch System...252 Power Steering...252 Air Cleaner Element...253 Hood Latch...256 Spark Plugs...256 Replacement...256 Specifications...257 Battery...260 Wiper Blades...263 Air Conditioning System...265 Air Conditioning Filter...266 Drive Belts...266 Timing Belt...267 Tires...

Owner's Manual
Page 221
... proper octane rating (see page 178). Select the schedule for "Severe Conditions" if most of safety, dependability, and emissions control performance. Drive your car's load limit. You should have your car according to retain its high level of your vehicle as scheduled to the time and mileage periods on one or more of several miles (kilometers). Operate your car serviced and what things need attention. Maintenance Schedule The Maintenance Schedule specifies...
... proper octane rating (see page 178). Select the schedule for "Severe Conditions" if most of safety, dependability, and emissions control performance. Drive your car's load limit. You should have your car according to retain its high level of your vehicle as scheduled to the time and mileage periods on one or more of several miles (kilometers). Operate your car serviced and what things need attention. Maintenance Schedule The Maintenance Schedule specifies...
Owner's Manual
Page 236
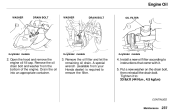
... filter. 4. Open the hood and remove the engine oil fill cap. Tighten it to instructions that come with it. 5. Drain the oil into an appropriate container. 3. Put a new washer on the drain bolt, then reinstall the drain bolt. Remove the oil filter and let the remaining oil drain. Install a new oil filter according to : 33 Ibf.ft (44 N.m , 4.5 kgf.m) CONTINUED Maintenance Engine Oil WASHER DRAIN BOLT WASHER DRAIN BOLT OIL FILTER 4-cylinder models 6-cylinder models 4-cylinder models...
... filter. 4. Open the hood and remove the engine oil fill cap. Tighten it to instructions that come with it. 5. Drain the oil into an appropriate container. 3. Put a new washer on the drain bolt, then reinstall the drain bolt. Remove the oil filter and let the remaining oil drain. Install a new oil filter according to : 33 Ibf.ft (44 N.m , 4.5 kgf.m) CONTINUED Maintenance Engine Oil WASHER DRAIN BOLT WASHER DRAIN BOLT OIL FILTER 4-cylinder models 6-cylinder models 4-cylinder models...
Owner's Manual
Page 242
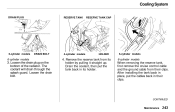
... control cable and the ground cable from their clips. The coolant will drain through the splash guard. Loosen the drain bolt. 4. CONTINUED Maintenance Drain the coolant, then put the cables back in its holder by pulling it straight up. After installing the tank back in place, put the tank back in their clips. Cooling System DRAIN PLUG RESERVE TANK RESERVE TANK CAP 6-cylinder models DRAIN BOLT 4-cylinder models HOLDER 6-cylinder models 6-cylinder models...
... control cable and the ground cable from their clips. The coolant will drain through the splash guard. Loosen the drain bolt. 4. CONTINUED Maintenance Drain the coolant, then put the cables back in its holder by pulling it straight up. After installing the tank back in place, put the tank back in their clips. Cooling System DRAIN PLUG RESERVE TANK RESERVE TANK CAP 6-cylinder models DRAIN BOLT 4-cylinder models HOLDER 6-cylinder models 6-cylinder models...

Owner's Manual
Page 245
... you use engine antifreeze or a vinegar/water solution in cold weather. Canadian Models LEVEL GAUGE 4-cylinder models 6-cylinder models NOTICE Do not use the washers often, check the level every time you refill the reservoir, clean the edges of the windshield wiper blades with a good-quality windshield washer fluid. The low washer level indicator will help to the cap. Maintenance Check the reservoir's fluid level by removing...
... you use engine antifreeze or a vinegar/water solution in cold weather. Canadian Models LEVEL GAUGE 4-cylinder models 6-cylinder models NOTICE Do not use the washers often, check the level every time you refill the reservoir, clean the edges of the windshield wiper blades with a good-quality windshield washer fluid. The low washer level indicator will help to the cap. Maintenance Check the reservoir's fluid level by removing...

Owner's Manual
Page 284
... door and trunk seals. Also, apply a vehicle body wax to the painted surfaces that time or mileage. If you store your car for 12 months or longer, have your Honda dealer perform the inspections called for in the maintenance schedule are completely dry. Block the rear wheels. If the car is being stored indoors). Cover the car with the door and trunk seals. Fill the fuel tank. Support the front wiper blade arms...
... door and trunk seals. Also, apply a vehicle body wax to the painted surfaces that time or mileage. If you store your car for 12 months or longer, have your Honda dealer perform the inspections called for in the maintenance schedule are completely dry. Block the rear wheels. If the car is being stored indoors). Cover the car with the door and trunk seals. Fill the fuel tank. Support the front wiper blade arms...

Owner's Manual
Page 344
... Anchorage Points...38 Cleaner, Air...253 Cleaning Aluminum Wheels...289 DANGER, Explanation of...ii Dashboard...52 Daytime Running Lights...63 Defects, Reporting Safety...344 Defogger, Rear Window...64 Dimensions...328 Dimming the Headlights...62 Dipstick Automatic Transmission . 247, 248 Engine Oil...182 Directional Signals...64 Disc Brake Wear Indicators...203 Disposal of Used Oil...238 Doors Locking and Unlocking...74 Power Door Locks...75 DOT Tire Quality Grading...329 Downshifting, 5-speed Manual Transmission...195 Drive Belts...266 Driver and Passenger Safety...5
... Anchorage Points...38 Cleaner, Air...253 Cleaning Aluminum Wheels...289 DANGER, Explanation of...ii Dashboard...52 Daytime Running Lights...63 Defects, Reporting Safety...344 Defogger, Rear Window...64 Dimensions...328 Dimming the Headlights...62 Dipstick Automatic Transmission . 247, 248 Engine Oil...182 Directional Signals...64 Disc Brake Wear Indicators...203 Disposal of Used Oil...238 Doors Locking and Unlocking...74 Power Door Locks...75 DOT Tire Quality Grading...329 Downshifting, 5-speed Manual Transmission...195 Drive Belts...266 Driver and Passenger Safety...5

Owner's Manual
Page 345
... 5-speed Manual Transmission Shifting the...195 Flashers, Hazard Warning...66 Flat Tire, Changing a...297 Fluids Automatic Transmission .. 247, 248 Brake...251 Clutch...252 Manual Transmission...249 Power Steering...252 Windshield Washer...246 FM Stereo Radio Reception...158 Folding Rear Seat...92 Foreign Countries, Driving in...332 Four-way Flashers...66 Fuel...178 Fill Door and Cap...178 Gauge...58 Octane Requirement...178 Oxygenated...331 Tank, Filling the...178 Fuses, Checking the...316 CONTINUED Economy, Fuel...185 Emergencies on the Road...295 Battery...
... 5-speed Manual Transmission Shifting the...195 Flashers, Hazard Warning...66 Flat Tire, Changing a...297 Fluids Automatic Transmission .. 247, 248 Brake...251 Clutch...252 Manual Transmission...249 Power Steering...252 Windshield Washer...246 FM Stereo Radio Reception...158 Folding Rear Seat...92 Foreign Countries, Driving in...332 Four-way Flashers...66 Fuel...178 Fill Door and Cap...178 Gauge...58 Octane Requirement...178 Oxygenated...331 Tank, Filling the...178 Fuses, Checking the...316 CONTINUED Economy, Fuel...185 Emergencies on the Road...295 Battery...

Owner's Manual
Page 346
......i Gas Mileage, Improving...185 Gasohol...331 Gasoline...178 Gauge...58 Octane Requirement...178 Tank, Filling the...178 Gas Station Procedures...178 Gauges Engine Coolant Temperature ...59 Fuel...59 Speedometer...58 Tachometer...58 Gearshift Lever Positions Automatic Transmission...197 5-speed Manual Transmission...195 Glass Cleaning...292 Glove Box...82 Jacking up the Car...209 Jack, Tire...298 Jump Starting...304 Halogen Headlight Bulbs...278 Hazard Warning Flashers...66 Identification Number, Vehicle...326 Ignition Keys...71 Switch...73 Timing Control...
......i Gas Mileage, Improving...185 Gasohol...331 Gasoline...178 Gauge...58 Octane Requirement...178 Tank, Filling the...178 Gas Station Procedures...178 Gauges Engine Coolant Temperature ...59 Fuel...59 Speedometer...58 Tachometer...58 Gearshift Lever Positions Automatic Transmission...197 5-speed Manual Transmission...195 Glass Cleaning...292 Glove Box...82 Jacking up the Car...209 Jack, Tire...298 Jump Starting...304 Halogen Headlight Bulbs...278 Hazard Warning Flashers...66 Identification Number, Vehicle...326 Ignition Keys...71 Switch...73 Timing Control...

Owner's Manual
Page 349
... How Your Airbags Work...43, 45 How Your SRS Indicator Works...43 SRS Components...43 SRS Service...48 SRS Indicator...43, 55 START (Ignition Key Position) ...74 Starting the Engine...193 In Cold Weather at High Altitude...194 With a Dead Battery...306 Steam Coming from Engine...308 Steering Wheel Adjustment...67 Anti-theft Column Lock...73 Stereo Sound System...125, 153 Storing Your Car...287 Sun Visor...105...
... How Your Airbags Work...43, 45 How Your SRS Indicator Works...43 SRS Components...43 SRS Service...48 SRS Indicator...43, 55 START (Ignition Key Position) ...74 Starting the Engine...193 In Cold Weather at High Altitude...194 With a Dead Battery...306 Steam Coming from Engine...308 Steering Wheel Adjustment...67 Anti-theft Column Lock...73 Stereo Sound System...125, 153 Storing Your Car...287 Sun Visor...105...


