
Owner's Manual
Page 2
Every 2001 Jimmy/Envoy under warranty is backed with the following services: 1-800-GMC-8782 ( For vehicles purchased in Canada, call 1-800-268-6800) call 1-800-268-6800 ) that provides in an emergency: Courtesy Transportation Trip Routing Free lockout assistance Free dead-battery assistance Free out-of-fuel assistance Free flat-tire change Emergency towing
Every 2001 Jimmy/Envoy under warranty is backed with the following services: 1-800-GMC-8782 ( For vehicles purchased in Canada, call 1-800-268-6800) call 1-800-268-6800 ) that provides in an emergency: Courtesy Transportation Trip Routing Free lockout assistance Free dead-battery assistance Free out-of-fuel assistance Free flat-tire change Emergency towing
Owner's Manual
Page 3
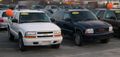
Part Number X2111 A First Edition © Copyright General Motors Corporation 2000 All Rights Reserved i 2001 GMC Jimmy/Envoy Owner's Manual Litho in U.S.A.
Part Number X2111 A First Edition © Copyright General Motors Corporation 2000 All Rights Reserved i 2001 GMC Jimmy/Envoy Owner's Manual Litho in U.S.A.
Owner's Manual
Page 4
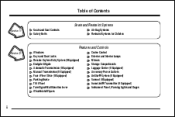
Table of Contents Seats and Restraint Systems Section 1 Seats and Seat Controls Safety Belts Air Bag Systems Restraint Systems for Children Features and Controls Section 2 Windows Keys and Door Locks Remote Keyless Entry System (If Equipped) Endgate/Liftgate Automatic Transmission (If Equipped) Manual Transmission (If Equipped) Four-Wheel Drive (If Equipped) Parking Brake Tilt Wheel Turn Signal/Multifunction Lever Windshield Wipers Cruise Control Exterior and Interior Lamps Mirrors Storage Compartments Luggage Carrier (If Equipped) Accessory Power Outlets OnStar® System (If Equipped)...
Table of Contents Seats and Restraint Systems Section 1 Seats and Seat Controls Safety Belts Air Bag Systems Restraint Systems for Children Features and Controls Section 2 Windows Keys and Door Locks Remote Keyless Entry System (If Equipped) Endgate/Liftgate Automatic Transmission (If Equipped) Manual Transmission (If Equipped) Four-Wheel Drive (If Equipped) Parking Brake Tilt Wheel Turn Signal/Multifunction Lever Windshield Wipers Cruise Control Exterior and Interior Lamps Mirrors Storage Compartments Luggage Carrier (If Equipped) Accessory Power Outlets OnStar® System (If Equipped)...

Owner's Manual
Page 5
Table of Contents (cont'd) Comfort Controls and Audio Systems Section 3 Heating and Air Conditioning Setting the Radio Clock Radio/Cassette Player/CD Player Radio Theft-Deterrent Feature Steering Wheel Controls (If Equipped) Your Driving and the Road Section 4 Your Driving, the Road and Your Vehicle Defensive Driving Drunken Driving Control of a Vehicle Braking Steering Driving Tips for Various Road Conditions Off-Road Driving Recreational Vehicle Towing Loading Your Vehicle Towing a Trailer Problems on the Road Section 5 Hazard Warning Flashers Jump Starting Towing Your Vehicle Engine...
Table of Contents (cont'd) Comfort Controls and Audio Systems Section 3 Heating and Air Conditioning Setting the Radio Clock Radio/Cassette Player/CD Player Radio Theft-Deterrent Feature Steering Wheel Controls (If Equipped) Your Driving and the Road Section 4 Your Driving, the Road and Your Vehicle Defensive Driving Drunken Driving Control of a Vehicle Braking Steering Driving Tips for Various Road Conditions Off-Road Driving Recreational Vehicle Towing Loading Your Vehicle Towing a Trailer Problems on the Road Section 5 Hazard Warning Flashers Jump Starting Towing Your Vehicle Engine...
Owner's Manual
Page 6
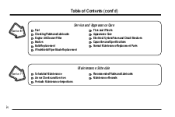
Table of Contents (cont'd) Service and Appearance Care Section 6 Fuel Checking Fluids and Lubricants Engine Air Cleaner/Filter Brakes Bulb Replacement Windshield Wiper Blade Replacement Tires and Wheels Appearance Care Electrical System/Fuses and Circuit Breakers Capacities and Specifications Normal Maintenance Replacement Parts Maintenance Schedule Section 7 Scheduled Maintenance Owner Checks and Services Periodic Maintenance Inspections Recommended Fluids and Lubricants Maintenance Records iv
Table of Contents (cont'd) Service and Appearance Care Section 6 Fuel Checking Fluids and Lubricants Engine Air Cleaner/Filter Brakes Bulb Replacement Windshield Wiper Blade Replacement Tires and Wheels Appearance Care Electrical System/Fuses and Circuit Breakers Capacities and Specifications Normal Maintenance Replacement Parts Maintenance Schedule Section 7 Scheduled Maintenance Owner Checks and Services Periodic Maintenance Inspections Recommended Fluids and Lubricants Maintenance Records iv
Owner's Manual
Page 7
You can use it to quickly find an alphabetical listing of almost every subject in this manual for your Service Station Guide v Please refer to the last page of this manual. Table of Contents (cont'd) Customer Assistance Information Section 8 Customer Satisfaction Procedures Customer Assistance Offices Roadside Assistance and Courtesy Transportation Warranty Information (See Warranty Manual) Reporting Safety Defects on page 8-10 Service Publications Index Section 9 In the Index you will find something you want to read.
You can use it to quickly find an alphabetical listing of almost every subject in this manual for your Service Station Guide v Please refer to the last page of this manual. Table of Contents (cont'd) Customer Assistance Information Section 8 Customer Satisfaction Procedures Customer Assistance Offices Roadside Assistance and Courtesy Transportation Warranty Information (See Warranty Manual) Reporting Safety Defects on page 8-10 Service Publications Index Section 9 In the Index you will find something you want to read.

Owner's Manual
Page 8
GENERAL MOTORS, GM, the GM Emblem, GMC, the GMC Emblem and the name JIMMY, and the name ENVOY are registered trademarks of Canada Limited" for GMC whenever it appears in your vehicle, so it will be there if you ever need it when you sell the vehicle, please leave this manual. ...
GENERAL MOTORS, GM, the GM Emblem, GMC, the GMC Emblem and the name JIMMY, and the name ENVOY are registered trademarks of Canada Limited" for GMC whenever it appears in your vehicle, so it will be there if you ever need it when you sell the vehicle, please leave this manual. ...
Owner's Manual
Page 9
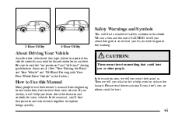
vii Safety Warnings and Symbols You will help avoid or reduce the hazard. Please read their owner's manual from beginning to end when they first receive their new vehicle. In the caution area, we tell you 'll find a number of control or an accident. Be sure to tell you about the features and controls for your vehicle. We use a box and the word CAUTION to read the "on-pavement" and "off-road" driving guidelines in the Index.) CAUTION: These mean there is . If you do to Use this manual. (See "Your Driving, the Road and Your Vehicle" and "Off-Road Driving with...
vii Safety Warnings and Symbols You will help avoid or reduce the hazard. Please read their owner's manual from beginning to end when they first receive their new vehicle. In the caution area, we tell you 'll find a number of control or an accident. Be sure to tell you about the features and controls for your vehicle. We use a box and the word CAUTION to read the "on-pavement" and "off-road" driving guidelines in the Index.) CAUTION: These mean there is . If you do to Use this manual. (See "Your Driving, the Road and Your Vehicle" and "Off-Road Driving with...
Owner's Manual
Page 10
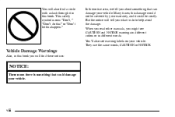
Many times, this happen." In the notice area, we tell you about something that can damage your vehicle. This safety symbol means "Don't," "Don't do to do this" or "Don't let this damage would not be costly. When you read other manuals, you might see warning labels on your vehicle. They use the same words, CAUTION or NOTICE. But the notice will find a circle with a slash through it could damage your vehicle. Vehicle Damage Warnings Also, in this book. You'll also see CAUTION and NOTICE warnings in different colors or in different words. viii You will also find ...
Many times, this happen." In the notice area, we tell you about something that can damage your vehicle. This safety symbol means "Don't," "Don't do to do this" or "Don't let this damage would not be costly. When you read other manuals, you might see warning labels on your vehicle. They use the same words, CAUTION or NOTICE. But the notice will find a circle with a slash through it could damage your vehicle. Vehicle Damage Warnings Also, in this book. You'll also see CAUTION and NOTICE warnings in different colors or in different words. viii You will also find ...
Owner's Manual
Page 11
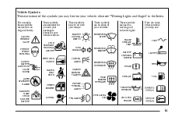
Also see : ENGINE COOLANT TEMP WINDSHIELD WASHER BATTERY CHARGING SYSTEM FUSE TURN SIGNALS LIGHTER DOOR LOCK UNLOCK PARKING LAMPS WINDSHIELD DEFROSTER HORN BRAKE FASTEN SEAT BELTS HAZARD WARNING FLASHER POWER WINDOW DAYTIME RUNNING LAMPS REAR WINDOW DEFOGGER COOLANT FUEL ENGINE OIL PRESSURE VENTILATING FAN AIR BAG FOG LAMPS ANTI-LOCK BRAKES ix Vehicle Symbols These are some other symbols you may find on warning and indicator lights: Here are some of your controls: WINDSHIELD WIPER These symbols are on some of the symbols you may see "Warning Lights and Gages" ...
Also see : ENGINE COOLANT TEMP WINDSHIELD WASHER BATTERY CHARGING SYSTEM FUSE TURN SIGNALS LIGHTER DOOR LOCK UNLOCK PARKING LAMPS WINDSHIELD DEFROSTER HORN BRAKE FASTEN SEAT BELTS HAZARD WARNING FLASHER POWER WINDOW DAYTIME RUNNING LAMPS REAR WINDOW DEFOGGER COOLANT FUEL ENGINE OIL PRESSURE VENTILATING FAN AIR BAG FOG LAMPS ANTI-LOCK BRAKES ix Vehicle Symbols These are some other symbols you may find on warning and indicator lights: Here are some of your controls: WINDSHIELD WIPER These symbols are on some of the symbols you may see "Warning Lights and Gages" ...
Owner's Manual
Page 12
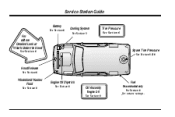
Service Station Guide Battery See Section 6 Cooling System See Section 5 Tire Pressure See Section 6 For a More Detailed Look at What's Under the Hood See Section 6 Spare Tire Pressure See Section 5 & 6 Hood Release See Section 6 Windshield Washer Fluid See Section 6 Engine Oil Dipstick See Section 6 Fuel Oil Viscosity Engine Oil See Section 6 Use unleaded only. See Section 6 for octane ratings.
Service Station Guide Battery See Section 6 Cooling System See Section 5 Tire Pressure See Section 6 For a More Detailed Look at What's Under the Hood See Section 6 Spare Tire Pressure See Section 5 & 6 Hood Release See Section 6 Windshield Washer Fluid See Section 6 Engine Oil Dipstick See Section 6 Fuel Oil Viscosity Engine Oil See Section 6 Use unleaded only. See Section 6 for octane ratings.
Owner's Manual
Page 13
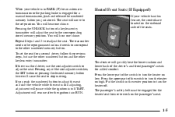
and the Answers How to use your vehicle and how to Wear Safety Belts Properly Driver Position Safety Belt Use During Pregnancy Right Front Passenger Position Air Bag System Center Front Passenger Position (4-Door Models with air bags and safety belts. 1-2 1-10 1-14 1-15 1-16 1-22 1-23 1-23 1-29 Seats and Seat Controls Safety Belts: They're for Children Older Children Safety Belt Extender Checking Your Restraint Systems Replacing Restraint System Parts After a Crash 1- 1-1 You can also learn about the seats in your safety belts properly. Section 1 Seats and Restraint Systems Here ...
and the Answers How to use your vehicle and how to Wear Safety Belts Properly Driver Position Safety Belt Use During Pregnancy Right Front Passenger Position Air Bag System Center Front Passenger Position (4-Door Models with air bags and safety belts. 1-2 1-10 1-14 1-15 1-16 1-22 1-23 1-23 1-29 Seats and Seat Controls Safety Belts: They're for Children Older Children Safety Belt Extender Checking Your Restraint Systems Replacing Restraint System Parts After a Crash 1- 1-1 You can also learn about the seats in your safety belts properly. Section 1 Seats and Restraint Systems Here ...
Owner's Manual
Page 14
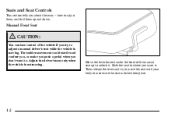
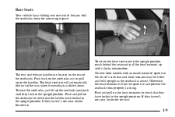
Slide the seat to . Then release the lever and try to make you push a pedal when you don't want it . Seats and Seat Controls This section tells you try to move the seat with your body to adjust a manual driver's seat while the vehicle is moving . Adjust the driver's seat only when the vehicle is locked into place. 1-2 The sudden movement could startle and confuse you want to where you , or make sure the seat is not moving . how to unlock it . Manual Front Seat CAUTION: You can lose control of the manual seat up to adjust them, and fold them up and down. Move ...
Slide the seat to . Then release the lever and try to make you push a pedal when you don't want it . Seats and Seat Controls This section tells you try to move the seat with your body to adjust a manual driver's seat while the vehicle is moving . Adjust the driver's seat only when the vehicle is locked into place. 1-2 The sudden movement could startle and confuse you want to where you , or make sure the seat is not moving . how to unlock it . Manual Front Seat CAUTION: You can lose control of the manual seat up to adjust them, and fold them up and down. Move ...

Owner's Manual
Page 15
Horizontal Control: Raise or lower the front of the seat by raising or lowering the forward edge of the vehicle. 1-3 Turn the knob counterclockwise to increase lumbar support and clockwise to decrease lumbar support. Manual Lumbar Support (If Equipped) If your vehicle has this feature, there will be a control on the outboard side of your vehicle has this feature, there will be a knob on the outboard side of the control. Power Seats (If Equipped) If your seat. Move the seat forward or rearward by raising or lowering the rear edge of the driver's and passenger's bucket seats....
Horizontal Control: Raise or lower the front of the seat by raising or lowering the forward edge of the vehicle. 1-3 Turn the knob counterclockwise to increase lumbar support and clockwise to decrease lumbar support. Manual Lumbar Support (If Equipped) If your vehicle has this feature, there will be a control on the outboard side of your vehicle has this feature, there will be a knob on the outboard side of the control. Power Seats (If Equipped) If your seat. Move the seat forward or rearward by raising or lowering the rear edge of the driver's and passenger's bucket seats....
Owner's Manual
Page 16
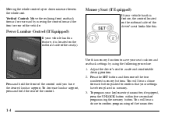
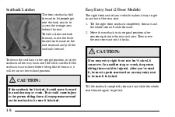
Moving the whole control up or down raises or lowers the whole seat. Use this feature, the control located on the outboard side of the two numbered memory buttons. To program your keyless entry transmitter, if equipped, press the UNLOCK button within five seconds of the control until you have been placed in memory. 3. Press and hold the rear of the transmitter. You will hear a chime to a safe and comfortable driving position. 2. Power Lumbar Control (If Equipped) If your vehicle has this memory function to confirm that your seat cushion and seatback settings by moving the ...
Moving the whole control up or down raises or lowers the whole seat. Use this feature, the control located on the outboard side of the two numbered memory buttons. To program your keyless entry transmitter, if equipped, press the UNLOCK button within five seconds of the control until you have been placed in memory. 3. Press and hold the rear of the transmitter. You will hear a chime to a safe and comfortable driving position. 2. Power Lumbar Control (If Equipped) If your vehicle has this memory function to confirm that your seat cushion and seatback settings by moving the ...
Owner's Manual
Page 17
When your vehicle has this feature, the controls are located on the outboard side of the switch to turn the heater on high. Repeat Steps 1 and 2 to adjust the seat. If there is engaged for a manual transmission, push and release the numbered memory button you push the numbered button to the set the seat for an automatic transmission or the parking brake is a third driver, use the other numbered button and the other numbered memory button. If you just stored. Heated Front Seats (If Equipped) If your vehicle is in START. Press the upper part of the seats. The seat will hear ...
When your vehicle has this feature, the controls are located on the outboard side of the switch to turn the heater on high. Repeat Steps 1 and 2 to adjust the seat. If there is engaged for a manual transmission, push and release the numbered memory button you push the numbered button to the set the seat for an automatic transmission or the parking brake is a third driver, use the other numbered button and the other numbered memory button. If you just stored. Heated Front Seats (If Equipped) If your vehicle is in START. Press the upper part of the seats. The seat will hear ...
Owner's Manual
Page 18
Pull up on the outboard side of the seat. If your vehicle is equipped with the vertical power seat control described earlier, it . Reclining Front Seatbacks To adjust a manual seatback, lift the lever on the lever and the seat will go to recline also. But don't have a seatback reclined if your vehicle is moving. 1-6 Release the lever to lock the seatback where you want it allows the seatback to an upright position.
Pull up on the outboard side of the seat. If your vehicle is equipped with the vertical power seat control described earlier, it . Reclining Front Seatbacks To adjust a manual seatback, lift the lever on the lever and the seat will go to recline also. But don't have a seatback reclined if your vehicle is moving. 1-6 Release the lever to lock the seatback where you want it allows the seatback to an upright position.
Owner's Manual
Page 19
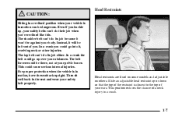
Head Restraints CAUTION: Sitting in a reclined position when your vehicle is in motion, have the seatback upright. Instead, it will be dangerous. Head restraints are fixed on some models and adjustable on others. In a crash the belt could go into it won't be there, not at your pelvic bones. The belt forces would be against your abdomen. In a crash you buckle up over your body. For proper protection when the vehicle is closest to the top of you 're reclined like this. Slide an adjustable head restraint up or down so that the top of the restraint is in motion can 't ...
Head Restraints CAUTION: Sitting in a reclined position when your vehicle is in motion, have the seatback upright. Instead, it will be dangerous. Head restraints are fixed on some models and adjustable on others. In a crash the belt could go into it won't be there, not at your pelvic bones. The belt forces would be against your abdomen. In a crash you buckle up over your body. For proper protection when the vehicle is closest to the top of you 're reclined like this. Slide an adjustable head restraint up or down so that the top of the restraint is in motion can 't ...
Owner's Manual
Page 20
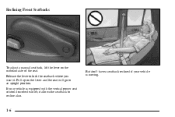
Tilt the right front seatback completely forward and the whole seat will return to the reclined position. Then move the lever located on the side of the rear seat. 1. To fold a front seatback forward, move the seat rearward until the latch catches. CAUTION: If the seatback isn't locked, it could move . That could be injured. Always press rearward on an easy entry seat to access the storage area behind the seat. Seatback Latches The front seatbacks fold forward to let people get out. Move the seatback to the person sitting there. Tilt the seatback completely forward ...
Tilt the right front seatback completely forward and the whole seat will return to the reclined position. Then move the lever located on the side of the rear seat. 1. To fold a front seatback forward, move the seat rearward until the latch catches. CAUTION: If the seatback isn't locked, it could move . That could be injured. Always press rearward on an easy entry seat to access the storage area behind the seat. Seatback Latches The front seatbacks fold forward to let people get out. Move the seatback to the person sitting there. Tilt the seatback completely forward ...
Owner's Manual
Page 21
Rear Seats Your vehicle has a folding rear seat which lets you pull up on the seatbacks to the upright position, reach behind the seats and pull the head restraint up the seatbacks and push until it locks into position. To raise the seatbacks, just lift up until they lock in the upright position. Otherwise, the head restraint will automatically fold out of the seatbacks. Push and pull on the head restraints to check that the latches have locked in the upright position. To return the head restraints to check that they have locked in the upright position. Push and pull on...
Rear Seats Your vehicle has a folding rear seat which lets you pull up on the seatbacks to the upright position, reach behind the seats and pull the head restraint up the seatbacks and push until it locks into position. To raise the seatbacks, just lift up until they lock in the upright position. Otherwise, the head restraint will automatically fold out of the seatbacks. Push and pull on the head restraints to check that the latches have locked in the upright position. To return the head restraints to check that they have locked in the upright position. Push and pull on...
